
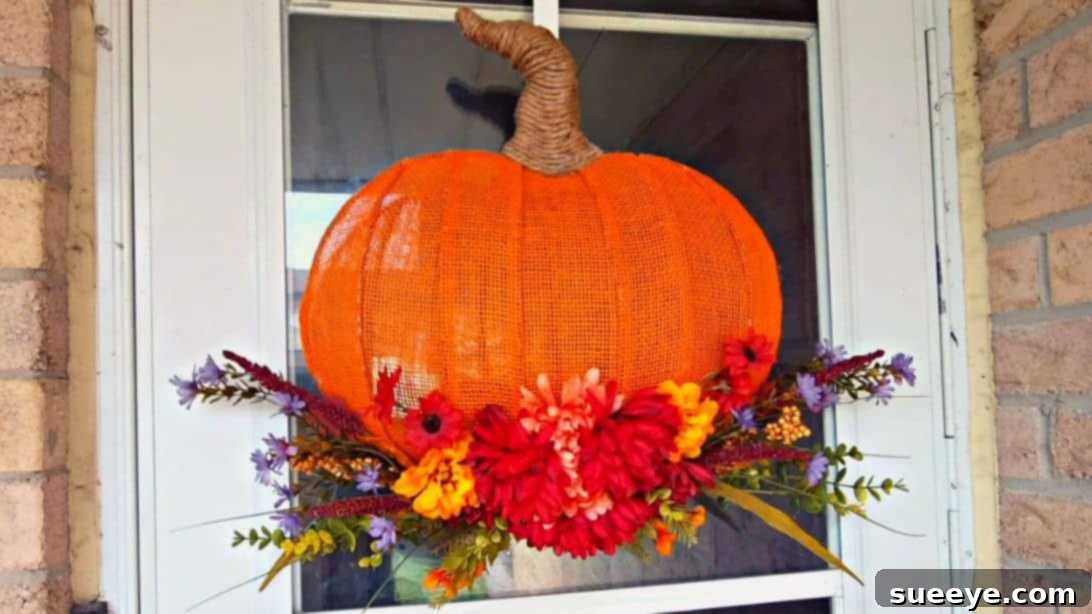
As the leaves begin to change and the crisp air of autumn settles in, there’s a unique joy in transforming our homes with seasonal decor. Among the most beloved symbols of fall is the pumpkin, and what better way to celebrate its charm than with a stunning, handmade wreath? This tutorial guides you through creating an exquisite pumpkin-shaped fall wreath that promises to be a vibrant focal point for your front door or interior space. With its rich colors and charming design, this DIY project is not only satisfying to make but also incredibly rewarding. The best part? Many of the materials are affordable and easily accessible, making it a perfect project for crafters of all levels. You can even give new life to artificial flowers from previous seasons or projects, embracing sustainability while unleashing your creativity. This fantastic decorative idea comes to us courtesy of the talented Delighted to DIY on YouTube, whose inspiration makes this beautiful piece achievable for everyone.
Why Craft Your Own DIY Fall Pumpkin Wreath?
There’s a special magic that comes with handmade decor. Unlike mass-produced items, a DIY pumpkin wreath reflects your personal touch, allowing you to choose colors, textures, and embellishments that perfectly match your style and home aesthetic. Crafting your own wreath is also a wonderfully budget-friendly option, especially when you utilize inexpensive materials or repurpose existing items. It’s a therapeutic activity that allows you to unwind, express creativity, and ultimately, adorn your home with a piece that carries sentimental value. Imagine the compliments you’ll receive from guests admiring your unique, artisan creation!
Essential Materials for Your Pumpkin Wreath
Gathering your materials is the first exciting step in any crafting journey. For this beautiful DIY fall wreath, you’ll find that most items are readily available at craft stores, dollar stores, or even by repurposing what you already have. Here’s a detailed look at what you’ll need:
- Pumpkin-Shaped Wire Wreath Frame: This is the foundation of your wreath, giving it its distinctive autumnal shape. While a pre-shaped frame simplifies the process, you could also fashion one from sturdy wire if you’re feeling ambitious.
- Orange Burlap Jute Roll: Burlap adds a rustic, natural texture perfect for fall. Orange is ideal for the pumpkin body, but you could experiment with other fall shades like deep red or brown for a unique twist. Look for rolls that are easy to cut and manipulate.
- Jute Rope: This will be used to create the pumpkin’s stem, offering a natural and cohesive look. Choose a medium thickness for easy wrapping.
- Aluminum Foil: A simple yet effective material, aluminum foil will help build volume and shape for your pumpkin’s stem, making it robust and realistic.
- Hot Glue Gun and Glue Sticks: Your best friend for securing all elements firmly in place. Ensure you have plenty of glue sticks on hand, as you’ll be using it extensively. Safety first: always use caution when working with hot glue.
- Sharp Scissors: Essential for cleanly cutting burlap and snipping off flower stems. A dedicated fabric scissor will make cutting burlap much easier and cleaner.
- Artificial Maple Leaves: These add beautiful layers of fall color and texture to the wreath. Look for a variety of sizes and shades of red, orange, and yellow to create depth.
- Assorted Artificial Flowers: This is where you can truly personalize your wreath! Choose fall-themed flowers such as chrysanthemums, sunflowers, daisies, or berry sprigs. A mix of sizes and colors will create a dynamic and appealing arrangement. Consider repurposing flowers from old bouquets or decorations to save money and add a sentimental touch.
Step-by-Step Directions to Craft Your Fall Pumpkin Wreath
Follow these detailed instructions to bring your stunning DIY pumpkin wreath to life. Patience and precision will ensure a beautiful, lasting result.
Step 1: Building the Burlap Base of Your Pumpkin Wreath
The foundation of your pumpkin wreath is the burlap base, which gives it fullness and a rustic charm. This step requires careful wrapping and securing to achieve a neat and vibrant look.
- Prepare Your Wreath Frame: Lay your pumpkin-shaped wire wreath frame on a clean, flat surface with the front side facing up. This orientation is important for ensuring the burlap wraps correctly.
- Initiate the Burlap Wrap: Take your roll of orange burlap jute. Cut a starting piece, long enough to comfortably wrap around two adjacent wires of the wreath frame. Apply a small amount of hot glue to the back of the wreath frame on one of the wire sections, then firmly press one end of the burlap strip onto the glue to secure it.
- Wrap the First Section: Begin tightly wrapping the burlap around the two selected wires. Ensure each wrap is snug against the previous one, covering the wire completely. Once you reach the end of this section (before a gap in the wires), secure the end of the burlap on the back of the wreath with another dab of hot glue. Repeat this process for each section of two wires, working your way around the entire pumpkin frame. You will notice small gaps between each wrapped section; this is normal for now.
- Trim Excess Burlap from the Edges: Once all the wire sections are wrapped, carefully flip the wreath over so the back is facing up. Using sharp scissors, meticulously trim off any excess burlap that extends beyond the outer and inner edges of the wire frame. Aim for a clean, even edge close to the wire.
- Fill the Gaps for a Full Look: Now, address the gaps you left between the wrapped wire sections. Cut smaller pieces of burlap. Lay each piece over a gap, ensuring it covers the exposed wire adequately. Secure the edges of these burlap pieces to the main wrapped sections with hot glue from the back, blending them in as seamlessly as possible. Trim any excess burlap from these newly added pieces. This step is crucial for creating a continuous, full pumpkin shape.
- Refine the Bottom Edge: Observe the bottom edge of your wreath. If there’s any loose or untidy burlap, fold these excess edges upwards towards the back of the wreath. Secure them firmly with hot glue. Trim any final bits of excess fabric to ensure a clean finish.
- Final Inspection of the Base: Flip your wreath back to its right side. Inspect the burlap base for any uncovered wires, loose edges, or uneven areas. Make any necessary adjustments or add small dabs of glue to reinforce areas. You should now have a fully covered, orange pumpkin-shaped burlap base, ready for embellishments.
Step 2: Adorning Your Wreath with Leaves, Flowers, and the Stem
With your burlap base complete, it’s time to add the beautiful autumnal elements that will bring your pumpkin wreath to life, along with its characteristic stem.
- Prepare Your Foliage: Begin by snipping off the individual stems of your artificial maple leaves. You’ll want the leaf clusters to be separate and easy to handle for precise placement.
- Arrange the Maple Leaves: Using your hot glue gun, start by gluing the maple leaves around the bottom curves of the pumpkin shape on each side. Layer them slightly, allowing some leaves to overlap others to create a natural, lush appearance. Focus on building a rich foundation of foliage.
- Incorporate Smaller Flowers: Next, add smaller, thinner artificial flowers to the bottom section of the pumpkin, scattering them among the maple leaves. These act as filler flowers, adding texture and subtle pops of color without overpowering the main focal points. Think about creating a gradual transition of sizes.
- Place the Focal Flowers: Identify your largest and most vibrant artificial flowers. These will be the focal points of your wreath. Carefully arrange and hot glue these larger blooms at the bottom center of the pumpkin, where they will draw the eye and provide a beautiful anchor for your design. Ensure they are securely attached.
- Craft the Pumpkin Stem with Foil: Now, let’s create the pumpkin’s stem. Take a piece of aluminum foil and crumple it around the top, narrow wire section of your wreath frame. Mold the foil into a sturdy, cylindrical stem shape, making it as full and lifelike as desired. Use hot glue to secure the foil tightly to the wire frame, ensuring it won’t shift. This foil base provides the necessary bulk for a realistic stem.
- Wrap the Stem with Jute Rope: Grab your jute rope. Apply a small amount of hot glue to the very bottom of the foil-covered stem and firmly press one end of the jute rope onto it. Begin tightly wrapping the jute rope upwards, spiraling it around the entire foil stem. Keep the wraps close together to completely cover the foil and create a uniform, natural-looking stem. Once you reach the top, secure the end of the jute rope with more hot glue.
- Add a Hanging Loop: To make your wreath ready for display, form a small loop with a piece of jute rope. Secure this loop to the back of the wreath, typically at the top of the stem area, using a generous amount of hot glue. Make sure it’s strongly attached, as it will bear the weight of the wreath. Alternatively, you can use the wire frame itself or a separate picture hanger if preferred.
Creative Customization Ideas for Your Fall Wreath
While the basic tutorial provides a beautiful foundation, don’t hesitate to infuse your unique style into your DIY pumpkin wreath. Here are some ideas for customization:
- Color Palettes: Instead of traditional orange, consider deep burgundies, muted greens, or even sophisticated cream and gold tones for a more elegant look.
- Additional Embellishments: Add small faux pumpkins, pinecones, acorns, or miniature berry clusters for extra texture and fall charm. Ribbons in complementary colors, tied into bows or streamers, can also enhance the design.
- Themed Wreaths: Adapt your wreath for specific holidays. For Halloween, incorporate spooky elements like small spiders or black and purple flowers. For Thanksgiving, add cornucopia-like details or small “Give Thanks” signs.
- Varying Textures: Combine burlap with other fabrics like plaid, velvet, or lace for a rich textural contrast.
- Lighting: For an enchanting evening glow, weave a string of battery-operated fairy lights through your wreath.
Tips for a Flawless Finish
Achieving a professional-looking wreath is all about attention to detail. Keep these tips in mind as you craft:
- Hot Glue Control: Use hot glue sparingly but effectively. Too much can create visible clumps, while too little won’t secure your elements. Practice on scrap material if you’re new to hot gluing. Pull away glue strings immediately to keep your wreath neat.
- Symmetry vs. Asymmetry: Decide if you want a perfectly symmetrical design or a more organic, asymmetrical look. Both can be stunning, but planning ahead helps.
- Fluff and Arrange: Artificial leaves and flowers often come pressed. Gently fluff them out to give them a more natural and voluminous appearance before gluing them down.
- Step Back and Observe: Periodically step away from your wreath and view it from a distance. This helps you spot any areas that need more filling, adjustments to arrangement, or an uneven balance.
- Work in Layers: Start with your base layer (leaves), then add smaller elements, and finally place your larger focal points. This layering technique creates depth and visual interest.
Caring for Your Handmade Fall Wreath
To ensure your beautiful DIY pumpkin wreath lasts for many seasons, a little care goes a long way:
- Indoor Display Recommended: While sturdy, artificial wreaths can fade in direct sunlight or be damaged by harsh weather (rain, strong winds). For longevity, display your wreath indoors or in a well-sheltered outdoor area, like a covered porch.
- Gentle Cleaning: Dust your wreath occasionally with a soft brush, a can of compressed air, or a hairdryer on a cool, low setting to remove any accumulated dust.
- Proper Storage: When the fall season ends, store your wreath in a sturdy box or a dedicated wreath storage bag. This protects it from dust, crushing, and deformation. Keep it in a cool, dry place away from extreme temperatures. You can also loosely stuff tissue paper between elements to help retain their shape.
Conclusion: Embrace the Spirit of Autumn with Your Handmade Wreath
Crafting your very own DIY pumpkin fall wreath is more than just a project; it’s an invitation to embrace the rich beauty and warmth of the autumn season. From the tactile pleasure of working with burlap and artificial foliage to the satisfaction of seeing your vision come to life, this project is designed to bring joy. The vibrant colors and charming pumpkin shape will undoubtedly add a welcoming touch to any home, making it feel cozy and festive for visitors and family alike. Whether you’re a seasoned crafter or just starting your DIY journey, this easy-to-follow guide, inspired by the creativity of Delighted to DIY, empowers you to create a piece of decor that you’ll cherish for years to come. So gather your materials, ignite your creativity, and let the spirit of autumn inspire your next masterpiece!
*All images featured in this tutorial are credited to Delighted to DIY via YouTube. We highly recommend visiting her channel and subscribing for more inspiring DIY projects!