
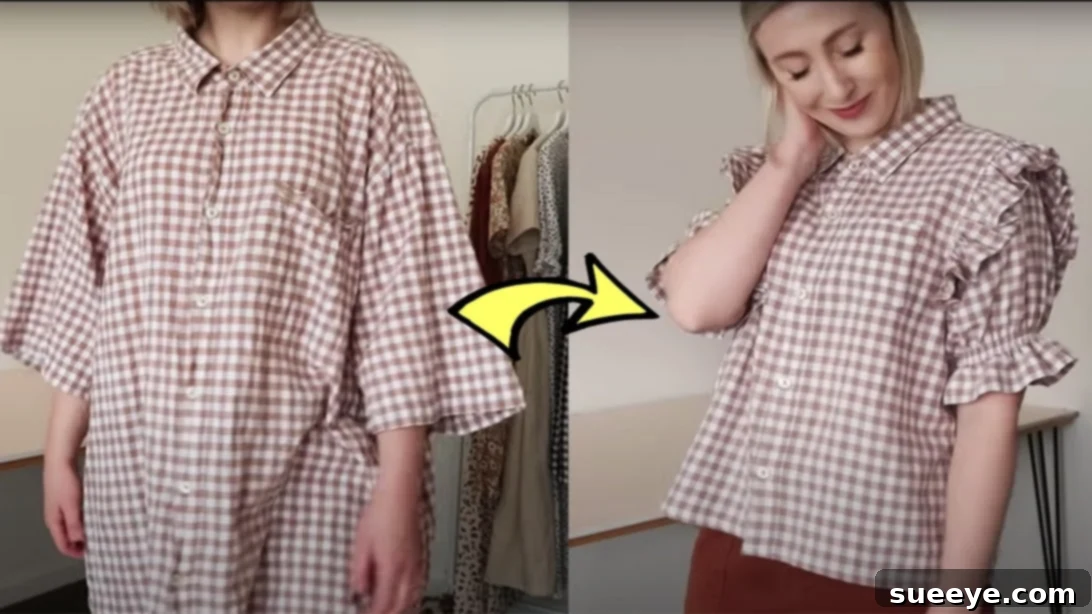
Upcycling has become a cornerstone of sustainable fashion, offering a creative and environmentally friendly way to revitalize your wardrobe. Instead of discarding old garments, you can transform them into entirely new, stylish pieces that reflect your personal aesthetic. This guide will walk you through an inspiring project: converting an oversized man’s shirt into a chic and unique ruffled blouse, a technique beautifully demonstrated by Rosery Apparel on YouTube.
Imagine breathing new life into a forgotten shirt, turning it into a bespoke fashion statement that perfectly suits you. This upcycling journey is not just about sewing; it’s about embracing creativity, reducing waste, and crafting something truly one-of-a-kind. Whether you’re a seasoned seamstress or just starting your sewing adventure, this detailed tutorial will provide you with all the steps to create a charming ruffled blouse that will surely turn heads.
From Oversized to Ooh-La-La: Upcycling a Men’s Shirt into a Stylish Ruffled Blouse
In a world increasingly conscious of environmental impact, upcycling textiles stands out as a powerful way to contribute to a more sustainable future. Every garment transformed means one less item in a landfill and one less new product requiring resources to manufacture. Beyond its ecological benefits, upcycling offers an unparalleled opportunity for personal expression. It allows you to create custom-fit, unique clothing that you simply can’t buy off the rack.
This particular project focuses on giving an oversized men’s shirt a complete makeover, reinventing it as an elegant ruffled blouse. The beauty of this transformation lies in its simplicity and the dramatic impact of the final result. You’ll take a garment typically associated with masculine tailoring and infuse it with feminine charm, creating a versatile blouse suitable for various occasions.
Essential Materials for Your Ruffled Blouse Project
Before diving into the creative process, gathering all your necessary tools and materials will ensure a smooth and enjoyable crafting experience. Most of these items are standard sewing kit staples, making this an accessible project for many.
- An Oversized Man’s Shirt: The star of our project! Look for a shirt with a fabric you love, perhaps a soft cotton, linen blend, or even a lightweight denim. The oversized nature is crucial as it provides ample fabric for the new design, especially for the ruffles. Consider the shirt’s existing buttons and collar, as they will contribute to the final look.
- Seam Ripper: Your best friend for precision unpicking. This tool is essential for carefully removing the shirt’s pocket and later for any adjustments, ensuring clean edges without damaging the fabric.
- Erasable Pen or Fabric Marker: For marking your pattern lines directly onto the fabric. An erasable pen (like a Frixion pen) or a heat-erasable fabric marker is ideal, as it leaves no trace after ironing, preserving the pristine look of your finished blouse.
- Sharp Fabric Scissors or Rotary Cutter: For precise and clean cuts. Good quality scissors or a rotary cutter (with a cutting mat) will make a significant difference in the accuracy of your pattern pieces, leading to a professional finish.
- Cloth Iron and Ironing Board: Crucial for pressing seams open, setting hems, and giving your fabric a crisp, professional appearance throughout the construction process. Don’t underestimate the power of good pressing in sewing!
- Sewing Machine: While hand-sewing is possible, a sewing machine will significantly speed up the process and provide stronger, more consistent stitches. Ensure it’s threaded correctly and you have basic knowledge of its operation.
- Matching Thread: Choose a high-quality polyester thread that closely matches the color of your shirt fabric for seams that blend seamlessly. Alternatively, choose a contrasting color for a deliberate design element.
Accessing Your Blouse Pattern
A well-designed pattern is the roadmap for any sewing project. For this particular ruffled blouse, we’ll be using the pattern generously provided by Rosery Apparel. This pattern is specifically designed to guide you through the unique transformations required for this project.
Pattern Link: https://www.roseryapparel.com/rosa
Make sure to download and print the pattern according to Rosery Apparel’s instructions to ensure correct sizing and scale. Reading through the pattern instructions thoroughly before you begin cutting will also help you visualize the entire process.
Step-by-Step Directions: Crafting Your Ruffled Blouse
Let’s begin the exciting transformation! Follow these detailed steps carefully to turn that oversized shirt into a stunning ruffled blouse. Patience and precision are key to achieving beautiful results.
Step 1: Preparing Your Shirt and Initial Cuts
The first step involves modifying the original shirt to create the basic bodice shape for your new blouse. This requires careful unpicking and precise cutting.
- Remove the Shirt’s Pocket: Using your seam ripper, carefully unpick the stitching around the shirt’s existing pocket. Take your time to avoid tearing the fabric. Once removed, set the pocket aside; it will be reattached later as a thoughtful design detail on your finished blouse.
- Fold and Align the Shirt: Lay the shirt flat on your work surface. Fold it precisely in half, ensuring all seams, shoulders, and the front placket (the part with buttons) are perfectly aligned. This creates a symmetrical base for accurate pattern placement.
- Position the Pattern Template: Take your printed pattern template for the blouse bodice. Place it along the folded shirt, positioning it just below the original shirt’s collar. Align the pattern’s straight edges with the folded edge of the shirt and ensure it sits smoothly on the fabric.
- Trace the Bodice Outline: Using your erasable pen or fabric marker, carefully trace around the edges of the pattern template. This will be your cutting guide for the main body of the blouse.
- Determine Blouse Length and Add Seam Allowance: Decide on the desired finished length of your blouse. Using a ruler, mark this length on the fabric, extending from your traced pattern. Crucially, add an additional 2.5 inches (approximately 6.35 cm) below this line for the hem allowance. This extra fabric is essential for creating a neat and professional bottom hem.
- Cut Out the Bodice: Carefully cut along your traced lines, including the additional hem allowance. Use sharp scissors or a rotary cutter for clean, crisp edges. Once cut, the main body of your shirt should resemble the basic shape of your new blouse’s bodice, ready for further embellishments.
Step 2: Crafting the Ruffles
The ruffles are the signature feature of this blouse, adding a touch of feminine elegance. This step involves repurposing the remaining fabric from the original shirt.
- Prepare Excess Fabric for Ruffles: Take the bottom section of the original shirt that you cut off. Remove any buttons from this fabric if present. This larger piece of fabric will be transformed into your ruffle strips.
- Cut Ruffle Strips: Fold this excess fabric twice to create multiple layers. Draw a line directly down the center of the folded fabric and cut along this line to create two long pieces. Then, take any sections that have a curved edge (like the original shirt’s side seams if they were part of the remaining fabric) and cut them into quarters lengthwise. Cut any remaining rectangular pieces in half. The goal is to end up with approximately 6 long, relatively narrow fabric strips. These will be pieced together to form continuous ruffle lengths.
- Assemble Ruffle Pieces: Lay out your 6 fabric strips. Pin the right sides of these pieces together, end-to-end, forming two or three very long strips. Sew them securely along the pinned edges, using a standard straight stitch. Press the seams open neatly with your iron to reduce bulk.
- Prepare for Gathering: Take the long strips you just created. Along one long edge of each strip, sew two parallel lines of loose basting stitches (a long stitch length on your machine, without backstitching). Do not backstitch at the beginning or end, and leave long thread tails.
- Create the Ruffles: Gently pull on the bobbin threads of your basting stitches. As you pull, the fabric will gather, forming beautiful ruffles. Continue gathering until the length of your ruffled strips matches the circumference of the armholes on your blouse bodice (plus a little extra, which can be trimmed). Distribute the gathers evenly for a consistent ruffle effect.
Step 3: Preparing the Blouse Bodice for Ruffle Attachment
Now that you have your ruffles ready, it’s time to prepare the bodice to receive them, specifically focusing on the armhole areas.
- Modify Original Armholes: Take your cut bodice piece. Using your scissors, carefully cut across the existing underarm seams of what would have been the original shirt’s armholes. Then, cut along the remaining side of the original armhole curve. Repeat this process for the other armhole. This step effectively opens up and reshapes the armholes, making them suitable for attaching the new ruffled “sleeves.”
Step 4: Assembling the Blouse and Finishing Touches
With your ruffles and bodice prepared, it’s time to bring all the elements together to form your final blouse.
- Attach the Ruffles to the Bodice: Unbutton the bodice of the shirt and lay it flat with the right side facing up. Take your gathered ruffle strips. Pin the raw, gathered edge of the ruffles to the raw edge of the reshaped armholes, matching right sides together. Carefully sew the ruffles in place using a standard straight stitch, ensuring the gathers are evenly distributed.
- Add Sleeves (Optional or as part of Ruffle Design): The original instruction is a bit ambiguous here (“Pin the sleeves on top of the ruffles and sew them in place”). This implies that either the ruffles *are* the sleeves, or separate sleeve pieces are added. Given the design, it’s likely the ruffles form the decorative sleeve element. If your pattern calls for additional sleeve pieces, pin them atop the ruffles (right sides together) and sew them securely. If the ruffles are your sleeves, proceed to the next step to finish them.
- Finish Ruffles and Blouse Edges: Press out the ruffle seams to ensure they lie flat and look neat. Stitch around the ruffles again, perhaps with a topstitch, to secure them and add a decorative touch. Finish the bottom edge of the ruffled “sleeves” (or any added sleeve pieces) by hemming them. You might “sheer out” or very finely roll hem the edges for a delicate finish.
- Hem the Blouse: Remember that 2.5-inch hem allowance you added? Now it’s time to use it. Fold up the raw bottom edge of the blouse by about 0.5 inches and press. Then, fold it up again by another 2 inches (or whatever amount you need to reach your desired final hem depth) and press firmly. Stitch this hem in place, either by machine or by hand for an invisible finish.
- Reattach the Pocket: Finally, retrieve the pocket you set aside at the beginning. Decide on its new placement – perhaps on one side of the chest, or lower down for a utility look. Pin it firmly in place and sew it back onto the shirt, reinforcing the top corners for durability.
Tips for a Flawless Upcycling Experience
- Press, Press, Press: Ironing between each step is a game-changer. It helps your seams lay flat, ensures accurate measurements, and gives your finished project a much more professional appearance.
- Test Stitches: Before sewing on your main garment, always test your stitch length and tension on a scrap piece of the same fabric. This helps prevent unraveling and ensures your machine is set up correctly.
- Patience is a Virtue: Upcycling and sewing take time. Don’t rush through steps, especially when cutting or attaching delicate ruffles. Taking your time will result in a higher quality garment.
- Don’t Fear the Seam Ripper: Mistakes happen, even to experienced sewers. The seam ripper is your friend, allowing you to undo errors and try again. It’s better to unpick and redo than to live with a flawed seam.
- Personalize It: This tutorial provides a fantastic foundation, but feel free to add your unique flair! Consider adding embroidery, lace trim, different buttons, or even fabric paint to truly make the blouse your own.
Unleash Your Inner Designer with Upcycled Fashion
Congratulations! You’ve successfully transformed an ordinary men’s shirt into an extraordinary ruffled blouse. This project is more than just a sewing exercise; it’s a testament to the power of imagination and the value of sustainable living. By choosing to upcycle, you’ve not only created a beautiful, custom-fit garment but also contributed positively to the environment by reducing textile waste.
Wearing something you’ve made with your own hands brings a unique sense of pride and accomplishment. This ruffled blouse, inspired by Rosery Apparel, serves as a versatile addition to any wardrobe, effortlessly transitioning from casual outings to more dressed-up occasions. Each time you wear it, you’ll be showcasing your creativity, your commitment to sustainability, and your distinct sense of style.
We encourage you to embark on more upcycling adventures. The possibilities are endless, and with every project, you hone your skills and discover new ways to express yourself through fashion. Share your creations with the world and inspire others to give their old clothes a new life!