
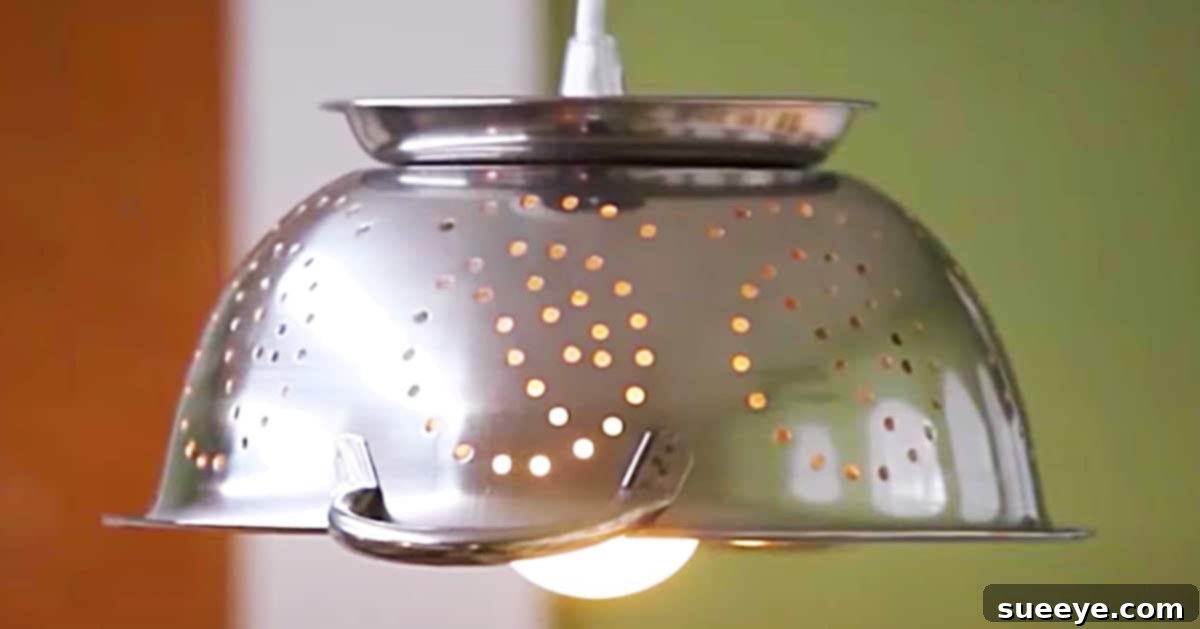
Transform Your Kitchen: DIY Colander Pendant Light Fixture
Are you searching for a unique, budget-friendly way to illuminate your home? Look no further than your kitchen cupboard! Ordinary colanders, often relegated to draining pasta or washing vegetables, possess an unexpected potential for stunning home decor. With a little creativity and a few simple tools, you can transform a humble colander into a stylish, custom-made pendant light fixture that adds a distinctive touch to any room. This guide will walk you through the surprisingly straightforward process of crafting your own colander pendant light, a project so easy and quick, you’ll wonder why you hadn’t thought of it sooner.
Creating a DIY colander light fixture is not only incredibly satisfying but also an excellent way to infuse your space with personality. Whether you’re aiming for a charming farmhouse aesthetic, an industrial chic vibe, or simply a conversation-starting piece, this project delivers professional-looking results without requiring extensive DIY experience or breaking the bank. In less than an hour, you can have a brand-new light fixture ready to hang, adding warmth and character to your kitchen, dining area, or even a cozy reading nook. Dive into this exciting upcycling adventure and discover how to cast a beautiful glow using an everyday kitchen essential.
Why Choose a Colander for Your DIY Lighting Project?
The idea of using a colander as a light fixture might seem unconventional at first, but its inherent design makes it surprisingly suitable for illuminating spaces. Here’s why a colander is an excellent choice for a DIY pendant light:
- Unique Aesthetic: The perforated design of a colander creates beautiful, dappled light patterns on your walls and ceiling, adding a dynamic and artistic element to your room that traditional shades can’t replicate.
- Industrial Chic & Farmhouse Charm: Depending on the colander’s material and finish, it can effortlessly complement a range of interior styles. Stainless steel colanders lend themselves perfectly to an industrial or modern minimalist look, while enamel or vintage metal colanders fit seamlessly into farmhouse or rustic decor schemes.
- Durability and Material Quality: Most colanders, especially those made from stainless steel, are designed to be durable and withstand heat, making them a safe and long-lasting choice for a light fixture. Their robust construction ensures your DIY project will stand the test of time.
- Cost-Effective: Compared to purchasing designer light fixtures, a colander pendant light is incredibly economical. You might even have a suitable colander already, making this a near-zero-cost project, or you can find one cheaply at a local thrift store or hardware shop.
- Ease of Modification: Colanders are relatively easy to work with. Their metal construction allows for simple drilling and cutting to accommodate light fittings, making the DIY process smooth and accessible for beginners.
- Eco-Friendly Upcycling: Repurposing an item like a colander helps reduce waste and promotes sustainable living. It’s a fantastic example of giving new life to an old object, transforming it from kitchen utensil to a striking piece of home decor.
Embracing the colander as a lighting element is a testament to creative reuse, offering both functional illumination and a captivating visual appeal. It’s an opportunity to create something truly unique that reflects your personal style and ingenuity.
Materials You’ll Need to Craft Your Colander Pendant Light
Before you begin, gather all your materials to ensure a smooth and efficient crafting process. The beauty of this project lies in its simplicity and the readily available nature of its components.
- A Colander: The star of our project! While any colander can work, stainless steel varieties are often preferred for their durability, heat resistance, and sleek appearance. Consider the size and shape that best suits your desired lighting effect and the space where it will hang. Larger colanders create a more dramatic statement, while smaller ones are perfect for accent lighting or clusters.
- A Pendant Light Cord Kit: These kits are widely available at hardware stores and online. They typically include the electrical cord, a pre-wired light socket, and a ceiling canopy (or plug) for installation. Look for kits that are UL-listed (or equivalent safety certification in your region) to ensure electrical safety. You can find these in various cord colors and lengths to match your decor.
- A Drill: Essential for creating the initial hole in your colander. Make sure you have a set of metal-specific drill bits for clean, precise cuts.
- Metal Cutters or Tin Snips: These specialized tools will allow you to enlarge the drilled hole to accommodate the light socket fitting. Choose a pair that is comfortable to grip and designed for cutting thin sheet metal.
- A Pair of Pliers: Useful for bending and shaping the cut edges around the hole, ensuring a snug fit for the socket and smoothing any rough spots.
- A Lightbulb: For optimal safety and energy efficiency, an LED bulb is highly recommended. LED bulbs produce minimal heat, which is crucial when enclosing them in a metal fixture. Consider an Edison-style LED bulb for a vintage, decorative look that complements the industrial or farmhouse aesthetic of the colander. Choose a wattage equivalent that provides adequate illumination for your space.
- Safety Gear (Recommended): Always prioritize safety. A pair of work gloves will protect your hands from sharp metal edges, and safety glasses are essential to shield your eyes from flying debris during drilling and cutting.
Having all these items ready before you start will make the assembly process incredibly straightforward and enjoyable.
Step-by-Step Directions: Assembling Your Colander Pendant Light
With your materials at hand, let’s begin the transformation. This project is surprisingly quick, often taking less than an hour from start to finish. Follow these simple steps to create your unique light fixture:
Step 1: Preparing Your Colander and Marking the Center Point
Begin by thoroughly cleaning your colander, especially if it’s a used one. A clean surface ensures better handling and a polished final product. Once clean and dry, you need to locate the exact center on the bottom of your colander. You can do this by drawing diagonal lines from opposite edges, or simply by eyeballing it and marking with a permanent marker. Precision here helps ensure your light hangs straight and evenly. This marked spot is where your pendant light cord will ultimately emerge.
Step 2: Drilling the Pilot Hole
Once your center point is marked, it’s time to drill. Select a metal drill bit that is slightly larger than the thickness of your pendant light cord, but smaller than the actual light socket fitting. Place the colander on a stable, non-slip surface, perhaps on a scrap piece of wood to protect your workbench. Wearing your safety glasses and gloves, slowly and steadily drill a pilot hole through the marked center. Start with a slow speed and gradually increase it, applying gentle, consistent pressure. A small amount of cutting oil can help keep the bit cool and make drilling easier through metal. Be careful not to warp the colander’s shape during this process.
Step 3: Enlarging the Opening for the Light Socket
After drilling the pilot hole, you’ll need to enlarge it to accommodate the threaded fitting of your pendant light socket. This is where your metal cutters or tin snips come into play. Carefully insert the tip of your metal cutters into the pilot hole. Make small, incremental cuts, working your way around the perimeter of the hole, gradually widening it. Continually test the size by attempting to fit the light socket through the opening. You want a snug fit, so avoid cutting too much too quickly. Once the hole is almost the right size, use your pliers to gently bend and smooth any sharp edges, shaping the opening for a perfect fit. This step is critical for both aesthetic appeal and safety, as it prevents the cord from being frayed by jagged metal.
Step 4: Installing the Light Socket
With the hole perfectly sized and smoothed, you can now install the pendant light socket. Most pendant light kits come with a threaded collar and a securing ring. Feed the electrical cord from the pendant kit through the newly created hole in the colander, starting from the outside (the concave side) inwards. The light socket should now be positioned inside the colander. The threaded part of the socket will protrude through the hole. On the outside bottom of the colander, secure the socket by attaching and tightening the provided securing ring. Ensure it is firmly fastened so the socket doesn’t wobble. This creates a secure and stable connection between your colander and the lighting element.
Step 5: Inserting the Lightbulb and Testing
Once the socket is securely installed, carefully screw your chosen LED lightbulb into the socket. Before final installation, it’s always a good idea to test your new fixture. If your pendant kit is a plug-in type, simply plug it into an outlet. If it’s designed for hardwiring, briefly and safely connect it to a temporary power source (if you are qualified) or wait for professional installation to test. This ensures all connections are sound and the light functions correctly. Enjoy the first glow of your handcrafted colander light!
Step 6: Final Touches and Installation Considerations
Your colander pendant light is now complete and ready for its new home! Give it a final wipe down to remove any fingerprints or debris. Now, all you have to do is decide where you want to place this attractive, often farmhouse-themed, fixture. For ceiling installation, unless you are a certified electrician or experienced with electrical wiring, it is highly recommended to hire a qualified professional to hardwire your new pendant light into your home’s electrical system. This ensures safety and compliance with local building codes. If your pendant light kit is a plug-in type, installation is as simple as hanging it from a ceiling hook and plugging it into a nearby outlet.
Design and Placement Ideas for Your Colander Pendant Light
The versatility of a colander pendant light extends beyond just its ease of creation; it also offers a multitude of design possibilities and placement options to enhance various rooms and decor styles.
- Kitchen Island or Dining Table: This is perhaps the most popular and fitting location. A single colander pendant light can provide focused task lighting over a kitchen island, while a row of two or three can create a striking visual statement and even illumination over a longer dining table. The perforated design will cast captivating light patterns, adding ambiance to meal prep or family dinners.
- Farmhouse Kitchen Charm: For homes embracing the rustic or farmhouse aesthetic, a metal colander pendant light is a perfect complement. Its humble origins and utilitarian design fit right in, adding an authentic, handcrafted feel. Consider pairing it with other natural materials like wood, linen, and ceramic for a cohesive look.
- Industrial Chic Appeal: Stainless steel colanders with their raw, metallic finish are ideal for industrial-style interiors. They pair well with exposed brick, concrete, and black metal accents, creating a cool, urban vibe. Consider using an Edison-style LED bulb to further enhance this aesthetic.
- Reading Nook or Home Office: A smaller colander pendant can provide focused light for a reading corner, illuminating your favorite armchair without being overly bright. In a home office, it can add a touch of personality above a desk, making the workspace more inviting.
- Entryway or Hallway Accent: Greet guests with a unique, welcoming glow. A colander pendant in an entryway or hallway can serve as an interesting focal point, adding unexpected charm to transitional spaces.
- Customization with Color: Don’t limit yourself to the colander’s original color. With a good quality metal-specific spray paint, you can customize your pendant light to match any interior palette. Matte black for a modern touch, vibrant primary colors for a playful look, or soft pastels for a subtle accent – the possibilities are endless. Just ensure the paint is high-heat resistant if covering the interior of the fixture, although LED bulbs minimize heat concerns.
- Clustering for Impact: For a truly dramatic effect, consider hanging multiple colander pendants of varying sizes or at different heights in a cluster. This creates a sculptural lighting installation that becomes a centerpiece in any room.
The colander pendant light is more than just a source of illumination; it’s a piece of functional art that tells a story of creativity and resourcefulness. Experiment with different placements and styles to find the perfect spot for your new, handmade masterpiece.
Safety First: Important Considerations for Your DIY Light
While this project is relatively simple, working with electricity and tools always requires attention to safety. Please keep the following in mind:
- Electrical Safety: Always use a pendant light cord kit that is UL-listed or certified by a recognized safety authority in your region. These certifications ensure the components meet stringent safety standards. If you are hardwiring the fixture into your home’s electrical system, and you are not a qualified electrician, please hire a professional. Incorrect wiring can lead to fire hazards or electric shock.
- Heat Management: This is why LED bulbs are so strongly recommended. Incandescent bulbs produce significant heat, which can become trapped inside the metal colander, potentially damaging the wiring or posing a fire risk. LED bulbs generate very little heat, making them the safest choice for enclosed or partially enclosed fixtures.
- Sharp Edges: The process of cutting metal to enlarge the hole can leave sharp edges. Always wear gloves during this step and use pliers to smooth any rough spots. Inspect the interior of the hole to ensure no jagged edges can rub against and fray the electrical cord.
- Secure Installation: Ensure the pendant light kit is securely fastened within the colander, and the entire fixture is properly mounted to the ceiling or a sturdy hook. Loose fixtures can be a falling hazard.
Conclusion: Illuminate Your Home with Creativity
The DIY colander pendant light project offers a fantastic opportunity to unleash your creativity, save money, and add a truly unique element to your home decor. From its humble beginnings as a kitchen utensil, the colander transforms into a stylish, functional light fixture that radiates charm and character. It’s a testament to the power of upcycling and the satisfaction that comes from creating something beautiful with your own hands.
Whether you’re drawn to the rustic allure of farmhouse design, the sleek lines of industrial decor, or simply love the idea of a personalized touch, this project is accessible to anyone. With minimal tools, a little time, and a dash of imagination, you can illuminate your space with a custom-made piece that is sure to draw compliments and spark conversations. So, go ahead, grab that colander, and let your creativity shine! Share your creations with the world and inspire others to discover the joy of DIY home decorating.