
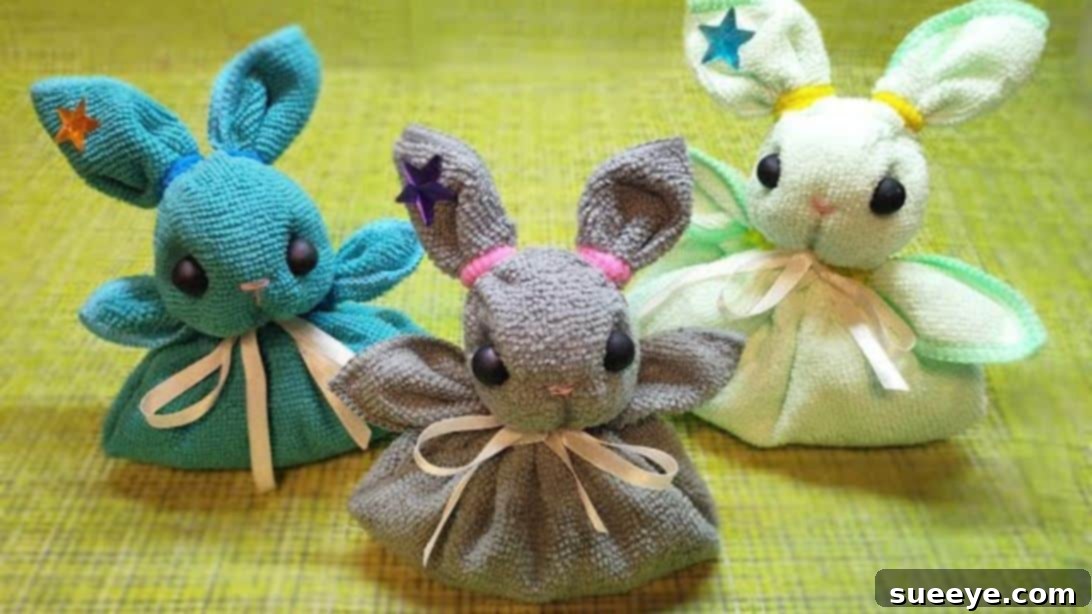
Craft an Adorable Towel Rabbit: The Ultimate DIY Guide for Charming Gifts and Decor
There’s something truly magical about transforming an everyday item into a whimsical creation. The moment I first laid eyes on these delightful towel rabbits, I was utterly captivated by their charm and simplicity. They’re not just cute; they’re incredibly versatile, perfect for adding a touch of sweetness to any occasion. Imagine presenting a thoughtful, handmade gift, perhaps with a hidden treat inside, to a loved one. These towel rabbits are ideal for baby showers, Easter baskets, birthday surprises, or simply as a charming piece of home decor.
This comprehensive guide will walk you through the process of making your very own towel rabbit, step by step. Inspired by the brilliant tutorial from Natasha Kinza on YouTube, we’ll delve into the details, offering tips and insights to ensure your crafting experience is as enjoyable as the finished product is adorable. Get ready to unleash your creativity and bring these enchanting towel creatures to life!
Why Craft a Towel Rabbit? More Than Just a Cute Face
Beyond their undeniable cuteness, towel rabbits offer a myriad of benefits that make them a fantastic DIY project:
- Unique and Heartfelt Gifts: In a world of mass-produced items, a handmade towel rabbit stands out. It shows thought, effort, and a personal touch, making it a truly special present for friends, family, or even colleagues.
- Versatile for Any Occasion: Fill them with chocolates for Easter, small soaps for a hostess gift, or baby essentials for a baby shower. They can be adapted for virtually any celebration or just to brighten someone’s day.
- Charming Home Decor: Place them on a guest bathroom counter, a nursery shelf, or even as a centerpiece for a casual gathering. They instantly add a cozy, whimsical, and welcoming vibe to any space.
- Budget-Friendly Craft: You likely already have most of the materials at home, especially towels! This project is an economical way to create stunning items without breaking the bank.
- Engaging for All Ages: While younger crafters will need supervision, the basic steps are simple enough for older children and adults alike to enjoy. It’s a wonderful activity for family bonding or a relaxing solo project.
- Eco-Friendly Potential: Give new life to old towels that might otherwise be discarded. Repurposing textiles is a sustainable approach to crafting.
Whether you’re a seasoned crafter or just starting your DIY journey, this towel rabbit tutorial is designed to be accessible and rewarding. Let’s gather our supplies and begin this delightful transformation!
Essential Materials for Your Towel Rabbit Project
Before we dive into the folding and decorating, ensure you have all the necessary items at hand. Having everything ready will make the crafting process smooth and enjoyable. Here’s a detailed look at what you’ll need:
- Square Towel: The foundation of your rabbit. A hand towel (approx. 16×28 inches to 20×30 inches) works perfectly for a medium-sized rabbit. Ensure it’s clean, dry, and free of snags. The color and texture will contribute significantly to your rabbit’s final look.
- Stuffing: Polyester fiberfill is ideal, but you can also use cotton balls, fabric scraps, or even a small, soft washcloth. This will give your rabbit’s head and body shape and plumpness.
- Scissors: For cutting thread and ribbon. A sharp pair will ensure clean cuts.
- Thread and Needle: A strong, all-purpose thread in a color that either matches your towel or is neutral (like white or cream). The needle should be suitable for hand sewing, preferably one with an eye large enough for your thread.
- 2 Black Beads: These will form the rabbit’s expressive eyes. Small, round beads (around 4-6mm) work best. You can also use small buttons, googly eyes, or even embroidery floss for a softer look.
- Star Beads: For decoration. While star beads are suggested, feel free to use any small decorative beads, charms, or even a small fabric flower to adorn an ear or the ribbon.
- Ribbon: A length of decorative ribbon (about 1/2 to 1 inch wide) to tie around the rabbit’s neck, adding a charming collar. Satin, grosgrain, or even lace ribbons work beautifully.
- Super Glue: For securely attaching the decorative beads. A strong craft glue or fabric glue can also be used, but ensure it dries clear and holds well.
- Chocolates or Candies: Optional, but highly recommended if you’re making this as a gift! Small, individually wrapped chocolates, truffles, or other candies are perfect for filling the rabbit’s body.
- Small Ponytails (Elastic Bands): You’ll need several of these, preferably clear or in a color that blends with your towel. These are crucial for shaping the rabbit’s head, ears, and body sections. Hair elastics designed for children often work well.
Having a clean, flat workspace will also be beneficial for ease of crafting.
Step-by-Step Guide: How to Craft Your Adorable Towel Rabbit
Now that you have all your materials, let’s begin the fun process of transforming your simple towel into an enchanting rabbit. Follow these instructions carefully, and don’t be afraid to add your personal flair!
Step 1: Preparing the Towel for Shaping the Ears
Begin by laying your square towel out completely flat on a clean surface. Ensure it’s smooth and free of wrinkles. Next, you’ll create the initial folds that will form the core structure. Take one side of the towel and fold it towards the center, then repeat with the other side, so that both folded edges meet precisely in the middle. This creates a long, narrow strip. Now, focus on the top section. Grasp one of the top corners (which is now part of the folded strip) and bring it inward, then secure it firmly with a small ponytail elastic band. This will start to define one of the rabbit’s ears. Repeat this exact action for the other top corner, ensuring both “ears” are symmetrical and secured at roughly the same point.
Step 2: Forming the Rabbit’s Head
With the ears now taking shape, it’s time to create the head. Take a generous amount of your chosen stuffing material and form it into a firm, compact ball. The size of this ball will determine the size of your rabbit’s head, so aim for a proportion that looks pleasing with your towel size. Carefully insert this stuffing ball into the top part of the towel, directly beneath the two ear sections you just created. Position it centrally to form the rabbit’s head. Once the stuffing is in place and the head looks round and smooth, gather the towel material around the base of the stuffing ball. Secure this section tightly with another small ponytail elastic band. This will firmly hold the stuffing in place and define the neck of your rabbit, separating the head from what will become the body.
Step 3: Shaping the Rabbit’s Legs
Move your attention to the bottom section of the towel. Similar to how you created the ears, you will now form the rabbit’s legs. Take one of the bottom corners of the towel (which is also part of the folded strip) and bring it inward, then tie it securely with a small ponytail elastic band. This will create one of the rabbit’s hind legs. Repeat this process for the other bottom corner. Try to make these two leg sections as even as possible in size and shape for a balanced look. At this stage, you should have a towel with two distinct ears at the top, a round head in the middle, and two “legs” at the bottom, all held in place by elastic bands.
Step 4: Filling the Rabbit’s Body
Now we’ll give the rabbit’s body its shape and substance. Take another portion of your stuffing. This amount will depend on how plump you want your rabbit’s body to be. Gently but firmly insert this stuffing into the central section of the towel, between the head and the leg sections. Carefully work the stuffing to distribute it evenly, ensuring the body takes on a rounded, cuddly form. The goal is to create a soft, full body that contrasts nicely with the defined head and legs. Don’t overstuff it to the point of stretching the towel, but ensure it’s firm enough to hold its shape.
Step 5: Securing the Body and Shaping the Base
Once the body is adequately stuffed, gather the loose ends of the towel at the very bottom, beneath the leg sections. Fold these ends upwards, tucking them neatly into the body section. Continue folding and tucking until these ends meet the base of the rabbit’s head. This creates a tidy, enclosed base for your rabbit. To secure this entire structure and maintain the body’s shape, locate the ponytail elastic band you used earlier to define the neck (at the base of the head). Use this existing ponytail, or add another one if necessary, to firmly secure the folded-up ends against the body, keeping everything snug and in place. This step effectively closes off the bottom of the rabbit, giving it a stable base.
Step 6: Adding a Surprise: Inserting Chocolates or Treats
This step is optional, but it’s what makes the towel rabbit an even more delightful gift! Carefully create a small opening or pocket within the stuffing of the rabbit’s body. Gently insert your chosen chocolates, candies, or small gifts into this cavity. Ensure they are fully enclosed within the stuffing and not visible from the outside. If you’re not adding treats, you can skip this step, or simply ensure the body stuffing is well-distributed and firm for a plush rabbit.
Step 7: Bringing the Eyes to Life
It’s time to give your rabbit personality! Thread your needle with a length of thread. Take one of your black beads and carefully thread it onto the needle. Position the bead on the rabbit’s head where you’d like one eye to be. Using small, neat stitches, sew the bead securely onto the towel fabric. Make sure it’s firmly attached so it won’t come loose. Repeat this process for the second black bead, placing it symmetrically on the other side of the head to form the second eye. Take care to ensure both eyes are aligned and spaced appropriately to give your rabbit a charming expression. Double-knot your thread at the back of the head and trim any excess.
Step 8: Crafting the Nose and Mouth
For the nose and mouth, choose a thread that either matches the color of the ponytails or contrasts subtly, like a light pink or black. Thread your needle. Begin by making a small, vertical stitch in the middle of the rabbit’s face, just below the eyes. Pass the thread several times through this spot, creating a small, raised “nose” shape. You can make it a simple straight line, a small triangle, or even a subtle V-shape. Once satisfied with the nose, insert your needle into the bottom edge of this newly formed nose. Carefully pass the needle through the towel fabric and out through the threads you’ve just created for the nose. Gently pull the thread downwards and slightly outward to create a small indentation, forming the rabbit’s mouth. This tight pull will give the mouth a distinct, sculpted appearance. Secure the thread with a strong knot at the back of the head and trim.
Step 9: Final Touches and Decoration
The final step brings all the charming details together. Choose one of the rabbit’s ears to adorn. Take your star bead (or chosen decoration) and apply a small dab of super glue to its back. Carefully press the bead onto the ear, holding it in place for a few seconds until the glue sets. Allow ample time for the glue to dry completely. Finally, take your chosen ribbon and gently wrap it around the rabbit’s neck, tying it into a pretty bow or knot. This adds a delightful “collar” and completes your rabbit’s endearing look. Take a moment to adjust any folds, fluff the ears, and ensure all elements are perfectly positioned. Your adorable towel rabbit is now complete!
Tips for Personalizing Your Towel Rabbit
One of the joys of DIY projects is the ability to infuse your unique style. Here are some ideas to make your towel rabbit truly one-of-a-kind:
- Towel Choices: Experiment with different towel colors and patterns. A pastel towel is perfect for a baby, while a vibrant color can create a playful look. Terry cloth gives a classic plush feel, but a microfibre towel can offer a smoother finish.
- Eye Options: Instead of beads, consider sewing on small buttons for a vintage look, embroidering eyes with black floss for a softer effect, or even using small fabric paint dots (ensure they are non-toxic if for children).
- Nose and Mouth Creativity: Beyond thread, you can embroider a small pink triangle for the nose or use a tiny piece of felt glued on.
- Ear Adornments: Besides star beads, tiny fabric flowers, small bows, or even a dab of glitter glue can add a special touch to the ears.
- Ribbon Varieties: Play with different textures and widths of ribbon. Lace, velvet, or even a thin strip of patterned fabric can replace the standard ribbon.
- Body Fillings: If not chocolates, consider small, individually wrapped soaps, bath bombs, tea bags, or even a tiny plush toy for the rabbit to “hold.”
- Scented Rabbits: Tuck in a small sachet of lavender or cedar chips with the stuffing for a subtly fragrant rabbit, perfect for a linen closet or dresser drawer.
- Making a Family: Use different sized towels to create a mother rabbit and her bunnies!
Caring for Your Towel Rabbit and Display Ideas
To ensure your handcrafted towel rabbit remains a charming fixture for as long as possible, here are a few tips:
- Gentle Handling: While sturdy, they are still made of fabric. Handle with care, especially if stuffed with treats.
- Display Stability: Ensure your rabbit is placed on a flat, stable surface where it won’t easily tip over or be disturbed.
- Cleaning: If it gets dusty, a gentle pat with a lint roller or a soft brush can help. Avoid washing the entire rabbit if it has glued-on parts or special fillings. If it needs a refresh, you might need to carefully disassemble it, wash the towel, and then reassemble.
- Re-fluffing: Over time, the stuffing might compress. Gently fluff and reshape the head and body as needed to restore its plumpness.
These adorable towel rabbits make excellent additions to:
- Bathroom Decor: A whimsical touch on a guest towel rack or beside a sink.
- Nursery or Child’s Room: A soft, imaginative friend for a dresser or shelf (ensure small parts are securely attached if for very young children).
- Gift Baskets: The perfect focal point for a themed gift basket, such as a spa basket or a baby gift set.
- Seasonal Displays: An essential for Easter, spring, or even holiday decorations if made with festive colors.
Embrace the Joy of Crafting: Your Towel Rabbit Awaits!
Crafting a towel rabbit is a delightful experience that blends simplicity with creativity. From the initial folds to the final decorative touches, each step brings you closer to creating a truly charming and personal item. Whether you’re making it as a thoughtful gift, a unique party favor, or simply to add a touch of handmade warmth to your home, these towel animals are guaranteed to bring a smile. They are a testament to how a simple towel can be transformed into something truly special with just a little time and imagination.
We hope this detailed tutorial has inspired you to embark on this fun and rewarding project. Remember, the beauty of DIY lies in the process and the personal touches you add. Don’t hesitate to experiment with different materials, colors, and embellishments to make your towel rabbit uniquely yours. Share your creations, inspire others, and most importantly, enjoy the magic of crafting. A huge thank you once again to Natasha Kinza for sharing her wonderful original idea!