
Master the Thistle Flower Quilt Block: A Free Pattern & Comprehensive Tutorial
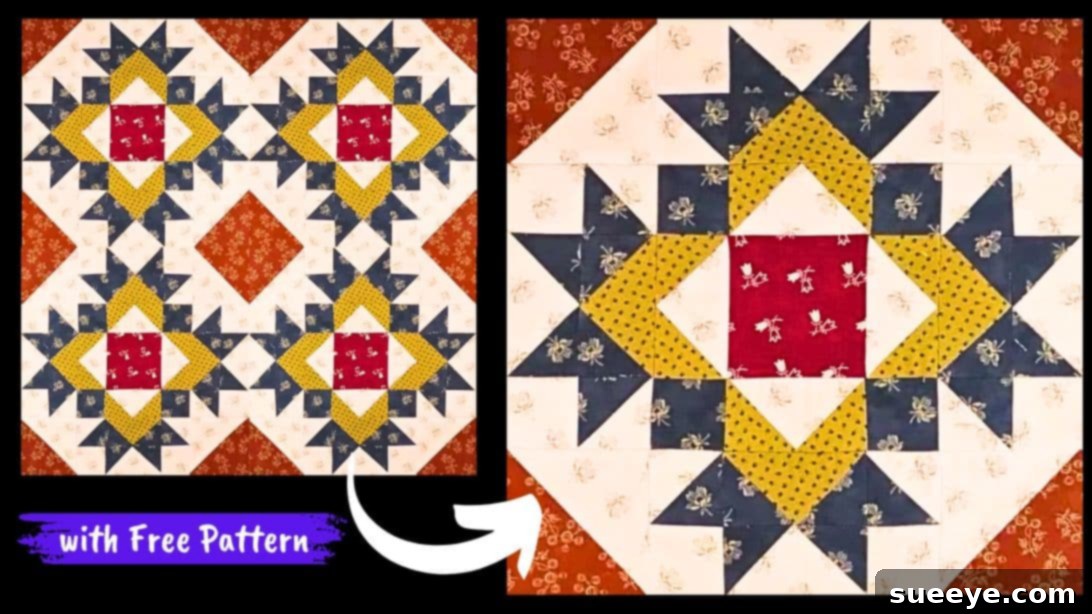
Embark on a delightful quilting journey with the captivating Thistle Flower quilt block, a design introduced by the talented Carol Thelen on YouTube. This pattern is not only aesthetically pleasing but also incredibly versatile, allowing quilters of all skill levels to experiment with various fabrics and color palettes to create truly unique pieces. Whether you’re a seasoned quilter looking for a fresh project or a beginner eager to learn essential techniques, this block offers a perfect blend of challenge and charm. Its intricate appearance belies a surprisingly straightforward construction, especially with the detailed guidance provided in this tutorial and the accompanying free pattern.
The beauty of the Thistle Flower quilt block lies in its adaptability. Imagine it as the centerpiece of a larger quilt, a charming accent on a decorative pillow, or even a functional placemat. The possibilities are endless, and the joy of seeing your fabric choices come to life in this stunning design is immeasurable. This guide aims to transform Carol Thelen’s insightful video into a comprehensive, easy-to-follow written resource, ensuring you have all the information you need to successfully complete your own Thistle Flower quilt block. Get ready to select your favorite fabrics, sharpen your rotary cutter, and immerse yourself in the rewarding craft of quilting!
Why the Thistle Flower Quilt Block is a Must-Try
The Thistle Flower quilt block stands out for several compelling reasons, making it a favorite among quilting enthusiasts:
- Elegant Design: Its unique geometric pattern, reminiscent of a blooming thistle, adds a touch of sophistication and charm to any project. The interplay of different fabric elements creates depth and visual interest.
- Versatility in Fabric Choices: This block truly shines when you experiment with various fabrics. From vibrant florals to subtle solids, or even carefully selected scraps, each choice can dramatically alter the block’s character, making it truly personal.
- Skill-Building Opportunity: For beginners, this pattern offers an excellent opportunity to master fundamental quilting techniques such as accurate cutting, piecing half-square triangles (HSTs), and constructing flying geese units. Experienced quilters will appreciate the chance to refine their precision and explore new color combinations.
- Free and Accessible Pattern: Thanks to Carol Thelen’s generosity, the pattern is freely available, removing any barrier to entry and encouraging more people to try this beautiful design.
- Rewarding Project: The process of piecing together this block is incredibly satisfying. Watching the individual fabric pieces transform into a cohesive and intricate design is a joy that keeps quilters coming back for more.
Essential Materials for Your Thistle Flower Quilt Block
Before you begin, gathering all your materials is crucial for a smooth and enjoyable quilting experience. The right tools and fabrics will ensure accuracy and enhance the final look of your Thistle Flower quilt block. Pay close attention to fabric selection, as it will largely define the character of your finished piece.
- Center Block Fabric: Choose a fabric that will stand out and anchor the design. This piece often serves as the focal point, so consider a print or a bold solid that complements your overall color scheme.
- Accent Fabric #1: This fabric will add a layer of complexity and visual appeal to your block. It typically contrasts with the center fabric while harmonizing with other elements.
- Accent Fabric #2: Introduce a second accent fabric to create depth and movement within the design. This fabric should either complement or subtly contrast with Accent Fabric #1 to enhance the block’s intricate structure.
- Background Fabric: A consistent background fabric helps to unify the various elements of the block and allows the design to truly pop. Often, a neutral solid or a subtle tone-on-tone print works best here.
- Corner Fabric: This fabric is used for the corner units, framing the main design. It can either blend with the background for a seamless look or provide a subtle contrast for added definition.
- Quilter’s Ruler: A transparent acrylic ruler with clear markings is indispensable for accurate cutting and squaring up your fabric pieces. Precision is key in quilting, and a good ruler is your best friend.
- Marking Tool: A fabric-specific marking pen, pencil, or tailor’s chalk is essential for drawing diagonal lines for half-square triangles and other precise markings. Ensure it’s removable or disappears with heat/water.
- Scissors or Rotary Cutter and Cutting Mat: A sharp pair of fabric scissors is fundamental, but a rotary cutter paired with a self-healing cutting mat offers unparalleled speed and accuracy for cutting multiple layers of fabric.
- Needle and Thread: High-quality polyester or cotton quilting thread that matches or blends with your fabrics will ensure strong, durable seams. A sharp needle appropriate for your fabric type is also important.
- Iron and Ironing Board: Crucial for pressing seams open or to one side at every stage of construction. Proper pressing prevents bulk, ensures flat seams, and contributes significantly to the accuracy and professional finish of your block.
- Sewing Machine: A reliable sewing machine capable of maintaining a consistent ¼-inch seam allowance is vital for successful piecing.
- Free Thistle Flower Quilt Block Pattern: Don’t forget to download and print the pattern! This will provide all the necessary cutting dimensions and diagrams for assembly.
Step-by-Step Directions to Craft Your Thistle Flower Quilt Block
Creating the Thistle Flower quilt block is a rewarding process that combines careful preparation with precise piecing. Follow these detailed steps to bring your vision to life, paying close attention to accuracy and pressing at each stage.
Step 1: Fabric Preparation and Half-Square Triangles (HSTs)
Begin by selecting your chosen fabrics, considering how their colors and patterns will interact to form the final Thistle Flower design. Once selected, pre-wash your fabrics to prevent shrinking and color bleeding, then press them thoroughly to remove any wrinkles. This initial preparation is vital for accurate cutting.
Now, refer to the downloaded pattern for the specific cutting requirements for each fabric unit. Using your rotary cutter, ruler, and cutting mat, precisely cut all your fabric pieces according to the pattern’s dimensions. Organize these cut pieces into their respective units (e.g., center block pieces, accent pieces, background, corners) to streamline the assembly process.
The first major piecing component involves creating Half-Square Triangles (HSTs). Take two fabric squares designated for HSTs, place them right sides together, and ensure their edges are perfectly aligned. Using your marking tool, draw a diagonal line from one corner to the opposite corner on the lighter of the two fabrics. Stitch a seam ¼-inch away from this drawn line on both sides of the line. Once sewn, carefully cut along the drawn line to yield two individual HST units. Press these units open, typically pressing the seam allowance towards the darker fabric to minimize bulk, or press them open if preferred, ensuring they lie perfectly flat. Trim each HST to the exact size specified in the pattern, squaring them up for maximum precision.
Step 2: Constructing Flying Geese Units and Side Panels
Next, focus on assembling the “Flying Geese” units, which add dynamic movement to the quilt block. For each flying geese unit, you’ll typically have one larger rectangle (the “goose”) and two smaller squares (the “sky”). Take one of the smaller squares and align it, right sides together, with one corner of the larger rectangle. Position it so that when sewn and pressed open, it forms a triangle at the corner. Stitch diagonally from the upper corner to the bottom corner of the smaller square. Carefully trim the excess fabric, leaving a ¼-inch seam allowance. Press the seam open, or towards the triangle. Repeat this process with the second smaller square on the opposite corner of the larger rectangle to complete the flying geese unit. Ensure all points are crisp and seams are flat.
With your HSTs and Flying Geese units ready, it’s time to start laying out the pieces to form the side units of the Thistle Flower block. Consult the diagram provided in Carol Thelen’s pattern as your guide. This diagram is crucial for correctly arranging your HSTs, flying geese, and other small fabric squares to create the unique visual elements that flank the central block. Lay them out on a flat surface, ensuring everything is oriented correctly before you begin sewing. This visual pre-assembly helps to catch any errors in placement before they become permanent.
Step 3: Assembling the Block – Center, Rows, and Final Stitching
Once you have accurately laid out all the components for your side units, carefully sew these smaller pieces together, maintaining a consistent ¼-inch seam allowance. Press each seam as you go, ensuring they lay flat and contribute to the overall precision of the unit. Set these completed side units aside for now.
Now, focus on assembling the center block. This typically involves piecing several smaller squares or rectangles together to form the core of your Thistle Flower design. Again, refer to your pattern diagram for the exact arrangement. Stitch these pieces together row by row, or in sub-units, always pressing your seams after each join. This meticulous pressing helps to ensure that all pieces will fit together smoothly in the later stages.
After the center block is complete, you will begin assembling the full quilt block by sewing the rows together. The Thistle Flower block usually consists of three horizontal rows: the top side unit, the center block, and the bottom side unit. Pin your rows together carefully, matching seam intersections as precisely as possible to ensure points align. Stitch the rows together with a ¼-inch seam allowance. As always, press your seams open or to one side after each row is joined, aiming for a perfectly flat and square block.
Finally, place the completed center block in the middle, and then carefully position the finished side units around it according to the pattern’s full block diagram. Pin these larger units together, ensuring all seams and corners align perfectly. Stitch them together using your consistent ¼-inch seam allowance. After the entire block is sewn, give it a final, thorough press to set all the seams. Congratulations, your Thistle Flower quilt block is complete! Take a moment to admire your handiwork and the intricate design you’ve created.
Essential Quilting Tips for Success
To ensure your Thistle Flower quilt block turns out beautifully, keep these fundamental quilting tips in mind:
- Precision is Paramount: In quilting, accuracy in cutting and stitching is key. A ¼-inch seam allowance should be consistent throughout your project. Use a seam guide on your machine if necessary.
- Pressing, Not Ironing: When pressing seams, lift and place the iron rather than sliding it, which can distort your fabric. Press seams open or to one side consistently to minimize bulk.
- Sharp Tools: Always use a sharp rotary cutter blade and fresh sewing machine needles. Dull tools can fray fabric and lead to imprecise cuts and stitches.
- Chain Piecing: For repetitive units like HSTs, consider chain piecing. This involves sewing multiple units consecutively without cutting the thread in between, saving time and thread.
- Pinning: Use pins liberally, especially when matching seams. Pin perpendicular to your seam line, removing them just before the needle reaches them.
- Squaring Up: After creating units like HSTs or flying geese, always square them up to the correct size using your ruler and rotary cutter. This ensures all your pieces will fit together perfectly.
- Stay Organized: Keep your cut fabric pieces organized by unit or step. Labeling can be helpful, especially for more complex blocks.
- Test Stitches: Before starting your project, do a few test stitches on scrap fabric to ensure your tension is correct and your seam allowance is accurate.
Creative Variations and Project Ideas
Once you’ve mastered the Thistle Flower quilt block, don’t stop there! This versatile design can be incorporated into a multitude of projects:
- Full Quilt: Combine multiple Thistle Flower blocks to create a stunning throw, lap, or bed quilt. Experiment with sashing and borders to enhance the overall design.
- Pillow Covers: A single Thistle Flower block makes an exquisite decorative pillow cover, adding a handmade touch to any room.
- Table Runners or Placemats: Use a few blocks in a row to create an elegant table runner, or individual blocks for unique placemats.
- Tote Bags: Incorporate a Thistle Flower block into the design of a handmade tote bag for a personalized accessory.
- Wall Hangings: Frame a beautifully crafted Thistle Flower block as a piece of textile art to adorn your walls.
Don’t be afraid to play with fabric placement and color. Try making the background a vibrant color, or use highly contrasting fabrics to make the thistle pop even more. Changing the scale of the pattern (if you’re comfortable with resizing) can also open up new design possibilities.
Frequently Asked Questions About the Thistle Flower Quilt Block
- Q: What type of fabric is best for this quilt block?
- A: 100% quilting cotton is highly recommended. It’s easy to work with, holds its shape well, and comes in an endless variety of prints and solids.
- Q: Can I use scraps for this project?
- A: Absolutely! This block is a fantastic way to use up your fabric scraps. Just ensure your scraps are large enough for the required cutting dimensions and are of a similar weight and fiber content.
- Q: My points aren’t matching up perfectly. What am I doing wrong?
- A: Mismatched points are a common quilting challenge. The main culprits are usually inconsistent seam allowances or imprecise cutting. Double-check your ¼-inch seam allowance with a seam gauge, and ensure all your fabric pieces are cut accurately and squared up before assembly. Pinning carefully at intersections also helps.
- Q: How do I make the quilt block larger or smaller?
- A: Resizing a quilt block requires recalculating all the cutting dimensions while maintaining the correct proportions. This can be complex for beginners. It’s often easier to simply use more blocks to create a larger finished project, or find a pattern designed in a different size.
- Q: What’s the best way to press seams?
- A: For most piecing, pressing seams to one side (usually towards the darker fabric) is common as it helps “nest” seams when joining units, reducing bulk. However, pressing seams open can create a flatter finish for very intricate blocks or thick fabrics. Experiment to see what works best for your specific project.
Conclusion: Your Thistle Flower Journey Awaits
The Thistle Flower quilt block is a truly rewarding project that combines beautiful aesthetics with fundamental quilting techniques. Through the expert guidance of Carol Thelen and this comprehensive tutorial, you now possess the knowledge and the free pattern to create stunning blocks that can be transformed into cherished heirlooms or delightful gifts. Remember that quilting is a journey of creativity and learning, so embrace the process, enjoy the meditative rhythm of stitching, and don’t be afraid to infuse your unique style into every block you make.
We encourage you to share your finished Thistle Flower quilt blocks and projects! It’s inspiring to see how different fabric choices and personal touches bring this design to life in countless ways. Happy quilting, and may your Thistle Flower bloom beautifully!
*All image credit belongs to Carol Thelen via YouTube. Follow and subscribe to her channel for more amazing quilting tutorials and ideas!