
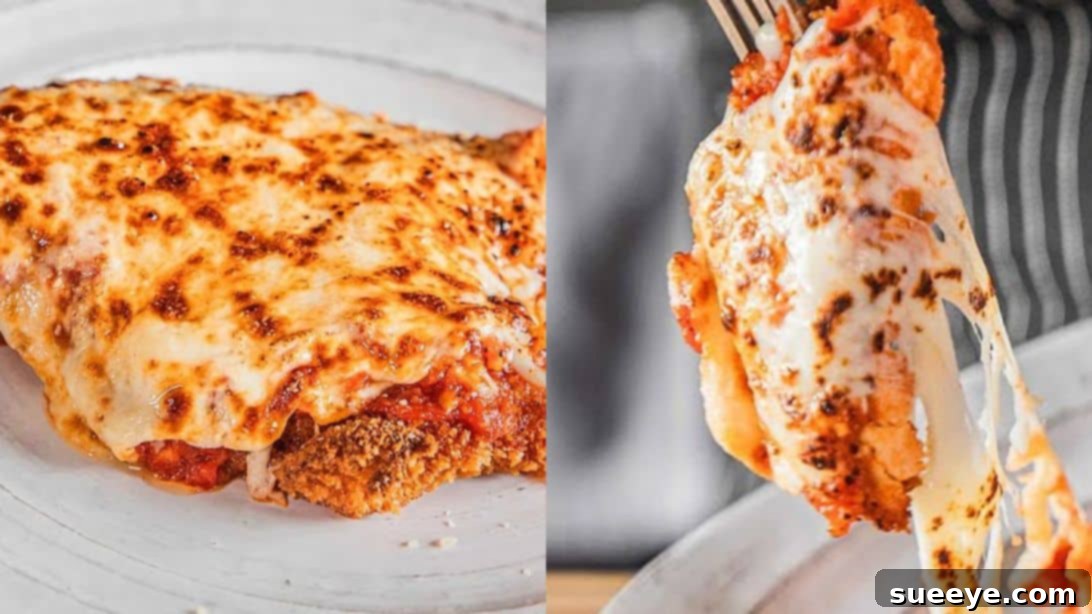
The Ultimate Crispy Homemade Chicken Parmesan: A Family Favorite Recipe
There are certain dishes that instantly evoke feelings of comfort, warmth, and pure culinary joy. For many, one such dish is the classic Chicken Parmesan. This beloved Italian-American staple, featuring tender chicken cutlets, a rich tomato sauce, and a generous blanket of melted cheese, holds a special place at dinner tables worldwide. While often enjoyed in restaurants, crafting a truly exceptional homemade Chicken Parmesan is an achievable and incredibly rewarding experience. Inspired by the meticulous techniques of renowned chef Joshua Weissman, this recipe takes everything you love about Chicken Parmesan and elevates it to new heights, ensuring a crispy texture, robust flavor, and an unforgettable meal.
What makes this particular homemade Chicken Parmesan stand out? It’s the harmonious blend of textures and flavors. We’re talking about chicken breasts that are pounded to perfection, breaded in crispy panko, and fried to a golden-brown crunch. But the magic doesn’t stop there. The star of this show is undoubtedly the sauce—a deeply flavorful concoction that goes beyond the ordinary. Infused with the smoky richness of bacon, the aromatic punch of garlic, and a hint of chili spice, it’s a sauce that you’ll want to drizzle over everything. Layered with fresh mozzarella and nutty Parmigiano Reggiano, each bite is a symphony of savory delights that will satisfy even the most intense cheese cravings. Get ready to impress your family and friends with a Chicken Parm that’s destined to become a cherished family favorite.
Ingredients for an Unforgettable Chicken Parmesan
Crafting a truly spectacular Chicken Parmesan starts with selecting the right ingredients. Quality makes all the difference, especially when it comes to the fresh components like cheese and tomatoes. Here’s what you’ll need to assemble this masterpiece:
For the Rich Bacon-Infused Tomato Sauce:
- 3 to 4 slices of thick-cut bacon: Cut into ½-inch wide pieces. Thick-cut bacon renders beautifully and provides ample smoky flavor.
- 2 ½ tablespoons of olive oil: A good quality extra virgin olive oil will add a subtle fruitiness to the sauce.
- 2 red chili peppers: Sliced thin. Adjust to your preferred spice level; for less heat, remove the seeds.
- 1 teaspoon of red pepper flakes: Adds another layer of warmth and a gentle kick.
- 5 cloves of garlic: Thinly sliced. Fresh garlic is key for an aromatic and pungent flavor base.
- 1 can (28 oz) of crushed tomatoes: Opt for high-quality crushed tomatoes, ideally San Marzano style, for the best flavor and texture.
- Salt and freshly ground black pepper to taste: Seasoning is crucial for balancing flavors.
- A pinch of sugar: Helps to balance the acidity of the tomatoes, enhancing their natural sweetness.
- ½ bunch of fresh thyme: The earthy, slightly floral notes of fresh thyme complement the tomato and bacon beautifully.
- ¼ cup of grated Parmigiano Reggiano or Parmesan cheese: Adds a salty, umami depth to the finished sauce.
For the Crispy Chicken Cutlets:
- 4 boneless, skinless chicken breasts: Look for uniformly sized breasts for even cooking.
- 2 cups of all-purpose flour: Used for the initial dredge, helping the egg wash adhere.
- 1 tablespoon of kosher salt: Essential for seasoning the flour and ultimately the chicken itself.
- Freshly cracked black pepper to taste: Adds a fresh, sharp flavor contrast.
- 2 cups of panko breadcrumbs: Panko creates an incredibly light and crispy coating, superior to regular breadcrumbs.
- 4 large eggs: Beaten with a splash of water to create an effective egg wash for breading.
- 3.5 cups of grated mozzarella: Use low-moisture, full-fat mozzarella for the best melt and stretch. Grating it yourself from a block is often preferred over pre-shredded.
- ¾ cup of grated Parmigiano Reggiano: Adds a sharp, salty, and complex flavor to the cheese topping.
With your ingredients prepped and ready, you’re well on your way to creating a homemade Chicken Parmesan that rivals any restaurant version!
Step-by-Step Guide to Perfect Homemade Chicken Parmesan
Follow these detailed steps to ensure every component of your Chicken Parmesan is perfect, from the rich sauce to the golden, crispy chicken and bubbling cheese.
Step 1: Building the Flavor Foundation – Rendering the Bacon
Begin by placing your ½-inch wide pieces of thick-cut bacon into a medium-sized, heavy-bottomed skillet. Set the skillet over medium heat. Add the olive oil to the pan. As the pan heats, the bacon will gradually render its fat, creating a wonderfully flavorful base for our sauce. Stir the bacon frequently to ensure even cooking and prevent sticking. Continue cooking until the bacon pieces are beautifully crispy and golden brown. This rendering process is crucial as it infuses the oil with a deep, smoky essence that will permeate the entire sauce.
Step 2: Infusing Aromatics and Spice
Once the bacon is crispy, add the thinly sliced red chili peppers, red pepper flakes, and thinly sliced garlic cloves to the skillet. Reduce the heat slightly if needed to prevent the garlic from burning. Continue to cook these aromatics over medium heat, stirring constantly, until they become incredibly fragrant and lightly toasted. You’ll notice the kitchen filling with a wonderful aroma as the garlic mellows and the chili peppers release their subtle heat. This step is about building layers of complex flavor.
Step 3: Crafting the Rich Tomato Sauce
Carefully remove all the solid ingredients (crispy bacon bits, chili peppers, and garlic) from the skillet, leaving behind the infused oil. Don’t discard these flavorful solids! Finely chop them on a cutting board, then return them to the pan. Immediately follow this by pouring in the can of crushed tomatoes. Stir everything together. Now it’s time to season: add salt and freshly ground black pepper to taste, and then stir in a pinch of sugar. The sugar helps to cut through the acidity of the tomatoes, enhancing their natural sweetness and creating a more balanced sauce. Bring the sauce to a gentle simmer, then reduce the heat to low and let it cook for about 15 minutes, stirring occasionally to prevent sticking. This simmering time allows the flavors to meld and deepen beautifully.
Step 4: Enhancing the Sauce with Fresh Herbs and Cheese
While your sauce is gently simmering, take a moment to prepare your final additions. In a small bowl, combine the fresh thyme leaves with the grated Parmigiano Reggiano. After the sauce has simmered for 15 minutes, remove it from the heat and stir in this fragrant thyme and cheese mixture. The residual heat of the sauce will gently warm the thyme, releasing its aroma, and partially melt the cheese, thickening the sauce slightly and adding an extra layer of savory depth. Once combined, pour the finished sauce into a clean bowl and set it aside. This allows it to cool slightly while you prepare the chicken.
Step 5: Preparing the Chicken Cutlets for Perfection
Take each boneless, skinless chicken breast and, using a sharp knife, carefully slice it horizontally almost all the way through, creating a butterfly cut. Do not cut completely through; you want to open it like a book. Place the butterflied chicken between two sheets of plastic wrap or in a large zip-top bag. Using a meat mallet or the bottom of a heavy skillet, gently but firmly pound the chicken until it is uniformly thin, about ¼ to ½ inch thick. This step is crucial for two reasons: it tenderizes the chicken, and it ensures even cooking, allowing the chicken to become perfectly crispy without drying out. Uniform thickness also allows for better adherence of the breading.
Step 6: Setting Up the Breading Station
To ensure a perfectly coated and crispy chicken, set up a classic breading station. You’ll need three separate, shallow bowls. In the first bowl, combine the all-purpose flour with the kosher salt and freshly cracked black pepper. Whisk these ingredients together until well combined. In the second bowl, crack the four eggs and add a splash of water (about 1-2 tablespoons). Whisk vigorously until the eggs are light and frothy, creating an egg wash. In the third bowl, pour the panko breadcrumbs. This organized setup will make the breading process efficient and mess-free.
Step 7: Breading the Chicken for Ultimate Crispiness
Now it’s time to bread your pounded chicken cutlets. Take one chicken piece and first dredge it thoroughly in the seasoned flour, ensuring it’s completely coated. Gently shake off any excess flour. Next, dip the flour-coated chicken into the egg wash, allowing any excess to drip off. Finally, transfer the chicken to the bowl of panko breadcrumbs. Press the panko firmly onto both sides of the chicken, ensuring a thick, even coating. The panko is key to achieving that signature crispy exterior. Transfer the breaded chicken to a clean plate or baking sheet and repeat this process for the remaining chicken slices. It’s helpful to use one hand for the dry ingredients and the other for the wet to keep your hands cleaner.
Step 8: Pan-Frying to Golden Perfection
Fill a large, deep pan or a heavy-bottomed skillet with about halfway with high-heat oil (such as canola, vegetable, or grapeseed oil). Place the pan over medium-high heat and allow the oil to heat up until it reaches a temperature of 350°F (175°C). Using a thermometer is highly recommended for accuracy, as the correct oil temperature is vital for crispiness without greasiness. Carefully and slowly drop one or two breaded chicken breasts into the hot oil, placing them facing away from you to prevent splattering. Do not overcrowd the pan, as this will drop the oil temperature and result in soggy chicken. Fry each side for approximately 3 to 5 minutes, or until the chicken is beautifully crispy and golden brown. The internal temperature of the chicken should reach 165°F (74°C) when checked with an instant-read thermometer. Once cooked, transfer the crispy chicken cutlets to a wire rack set over a rimmed baking sheet. This allows excess oil to drain away and helps maintain their crispness.
Step 9: Assembling Your Chicken Parmesan Masterpiece
In a large bowl, combine the generous amounts of grated mozzarella cheese and grated Parmigiano Reggiano. Toss them gently to ensure an even mix. Line a baking sheet with aluminum foil for easier cleanup. Carefully place the golden, crispy chicken cutlets onto the foil-lined baking sheet. Now, generously spoon your rich, bacon-infused tomato sauce over each piece of chicken, ensuring it’s well coated. Finally, top each sauced chicken cutlet with a hefty portion of the mixed mozzarella and Parmigiano Reggiano cheese. Don’t be shy with the cheese – it’s a critical component of Chicken Parmesan!
Step 10: The Grand Finale – Broiling to Melted Perfection
With your assembled Chicken Parmesan on the baking sheet, it’s time for the final touch. Place the baking sheet into a preheated broiler. Keep a close eye on the chicken, as broilers can vary greatly in intensity and speed. Broil for approximately 5 to 8 minutes, or until the cheese is completely melted, bubbling, and has developed a beautiful golden-brown crust in spots. The slight char on the cheese adds incredible flavor and texture. Once the cheese is perfectly melted and golden, carefully remove the baking sheet from the broiler. Let it rest for a minute or two before serving immediately. The aroma filling your kitchen will be absolutely irresistible!
Why This Homemade Chicken Parmesan Will Be Your New Go-To Recipe
This isn’t just another Chicken Parmesan recipe; it’s an experience. The attention to detail, from the bacon-infused sauce to the perfectly crispy chicken, transforms a familiar dish into something truly extraordinary. Here’s why you’ll fall in love with this version:
- Unmatched Crispiness: The double-pounding method and panko breading ensure a shatteringly crispy exterior that stands up beautifully to the sauce.
- Deeply Flavorful Sauce: The addition of thick-cut bacon, fresh garlic, and chili peppers creates a tomato sauce that is rich, complex, and utterly addictive. It’s far from a bland, store-bought alternative.
- Perfectly Tender Chicken: Pounding the chicken ensures it cooks evenly and remains incredibly juicy and tender on the inside, a perfect contrast to the crispy coating.
- Melty, Golden Cheese: A generous blend of fresh mozzarella and savory Parmigiano Reggiano melts into a glorious, bubbly topping that perfectly complements the chicken and sauce.
- Restaurant-Quality at Home: Following these steps allows you to achieve a Chicken Parmesan that rivals, if not surpasses, what you’d find in many Italian restaurants.
Expert Tips for the Best Chicken Parmesan
- Quality Ingredients Matter: Invest in good quality crushed tomatoes, fresh mozzarella (from a block, not pre-shredded), and authentic Parmigiano Reggiano. These make a significant difference.
- Don’t Skip the Pounding: Pounding the chicken ensures even cooking and tenderness. It also creates more surface area for that delicious breading.
- Control Oil Temperature: Use a thermometer when frying. Too low, and the chicken absorbs oil and becomes greasy; too high, and it burns before cooking through.
- Avoid Overcrowding: Fry the chicken in batches if necessary. Overcrowding cools the oil, leading to less crispy results.
- Rest the Fried Chicken: Placing the fried cutlets on a wire rack allows air circulation, preventing the bottom from becoming soggy.
- Watch the Broiler Closely: Broilers can be very powerful. Keep an eye on the cheese to prevent burning, as it can go from perfectly golden to burnt in seconds.
- Season Every Layer: Don’t forget to season the flour, the chicken itself, and the sauce adequately for maximum flavor.
Serving Suggestions and Perfect Pairings
This magnificent Homemade Chicken Parmesan is a complete meal in itself, but it pairs wonderfully with a few simple accompaniments to complete the dining experience:
- Pasta: A classic pairing! Serve it alongside a bed of spaghetti, linguine, or fettuccine tossed lightly with a little extra tomato sauce or olive oil.
- Garlic Bread: Essential for soaking up every last drop of that incredible sauce.
- Fresh Green Salad: A simple salad with a light vinaigrette provides a refreshing contrast to the richness of the Chicken Parm.
- Steamed or Roasted Vegetables: Asparagus, green beans, or broccoli lightly steamed or roasted can add a healthy and colorful side.
- Red Wine: A medium-bodied red wine like Chianti, Sangiovese, or Merlot complements the rich flavors beautifully.
Storage and Reheating
Leftover Chicken Parmesan can be stored in an airtight container in the refrigerator for up to 3-4 days. To reheat, the best method is in an oven or toaster oven at 350°F (175°C) until heated through and the cheese is bubbly again. This helps the chicken retain some of its crispiness, unlike microwave reheating which can make it soft.
Embark on this culinary journey and create a Homemade Chicken Parmesan that will undoubtedly become a treasured recipe in your home. The effort is well worth it for the incredible flavors and the sheer satisfaction of creating such a beloved dish from scratch. Enjoy every crispy, cheesy, saucy bite!