
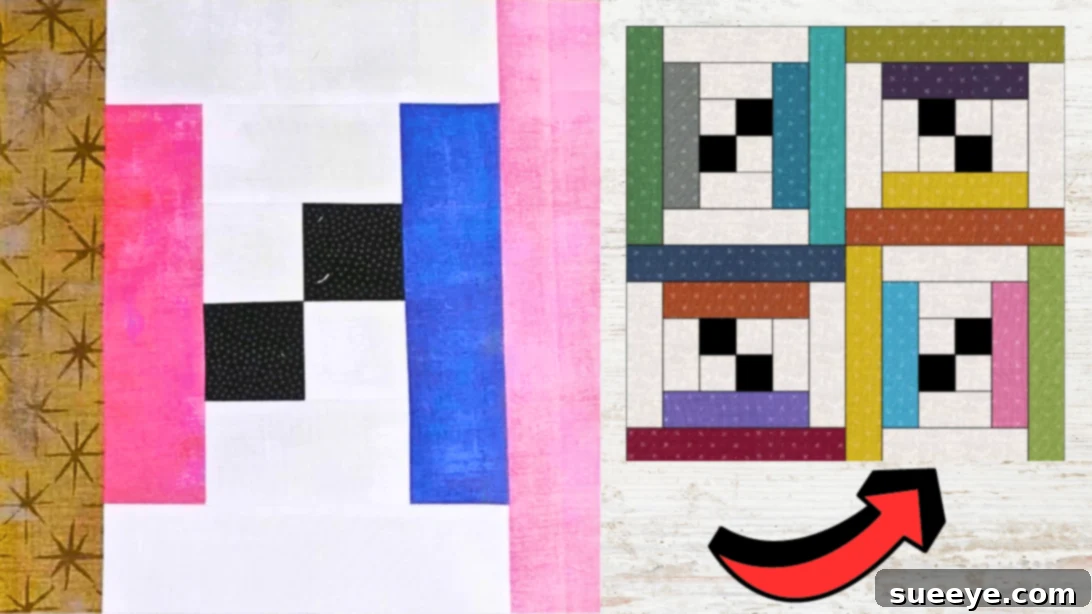
Embark on a delightful quilting journey with one of the most beloved and visually striking patterns: the Courthouse Steps Quilt Block. Often praised for its simplicity, elegant symmetry, and beginner-friendly construction, this block delivers stunning results without the complexity typically associated with intricate quilt designs. Whether you’re a seasoned quilter looking for a quick and satisfying project or a newcomer eager to dive into the world of fabric artistry, the Courthouse Steps block is an excellent choice. Its inherent beauty lies in its ability to transform simple fabric strips into a sophisticated design reminiscent of ascending steps, leading the eye around a central “hearth.” Get ready to unlock your creative potential as we guide you through each step of crafting this timeless quilt block, inspired by the clear and concise instructions provided by quilting expert Carol Thelen in her fantastic YouTube tutorial. You’ll be amazed at how easily you can create a block that looks far more complicated than it actually is!
Master the Effortless Courthouse Steps Quilt Block: A Beginner-Friendly Tutorial
The Courthouse Steps quilt block is a cherished variation of the classic Log Cabin block, known for its distinct appeal and straightforward construction. Unlike the traditional Log Cabin, where strips are added in a spiral around a central square, the Courthouse Steps block builds outwards in a specific order: strips are added to opposite sides of a central rectangle or square, then to the remaining two opposite sides, creating a striking visual rhythm. This methodical approach makes it incredibly accessible for beginners while offering endless possibilities for color and fabric experimentation. It’s a versatile design that can range from traditional and muted to bold and contemporary, depending entirely on your fabric selections. This tutorial will empower you to create a beautiful block with confidence, providing all the essential tips and techniques you need for success.
Why the Courthouse Steps Block is Perfect for You
- Beginner-Friendly: The step-by-step nature of adding fabric strips means there are no tricky angles or complex piecing techniques involved. If you can sew a straight seam, you can make this block!
- Stunning Visual Impact: Despite its simplicity, the Courthouse Steps block creates a captivating design. When multiple blocks are assembled, they can form intricate secondary patterns, adding depth and interest to your finished quilt.
- Versatile Design: Experiment with different color placements to achieve unique effects. Use high-contrast fabrics for a dramatic look, or subtle variations for a more cohesive, calm aesthetic. The possibilities are truly limitless.
- Excellent for Scrap Busting: This block is ideal for utilizing smaller fabric strips and remnants you might have in your stash. It’s a wonderful way to give new life to leftover fabrics and create a beautiful, memory-filled quilt.
- Quick to Assemble: Once you get into the rhythm, you’ll find these blocks come together surprisingly quickly, making it a satisfying project for those who want to see results fast.
Gathering Your Quilting Arsenal: Materials Needed
Before you begin sewing, ensure you have all your tools and materials organized. A well-prepared workspace contributes significantly to a smooth and enjoyable quilting experience. The exact quantities of fabric will depend on how many blocks you plan to make and the final size of your quilt.
- Fabric Strips: You’ll need an assortment of different colored and printed fabric strips, each cut to 2½ inches wide. Consider choosing fabrics that complement each other or provide interesting contrast for a dynamic effect. Pre-washing your fabrics is often recommended to prevent shrinkage and color bleeding.
- Black Fabric: A solid black fabric piece, also cut to 2½ inches wide, will serve as a foundational element, providing strong contrast and definition to your block.
- Background or White Fabric: A solid background fabric, typically white or a light neutral, also 2½ inches wide, will help frame your colored strips and highlight the “steps” pattern.
- Quilting Ruler: Essential for accurate cutting and measuring. A clear acrylic ruler with visible markings is highly recommended.
- Marking Pen, Pencil, or Chalk: For transferring pattern markings or drawing lines on your fabric. Choose a tool that is easily removable or disappears over time.
- Needle and Thread: High-quality polyester or cotton thread is suitable for machine piecing. Match the thread color to your fabrics or choose a neutral gray or beige.
- Iron and Ironing Board: Crucial for pressing seams open and ensuring flat, accurate blocks. A well-pressed block lays flatter and creates sharper points when blocks are joined.
- Sewing Machine: A reliable sewing machine equipped with a ¼-inch presser foot will make consistent seam allowances much easier to achieve.
- Downloadable Pattern:Click here to access and download the pattern provided by Carol Thelen. This pattern will guide you with precise cutting dimensions and block assembly diagrams, making the process even simpler.
Step-by-Step Guide: Crafting Your Courthouse Steps Quilt Block
Follow these detailed instructions to construct your beautiful Courthouse Steps quilt block. Precision in cutting and sewing is key to achieving a professional finish, so take your time with each step.
Step 1: Preparation and Initial Fabric Cuts
Accuracy begins with your initial cuts. Begin by preparing your black and background (white) fabrics. Cut strips from each, ensuring they are consistently 2½ inches wide. Lay one strip of black fabric and one strip of background fabric together, right sides facing each other. Sew them together along one long edge using a precise ¼-inch seam allowance. After stitching, press the seam open carefully. Pressing seams open helps to reduce bulk, creating flatter blocks that are easier to work with when you join them later. Once pressed, you will subcut this combined strip into smaller strip sets, typically squares or rectangles as indicated in the pattern, and set them aside. These will form the crucial central units of your blocks.
Next, prepare your print and colored fabric strips. Start by trimming off any uneven ends from your chosen assortment of 2½-inch wide fabric strips to ensure a straight edge. From these strips, cut specific lengths: one part at 12½ inches and another at 8½ inches. Continue this process for all your desired colored and printed fabric strips, stacking them neatly according to their respective sizes. Having all your pieces precisely cut and organized before you begin piecing will save you time and prevent errors.
Step 2: Assembling the Core and First Layers
Now, let’s begin to build the heart of your Courthouse Steps block. Take two of the black and white strip units that you prepared in Step 1. Lay them side by side, ensuring that their colors are opposite each other – for example, a black section next to a white section, creating a checkerboard effect in the center. Stitch these two units together along their long edges using a ¼-inch seam. Once sewn, press the seam open to maintain flatness. This will form a central square or rectangular unit, often referred to as the “hearth” of the block.
Next, take two small white rectangular pieces (as specified in the pattern). Place one of these small white rectangles on the top edge and another on the bottom edge of your newly formed central unit. Sew them into place, again using a ¼-inch seam allowance. Press these seams open. This action begins to expand the central motif, forming the first “steps.” Following this, select two shorter colored strips. Attach one of these shorter colored strips to each side of the patchwork you’ve just created. Stitch them securely, and then press the seams open. You’ll start to see the characteristic “log cabin” effect taking shape, with the colors building outwards.
Step 3: Expanding the Block and Finishing Touches
Continue building your block by adding the next set of layers. Take two longer white rectangular pieces (as indicated in your pattern). Place one of these longer white rectangles along the top edge and the other along the bottom edge of your existing patchwork unit. Sew them firmly in place with a ¼-inch seam, and then press these seams open. This further extends the white “steps” and increases the block’s size and definition.
Finally, select two longer colored strips. Attach one of these longer colored strips to each of the remaining sides of your block. Stitch them securely with a ¼-inch seam allowance. As always, press the seams open for a crisp, flat finish. Congratulations! Your first Courthouse Steps Quilt Block is now complete. The beauty of this pattern truly shines when you create multiple blocks. Experiment with alternating and playing with the vibrant colors and varied prints of your fabrics to make each block unique. Once you have a collection of blocks, you can arrange them in countless ways to form a stunning quilt top. Continue creating more blocks until you have enough for your desired quilt size, then proceed to assemble, baste, quilt, and bind your masterpiece however you wish. Enjoy the creative process and the satisfaction of a handmade quilt!
Tips for Quilting Success
Achieving beautiful and accurate quilt blocks is a matter of practice and attention to detail. Here are some invaluable tips to enhance your quilting journey:
- Consistent Seam Allowance: A ¼-inch seam allowance is standard in quilting. Practice maintaining this exact width for every seam. A special ¼-inch presser foot for your sewing machine can be incredibly helpful. Inconsistent seam allowances are the most common cause of block distortion.
- Pressing Matters: Always press your seams open and flat after each sewing step. This creates crisp, flat blocks that fit together perfectly when assembling the quilt top. Avoid ironing back and forth, which can stretch fabric; instead, use a “lift and press” motion.
- Squaring Up: After completing each block, it’s a good practice to “square it up” using your ruler and rotary cutter. This means trimming the block to its exact finished dimensions, ensuring all corners are 90 degrees. This step is crucial for perfectly aligning blocks when you piece them together.
- Fabric Selection: Don’t be afraid to experiment with different fabric combinations. The Courthouse Steps block looks fantastic with high-contrast colors, monochromatic schemes, or even a scrappy mix of prints. Consider the overall feel you want for your quilt.
- Chain Piecing: To speed up your process, especially when making multiple blocks, consider chain piecing. This involves sewing several units one after another without lifting the presser foot or cutting the threads in between, creating a “chain” of sewn pieces.
- Watch the Tutorial: While written instructions are helpful, seeing the process in action can clarify many steps. Make sure to watch Carol Thelen’s YouTube video for a visual guide and additional insights.
Creative Variations and Beyond the Block
The true magic of the Courthouse Steps block lies in its versatility. Once you’ve mastered the basic construction, you can begin to explore endless design possibilities. Here are a few ideas to spark your creativity:
- Color Placement: By alternating the light and dark fabric placement in your “steps,” you can create stunning optical illusions. For example, using light strips on two opposite sides and dark strips on the other two can make the block appear to recede or advance.
- Scrappy Delight: Embrace a “scrappy” aesthetic by using a wide variety of fabric prints and colors for your strips. This creates a vibrant, eclectic quilt that tells a story through its diverse fabric collection.
- Monochromatic Schemes: For a more sophisticated or subtle look, choose fabrics within a single color family, varying only in shade, tint, and value. This can produce a quilt with incredible texture and depth.
- Block Rotation: When assembling your full quilt, try rotating adjacent blocks. Turning every other block 90 or 180 degrees can create mesmerizing secondary patterns, such as zigzags, diamonds, or large overall designs.
- Quilt Layouts: Consider different settings for your blocks. You can arrange them in straight rows and columns, on-point (diagonal), or even mix them with sashing and cornerstones for a more traditional look.
Your Quilting Journey Starts Here!
The Courthouse Steps Quilt Block stands as a testament to how simple techniques can yield extraordinary results. Its classic appeal, combined with its ease of construction, makes it a perennial favorite among quilters of all skill levels. By following Carol Thelen’s clear guidance and our expanded tutorial, you’ve gained the confidence and skills to create a truly beautiful and meaningful piece of textile art. We hope you found this guide comprehensive and inspiring. Don’t hesitate to experiment with your fabric choices, embrace any “happy accidents,” and most importantly, enjoy every stitch of your creative process. Happy quilting!
For a visual demonstration of these steps and more expert tips, be sure to watch the full video tutorial:
Watch the “Easy to Sew Courthouse Steps Quilt Block” Tutorial by Carol Thelen on YouTube
*These amazing images and the inspiring tutorial are all credited to Carol Thelen via YouTube. We encourage you to check her other content and follow for more fantastic quilting ideas!