
Mastering the Art of Scissor Sharpening: A Comprehensive DIY Guide
Scissors are indispensable tools found in nearly every corner of our homes – from the kitchen drawer and the craft room to the garage workbench. They make countless daily tasks easier, whether it’s opening packages, cutting fabric, or snipping herbs. However, like all cutting tools, scissors inevitably lose their edge over time. Frequent use, cutting the wrong materials, or even improper storage can lead to dull blades, turning a simple task into a frustrating struggle. Dull scissors not only make precision cutting impossible but can also be a safety hazard, causing materials to tear rather than cut cleanly.
Instead of replacing your trusty shears every time they lose their sharpness, what if you could restore them to their former glory with a simple, effective DIY method? This comprehensive guide will walk you through an expert technique, inspired by the practical wisdom of Right On With Jon Crane on YouTube, to sharpen any pair of scissors using common tools. You’ll learn how to transform your dull, underperforming scissors into precision instruments, enhancing your efficiency and extending the lifespan of your valuable tools.
Why Your Scissors Get Dull (and Why it Matters)
Understanding why your scissors lose their edge is the first step toward effective maintenance. The primary culprits include:
- Frequent Use: Every cut causes microscopic wear on the blades, gradually rounding the cutting edge.
- Cutting Inappropriate Materials: Using household scissors for heavy-duty tasks like cutting cardboard, wire, or abrasive materials can quickly damage and dull the blades. Fabric shears, for instance, should ideally only ever touch fabric to preserve their sharpness.
- Improper Storage: Tossing scissors into a cluttered drawer where they rub against other metal objects can nick and dull the blades.
- Looseness at the Pivot Point: Over time, the screw or rivet holding the blades together can loosen, causing the blades to separate slightly. This prevents them from shearing properly, leading to tearing rather than clean cuts.
Dull scissors aren’t just an inconvenience; they can lead to frustration, wasted materials due to ragged cuts, and even increase the risk of injury as you apply more force trying to make them cut. By learning to sharpen them yourself, you’ll save money, reduce waste, and always have a reliable, sharp tool at hand.
Materials You’ll Need for Scissor Sharpening
To embark on this effective scissor sharpening journey, gather the following essential tools:
- Diamond Sharpening Stone: A large, flat diamond sharpening stone is crucial for establishing the initial flat edge and overall sharpness. Diamond stones are superior as they can sharpen very hard materials and typically last longer than other abrasive stones. Ideally, you’ll want one with both coarse and fine grit sides for optimal results.
- Handheld Diamond Polishing Stone: This smaller, more maneuverable stone is used for refining the inner bevel of the blades, giving them that razor-sharp finish. Again, having coarse and fine grit options is highly beneficial.
- Scissors: Any pair of dull scissors you wish to revive! This method works for a wide range of types, from kitchen shears to craft scissors.
- Hammer: Specifically used for tightening the pivot point of loose scissors, ensuring a snug fit for optimal cutting performance.
- Optional but Recommended:
- Clamp or Vice: To securely hold the scissors in place during the inner bevel sharpening step, ensuring stability and safety.
- Piece of Wood: A scrap piece of wood to place under the scissors when using the hammer, protecting your work surface and providing a stable, non-damaging base.
- Safety Gloves: To protect your hands from sharp edges, especially as the scissors become sharper.
- Cleaning Cloth: To wipe away metal shavings and dust after sharpening.
- Water or Honing Oil: Some diamond stones can be used dry, while others benefit from a little water or honing oil to help clear away metal particles and reduce friction. Check your stone’s manufacturer recommendations.
Step-by-Step Directions to Sharpen Your Scissors
Follow these detailed steps to bring your dull scissors back to life:
Step 1: Flattening the Primary Edges (The Foundation of Sharpness)
The first critical step involves creating a perfectly flat surface on the back of each scissor blade, which is essential for a truly sharp edge. This process helps remove any existing nicks or unevenness.
Begin by placing your large, flat diamond sharpening stone on a stable, non-slip work surface. A damp cloth underneath the stone can prevent it from sliding. Open your scissors wide, as far as they comfortably go, and lay one blade completely flat against the surface of the sharpening stone. It’s crucial that the entire flat side of the blade makes contact with the stone.
Apply even, consistent pressure with one hand holding the blade flat against the stone. With your other hand, gently but firmly push the scissor blade forward across the stone. Then, pull it back towards you. Repeat this forward and backward motion, ensuring the blade remains perfectly flat against the stone throughout the entire movement. The goal here is to evenly abrade the flat surface of the blade. You should see a fine slurry of metal particles forming, indicating that the stone is doing its job.
Continue working on this blade until you can visually confirm that the entire flat surface has been uniformly abraded, and any previous nicks or dull spots are gone. Once satisfied, carefully flip the scissors over and repeat the exact same flattening process on the other blade. Consistency in pressure and angle is key here.
After flattening both blades, it’s time to refine the very tip or micro bevel of your scissors. This is the extremely fine edge that actually does the cutting. Holding the scissors at a very slight angle (often matching the original factory bevel, which is usually around 15-20 degrees), gently polish this micro bevel. Use light, controlled strokes to avoid damaging the newly flattened surface. This step is about removing any burr created during the flattening process and giving the cutting edge a final polish.
Step 2: Refining the Inner Bevel (Achieving Razor Sharpness)
With the primary edges flattened, the next step is to sharpen the inner cutting bevel of each blade, which is the angled part that meets the other blade to make the cut. This is where the true sharpness is honed.
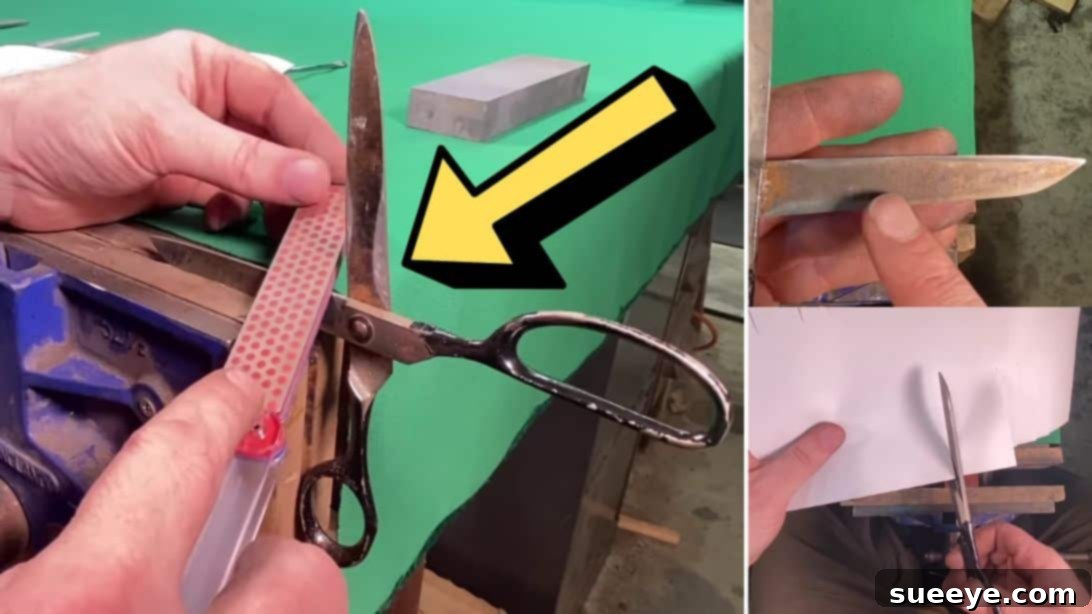
For stability and safety, it is highly recommended to hold the pair of scissors securely in an open position. You can use a workbench clamp or a vice to hold one of the blades firmly while keeping the scissors open. This prevents movement and allows you to focus on the sharpening angle.
Take your handheld diamond polishing stone. Start with the coarse grit side first. Carefully identify the existing bevel angle on your scissor blade. It’s crucial to match this angle as closely as possible. If you deviate too much, you risk creating a new, incorrect bevel, which can make the scissors cut poorly. Once you’ve established the angle, gently rub the coarse side of the handheld stone along the entire length of the inner bevel. Use smooth, controlled strokes, moving from the pivot point to the tip of the blade. Apply moderate, even pressure. The coarse grit will quickly remove material and establish a new, sharper edge.
After working the entire length of the bevel with the coarse side, switch over to the fine grit side of your handheld diamond stone. Repeat the same rubbing motion and maintain the exact same angle. The fine grit will polish the edge, removing the microscopic scratches left by the coarser grit and creating a much keener, smoother cutting edge. This polishing action is what truly brings out the razor sharpness.
Once you’ve completed both coarse and fine grit sharpening on one blade’s inner bevel, carefully unclamp the scissors, rotate them, and secure the other blade. Repeat the entire process (coarse then fine grit) on the inner bevel of the second blade. Pay close attention to matching the angle on both blades for balanced cutting performance.
Step 3: Tightening Loose Blades (Ensuring Optimal Performance)
Sometimes, scissors become dull not just because their edges are worn, but also because the blades have become loose at the pivot point. This looseness prevents the blades from closing tightly enough to achieve a clean shearing action, causing them to bend or tear materials instead of cutting them. If you notice your scissors feeling “floppy” or performing poorly even after sharpening the edges, this step is crucial.
To tighten the pivot point, lay the opened scissors flat on a sturdy, non-damaging surface. A piece of wood is ideal as it provides a firm but slightly yielding base, preventing damage to your work surface or the scissors themselves. Carefully locate the rivet or screw at the center where the two blades cross.
Take your hammer and, with controlled, gentle taps, strike directly down on the center rivet or screw. The goal is to slightly compress the metal, effectively tightening the connection between the blades. Start with light taps and gradually increase force if necessary. It’s better to tap multiple times gently than to strike once too hard and risk damaging the scissors.
After a few taps, close and open the scissors to check for tightness. They should feel snug, with no excessive side-to-side play, but still open and close smoothly. Continue tapping and checking until you achieve the desired tension. A properly tightened pivot point allows the blades to glide against each other perfectly, maximizing the effectiveness of your newly sharpened edges.
Testing Your Newly Sharpened Scissors
Once you’ve completed all the sharpening steps, it’s time to test your scissors. A popular and effective way to check sharpness is to try cutting a piece of tissue paper or thin fabric. Truly sharp scissors should be able to cut through these delicate materials cleanly and effortlessly, without tearing, bending, or catching. If they still struggle, revisit the sharpening steps, paying close attention to maintaining a consistent angle and ensuring thorough polishing with the fine grit stone. For a more robust test, try cutting a piece of regular paper – it should slice through cleanly from pivot to tip.
Maintenance Tips for Long-Lasting Sharpness
Sharpening your scissors is an investment in their longevity and performance. To keep them sharp for as long as possible, incorporate these maintenance habits:
- Clean After Every Use: Especially for kitchen or craft scissors, wipe them clean of any residue, adhesives, or food particles after each use. This prevents buildup that can dull blades or cause corrosion.
- Store Properly: Avoid tossing scissors into a drawer with other tools. Store them in a sheath, a dedicated holder, or hang them to prevent accidental nicks and damage to the blades.
- Use for Intended Purpose: Reserve specific scissors for specific tasks. Use fabric shears only for fabric, kitchen shears for food, and household scissors for paper and light materials. Never use good shears to cut wire, thick cardboard, or abrasive materials.
- Regular Light Honing: Instead of waiting for scissors to become completely dull, give them a quick pass with a fine grit sharpening stone every few months. This “honing” can maintain their edge and delay the need for a full sharpening session.
- Lubricate the Pivot: Occasionally, apply a tiny drop of mineral oil or sewing machine oil to the pivot point. This helps maintain smooth operation and prevents rust.
Common Mistakes to Avoid During Sharpening
While DIY scissor sharpening is accessible, there are a few pitfalls to steer clear of:
- Incorrect Angle: The most common mistake is failing to maintain a consistent, correct angle on the bevel. This can lead to rounded edges or uneven sharpness. Always try to match the original factory angle.
- Excessive Pressure: Too much pressure can remove too much material, damage the blade, or create an uneven edge. Let the abrasive do the work with moderate, even pressure.
- Ignoring Blade Looseness: Sharpening truly dull blades won’t matter if the pivot is loose. Always check and address looseness if present.
- Not Cleaning Blades: A dirty blade can leave grit on your sharpening stone, reducing its effectiveness and potentially scratching your blade.
- Using the Wrong Sharpening Tool: While some quick sharpeners exist, a diamond stone offers superior control and results for precision tools like scissors.
*These amazing images are all credited to Right On With Jon Crane via YouTube. Check his other content and follow for more expert tips!
Conclusion: Restore Your Tools, Enhance Your Craft
Learning how to sharpen your own scissors is a valuable skill that empowers you to maintain your tools, save money, and enhance the quality of your work. By following this detailed guide, you can confidently transform any dull pair of scissors into a sharp, efficient cutting instrument. The satisfaction of a perfectly clean cut, achieved with your newly revitalized tools, is unmatched. Embrace the art of tool maintenance, and you’ll find that your household and crafting tasks become not just easier, but more enjoyable. Don’t let dull blades hold you back – sharpen up and get cutting!