
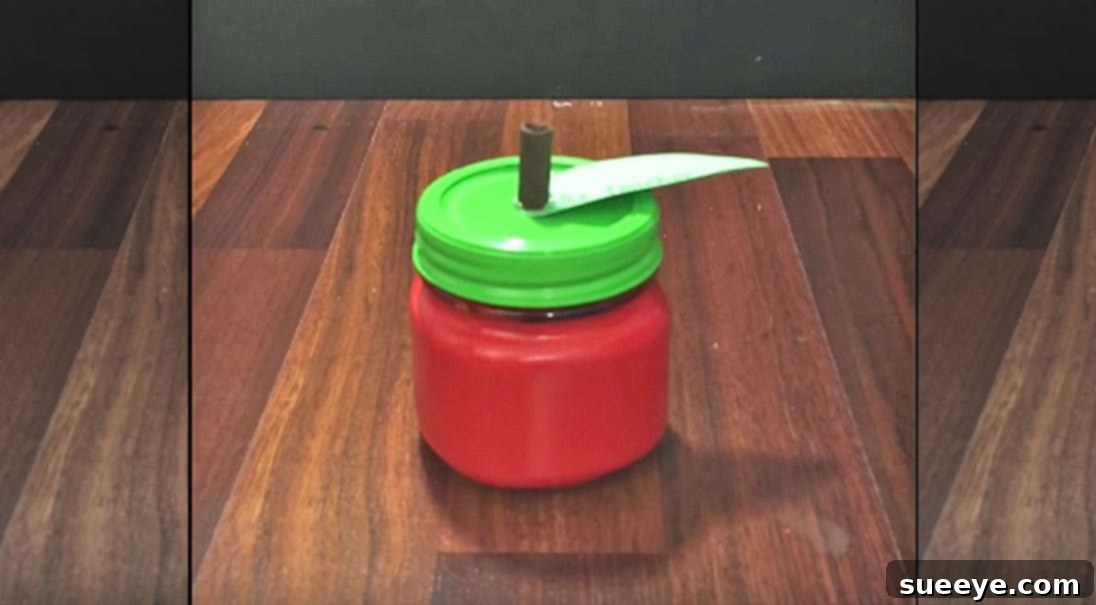
Craft the Perfect DIY Mason Jar Apple: A Heartfelt Thank You Gift for Teachers
Do you remember that one teacher who truly made a difference in your life? The educator who inspired you, challenged you, or simply made learning fun? Most of us do, and the desire to express our gratitude to these incredible individuals is timeless. While a simple “thank you” goes a long way, a thoughtful, handmade gift can make that appreciation even more memorable and personal. This year, why not craft something truly special that they’ll cherish?
We’re talking about an adorable, apple-themed mason jar – a craft that’s not only incredibly easy and budget-friendly to make but also bursts with charm. This delightful DIY project transforms an ordinary mason jar into a symbol of appreciation, perfectly suited for the dedicated teachers in your life. Whether it’s for Teacher Appreciation Week, an end-of-year gift, or just a spontaneous gesture of thanks, this personalized apple jar is sure to bring a smile to their face. The best part? The most time-consuming step is simply waiting for the paint to dry, making it a fantastic last-minute gift option that still looks like you put in immense effort.
Why Choose a Handmade Gift for Your Favorite Teacher?
In a world saturated with generic store-bought items, a handmade gift stands out. It’s a tangible representation of time, effort, and personal thought, conveying a depth of gratitude that pre-packaged presents often miss. For teachers, who pour so much of themselves into educating and nurturing their students, receiving a handcrafted item from a student or parent can be profoundly touching.
- Personal Touch: A DIY gift allows for customization, reflecting the teacher’s personality or specific interests.
- Shows Effort: The act of creating something demonstrates genuine care and appreciation, far beyond the monetary value.
- Memorable Keepsake: Unlike consumables that are quickly forgotten, a charming craft like this mason jar apple can serve as a lasting reminder of your appreciation.
- Budget-Friendly: Handmade gifts often utilize inexpensive materials, making them accessible options for families on any budget.
- Fun to Make: The process of crafting can be an enjoyable activity for children and adults alike, adding another layer of sentiment to the gift.
The Irresistible Appeal of the Mason Jar Apple
This particular craft combines several winning elements: the universal symbol of an apple for education, the rustic charm and versatility of a mason jar, and the joy of a personalized touch. It’s more than just a container; it’s a decorative piece, a storage solution, and a heartfelt message all rolled into one. Its simplicity ensures that even novice crafters can achieve beautiful results, while its potential for customization means no two apple jars have to be exactly alike.
Gather Your Supplies: What You’ll Need
Before you begin this rewarding project, ensure you have all your materials ready. The beauty of this DIY teacher gift lies in its minimal requirements and the accessibility of its components. Most items can be found at your local craft store, dollar store, or even around your home.
- Mason Jar: Any standard mason jar will work, but consider different sizes (pint, quart) depending on what you plan to fill it with. A clear jar is essential for painting.
- Acrylic Paints: You’ll need bright red for the apple body, a vibrant green for the lid and screw-on band, and a dark brown for the stem. High-quality acrylic paints will provide good coverage and vibrant colors.
- Paint Brushes: A flat brush for larger areas and a smaller detail brush for the stem are ideal.
- Clear Sealant (Optional but Recommended): A clear gloss or matte sealant spray or brush-on formula will protect your paint job and give the jar a professional, finished look. This adds durability and can prevent chipping.
- Wooden Dowel: A small section of a wooden dowel (about 0.5-1 inch in diameter and 2-3 inches long) will serve as the apple’s stem. You can often find these in various sizes at craft stores. As an alternative, a sturdy twig from your yard can also work beautifully for a more rustic feel.
- Green Craft Paper or Cardstock: This will be used to cut out the apple leaf. You could also use green felt for a softer, textured leaf. Consider a piece that already has a subtle pattern or a printed message like “A+ Teacher” for an extra touch.
- Strong Adhesive: Hot glue is excellent for quick and secure adhesion, especially for the stem and leaf. Craft glue or super glue can also work, but may require longer drying times.
- Newspaper or Drop Cloth: To protect your work surface from paint spills.
- Rubbing Alcohol or Soap and Water: For cleaning the mason jar before painting.
Step-by-Step Guide: Creating Your Mason Jar Apple
Follow these simple steps to transform your basic mason jar into a charming apple-themed gift. Patience during drying times is key to a professional finish!
Step 1: Prepare Your Mason Jar
Begin by thoroughly cleaning your mason jar. Wash it with soap and water, then rinse well. For best paint adhesion, wipe the exterior with rubbing alcohol and let it dry completely. This removes any oils or residues that could prevent the paint from sticking properly. Separate the jar, the lid, and the screw-on band.
Step 2: Paint the Apple Body (Jar Base)
On a protected surface, take your mason jar and begin painting the exterior of the base a bright, vibrant red. Apply thin, even coats to avoid drips and streaks. For optimal opacity and a rich color, you will likely need to apply two to three coats. Allow each coat to dry completely before applying the next. This typically takes 30 minutes to an hour per coat, depending on your paint and environment. Ensure full coverage, leaving no glass visible through the red paint.
Step 3: Paint the Lid and Screw-On Band
Next, paint the lid insert and the screw-on band a bright green. Similar to the jar base, apply two to three thin, even coats, allowing sufficient drying time between each application. You can choose to paint both sides of the lid insert for a fully finished look, or just the top side that will be visible. Once dry, reassemble the lid by placing the painted insert into the painted screw-on band.
Step 4: Seal Your Painted Jar (Optional but Recommended)
Once all the red and green paint is completely dry (ideally after 24 hours), apply a clear sealant. This step is crucial for durability, protecting the paint from scratches, moisture, and general wear and tear. If using a spray sealant, do so in a well-ventilated area, holding the can about 8-10 inches from the jar and applying light, even coats. If using a brush-on sealant, apply smoothly. Allow the sealant to cure fully according to the product instructions, which can range from a few hours to a full day.
Step 5: Prepare the Stem
Take your wooden dowel and cut a small piece, roughly 2-3 inches in length, to serve as the apple stem. Paint this piece a dark brown color. You might need two coats to achieve a deep, rich brown. Set it aside to dry completely.
Step 6: Craft the Leaf
From your green craft paper or cardstock, carefully cut out a leaf shape. You can freehand a classic apple leaf shape or find a template online. If you want to add a special touch, consider printing a message like “Best Teacher Ever” or “Thank You, Teacher!” onto the paper before cutting out the leaf. You can also gently fold the leaf down the middle to give it a more realistic, dimensional look.
Step 7: Assemble Your Apple
With all components dry, it’s time to bring your apple to life! Using a hot glue gun, carefully glue the painted wooden stem onto the center of the painted jar lid. Hold it firmly in place until the glue sets. Then, position your green leaf near the base of the stem, slightly overlapping it, and secure it with a small dab of hot glue. Ensure both the stem and leaf are securely attached.
Personalizing Your Mason Jar Apple Gift: Filling Ideas
The beauty of this DIY project is its versatility. Once your apple jar is complete, the possibilities for filling it are endless, allowing you to tailor the gift specifically to your teacher’s preferences and personality. Here are some fantastic ideas to get you started:
- Sweet Treats: Fill it with their favorite candies, chocolates, or the classic gummy worms (as mentioned in the original idea!). Homemade cookies, brownies, or granola are also wonderful options.
- School Supplies: A practical and much-appreciated gift! Fill the jar with colorful pens, pencils, highlighters, sticky notes, paper clips, erasers, or mini notebooks.
- Pampering Essentials: Teachers work incredibly hard! Consider small luxuries like a travel-sized hand cream, lip balm, a soothing tea bag assortment, or even a small candle (ensure it’s safe and appropriately sized for the jar).
- Gift Cards: Roll up a gift card to their favorite coffee shop, bookstore, or a local restaurant and place it inside. It’s a thoughtful way to treat them to something they’ll truly enjoy.
- Handwritten Notes: Encourage classmates to write small thank-you notes or draw pictures, then fold them up and fill the jar with these heartfelt messages. This creates a truly priceless keepsake.
- Healthy Snacks: If you know your teacher prefers healthier options, fill the jar with trail mix, gourmet nuts, dried fruit, or granola bars.
- Seeds or Small Plant: For a teacher with a green thumb, a small packet of flower seeds or a tiny succulent can be a delightful and long-lasting gift.
Remember to consider your teacher’s individual tastes and any dietary restrictions if you’re including food items. You can also tie a decorative ribbon around the neck of the jar or attach a personalized tag with a special message.
When to Present Your Thoughtful Gift
This handmade mason jar apple is a perfect gift for numerous occasions throughout the academic year:
- End of the School Year/Graduation Season: A classic time to show appreciation as students move on.
- Teacher Appreciation Week: A dedicated week to celebrate educators, usually in May.
- Holidays: A lovely holiday gift for Christmas, Thanksgiving, or Valentine’s Day.
- Teacher’s Birthday: A personalized touch for their special day.
- Just Because: Sometimes, the best gifts are given without a specific reason, simply to say “thank you” for their everyday dedication.
Share Your Creativity!
Creating this DIY mason jar apple is a wonderfully fulfilling way to express profound gratitude to the teachers who shape our futures. It’s a project that combines simplicity, affordability, and deep personal meaning, resulting in a gift that truly stands apart. So, roll up your sleeves, gather your supplies, and start crafting this adorable symbol of appreciation!
How will you personalize your mason jar apple for the special teacher in your life? What unique fillings will you choose? We’d love to hear your creative ideas! Share your thoughts and finished projects in the comments below, and don’t forget to share this inspiring DIY tutorial with friends and family. Let’s spread the joy of handmade gratitude!