
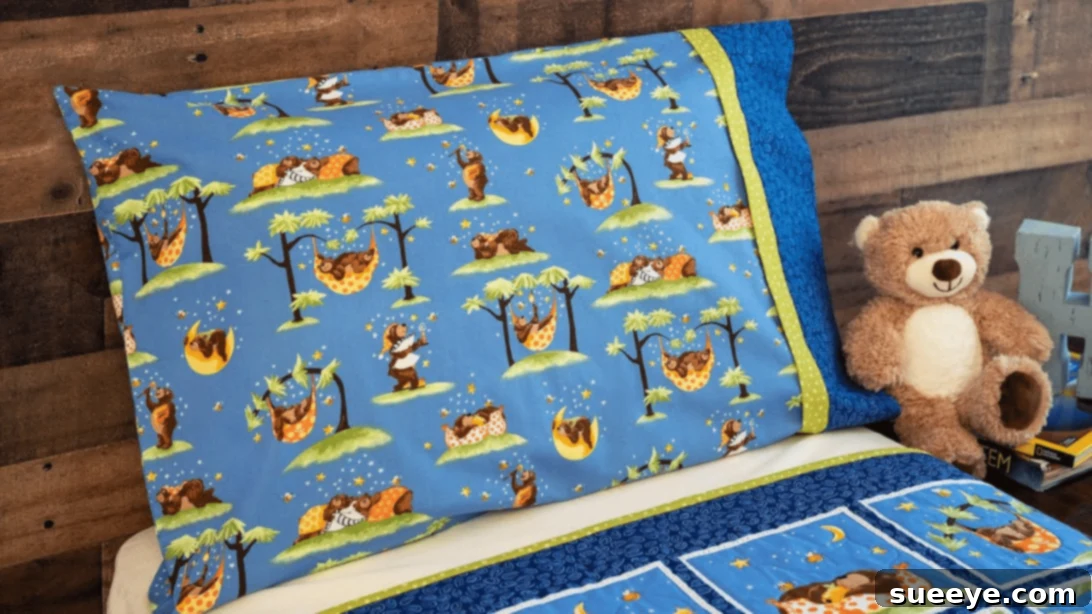
Embark on a delightful and incredibly rewarding sewing project: the magic pillowcase! This comprehensive tutorial, inspired by the clear and concise instructions from Shabby Fabrics on YouTube, is specifically crafted to guide you through creating a beautifully finished pillowcase, even when working with the often-tricky directional fabric. Renowned as one of the simplest methods to achieve a professional-looking finish with no visible raw edges, the “magic” technique is a favorite among sewing novices and experienced crafters alike. You’ll be amazed at how quickly you can transform a few pieces of fabric into a charming and practical item, making it an ideal choice for thoughtful, last-minute handmade gifts for baby showers, birthdays, housewarmings, or simply to add a personalized touch to your own home décor.
The true genius of the magic pillowcase lies in its ingenious construction, which cleverly encloses all raw seams within a durable and aesthetically pleasing French seam finish. This not only gives your pillowcase a remarkably neat and sturdy interior but also eliminates any pesky fraying after repeated washes. The satisfaction of turning out a perfectly finished pillowcase, knowing every seam is hidden, is unparalleled. If you’re searching for a quick win in the sewing room or a personalized, heartfelt present that’s both practical and cherished, this DIY magic pillowcase project is an absolute must-try. Prepare to impress yourself and delight your loved ones with your newfound sewing skills!
Why Choose the Magic Pillowcase Method?
The “magic” pillowcase technique has surged in popularity within the sewing community, and for excellent reasons, especially for those new to the craft. Firstly, its beginner-friendly nature is unparalleled. The steps are intuitive and designed to simplify what might otherwise be complex seam finishing, making it an encouraging project for anyone just starting their sewing journey. Secondly, this method consistently yields a professional-grade finish. By meticulously encasing all raw edges within a French seam, the pillowcase looks impeccably neat and tidy both inside and out. This significantly enhances its durability and longevity, meaning fewer frayed threads after countless washes and a product that truly stands the test of time.
Beyond its technical advantages, sewing a magic pillowcase offers immense personal satisfaction. It’s a relatively quick project, often completable in a single sitting, providing immediate gratification and a tangible sense of accomplishment. This makes it an ideal choice for building confidence in new sewers or for experienced crafters seeking a fast, enjoyable, and low-stress make. Furthermore, the extensive versatility in fabric choices allows for endless customization possibilities. Whether your preference leans towards playful prints for a child’s bedroom, elegant patterns for a sophisticated guest room, or festive fabrics for holiday cheer, a magic pillowcase can be effortlessly tailored to complement any style or occasion. It stands out as an exceptional handmade gift idea, perfect for baby showers, thoughtful housewarming presents, birthday surprises, or simply as a way to show appreciation to a loved one. The inherent personal touch of a handmade item often carries far more sentimental value than store-bought alternatives, and a custom pillowcase is both a practical and deeply cherished keepsake.
Mastering Directional Fabric with Ease
Working with directional fabric—textiles featuring patterns that must run in a specific orientation, such as images, text, or motifs that need to be right-side up—can often present a challenge in sewing projects. This tutorial specifically shines a light on how to flawlessly incorporate directional fabric into your magic pillowcase. The ingenious construction method ensures that your chosen print will consistently face the correct way on both the main body of the pillowcase and its decorative cuff, all without requiring complicated or confusing maneuvers. This clever technique effectively eliminates the guesswork and potential frustration often associated with aligning patterned fabrics, making the entire process smooth, enjoyable, and stress-free. With the magic pillowcase method, you won’t have to fret about upside-down designs; it expertly handles proper orientation, allowing your fabric’s unique design to truly shine as intended, contributing to a polished and professional final product.
Essential Materials for Your Magic Pillowcase Project:
Gathering the right tools and materials before you begin will ensure a smooth and enjoyable sewing experience. Here’s what you’ll need:
- Main Fabric (Directional Print): Select a high-quality cotton fabric for the main body of your pillowcase. Since this tutorial emphasizes directional prints, choose a design where the pattern needs to face a specific way. High-quality quilter’s cotton is highly recommended for its excellent drape, durability, and ease of handling during sewing.
- Dark Print Fabric (Coordinating): This fabric will form the primary band or cuff of your pillowcase. Opt for a print or solid color that beautifully complements your main directional fabric. A contrasting color or a subtle pattern can add significant visual interest and effectively frame the cuff, enhancing the overall aesthetic.
- Light Print Fabric (Contrasting Accent): This smaller strip serves as a delicate accent trim, often appearing as a thin strip of piping between the main fabric and the cuff. Choose a lighter color or a contrasting texture that distinctly pops against your other two chosen fabrics, adding an extra layer of design sophistication and visual appeal.
- Marking Pen, Pencil, or Chalk: These tools are essential for accurately transferring pattern markings, drawing precise seam lines, or noting critical cutting dimensions directly onto your fabric. A water-soluble pen or tailor’s chalk is ideal as it can be easily removed without leaving permanent marks.
- Ruler: A clear acrylic quilting ruler is highly recommended for achieving accurate measurements and precise cuts, especially when working with long, straight lines and ensuring consistent seam allowances, which are crucial for this method.
- Scissors or Rotary Cutter and Cutting Mat: While sharp fabric scissors are sufficient, a rotary cutter paired with a self-healing cutting mat offers unparalleled speed, accuracy, and efficiency for cutting fabric strips and large pieces, ensuring perfectly clean and straight edges vital for a professional finish.
- Fabric Pins and Clips: Use sharp fabric pins to securely hold fabric layers together before stitching. Fabric clips, such as Wonder Clips, are excellent alternatives, particularly for thicker fabrics or for holding delicate materials without snagging, providing even and consistent pressure.
- Needle and Thread: Ensure you have a good quality, all-purpose polyester thread that either matches or closely coordinates with your fabric colors. A fresh sewing machine needle (universal 80/12 or 90/14) is also critical for smooth stitching and preventing skipped stitches or fabric damage.
- Iron and Ironing Board (for pressing): Pressing is not merely an optional step; it is absolutely vital in sewing. An iron helps to set stitches, create crisp folds, and achieve flat, professional-looking results consistently throughout your entire project, ensuring a polished final product.
- Sewing Machine: Any standard sewing machine that is in good working order will be suitable for this project. Ensure it is correctly threaded and equipped with a standard presser foot.
- Pattern: (Click here to download the pattern) This complimentary downloadable pattern from Shabby Fabrics will provide precise cutting dimensions specifically tailored for this unique method, guaranteeing optimal results for your magic pillowcase.
How to Make a Magic Pillowcase: A Detailed Step-by-Step Guide
Preparation for a Flawless Finish: Setting Up for Success
Before you even begin cutting or touching your sewing machine, thorough preparation is paramount and will undoubtedly set you up for success. Always pre-wash and dry all your chosen fabrics according to their specific care instructions. This critical step ensures that the fabric preshrinks, preventing any undesirable uneven shrinkage of your finished pillowcase later on. Once your fabrics are completely dry, take the time to press them thoroughly with an iron, removing any wrinkles or creases. This ensures a smooth and accurate cutting process, which is foundational for a professional outcome. Gather all your necessary tools and materials, making sure your sewing machine is in excellent working order, freshly threaded with matching or coordinating thread, and ready for action. A well-lit, clean, and organized workspace will not only make your sewing experience much more enjoyable but also significantly more efficient and mistake-free.
Step 1: Precise Fabric Preparation and The Magic Layering
Begin by downloading the pattern generously provided by Shabby Fabrics. Adhere carefully to the instructions to precisely cut your main directional fabric, the coordinating dark print fabric, and the contrasting light print accent fabric to the specified dimensions. Precision in cutting is absolutely crucial for achieving a clean and seamless finish with the “magic” method, so take your time with this initial step, utilizing your ruler and rotary cutter for the best and most accurate results.
Once all your fabric pieces are accurately cut, lay your main directional fabric completely flat on your work surface. It is critical that the *wrong side* of the fabric is facing up. This specific orientation is vital for the “magic” method to work correctly and ensures that your beautiful directional print ends up facing the right way on the finished pillowcase. Smooth out any lingering wrinkles thoroughly. Next, take your dark print fabric strip. Fold it precisely in half lengthwise, with the wrong sides together, creating a clean, crisp folded edge. Place this folded dark print strip along the top edge of your main fabric, meticulously aligning its raw edges perfectly flush with the top raw edge of the main fabric. Ensure the folded edge of the dark print strip is pointing inwards, towards the center of the main fabric.
Now, take your folded light print strip. Place this accent strip directly in the middle of your main fabric, carefully positioned on top of the dark print strip. The video tutorial from Shabby Fabrics is particularly helpful at this stage for visualizing this precise placement. Ensure that the folded side of the light print strip is facing down, towards the main fabric, and its raw edges are perfectly aligned with the raw edges of both the dark print strip and the main fabric. This careful layering effectively creates a fabric “sandwich”: the main fabric is on the bottom (wrong side up), followed by the dark print strip (folded, raw edges up), and then the light print strip (folded, raw edges down, aligning with the others). This precise and intentional arrangement is the absolute key to the magical reveal that will occur later.
Step 2: Constructing the Cuff with a Hidden French Seam – The “Burrito” Method
This step is truly where the “magic” of this pillowcase technique unfolds, resulting in a beautifully finished cuff with absolutely no raw edges visible. Carefully begin to roll the main fabric upward from its bottom edge, rolling it smoothly towards the top where your meticulously layered dark and light print strips are positioned. Continue rolling until the main fabric forms a compact “burrito” or “hot dog” shape, stopping just before it reaches the top layered fabrics. Now, take the folded dark print fabric strip (which is currently lying flat on top of the main fabric and light strip) and carefully fold it *over* the rolled main fabric. Bring the raw edges of the dark print fabric, which are aligned with the light print strip and the main fabric, and match them precisely with the raw edge of the main fabric (which is now on the top of your rolled fabric). Effectively, you are enclosing the rolled main fabric inside a “tube” formed by the dark print fabric and the light print strip.
Pin these three accurately aligned raw edges together securely. Use plenty of pins to prevent any shifting or puckering during the sewing process. Head to your sewing machine and stitch along this pinned edge with a consistent ¼ inch seam allowance. This seam will expertly enclose the raw edges of the main fabric, the dark print strip, and the light print strip, forming the initial pass of a perfect French seam. Once stitched, carefully remove all the pins. Now, with a gentle pull, extract the rolled main fabric out from the “tube” you’ve just created. This action will gracefully turn the cuff assembly right side out, instantly revealing your beautiful main fabric, the defined dark print cuff, and the delicate light print accent strip, all seamlessly joined with absolutely no raw edges in sight. Press this newly formed seam nicely with your iron, pushing the seam allowance smoothly towards the dark print fabric. This critical pressing step sets the stitches, creates a crisp, professional finish for the cuff, and flawlessly lays the foundation for a stunning, custom-made pillowcase.
Step 3: Finishing the Pillowcase Body with Durable French Seams
With your cuff now beautifully attached and perfectly finished, it’s time to complete the main body of your pillowcase. Lay the entire pillowcase flat on your work surface, ensuring the *wrong side* of the fabric is facing outwards. Fold the pillowcase precisely in half lengthwise, meticulously aligning the raw side edges and the raw bottom edges perfectly flush. Pin these edges securely, making sure every layer is perfectly aligned and flat. For an exceptionally clean, durable, and professional finish, we will utilize French seams for both the side and bottom edges. This highly effective technique hides all raw edges, mirroring the impeccable finish achieved on the cuff.
First, sew a ¼ inch seam along the entire length of the pinned side and bottom edges. Remember to backstitch firmly at both the beginning and end of your seams to thoroughly secure your stitches and prevent any unraveling. After stitching, carefully trim the seam allowance down to a scant eighth of an inch (1/8″) to remove any excess bulk and ensure a neat and tidy French seam. Next, turn the pillowcase completely inside out (so the *right sides* of the fabric are now facing each other). Carefully use a point turner or your fingers to gently poke out the corners, ensuring they are sharp and crisp. Press the freshly sewn seams flat with your iron to set the stitches properly. Now, sew a second seam along the side and bottom edges, this time using a slightly larger ⅜ inch seam allowance. This second seam will completely encase the previous raw edges, creating a perfectly clean and durable finish inside your pillowcase, making it resilient to wear and washing. Once these final seams are stitched, turn the pillowcase right side out for the grand reveal. Use a point turner or a dull pencil to gently push out the corners from the inside, ensuring they are as sharp and well-defined as possible. Give your entire pillowcase a final, thorough press with your iron, admiring your beautifully constructed, professional-looking magic pillowcase!
Expert Tips for Achieving a Perfect Magic Pillowcase
To ensure your magic pillowcase turns out beautifully and stands the test of time, keep these expert tips in mind:
- Always Pre-wash Your Fabric: This foundational step is non-negotiable. Pre-washing and drying all your fabrics before cutting prevents any potential shrinkage after your pillowcase is completed and ensures all fabric components shrink evenly, maintaining the integrity of your design.
- Accuracy in Cutting is Paramount: Precision in cutting your fabric pieces to the exact dimensions specified in the pattern is absolutely crucial for the “magic” method to align flawlessly and for the French seams to form correctly. Invest in a rotary cutter and a clear quilting ruler for the straightest, most accurate cuts possible.
- Pressing is Your Best Friend: Never underestimate the power of pressing! Ironing your fabric before cutting, pressing every seam after each stitching step, and giving a final thorough press at the end will make an enormous difference in the professional appearance and crispness of your pillowcase. Pressing helps to set stitches, flatten seams beautifully, and ensures crisp, well-defined folds.
- Maintain Consistent Seam Allowance: A consistent seam allowance throughout your project is vital. The specified ¼ inch and ⅜ inch seam allowances are critical for the French seams to enclose properly and create that desirable clean finish. Utilize a seam guide on your sewing machine if one is available, or mark your lines if you’re a beginner.
- Secure Your Stitches with Backstitching: Always backstitch firmly at both the beginning and end of each seam. This simple yet effective step locks your stitches in place and prevents them from unraveling, particularly on areas that will experience stress or frequent handling.
- Carefully Clip Corners: When forming corners (especially before turning your pillowcase right side out), gently clip the seam allowance diagonally across the corner. Be extremely careful not to cut through your actual stitches. This technique reduces bulk, allowing the corners to turn out sharply and cleanly.
- Use Quality Thread: A strong, good-quality all-purpose polyester thread will hold up exceptionally well to repeated washing and daily use, significantly contributing to the overall longevity and durability of your handmade pillowcase.
- Watch the Video Tutorial: While these written instructions are incredibly comprehensive, watching the Shabby Fabrics video tutorial can provide invaluable visual guidance. This is especially true for understanding the unique layering and rolling steps involved in the “magic” cuff construction, offering a visual clarity that complements the written word.
Customize and Gift Your Handmade Pillowcase
The magic pillowcase isn’t just a sewing project; it’s a blank canvas awaiting your creativity and a wonderful opportunity for thoughtful, personalized gifting. Once you’ve mastered the fundamental technique, you’ll find it incredibly easy to customize your pillowcases to suit an endless array of tastes and occasions. Consider experimenting with diverse fabric combinations – vibrant, playful prints for a child’s bedroom, sophisticated geometric patterns for a modern aesthetic, or classic florals for a timeless, traditional touch. You can also vary the widths of your cuff and accent strips to create truly unique visual effects and distinct design statements. For an even more personalized touch, think about adding subtle embellishments: a small embroidered initial, a charming appliqué, or even incorporating a delicate decorative trim along the accent strip before you complete the final stitching.
These handmade pillowcases transform into truly cherished gifts. Imagine the delight of gifting a custom set of pillowcases to a newborn, adorned with prints that perfectly match their nursery theme, or presenting a luxurious pair as a unique wedding gift that speaks volumes of your effort and care. They are absolutely perfect for housewarming parties, holiday presents, teacher appreciation gifts, or as a cozy, comforting addition to a care package for a college student far from home. The enduring beauty of a handmade item lies deeply in the love, time, and effort poured into its creation, making your magic pillowcase a gift that is both profoundly practical and deeply personal. Don’t feel confined to standard sizes; easily adapt the pattern to create charming travel pillowcases, stylish decorative throw pillow covers, or even unique and comfortable pet beds. The creative possibilities are truly limitless!
Care Instructions for Your Handmade Pillowcase
To ensure your beautifully crafted magic pillowcase remains vibrant, comfortable, and functional for many years to come, proper care is absolutely essential. Generally, cotton pillowcases, like the ones you’ve made, can be safely machine washed in cold or warm water with similar colors. To preserve the vibrancy of your fabrics and prevent weakening of the fibers, it’s best to avoid using harsh bleaches. For drying, tumble dry on a low heat setting. For optimal results, including minimizing wrinkles and maintaining fabric integrity, remove the pillowcase promptly from the dryer and allow it to air dry completely. If necessary, you can iron your pillowcase on a medium-heat setting to achieve a crisp, smooth finish. Always remember to refer to the specific care instructions of your chosen fabrics, especially if you’ve incorporated blends or specialty textiles, as these may require slightly different treatment. With just a little care and attention, your handmade magic pillowcase will continue to provide comfort, style, and a touch of personalized charm to any space.
*All image credit belongs to Shabby Fabrics via YouTube. We highly recommend following and subscribing to her channel for more inspiring and easy-to-follow sewing tutorials, creative ideas, and expert tips to enhance your crafting journey!
Experience the Magic of Sewing and Create!
Congratulations! You have now successfully learned how to create a stunning magic pillowcase using directional fabric, complete with beautifully hidden French seams and an undeniably professional finish. This project serves as a wonderful testament to how simple yet clever sewing techniques can yield truly impressive results, making it an excellent and encouraging stepping stone for anyone eager to delve deeper into the captivating world of sewing. Not only have you skillfully crafted a beautiful and durable item that will bring comfort and style, but you’ve also honed invaluable skills in fabric handling, precision cutting, and advanced seam construction. Whether you’ve made this pillowcase for your own enjoyment or as a thoughtful, heartfelt gift for someone special, your handmade magic pillowcase is sure to bring immense joy and comfort. Don’t hesitate to experiment with different fabrics, patterns, and color combinations to create an entire collection of these delightful pillowcases. Embrace your creativity and continue exploring the endless possibilities that sewing offers. Happy sewing!