
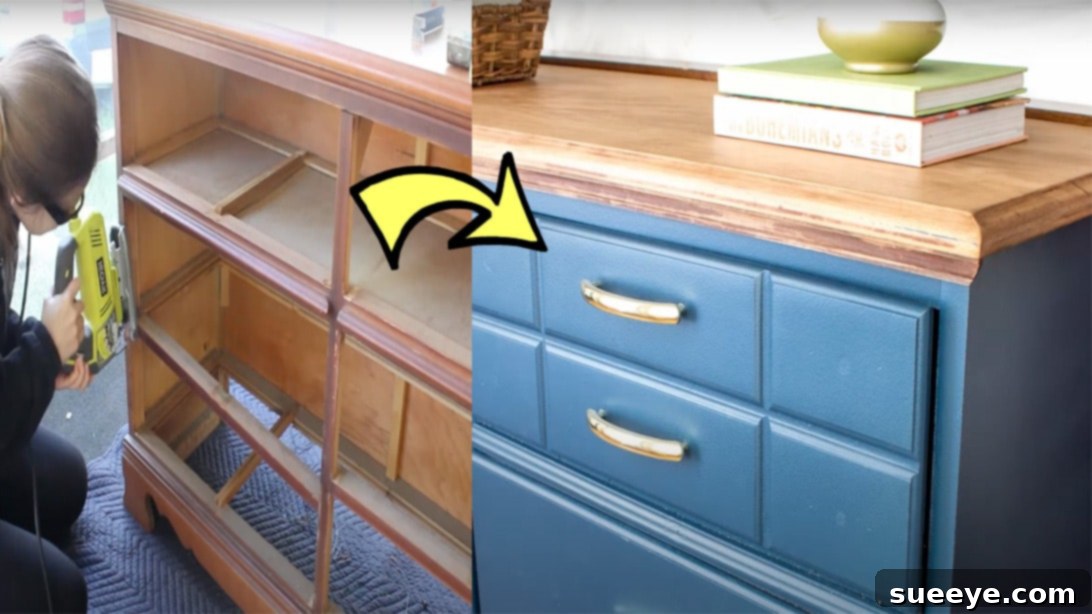
DIY Dresser to Hamper: Upcycle Your Furniture into a Stylish Laundry Solution
Are you looking for a creative way to add character and functionality to your home while embracing sustainable practices? Upcycling is a fantastic solution, allowing you to transform tired, old furniture into custom pieces that perfectly match your style and needs. In this comprehensive guide, we’ll walk you through the exciting process of converting a well-loved dresser into a beautifully finished and highly functional laundry hamper. Not only will you save money and reduce waste, but you’ll also create a unique storage solution that adds a touch of personalized charm to your space. This rewarding project, inspired by the innovative tutorial from A Butterfly House, is perfect for DIY enthusiasts of all skill levels, offering a chance to refresh your home decor and improve your organization.
The Benefits of Upcycling: Why Transform Your Dresser?
Upcycling offers a multitude of benefits beyond just gaining a new piece of furniture. It’s an environmentally conscious choice that prevents items from ending up in landfills, extending their lifecycle and reducing demand for new resources. This commitment to sustainability is increasingly important in modern home design. Furthermore, upcycling is a significantly more budget-friendly alternative to buying new, often mass-produced furniture that may lack character. The real magic, however, lies in the ability to create something truly unique and tailored to your specific requirements. A DIY dresser-to-hamper project allows for complete customization – from the internal dimensions and organization of compartments to the paint colors, finishes, and hardware. Imagine a laundry hamper that not only efficiently hides your dirty clothes but also serves as an attractive, integrated piece of furniture that genuinely complements your home decor. It’s a statement of style and practicality.
- Sustainability and Eco-Friendliness: Give old furniture a new lease on life, reducing waste and your carbon footprint by keeping items out of landfills.
- Cost-Effectiveness: Save a substantial amount of money compared to purchasing new, high-quality furniture, especially custom-designed storage solutions.
- Unique and Personalized Design: Create a one-of-a-kind piece that perfectly reflects your personal style and aesthetic, distinguishing your home from others.
- Custom Functionality: Design the hamper to perfectly fit your specific laundry needs, whether it’s sorting by color, fabric type, or individual family members.
- Skill Development and Satisfaction: Enhance your woodworking, painting, and general DIY skills with a rewarding project that yields tangible results and a sense of accomplishment.
- Durable and Quality Construction: Often, older dressers are made from solid wood, providing a robust base that new furniture might lack.
Planning Your Upcycling Project: Essential Considerations Before You Begin
Before diving into the renovation, a little planning goes a long way towards ensuring a successful outcome. Selecting the right dresser is crucial; look for a sturdy piece, ideally with solid wood construction, as it will provide a durable and stable base for your new hamper. Avoid particleboard or cheaply constructed dressers if possible, as they may not hold up to the modifications. Consider the overall size and the number of drawers; these factors will dictate the internal capacity and potential design of your hamper compartments. Visualize the end product: how many sections will you need? Will it be designed for separating lights, darks, delicates, or perhaps dedicated bins for specific family members? Thinking about these practical details beforehand will help streamline the entire conversion process, minimize errors, and ensure the final product meets your expectations.
Materials & Tools: Gathering Your Essentials for a Seamless Project
To embark on this exciting transformation, you’ll need a combination of basic woodworking tools and quality finishing supplies. Having everything organized and readily available before you begin will ensure a smooth workflow, prevent interruptions, and make the entire project more enjoyable. Safety should always be a priority, so ensure you have the necessary protective gear.
Essential Materials List:
- Dresser: The foundation of your project. Choose one that is structurally sound and suitable for conversion.
- Wood Panels or Plywood: Crucial for building the new internal structure of the hamper bins and their bases. Opt for a thickness that provides good stability (e.g., 1/2 inch or 3/4 inch).
- Wood Screws: A variety of sizes will be useful. This includes general-purpose wood screws for assembly, and pocket hole screws if you choose to use a pocket hole jig for stronger, concealed joints.
- Nails: Small nails, often referred to as bard’s nails or brad nails, are ideal for temporary attachments and securing smaller components or trim pieces without causing significant damage.
- Wood Glue: A high-quality wood glue provides a strong, permanent bond for wood joints, significantly enhancing the structural integrity and longevity of your new hamper.
- Wood Filler: Essential for filling in old screw holes, nail holes, imperfections, dents, or gaps in the wood, creating a perfectly smooth surface ready for painting or finishing.
- Paint Primer: A high-quality primer is crucial for ensuring excellent paint adhesion, preventing stains from bleeding through, and providing a durable, uniform base for your chosen paint color.
- Paints: Select your desired colors for the dresser body and any accent details. For furniture, consider durable, low-VOC (Volatile Organic Compound) options like chalk paint, milk paint, or acrylic latex paints.
- Stripping Agent: Products like citrus strip are effective for safely removing old finishes from wooden surfaces. Always follow manufacturer instructions and use in a well-ventilated area.
- Plastic Wrap: Used to cover areas treated with stripping agent, helping it penetrate deeper and stay active longer by preventing premature drying.
- Mineral Spirits: An excellent solvent for cleaning up residue left behind after stripping old finishes and for general cleaning before sanding and finishing.
- Wax Primer or Polyurethane/Polycrylic Finish: For protecting and sealing the stripped wood surface on the top, adding durability, water resistance, and your desired sheen (matte, satin, or gloss).
Recommended Tools List:
- Jigsaw: An indispensable tool for making precise, curved, or straight cuts in wood panels for the new drawer components.
- Pry Bar & Hammer: Essential tools for safely and effectively removing old drawer dividers, internal supports, and any other stubborn structural pieces.
- Cordless Drill/Driver: A versatile tool for pre-drilling pilot holes (to prevent wood splitting) and driving screws quickly and efficiently.
- Orbital Sander: For achieving wonderfully smooth surfaces, especially on the top, and preparing the entire piece for paint or stain. You’ll need various grit sandpaper, typically ranging from coarse (40-60 grit) for heavy removal to very fine (220-240 grit) for a silky finish.
- Putty Knife (Plastic): Specifically for scraping off softened old finishes after applying a stripping agent. A plastic knife helps prevent damage to the underlying wood.
- Paint Brushes & Rollers: High-quality brushes will ensure smooth application for detailed areas, while small rollers are great for achieving an even finish on larger flat surfaces.
- Tape Measure & Pencil: Absolutely critical for accurate measurements and precise marking of cuts and drilling locations.
- Safety Glasses & Work Gloves: Always wear appropriate personal protective equipment, especially when cutting, sanding, or working with chemicals, to protect your eyes and hands.
- Rags/Old Cloths: Useful for cleaning, applying finishes, wiping away dust, and general cleanup throughout the project.
- Pocket Hole Jig (Optional but Highly Recommended): A specialized tool for creating strong, concealed joints, perfect for constructing the sides of your new hamper bins with a professional look.
- Clamps: Various clamps (bar clamps, C-clamps) are very helpful for holding pieces securely in place while glue dries or during assembly.
Step-by-Step Guide: Transforming Your Dresser into a Custom Laundry Hamper
Follow these detailed steps carefully to meticulously convert your old dresser into a stylish and highly functional laundry hamper. Take your time with each stage to ensure a high-quality finish and a durable, long-lasting piece of furniture that you’ll be proud of.
Step 1: Disassemble and Clear the Dresser’s Interior
Begin by completely emptying the dresser of its contents. Carefully remove all the original drawers and set them aside; some parts of them may be repurposed later. Next, thoroughly inspect the interior of the dresser. Your primary goal at this stage is to create open, unobstructed compartments that will house your new hamper bags or bins. Identify any internal dividers, wooden rails, supports, or cross-braces that are no longer necessary for the new structure. Using a pry bar and hammer, gently but firmly loosen and remove these structural pieces. Work methodically to avoid damaging the main frame or exterior panels of the dresser. For any particularly stubborn sections, apply steady, controlled pressure and work slowly, checking for any hidden fasteners.
Step 2: Construct the New Hamper Drawers or Bins
With the dresser interior completely cleared and ready, it’s time to build the new components that will effectively house your laundry. You’ll be using new wood panels or plywood for this, cutting them to size. A clever and efficient trick is to repurpose the bottom panels of the original dresser drawers as the bases for your new hamper bins. This approach saves time, material, and often ensures a perfect fit within the dresser’s existing frame. Carefully measure the internal dimensions of the dresser compartments where your new bins will sit. Cut your wood panels to create the sides of these new bins, ensuring they are perfectly square and plumb. The original tutorial suggests using pocket hole screws to connect the sides, which creates strong, robust, and aesthetically discreet joints. For significantly enhanced stability and longevity, further reinforce these connections with small metal angle brackets on the inside corners of each bin.
Step 3: Secure the New Bins and Reattach Original Drawer Fronts
Once the sides of your new hamper bins are assembled and robust, it’s time to securely attach them to their bases (the repurposed original drawer bottoms). Apply a generous amount of high-quality wood glue along the bottom edges of the bin sides before meticulously screwing them into the base. This combination of wood glue and screws ensures a very strong and permanent bond. Next, carefully remove the decorative drawer fronts from the original dresser drawers. These will be thoughtfully reattached to the front of your newly constructed hamper bins to seamlessly maintain the original aesthetic appeal and character of the dresser. Use wood glue and small nails (bard’s nails or brad nails are ideal here) to temporarily position and hold the old drawer fronts onto your new bins. Once they are perfectly aligned and level, secure them permanently from the inside with wood screws, ensuring they are flush and evenly spaced.
Step 4: Install Drawer Slides and Reattach Front Trim Pieces
For smooth operation, easy access to your laundry, and a professional finish, you’ll need to install drawer slides on the sides of your newly built hamper bins and within the dresser frame. Measure meticulously and ensure the slides are perfectly level and precisely aligned on both the bins and the dresser frame. Before permanently screwing the slides into place, always do a dry fit to confirm everything moves effortlessly and fits correctly without binding. Once you are completely satisfied with the alignment and movement, screw the drawer slides securely in place using the appropriate screws. If you previously removed any decorative front trim pieces from the dresser during the initial disassembly, now is the opportune time to carefully reattach them. Use wood glue and small nails or screws, making sure they are flush with the surface and neatly aligned.
Step 5: Prepare for Finishing: Wood Filling, Priming, and Painting
Achieving a truly professional and durable finish requires meticulous preparation. Go over the entire dresser and the new hamper bins with a fine-tooth comb, identifying any visible screw holes, nail holes, gaps, or other imperfections. Fill these imperfections generously with a good quality wood filler, pressing it firmly into the gaps to ensure maximum adhesion. Allow the filler to dry completely according to the manufacturer’s instructions. Once thoroughly dry, sand all filled areas smooth with a fine-grit sandpaper (e.g., 180-220 grit) to create an invisible repair. Then, lightly sand the entire piece to create a ‘key’ or slight texture for the primer to adhere to effectively. Wipe away all sanding dust meticulously with a tack cloth or a slightly damp rag to ensure a clean surface. Now, apply a high-quality paint primer to the entire piece, ensuring even, comprehensive coverage. Primer helps seal the wood, prevents any existing stains from bleeding through, and provides a uniform, ideal base for your chosen paint color. Allow the primer to dry thoroughly as per instructions. Finally, apply two or more thin, even coats of your chosen paint color, allowing adequate drying time between each coat. Lightly sand with a very fine-grit sandpaper (e.g., 220-grit or higher) between coats for an ultra-smooth, professional-grade finish.
Step 6: Refinish the Top Surface for a Distinctive Look
Often, the top surface of an old dresser experiences the most wear and tear, making it an excellent candidate for a special refinishing treatment. If you desire a natural wood look, contrasting with the painted body, you’ll need to strip off the existing finish. Apply a generous, even layer of a stripping agent (such as a citrus strip product) to the entire top surface using a brush. Once applied, immediately cover the treated area with plastic wrap. This crucial step helps to keep the stripping agent active for longer, prevents it from drying out prematurely, and enhances its penetration. Let it sit for approximately 30 minutes, or as recommended by the product’s specific instructions. After the waiting period, carefully remove the plastic wrap and begin to gently scrape off the softened finish using a plastic putty knife. The plastic knife is specifically preferred over metal tools to avoid scratching or gouging the valuable wood underneath.
Step 7: Thoroughly Clean and Sand the Top Surface
After the initial scraping, there will likely be some sticky residue, old finish “gunk,” or wood dust left on the raw wood surface. To clean this up effectively, pour a small amount of mineral spirits onto a clean rag and gently scrub the remaining residue off the top surface. This step will thoroughly clean the wood pores and prepare it optimally for the subsequent sanding process. Once the mineral spirits have evaporated and the surface is dry, use an orbital sander to smooth the top surface to a flawless finish. Start with a coarse grit sandpaper, such as 40-grit or 60-grit, to aggressively remove any remaining stubborn imperfections, deep scratches, or variations, ensuring a perfectly flat and even surface. Gradually work your way up through progressively finer grits – typically 80-grit, 120-grit, 180-grit, and finally 220-grit or 240-grit. This gradual progression is absolutely key to achieving a silky-smooth, professional-quality finish that will accept the final stain or topcoat beautifully. Remember to meticulously wipe away all dust with a tack cloth or vacuum between each grit change to prevent scratching.
Step 8: Apply the Final Protective Finish to the Top
With the top surface perfectly smooth, clean, and ready, it’s time to apply a protective and beautifying finish. This tutorial suggests using wax for a natural, soft sheen, and a tactile feel that enhances the wood’s inherent beauty. Apply the wax evenly with a clean, lint-free cloth, working it into the wood following the grain. Allow it to penetrate for a few minutes, then buff off any excess with a fresh, clean cloth until you achieve your desired luster and smoothness. Alternatively, for a more durable and water-resistant finish, especially if the hamper will be in a high-traffic area or exposed to moisture (like a bathroom), you could opt for a polyurethane or polycrylic topcoat. These provide excellent protection and come in various sheens. Always follow the manufacturer’s specific instructions for application, drying times, and recoating for whichever finish you choose to ensure optimal results and longevity.
Expert Tips for a Flawless Finish and Long-Lasting Hamper
To ensure your upcycling project turns out beautifully and serves you well for years, keep these expert tips in mind:
- Patience is Paramount: Never rush any step, especially the crucial drying times for glue, wood filler, primer, and paint. Rushing can lead to an inferior finish, bubbling, or weak joints.
- Ensure Proper Ventilation: Always work in a well-ventilated area, particularly when using paints, primers, chemical strippers, or mineral spirits. Consider wearing a respirator mask specifically designed for chemical fumes to protect your respiratory health.
- Sanding Between Coats: Lightly sanding with very fine-grit sandpaper (220-grit or higher) between paint and topcoat applications helps create a remarkably smoother, more professional, and more durable finish.
- Invest in Quality Materials: Investing in good quality paint, primer, wood glue, and sandpaper will significantly impact the overall durability, appearance, and longevity of your finished hamper. Cheap materials often yield cheap-looking results.
- Consider Internal Liners: For added convenience and hygiene, consider adding a fabric liner or removable hamper bags inside your newly created bins. This makes laundry handling much easier and protects the wood interior from dirt and moisture.
- Update Hardware: Don’t underestimate the power of new handles or knobs. Updating the hardware can drastically change and elevate the overall look and feel of your upcycled piece, giving it a modern or desired aesthetic.
- Test Finishes: If you’re unsure about a paint color or topcoat, test it on an inconspicuous area or a scrap piece of wood from the dresser before applying it to the entire project.
Caring for Your Beautifully Upcycled Laundry Hamper
To ensure your beautiful, custom-made laundry hamper remains in pristine condition and continues to enhance your home for many years to come, a little routine maintenance goes a long way. Regularly wipe down the exterior surfaces with a soft, slightly damp cloth to remove dust and dirt. For painted surfaces, avoid harsh chemical cleaners, abrasive scrubbers, or excessive moisture, as these can damage the finish over time. If you used a wax finish on the top surface, reapply a fresh coat of wax periodically (every 6-12 months, depending on use) to maintain its protection, sheen, and water resistance. For polyurethane or polycrylic finishes, a simple wipe-down is usually sufficient, but avoid placing hot items directly on the surface. If you’ve installed removable laundry bags, clean or wash them regularly according to their fabric care instructions to maintain hygiene and freshness. Periodically inspect the drawer slides to ensure they remain clean and are functioning smoothly; apply a dry lubricant if they start to stick.
Conclusion: A Sustainable and Stylish Home Addition You’ll Love
Transforming an old, forgotten dresser into a custom laundry hamper is far more than just a typical DIY project; it’s an act of creativity, sustainability, and profound personal expression. By diligently following these detailed steps, you’ve not only given a valuable piece of furniture a remarkable new lease on life, but you’ve also crafted a truly unique and highly functional storage solution tailored precisely to the specific needs and aesthetic of your home. This beautifully upcycled hamper will not only help to meticulously keep your laundry organized and out of sight, but it will also serve as a stunning, conversation-starting piece in any room it graces. So, gather your materials, embrace the rewarding challenge of creation, and enjoy the immense satisfaction and pride of creating something truly special and enduring with your own hands! Your home will thank you, and your laundry routine might just become a little more enjoyable.