
The Ultimate Mississippi Mud Pie: A Decadent Four-Layer Chocolate Masterpiece
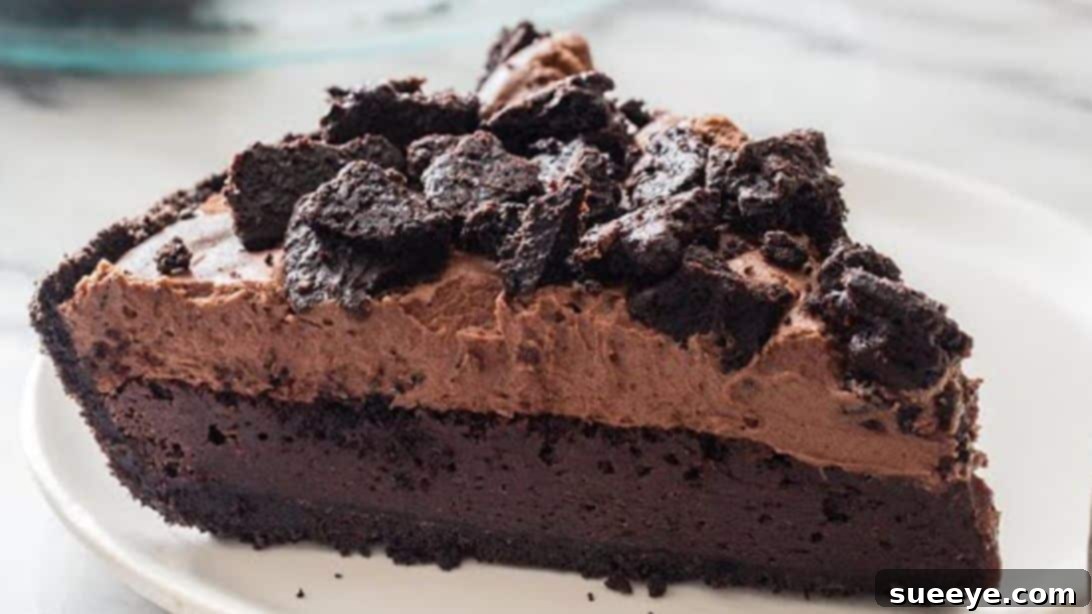
Prepare to satisfy your most intense chocolate cravings with this extraordinary Mississippi Mud Pie recipe, meticulously perfected by the culinary experts at America’s Test Kitchen. This isn’t just another dessert; it’s a grand symphony of textures and flavors, engineered into four distinct layers of unparalleled chocolate goodness. Each layer brings its unique character to the table, harmonizing beautifully to create a truly unforgettable experience with every single scoop. From the moment your fork breaks through the crisp crust to the creamy filling, the delightful crunch of the topping, and the light, airy finish, you’ll discover a rich, perfectly sweet, and incredibly satisfying treat that stands out as the best dessert pie you can possibly give yourself and your loved ones.
Rest assured, despite its rustic name, this pie tastes nothing like mud and contains absolutely none! The moniker simply refers to its dense, dark, and often uneven, rich brown appearance, reminiscent of the fertile banks of the Mississippi River. Crafting this magnificent mud pie at home involves several distinct steps, given its intricate layered structure. While the process may seem a little involved, we promise you, the effort is unequivocally worth it. The explosion of flavors in your mouth, the luxurious mouthfeel, and the sheer delight it brings are unparalleled. If only it were feasible to make it every week, one certainly would! Its impressive presentation and delectable taste make it an ideal centerpiece for holidays, family gatherings, special celebrations, or simply when you desire a truly remarkable homemade dessert.
If you’re looking for more delightful pie ideas, especially for chocolate lovers, consider exploring other options. For instance, a fantastic No-Bake Chocolate Mud Pie offers a quicker route to chocolate bliss, perfect for warmer days or when you need a dessert in a hurry. Alternatively, for a refreshing and vibrant change, you might enjoy trying an Easy No-Bake Grasshopper Pie Recipe.
What is Mississippi Mud Pie and Why Is It So Beloved?
At its core, Mississippi Mud Pie is a deeply indulgent American chocolate dessert known for its rich, layered structure. Its charmingly rustic name is purely descriptive of its appearance—dark, dense, and often irregularly textured, much like the rich soil found along the Mississippi River. There’s no actual mud involved, just pure chocolate decadence!
A classic Mississippi Mud Pie typically features a dark chocolate cookie crust, a luscious and often dense chocolate custard or pudding-like filling, and is frequently topped with whipped cream or a chocolate mousse. What sets America’s Test Kitchen’s version apart, and what we’re about to explore, is its masterful combination of four distinct layers. Each layer contributes not only to the overall chocolate flavor but also to a complex and exciting textural experience: a sturdy, crisp chocolate crust, a moist and intensely flavorful chocolate filling, a delightful crunchy chocolate crumb topping, and finally, a light, airy chocolate whipped cream layer. This thoughtful construction transforms a beloved classic into an ultimate culinary masterpiece.
Why America’s Test Kitchen’s Mississippi Mud Pie Recipe is Unbeatable
America’s Test Kitchen has a reputation for dissecting and perfecting recipes through rigorous testing, and their Mississippi Mud Pie is a testament to their culinary philosophy. This particular recipe isn’t just good; it’s exceptional. Here’s why it stands head and shoulders above other mud pie recipes:
- Perfected Texture Harmony: The most remarkable feature of this recipe is the incredible interplay of textures. Many mud pies can be uniformly soft, but ATK’s version delivers a delightful contrast: a firm, buttery crust, a dense yet tender chocolate filling, a unique crunchy crumb topping, and a cloud-like chocolate whipped cream. This symphony of textures elevates the eating experience from pleasant to truly extraordinary.
- Balanced Richness and Sweetness: While undeniably decadent, this pie is expertly balanced. The use of bittersweet chocolate in the filling, combined with Dutch-processed cocoa and dark brown sugar, creates a deep, complex chocolate flavor that avoids being overly sweet or cloying. It’s intensely rich without being overwhelming.
- Reliability and Precision: Every measurement, every temperature, and every step in this recipe has been meticulously tested and refined. This means you can follow the instructions with confidence, knowing you’re set up for success, even if you’re a novice baker.
- Deep, Nuanced Chocolate Flavor: The careful selection of chocolate types and cocoa powder ensures a profound and multi-faceted chocolate profile that is both comforting and sophisticated. It’s a chocolate lover’s dream come true.
- Show-Stopping Presentation: With its distinct layers and appealing topping, this pie not only tastes incredible but also looks stunning on any dessert table, making it perfect for special occasions.
Choosing this recipe means choosing a proven path to a dessert that is not just delicious, but truly spectacular and memorable.
Essential Ingredients for Your Ultimate Mississippi Mud Pie
Creating this magnificent, multi-layered pie begins with selecting the right ingredients. Each component plays a pivotal role in achieving the signature texture and profound flavor that makes this America’s Test Kitchen recipe so extraordinary. We always recommend opting for high-quality ingredients for the most superior results.
For the Irresistible Chocolate Wafer Crust:
The foundation of our pie is a classic chocolate wafer crust, providing a crisp and robust base for the lavish layers to come.
- 25 pieces of chocolate wafers: These wafers are the key to a deeply chocolatey and structurally sound crust. Brands like Nabisco Famous Chocolate Wafers are ideal for their rich flavor and crisp texture.
- 4 tablespoons of unsalted melted butter: Unsalted butter allows for precise control over the salt content in your crust, ensuring a perfectly balanced flavor profile that complements the sweet elements.
This simple yet crucial layer ensures your pie holds together beautifully and provides a delightful contrast to the softer fillings.
For the Rich and Dense Chocolate Filling:
This is the heart of the pie—a luscious, almost brownie-like filling that delivers intense chocolate flavor and a tender texture.
- 4 oz of bittersweet chocolate: Opt for a high-quality bittersweet chocolate, typically with 60-70% cacao content. This provides a deep, sophisticated chocolate flavor that is not overly sweet and forms the backbone of the filling.
- 3 tablespoons of unsalted butter: Adds richness and helps create the smooth, velvety consistency crucial for the filling.
- 3 tablespoons of vegetable oil: A clever addition that contributes to the filling’s moistness and tenderness, preventing it from drying out during baking and ensuring a melt-in-your-mouth experience.
- 1 1/2 tablespoons of Dutch processed cocoa powder: Dutch-processed cocoa powder offers a darker color and a milder, less acidic chocolate flavor compared to natural cocoa. This enhances the depth of chocolate without adding bitterness.
- 2/3 cup of dark brown sugar: Provides a rich, molasses-like sweetness that perfectly complements the bittersweet chocolate. Its moisture content also contributes to the filling’s fudgy texture.
- 2 large eggs: These act as the primary binder, giving the filling structure and contributing to its rich, custardy consistency as it bakes.
- 2 teaspoons of vanilla extract: A fundamental flavor enhancer. Pure vanilla extract is recommended to brighten and round out the complex chocolate notes.
- 1/4 teaspoon of salt: Essential for balancing the sweetness and intensifying the overall chocolate flavor, preventing it from tasting flat.
- 3 tablespoons of all-purpose flour: Provides just enough structure to the filling, ensuring it sets firmly while remaining wonderfully tender and moist.
Every ingredient in this filling is carefully chosen to create a symphony of taste and texture that is both robust and refined.
For the Crunchy Chocolate Crumb Topping:
This layer adds a delightful textural surprise, providing a contrast to the smooth and creamy components of the pie.
- 10 pieces of chocolate wafers: Similar to the crust, these wafers are transformed into a coarse crumb, which is then baked to achieve a unique crunch.
- 2 tablespoons of confectioner’s sugar: Sweetens the crumbs subtly and helps them crisp up beautifully.
- 1 tablespoon of Dutch process cocoa powder: Reinforces the chocolate flavor and contributes to the rich, dark appearance of the topping.
- 1/8 teaspoon of salt: A tiny pinch that elevates the flavors and provides balance.
- 2 tablespoons of unsalted melted butter: Binds the crumb mixture together, ensuring it holds its form and crisps evenly during baking.
This ingenious crumb topping is a true game-changer, adding an unexpected and much-loved element to the pie.
For the Light and Airy Chocolate Whipped Cream Layer:
The final layer provides a delicate, airy finish, perfectly balancing the richness of the previous layers with its light texture and subtle chocolate flavor.
- 1 cup of heavy cream (chilled): Crucial for whipping into stable, voluminous peaks. Ensure your heavy cream is very cold for optimal whipping results.
- 2 tablespoons of confectioner’s sugar: Sweetens the cream and helps stabilize it, ensuring it holds its shape beautifully.
- 2 tablespoons of Dutch process cocoa powder: Infuses the whipped cream with a lovely, delicate chocolate flavor and a beautiful light brown hue.
- 1/8 teaspoon of salt: A tiny pinch to enhance the chocolate notes and prevent the cream from tasting bland.
- 6 oz of melted milk chocolate (90F to 100F): Melted milk chocolate, cooled to a precise temperature, is carefully folded into the whipped cream. This creates a stable, mousse-like topping that is both airy and rich, without deflating. Maintaining the specific temperature is vital to prevent the chocolate from seizing.
This last layer is the perfect crowning glory, offering a refreshing and luxurious finish to your decadent Mississippi Mud Pie.
Step-by-Step Guide: Crafting Your Ultimate Mississippi Mud Pie
Embark on the delightful process of creating this four-layered chocolate masterpiece. Each step is detailed to ensure you achieve the perfect texture and flavor for every component of your Mississippi Mud Pie. Follow these instructions carefully, and you’ll be rewarded with a truly spectacular dessert.
Step 1: Preparing the Chocolate Wafer Crust
The journey to your perfect pie begins with its foundation. Take 25 chocolate wafers and break them into smaller, manageable pieces. Place these pieces into the bowl of a food processor. Add 4 tablespoons of unsalted melted butter over the wafers. Secure the lid and pulse the mixture repeatedly until the wafers are finely ground into even crumbs. The texture should resemble moist sand; if you pinch a small amount between your fingers, it should hold together. This ensures a cohesive and flavorful crust.
Step 2: Forming and Baking the Crust
Carefully transfer the chocolate crumbs from the food processor into a standard 9-inch pie dish. Using the bottom of a flat measuring cup, a straight-sided glass, or your clean fingertips, press the mixture firmly and evenly across the bottom and up the sides of the pie dish. It’s crucial to compact the crumbs well to create a sturdy and uniform crust that won’t crumble when sliced. Once pressed, bake the prepared crust in a preheated oven at 325°F (160°C) for 15 minutes. This baking step helps set the crust and enhances its crispness. After baking, remove the crust from the oven and allow it to cool completely on a wire rack while you prepare the delicious filling.
Step 3: Creating the Luxurious Chocolate Filling Base
In a medium microwave-safe bowl, combine the 4 oz of bittersweet chocolate (broken into smaller pieces for faster melting), 3 tablespoons of unsalted butter, 3 tablespoons of vegetable oil, and 1 1/2 tablespoons of Dutch-processed cocoa powder. Place the bowl into the microwave and heat it at 50% power for approximately 1.5 minutes. The aim is to gently melt the chocolate and butter without scorching. Remove the bowl from the microwave and stir the mixture thoroughly with a spatula or whisk until it is completely smooth and all ingredients are well combined. Any remaining chocolate pieces should melt from the residual heat. Let this rich chocolate mixture cool for a few minutes until it’s warm but not hot to the touch.
Step 4: Mixing the Remaining Filling Ingredients
In a separate, large mixing bowl, add 2/3 cup of dark brown sugar, 2 large eggs, 2 teaspoons of vanilla extract, and 1/4 teaspoon of salt. Whisk these ingredients together until the mixture is smooth and the dark brown sugar has largely dissolved, ensuring a consistent texture. Next, gradually pour the slightly cooled chocolate mixture into the egg and sugar mixture, whisking continuously until everything is perfectly incorporated and uniform. Finally, gently fold in 3 tablespoons of all-purpose flour. Whisk again just until no lumps of flour remain and the filling is smooth and glossy. Be mindful not to overmix at this stage once the flour is added, as this can lead to a tougher filling.
Step 5: Baking and Chilling the Filling
Pour the prepared chocolate filling evenly into your completely cooled chocolate wafer crust. Spread it smoothly across the bottom of the pie using a spatula. Bake the pie in the preheated 325°F (160°C) oven for 15 minutes. The filling should appear set around the edges but may still have a slight gentle wobble in the center; this indicates it’s perfectly baked and will firm up as it cools. Remove the pie from the oven and let it cool on a wire rack at room temperature for a full hour. This initial cooling helps prevent condensation. After an hour, transfer the pie to the refrigerator and chill for at least another hour. This extended chilling time is absolutely crucial for the filling to fully set, firm up, and become easily sliceable.
Step 6: Crafting the Crunchy Crumb Topping
For the delightful, contrasting crunchy topping, take the remaining 10 chocolate wafers and place them inside a sturdy ziplock bag. Use a rolling pin to break them into larger, irregular pieces. The goal here is a rustic crumb texture, not fine dust, for maximum crunch. Transfer these crushed wafers to a medium bowl. Add 2 tablespoons of confectioner’s sugar, 1 tablespoon of Dutch-processed cocoa powder, and 1/8 teaspoon of salt. Mix these dry ingredients thoroughly to ensure even distribution. Pour in 2 tablespoons of unsalted melted butter and mix again until all the crumbs are evenly coated and moist. Spread this mixture in a single layer onto a baking sheet lined with parchment paper. Bake in the same 325°F (160°C) oven for 10 minutes, or until the crumbs are fragrant and noticeably crisped. Allow them to cool completely on the baking sheet; they will become even crunchier as they reach room temperature.
Step 7: Preparing the Velvety Chocolate Whipped Cream
Now, prepare the light and airy final layer. In a small saucepan, gently heat 3 tablespoons of the very cold heavy cream over low heat until it is just warm to the touch. Remove from heat and stir in 2 tablespoons of confectioner’s sugar until it dissolves completely. Then, whisk in 2 tablespoons of Dutch-processed cocoa powder and 1/8 teaspoon of salt until the mixture is smooth and lump-free. Transfer this cocoa-cream mixture to the bowl of a stand mixer fitted with the whisk attachment (alternatively, use a large mixing bowl with a hand mixer). Pour in the remaining 7 tablespoons of chilled heavy cream. Begin mixing on low speed, gradually increasing to high speed. Whip the cream until it forms soft peaks—it should be light, fluffy, and hold its shape, but not be stiff or grainy. Be careful not to over-whip.
Next, take the 6 oz of melted milk chocolate, which should have cooled to between 90°F and 100°F (32-38°C). Gently fold about 1/3 of the freshly whipped cream into the cooled melted chocolate. This crucial step, often called tempering or lightening, helps to gradually incorporate the chocolate into the cream without shocking it and preventing it from seizing. Once the first portion is fully incorporated, gently fold in the remaining whipped cream in two additions, taking care not to deflate the air. You want a light, airy, and uniformly chocolate-colored mousse-like cream. Finally, spread this heavenly mixture evenly over the top of your completely cooled and chilled pie filling, creating a beautiful domed layer.
Step 8: Final Touches and Crucial Chilling
Generously sprinkle the cooled, crunchy chocolate crumb topping over the smooth chocolate whipped cream layer. Distribute it evenly for both visual appeal and textural delight. Now, for arguably the hardest part of the entire recipe: patience! For the best flavor development, optimal texture, and easy slicing, the pie requires significant chilling time. Chill the assembled Mississippi Mud Pie in the refrigerator for a minimum of 3 hours, or ideally, overnight. This prolonged chilling period allows all the distinct layers to firm up completely, meld their flavors beautifully, and become perfectly cohesive and sliceable. When you’re ready to serve, removing the pie from the fridge about 15-20 minutes beforehand will allow the filling to soften slightly, achieving its optimal melt-in-your-mouth texture.
Pro Tips for a Flawless Mississippi Mud Pie
To ensure your Mississippi Mud Pie is nothing short of perfection, pay attention to these expert tips and tricks:
- Quality Ingredients are Key: Always use high-quality chocolate. The better the chocolate, the richer and more nuanced your pie will taste. For vanilla, opt for pure vanilla extract over imitation for superior flavor. Similarly, fresh eggs and good quality dairy make a difference.
- Don’t Rush the Chilling: This is perhaps the most crucial tip. Each chilling step is vital for the layers to set properly and for the flavors to meld. An under-chilled pie will be messy to slice and won’t have the desired firm yet tender texture. Overnight chilling for the final pie is highly recommended for the best results.
- Accurate Measurements: Baking is a science. Use proper measuring cups and spoons, and level off ingredients like flour and cocoa powder precisely. For flour, spoon it into the measuring cup and then level it with a straight edge for accuracy.
- Avoid Overmixing: When incorporating flour into the chocolate filling, mix just until combined. Overmixing can develop gluten, potentially leading to a tougher filling. Similarly, when folding the whipped cream into the melted chocolate, be gentle to maintain the airy texture of the cream.
- Temperature Control for Chocolate: When melting chocolate for the filling, use a low microwave power setting or a double boiler to prevent scorching. For the final chocolate whipped cream layer, it’s critical that your melted milk chocolate is cooled to the specified temperature (90-100°F or 32-38°C). If it’s too hot, it will melt and deflate your whipped cream; if it’s too cold, it will seize and create lumps.
- Crispy Crumb Topping: Ensure your chocolate crumb topping is completely cool and crispy before sprinkling it over the pie. If it’s still warm, it can soften the delicate whipped cream layer.
- Sharp, Warm Knife for Serving: For clean, beautiful slices, use a sharp, thin-bladed knife. Dip the knife in hot water and wipe it dry between each cut. This technique prevents the chocolate layers from sticking and ensures a pristine presentation.
Creative Variations & Customizations for Your Mud Pie
While this America’s Test Kitchen recipe for Mississippi Mud Pie is exceptional on its own, you can always unleash your creativity and introduce your own twists to personalize it or cater to different preferences. Here are some delightful variations and customization ideas:
- Crust Alternatives:
- Oreo Crust: For an even more intense chocolate experience, substitute the chocolate wafers with crushed Oreo cookies (cream filling included!). The added cream makes for a richer, more cohesive crust.
- Graham Cracker Crust: If you prefer a lighter, slightly less intense chocolate base, a classic graham cracker crust can offer a pleasant contrast.
- Nutty Crust: Incorporate finely ground toasted pecans, walnuts, or almonds into your chocolate wafer crust mixture for an added layer of flavor and texture.
- Flavor Boosters:
- Espresso Enhancement: Add 1 to 2 teaspoons of instant espresso powder or fine coffee grounds to the chocolate filling mixture or the cocoa-cream mixture for the whipped topping. Coffee naturally deepens and intensifies chocolate flavor without making the dessert taste like coffee.
- Liqueur Infusion: For an adult-friendly version, fold 1 to 2 tablespoons of a complementary liqueur into the chocolate filling mixture. Kahlúa (coffee liqueur), Grand Marnier (orange liqueur), or even a good quality bourbon can add a sophisticated depth of flavor.
- Minty Fresh Twist: A few drops of pure peppermint extract (start with 1/4 teaspoon and add more to taste) can be added to the chocolate whipped cream layer for a refreshing chocolate-mint mud pie.
- Topping & Garnish Galore:
- Chocolate Shavings or Curls: Instead of or in addition to the crumb topping, generously sprinkle the pie with elegant chocolate shavings or curls for a professional finish.
- Fresh Berries: For a vibrant contrast and to cut through the richness, arrange fresh raspberries, strawberries, or sliced cherries on top of the whipped cream layer just before serving.
- Caramel or Fudge Drizzle: A light drizzle of homemade caramel sauce or a rich chocolate fudge sauce can add another layer of indulgence.
- Toasted Nuts: Sprinkle toasted, chopped pecans or walnuts over the finished pie for extra crunch and a nutty aroma.
Don’t be afraid to experiment and make this ultimate Mississippi Mud Pie truly your own! Remember to taste as you go and adjust flavorings to your personal preference.
Serving and Storing Your Masterpiece: Tips for Enjoyment and Freshness
Serving Suggestions:
To fully appreciate the complex textures and rich flavors of your Ultimate Mississippi Mud Pie, serving it at the right temperature is key. While it’s essential for the pie to be well-chilled, taking it out of the refrigerator about 15-20 minutes before serving allows the filling to soften slightly, bringing its flavors to the forefront and achieving an optimal, melt-in-your-mouth texture. For beautifully clean and precise slices, use a sharp, thin-bladed knife that has been warmed under hot water and thoroughly wiped dry between each cut. This technique prevents the chocolate layers from sticking and ensures each slice looks as appealing as it tastes.
This pie is incredibly rich and satisfying on its own, making it a complete dessert. However, if you wish to offer accompaniments, a small scoop of high-quality vanilla bean ice cream, a dollop of unsweetened whipped cream, or a side of fresh, slightly tart berries (like raspberries or blackberries) can provide a wonderful contrast to its decadence. A strong cup of coffee or a glass of cold milk also serves as an excellent pairing to complement the intense chocolate flavors.
Storage Instructions:
One of the many advantages of Mississippi Mud Pie is its excellent keeping quality. Due to its dense, stable layers, it stores exceptionally well, making it a perfect make-ahead dessert for parties and events.
- Refrigeration: Cover the pie loosely with plastic wrap or aluminum foil to protect it from absorbing refrigerator odors and to prevent it from drying out. If you have individual slices, store them in an airtight container. The pie will remain fresh and delicious in the refrigerator for up to 3-4 days. In fact, many find that the flavors deepen and meld even more beautifully over time, making it potentially even better the day after it’s made.
- Freezing: For longer storage, Mississippi Mud Pie freezes remarkably well. To freeze an entire pie, wrap it tightly in several layers of plastic wrap, ensuring no air can get in, followed by a layer of heavy-duty aluminum foil. For individual slices, wrap each slice securely in plastic wrap and then aluminum foil before placing them in a freezer-safe bag or container. The pie can be stored in the freezer for up to 1-2 months.
- Thawing: To thaw a frozen pie or slices, simply transfer it to the refrigerator overnight. While the texture of the crust and filling will remain excellent, the whipped cream layer might be slightly softer after freezing and thawing. Allow frozen slices to come to room temperature for about 30 minutes before serving for the best experience.
The Ultimate Indulgence Awaits: Your Perfect Mississippi Mud Pie
Congratulations! You have now mastered the art of creating the Ultimate Mississippi Mud Pie, a dessert that truly lives up to every ounce of its promise. With its magnificent symphony of textures—from the crisp chocolate crust to the dense, fudgy filling, the delightful crunch of the crumb topping, and the cloud-like chocolate whipped cream—and its profoundly deep chocolate flavors, this recipe from America’s Test Kitchen transforms simple ingredients into an extraordinary culinary delight.
Every step of this baking journey, from preparing the individual layers to the crucial chilling periods, contributes to a final product that is not just a dessert, but a statement of passion and skill. Whether you are a seasoned baker looking for a new challenge or embarking on a sweet adventure, the effort invested will be rewarded tenfold with every decadent, satisfying bite.
This Mississippi Mud Pie is more than just a treat; it’s an experience, a testament to the joy of homemade goodness, and the undeniable magic of chocolate. We wholeheartedly encourage you to try this recipe, share your spectacular creation with loved ones, and savor the moments of pure chocolate bliss it brings. Don’t be surprised if this magnificent pie quickly becomes a highly requested favorite for all your future celebrations and gatherings. Happy baking, and enjoy your sensational Ultimate Mississippi Mud Pie!