
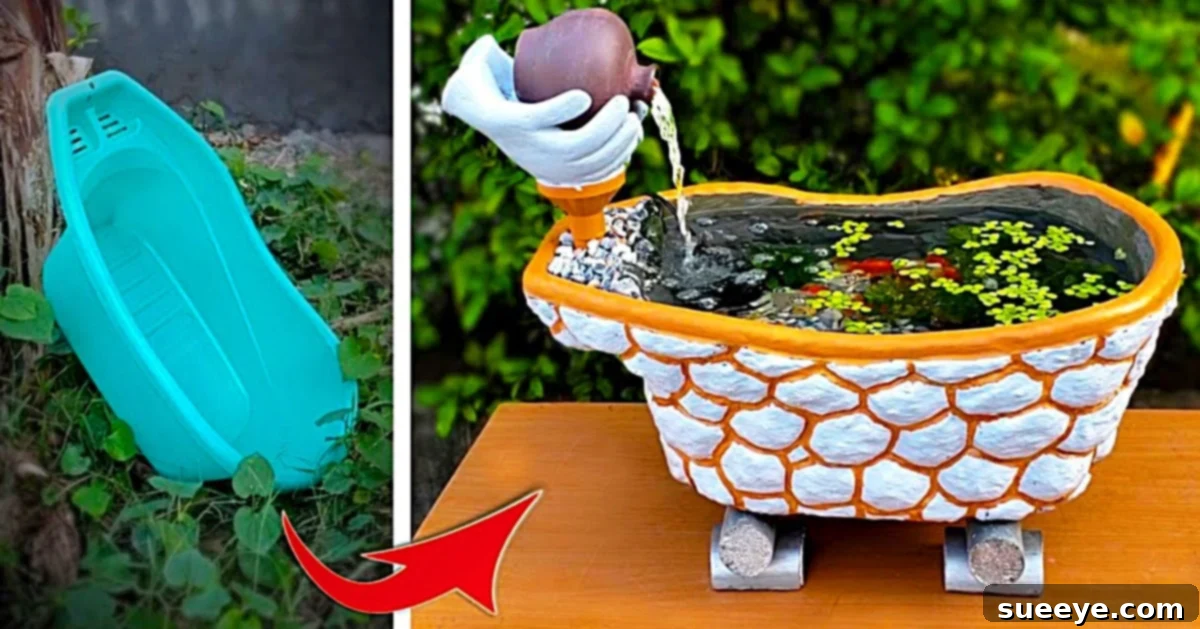
Transform an Old Baby Bathtub into a Stunning DIY Aquarium Fountain
There’s something truly magical about the gentle trickle and soothing sounds of an outdoor water fountain. It transforms any patio or garden into a serene retreat, inviting relaxation and offering a picturesque focal point. I’ve always admired these tranquil features, but often found store-bought options to be either too expensive, too generic, or not quite fitting my aesthetic vision. My perspective completely shifted recently when I visited an old friend. On her porch, nestled amongst lush greenery, was one of the most exquisite fountains I had ever seen.
Its unique design and rustic charm immediately caught my eye. Curious, I asked her where she possibly could have acquired such a magnificent piece. To my utter astonishment, she revealed that she had crafted it herself! I was dumbfounded. “You mean, you’re a fountain maker?” I exclaimed, half-jokingly. She burst into laughter, explaining that she was far from it. With a mischievous grin, she pulled out her phone and showed me a YouTube video—the source of her ingenious idea. I couldn’t wait to get home and put this incredible DIY project to the test. The moment my car pulled into the garage, I was already gathering the necessary materials, eager to begin.
Why Choose a DIY Bathtub Aquarium Fountain?
Beyond the sheer satisfaction of creating something beautiful with your own hands, building a fountain from an old baby bathtub offers a multitude of benefits:
- Eco-Friendly Upcycling: This project is a fantastic way to give a second life to an item that might otherwise end up in a landfill. It’s a testament to sustainable living and creative recycling.
- Cost-Effective: Compared to purchasing a pre-made fountain, which can often cost hundreds or even thousands of dollars, a DIY bathtub fountain uses readily available and often inexpensive materials, saving you a significant amount of money.
- Unique & Personalized: No two DIY fountains will ever be exactly alike. You have complete creative control over the design, colors, and decorative elements, ensuring your fountain is a one-of-a-kind piece that perfectly complements your outdoor space.
- Therapeutic Ambiance: The gentle sounds of flowing water are renowned for their calming and stress-reducing effects. Creating your own water feature brings this peaceful ambiance directly to your backyard or patio.
- Habitat for Wildlife: By adding aquatic plants and even fish, your fountain can become a mini ecosystem, attracting birds and beneficial insects, enhancing the biodiversity of your garden.
Materials You’ll Need for Your DIY Aquarium Fountain
Before you dive into the construction, ensure you have all the necessary components ready. Most of these items can be found at your local hardware store or even around your home:
- Old Baby Bathtub: The star of our project! Look for one that’s sturdy, doesn’t have any major cracks, and ideally has its drain plug intact or easily sealed. A plastic tub is lighter and easier to work with than a ceramic one.
- Cement (or Mortar Mix): You’ll need this to create the faux rocks and potentially for a stable base. A standard quick-setting cement or a versatile mortar mix will work well. The quantity will depend on how many rocks you plan to sculpt.
- A Pair of Old Gloves: Essential for protecting your hands when working with cement and paint.
- Outdoor-Grade Paint: Choose a paint that is suitable for outdoor use and can withstand varying weather conditions. If you plan to add fish or aquatic plants, opt for non-toxic, pond-safe paint.
- PVC Pipe or Flexible Tubing: This will be used to create the water circulation system, connecting the pump to your decorative water-pouring element.
- A Small Submersible Fountain Pump: Select a pump appropriate for the size of your tub. Consider its GPH (gallons per hour) rating, ensuring it’s strong enough to create the desired water flow without being excessively powerful. Look for pumps designed for small ponds or fountains.
- Decorative Jug or Pot: This will be the aesthetic element from which the water appears to flow. Choose something water-resistant and visually appealing.
- Optional but Recommended:
- Water Sealant: To ensure the bathtub is completely watertight, especially if it has a drain hole or minor imperfections.
- Bricks or Pavers: For building an internal foundation or elevating the tub.
- Sandpaper or Grinder: To smooth rough edges on your faux rocks.
- Cleaning Supplies: Soap, water, and brushes for thoroughly cleaning the bathtub.
- Decorative Elements: River stones, pebbles, aquatic plants, fish-safe ornaments, driftwood, etc.
Step-by-Step Guide: Crafting Your Bathtub Aquarium Fountain
Step 0: Preparation is Key – Cleaning and Sealing Your Bathtub
Before any creative work begins, give your baby bathtub a thorough cleaning. Scrub away any dirt, grime, or residue. If your tub has a drain hole, it’s crucial to seal it completely using a waterproof sealant or epoxy. Allow the sealant to cure fully according to the manufacturer’s instructions to ensure your fountain will be watertight. A clean and properly sealed base is the foundation for a successful project.
Step 1: Sculpting Faux Rocks with Cement
This step adds incredible character and natural beauty to your fountain. Mix your cement or mortar according to the package directions, aiming for a consistency similar to thick mud or clay. Don your gloves and begin forming small, irregular “rocks” directly onto the outside rim and sides of the bathtub. Don’t strive for perfection; natural rocks are imperfect and varied. You can mold them with your hands, pressing them firmly onto the tub’s surface. Create varying sizes and shapes to mimic a natural rock formation. Pay attention to how they blend into each other, creating a cohesive look. Allow the cement to cure completely, which might take 24-48 hours, depending on the cement type and humidity. You can gently spray the cement with water during the curing process to prevent it from drying out too quickly and cracking.
Step 2: Building a Sturdy Internal Foundation
Inside the bathtub, you’ll need to create a stable, elevated platform for your decorative jug or pot. This platform will hide the pump and tubing, providing a clean aesthetic. Use bricks, concrete blocks, or even sturdy PVC pipes cut to size to create a foundation that reaches just below the desired water level. Ensure this structure is stable and level. It needs to be strong enough to support the weight of the jug, especially when filled with water, and also allow ample space for the pump and its tubing to operate freely at the bottom of the tub.
Step 3: Bringing Color to Your Fountain
Now comes the fun part: adding color! Once your cement faux rocks are fully cured, it’s time to paint. Choose outdoor-grade, waterproof paint in colors that complement your garden or patio. Earthy tones like browns, grays, and muted greens will give the faux rocks a natural, aged look. You might also consider a pop of color for the tub’s interior or exterior, perhaps a vibrant blue to mimic water, or a deep terracotta. Apply several thin coats of paint, allowing each layer to dry thoroughly before applying the next. If you plan to introduce fish, ensure your chosen paint is non-toxic and pond-safe, paying special attention to the interior of the tub.
Step 4: Crafting the Decorative Pot Holder or Jug Support
The original reference to “hands pot holder” suggests a creative way to position the water-pouring element. This could be achieved by using rebar, sturdy wire, or even more sculpted cement to create a support structure that “holds” your decorative jug or pot above the water level. Alternatively, you can simply place the jug on your internal foundation (from Step 2) and secure it. Ensure this support is strong enough to hold the jug when it’s filled with flowing water. The goal is to create the illusion that the water is gracefully spilling from the jug into the tub. Paint this support structure to match your overall fountain design, or conceal it entirely with decorative stones and plants in later steps.
Step 5: Installing the Water System: Jug, Pump, and Hose
This is where your fountain comes to life! First, place your submersible fountain pump at the bottom of the bathtub, ideally hidden behind or within your internal foundation structure. Connect one end of your flexible tubing or PVC pipe to the pump’s outlet. Run the tubing up through your pot holder/support structure and into the decorative jug, ensuring the end of the tube is positioned where the water will gracefully flow out. Fill the bathtub with water, making sure the pump is fully submerged. Plug in the pump and test the flow. Adjust the tubing within the jug as needed to achieve the desired water stream. Make sure the pump’s power cord is safely routed and plugged into a GFCI (Ground Fault Circuit Interrupter) protected outdoor outlet for safety.
Step 6: Decorating Your Aquatic Oasis and Adding Life
The final touches transform your project into a captivating aquatic display. Arrange river stones, polished pebbles, and decorative rocks around the base of your jug and throughout the tub to hide the internal foundation and pump. Consider adding aquatic plants like water hyacinths, water lettuce, or small lily pads to enhance the natural feel and help with water quality. If you wish to introduce fish, such as goldfish or mosquito fish, ensure the water is dechlorinated and at a suitable temperature. Research fish care requirements for small outdoor ponds. You might also want to add a small solar-powered aerator for fish health, and ensure the fountain’s materials are truly non-toxic. Position your completed fountain in its desired outdoor spot, plug it in, and enjoy the tranquil beauty you’ve created.
Maintenance Tips for Your DIY Bathtub Fountain
To keep your beautiful bathtub aquarium fountain looking its best and running smoothly, regular maintenance is key:
- Keep Water Levels Full: Water evaporates, especially in warm weather. Check the water level daily and top it off to prevent the pump from running dry, which can damage it.
- Regular Cleaning: Periodically drain the fountain and clean out any debris, algae, or sediment. This will keep the water clear and the pump functioning efficiently. Use a soft brush and water; avoid harsh chemicals, especially if you have fish or plants.
- Pump Care: Clean the pump filter regularly to prevent clogs. If the water flow decreases, the filter is likely the culprit.
- Algae Control: Algae can be an issue in outdoor water features. Natural solutions include adding aquatic plants that compete with algae for nutrients, ensuring the fountain isn’t in direct sunlight all day, or introducing beneficial bacteria.
- Winterization: If you live in a region with freezing temperatures, you’ll need to winterize your fountain. Drain all water, clean the tub, and store the pump indoors to prevent freezing damage. You can cover the tub or bring it indoors if possible.
Troubleshooting Common Fountain Issues
- Pump Not Working: Check if it’s plugged in correctly to a GFCI outlet. Ensure the water level is high enough for the pump to be fully submerged. Clean the pump’s impeller and filter, as clogs are a common cause.
- Leaking Bathtub: If you notice water loss beyond normal evaporation, inspect the tub for cracks, especially around the drain hole area. Reapply sealant if necessary, allowing ample curing time.
- Cloudy Water: This can be caused by new materials leaching into the water, too much sunlight, or insufficient cleaning. Regular water changes and proper filtration (if you add a filter) can help.
- Algae Bloom: As mentioned, too much sun and excess nutrients can cause algae. Introduce more aquatic plants, try natural algae treatments, or move the fountain to a shadier spot.
Conclusion: Your New Backyard Oasis
The satisfaction of completing this DIY project is truly immense. I was so excited to share photos of my new cement creation on Facebook, and of course, I immediately called my best friend to show her the fantastic result of the inspiration she had given me! Everyone who saw it couldn’t believe how awesome it was. The way the water gently flows, the natural look of the faux rocks, and the peaceful ambiance it creates truly make it a centerpiece. I absolutely adore it, and so does everyone else who sees it.
The beauty and uniqueness of this project even sparked a new idea: I decided to make a few more and offer them for sale on eBay and at my local farmers market. I genuinely believe others will appreciate the craftsmanship, the eco-friendly aspect, and the calming presence these fountains bring to any outdoor space. This simple baby bathtub project transformed not only my patio but also ignited a new passion. I encourage you to embark on this rewarding DIY journey yourself. It’s an accessible, affordable, and incredibly satisfying way to create a stunning, tranquil oasis right in your own backyard!