
Crafting a Stunning Square Patchwork Centerpiece Mat: A Beginner-Friendly Guide
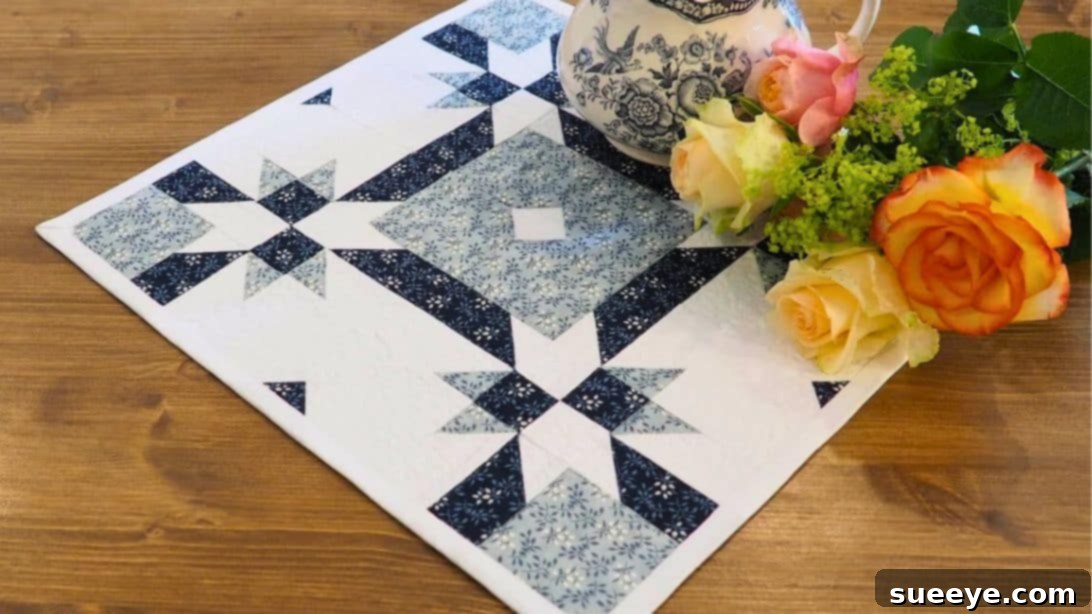
Transform your dining table or coffee table into a focal point with a beautifully handcrafted square patchwork centerpiece mat. This engaging quilting project, inspired by the gorgeous design from Liza Decor, is not only visually appealing but also surprisingly accessible for quilters of all skill levels, especially beginners. The intricate-looking design features charming star-like patterns on the sides, perfectly framing the solid squares in the middle, creating a balanced and elegant aesthetic that complements a wide range of home decor styles. Whether you’re looking for a unique handmade gift or a personal touch for your own home, this mat offers a wonderful opportunity to dive into the rewarding world of quilting. This step-by-step tutorial will guide you through the process, starting with fundamental techniques like half-square triangles (HSTs), ensuring a smooth and enjoyable crafting experience from start to finish. Get ready to create a masterpiece that will surely gather compliments!
Why Choose This Patchwork Centerpiece Mat Project?
Embarking on a quilting project like this square patchwork centerpiece mat offers numerous benefits beyond just creating a beautiful item. It’s an excellent way to hone your sewing machine skills, practice precision cutting, and develop a keen eye for color and pattern arrangement. For beginners, the ‘disappearing hourglass’ block is a fantastic introduction to more complex-looking patterns without requiring advanced techniques. This project allows you to:
- Enhance Your Home Decor: A handmade mat adds warmth, texture, and a personalized touch to any room.
- Utilize Fabric Scraps: It’s a perfect project for using up smaller pieces of your favorite quilting cottons, giving them a new purpose.
- Gift with Love: A handmade centerpiece mat makes for a thoughtful and cherished gift for birthdays, holidays, housewarmings, or weddings.
- Develop Quilting Skills: Learn or refine essential quilting techniques such as half-square triangles, accurate seam allowances, and proper pressing.
- Enjoy a Creative Outlet: The process of choosing fabrics, cutting, sewing, and seeing a design come to life is incredibly satisfying and a wonderful way to relax and express creativity.
Essential Materials and Tools for Your Quilting Project
Before you begin, gathering all your materials and tools ensures a seamless crafting experience. Precision is key in quilting, so investing in good quality tools will make a significant difference in the final outcome of your square patchwork centerpiece mat.
Fabric Selection:
- For each block, you will need:
- Two (2) pieces of 6″ x 6″ squares (one dark fabric, one light fabric)
- Two (2) pieces of 6″ x 6″ white squares
- Choosing Fabrics: Opt for high-quality 100% quilting cotton for best results. These fabrics are easy to work with, press well, and hold their shape. When selecting your colors, aim for a clear contrast between your “dark” and “light” fabrics to make the star and square patterns pop. The white fabric will serve as an excellent neutral background. Consider pre-washing your fabrics to prevent shrinkage and color bleeding, especially if they are new or vibrant.
- Batting: For the final mat, you’ll need a piece of batting slightly larger than your assembled top. Batting adds loft, warmth, and definition to your quilting stitches.
- Backing Fabric: A piece of backing fabric, also slightly larger than your quilt top, to complete the quilt sandwich. This can be a coordinating print or a solid color.
- Binding Fabric: Strips of fabric for finishing the edges of your mat. Typically, this involves cutting 2.5-inch wide strips and joining them to create a continuous length.
Key Tools:
- Sewing Machine: A reliable sewing machine with a quarter-inch foot is invaluable for consistent seam allowances.
- Rotary Cutter: A sharp rotary cutter (45mm is common) for precise and efficient fabric cutting.
- Self-Healing Cutting Mat: Protects your work surface and provides a grid for accurate measurements.
- Quilting Rulers: At least one long ruler (e.g., 6″ x 24″) and a square ruler (e.g., 6″ x 6″ or 8.5″ x 8.5″) for trimming blocks.
- Fabric Marker or Pencil: For drawing diagonal lines on your fabric squares. A Frixion pen or chalk pencil works well.
- Iron and Ironing Board: Crucial for pressing seams flat and setting stitches, ensuring your blocks are crisp and square.
- Pins or Fabric Clips: To hold fabric pieces together securely before sewing.
- Thread: High-quality polyester or cotton quilting thread that matches or blends with your fabrics.
- Seam Ripper: For those inevitable moments when a stitch needs to be removed.
Step-by-Step Instructions: Crafting Your Patchwork Centerpiece Mat
Follow these detailed steps carefully to construct your beautiful square patchwork centerpiece mat. Precision in cutting and sewing, along with consistent pressing, will ensure a professional-looking finish.
Step 1: Creating Half-Square Triangles (HSTs)
Half-square triangles (HSTs) are the building blocks of many quilting patterns, and they form the foundation of our centerpiece mat. This method creates two HSTs at once, making it efficient and easy for beginners.
- Begin by taking one 6″ x 6″ white square and placing it directly on top of one 6″ x 6″ light fabric square, right sides together. Ensure all edges are perfectly aligned.
- Repeat this process with the second 6″ x 6″ white square and the 6″ x 6″ dark fabric square. You now have two distinct fabric stacks.
- Using your fabric marker or pencil, draw a diagonal line from one corner to the opposite corner on the top (white) fabric of each stack. This line will serve as your guide for sewing.
- Now, carefully sew a seam 1/4″ away from the drawn line on both sides of the line for both fabric stacks. This creates two parallel stitch lines on each stack. Maintain a consistent 1/4″ seam allowance throughout.
- After sewing, use your rotary cutter and ruler to cut directly along the drawn diagonal line on each stack. This action separates each stack into two triangular units.
- Open each sewn unit. You will now have four half-square triangles (two made with white/light fabric and two made with white/dark fabric).
- Press these HSTs open with an iron. It is generally recommended to press the seams toward the darker fabric to prevent the seam allowance from showing through lighter fabrics.
- Finally, carefully trim each HST to a precise 5.25″ x 5.25″ block. This squaring-up step is crucial for ensuring your blocks fit together perfectly later on. Use a square ruler for accuracy.
Step 2: Assembling the Hourglass Block
With your HSTs prepared, the next step is to arrange them to form the initial ‘hourglass’ block, which is the precursor to our ‘disappearing hourglass’ design.
- Take your four trimmed 5.25″ x 5.25″ HST blocks.
- Arrange these blocks on your work surface or design wall to form an hourglass shape. The key is to position the HSTs so that the darker fabric triangles point towards the center of the arrangement, while the lighter fabric triangles point towards the outside edges. This creates a clear visual distinction and forms the classic hourglass pattern.
- Once you are satisfied with your arrangement, begin sewing the blocks together in rows. Typically, you’ll sew the two top blocks together, and then the two bottom blocks together. Use a consistent 1/4″ seam allowance.
- Press the seams from each row. For the top row, press the seam allowance to one side (e.g., to the right). For the bottom row, press the seam allowance to the opposite side (e.g., to the left). This technique, known as “nesting seams,” helps the seams align perfectly when you join the rows.
- Now, join the two rows you just created. Carefully align the center seams, using pins to hold them securely in place. Sew the rows together with a 1/4″ seam allowance.
- Press the final seam. You can choose to press this seam open for a flatter finish or press it to one side, depending on your preference. You now have a completed hourglass block.
Step 3: Initiating the “Disappearing Hourglass” Effect
This is where the magic happens! The ‘disappearing hourglass’ technique transforms a simple block into a more intricate design by strategically cutting and reassembling. It creates a secondary pattern that is visually captivating.
- Place your fully assembled hourglass block flat on your cutting mat.
- Identify the central seam where the two rows were joined. This horizontal seam runs through the middle of your hourglass block.
- Using your ruler and rotary cutter, carefully cut 1.5″ away from this central horizontal seam on both the top and bottom sides. This means you will make two new horizontal cuts, one 1.5 inches above the center seam and one 1.5 inches below the center seam.
- Next, locate the vertical center line of your block. This line would run vertically through the center of your hourglass block, intersecting the horizontal center seam.
- Similarly, cut 1.5″ away from this imaginary vertical center line on both the left and right sides. This results in two new vertical cuts, one 1.5 inches to the left of the center and one 1.5 inches to the right of the center.
- After these four cuts (two horizontal and two vertical), your original hourglass block will now be divided into nine smaller units: a central square, four corner squares, and four side rectangles. Handle these pieces carefully to maintain their orientation.
Step 4: Reassembling the Disappearing Hourglass Block
The beauty of the disappearing hourglass block comes alive in this step, as rotating the pieces creates an entirely new design with stars and squares.
- Take the nine smaller units you created in Step 3.
- Place the central square unit back in the middle of your cutting mat or design wall, keeping its original orientation.
- Now, rotate all the surrounding blocks (the four corner squares and the four side rectangles) by 180 degrees. This means flipping them upside down or rotating them half a turn. Visually, you will notice the patterns shift dramatically, revealing the star-like shapes on the sides and clear squares in the middle, as depicted in the reference photo.
- Once you are satisfied with the new arrangement, begin sewing these nine pieces back together. The most organized way to do this is to sew them in rows first (three horizontal rows of three blocks each). Use a precise 1/4″ seam allowance for each seam.
- Press the seams for each row. Alternate the direction of pressing for consecutive rows to allow for nesting seams when joining the rows together. For example, press seams in the first row to the right, the second row to the left, and the third row to the right.
- Finally, join the three rows together. Carefully align the seams, pinning them to ensure they match perfectly at the intersections. Sew with a 1/4″ seam allowance.
- Press the final seams. Your ‘disappearing hourglass’ block is now complete!
- To ensure perfect squareness and size, trim your finished block to an 8.5″ x 8.5″ square. This step is critical for ensuring your blocks fit together perfectly when assembling the final mat.
Step 5: Replicating Your Block
To create a full centerpiece mat of a practical size, you will need more than one block. Consistency is key when making multiple units.
- Repeat Steps 1 through 4 three more times. This will give you a total of four identical 8.5″ x 8.5″ disappearing hourglass blocks.
- As you create each block, pay close attention to maintaining the same 1/4″ seam allowance and precise trimming. Small discrepancies can lead to difficulties when trying to join blocks later.
- Consider batching tasks: for example, cut all your initial 6″ squares for all four blocks at once. Then, sew all the HSTs, then trim all the HSTs, and so on. This can often improve efficiency and consistency.
Step 6: Assembling the Mat Top, Quilting, and Binding
With all four blocks complete, it’s time to bring them together to form your centerpiece mat, and then finish it with quilting and binding.
- Arrange the Blocks: Lay out your four finished 8.5″ x 8.5″ blocks on your design wall or a clean floor. There are several ways to arrange these four blocks, creating different secondary patterns. Experiment by flipping and rotating individual blocks to discover the arrangement that you find most aesthetically pleasing. The beauty of this design is its versatility!
- Sewing the Blocks Together: Once you have decided on your final layout, begin by sewing the blocks together in rows. For a 2×2 arrangement, sew the two top blocks together, and then sew the two bottom blocks together, using a 1/4″ seam allowance. Press the seams open or to one side, alternating directions for nesting.
- Joining the Rows: Now, join the two rows you’ve just created. Carefully align the central seams and use pins to secure them before sewing with a 1/4″ seam allowance. Press the final seam. You now have your complete patchwork mat top!
- Quilting the Mat:
- Prepare the Quilt Sandwich: Lay your backing fabric right side down, smooth it out. Place your batting on top of the backing. Finally, center your patchwork mat top right side up on top of the batting.
- Basting: Secure the three layers together using basting pins, spray basting adhesive, or hand basting stitches. This prevents the layers from shifting during quilting.
- Stitch the Layers: Quilt your mat by stitching through all three layers. You can opt for simple straight-line quilting along seams (stitch-in-the-ditch), diagonal lines, or more intricate free-motion quilting patterns. The quilting stitches not only hold the layers together but also add texture and enhance the design.
- Binding the Mat:
- Trim the Edges: Once quilted, trim the edges of your mat to make them perfectly square and even.
- Prepare Binding Strips: Join your 2.5-inch wide binding strips end-to-end to create a continuous length long enough to go around the entire perimeter of your mat, plus an overlap.
- Attach Binding: Sew the binding to the front of your mat, aligning raw edges and using a 1/4″ seam allowance. Wrap the binding around to the back of the mat and hand-stitch or machine-stitch it into place for a clean, finished edge.
Expert Tips for a Flawless Patchwork Mat
Achieving a professional-looking finish in quilting often comes down to attention to detail and a few tried-and-true techniques. Keep these tips in mind as you work on your centerpiece mat:
- Accuracy is Paramount: Measure twice, cut once! Even a slight variation in your 1/4″ seam allowance can throw off the alignment of your blocks. Use a quarter-inch sewing machine foot if you have one, or mark your machine bed with painter’s tape to guide your fabric.
- Pressing Matters: Pressing is as important as sewing. Pressing seams correctly (usually towards the darker fabric, or open for less bulk) helps your blocks lie flat and square, making subsequent seams easier to match. Avoid “ironing” (pushing the iron back and forth), which can distort fabric; instead, “press” by lifting and setting the iron down.
- Squaring Up Blocks: Do not skip the trimming steps (e.g., to 5.25″ and 8.5″). Square rulers with clear markings are your best friend here. Perfectly squared blocks are essential for a flat, even quilt top.
- Pin, Pin, Pin: Don’t be shy with pins, especially when joining rows or aligning critical seam intersections. Pins help hold your fabric in place, preventing shifting and ensuring accurate joins.
- Test Your Stitches: Before sewing your actual fabric, test your machine’s tension and stitch length on a scrap piece of fabric. This ensures your seams will be strong and even.
- Take Your Time: Quilting is not a race. Enjoy the process! If you feel frustrated, take a break. Rushing often leads to mistakes that require more time to fix.
Unleash Your Creativity: Design Variations and Personal Touches
While this tutorial provides a solid foundation for a beautiful centerpiece mat, there’s ample room to infuse your own creativity and make the design uniquely yours. Consider these ideas for personalizing your next patchwork project:
- Color Palette Exploration: Instead of a simple light/dark/white scheme, experiment with analogous colors (colors next to each other on the color wheel), complementary colors (colors opposite each other for high contrast), or a monochromatic theme using various shades of a single color.
- Fabric Prints and Textures: Introduce small-scale prints, florals, geometrics, or even subtle textures to add depth and visual interest. Consider seasonal fabrics for holiday-themed mats.
- Size and Shape Modifications:
- Larger Mat: Create more blocks (e.g., 3×3 or 4×4) for a bigger table runner or even a small wall hanging.
- Adding Borders: Frame your assembled block with one or more borders. Borders can be solid, pieced, or even feature decorative elements like cornerstones.
- Beyond the Square: While this pattern focuses on a square mat, the individual blocks can be incorporated into larger quilts.
- Quilting Designs: Go beyond straight lines. Explore free-motion quilting with swirls, stippling, or feather designs. You can also use a walking foot for wavy lines or grids that add movement to the piece.
- Embellishments: For an extra touch, consider adding small appliqued shapes, embroidery stitches, or decorative buttons (if the mat won’t be used under very hot items) to the center squares or borders.
Caring for Your Handmade Patchwork Mat
To ensure your beautiful square patchwork centerpiece mat lasts for years to come, proper care is essential. Handmade quilted items require a gentle touch.
- Washing: If your mat needs cleaning, machine wash it in cold water on a delicate cycle. Use a mild detergent and avoid harsh chemicals or bleach.
- Drying: Tumble dry on a low setting or, even better, lay flat to air dry. Air drying helps maintain the integrity of the stitches and prevents shrinkage. If using a dryer, remove promptly to minimize wrinkles.
- Ironing: If necessary, iron on a low to medium setting with steam. Place a pressing cloth over the mat to protect the fabric.
- Storage: When not in use, store your mat flat or gently rolled to prevent creases and maintain its shape. Keep it in a clean, dry place away from direct sunlight to prevent fading.
Conclusion: Your New Favorite Quilting Project
Congratulations on completing your Square Patchwork Centerpiece Mat! You’ve not only created a beautiful and functional piece of home decor but also mastered several fundamental quilting techniques, including the ever-versatile half-square triangles and the captivating ‘disappearing hourglass’ block. This project, with its blend of intricate appearance and beginner-friendly steps, serves as a testament to the joy and accessibility of quilting. Each stitch tells a story of patience, creativity, and the satisfaction of making something truly unique with your own hands. We hope this detailed guide has empowered you to confidently tackle this project and inspire you to explore countless other quilting adventures. Display your mat with pride, gift it to a loved one, and let it be a reminder of the wonderful skill you’ve cultivated. Happy quilting!