
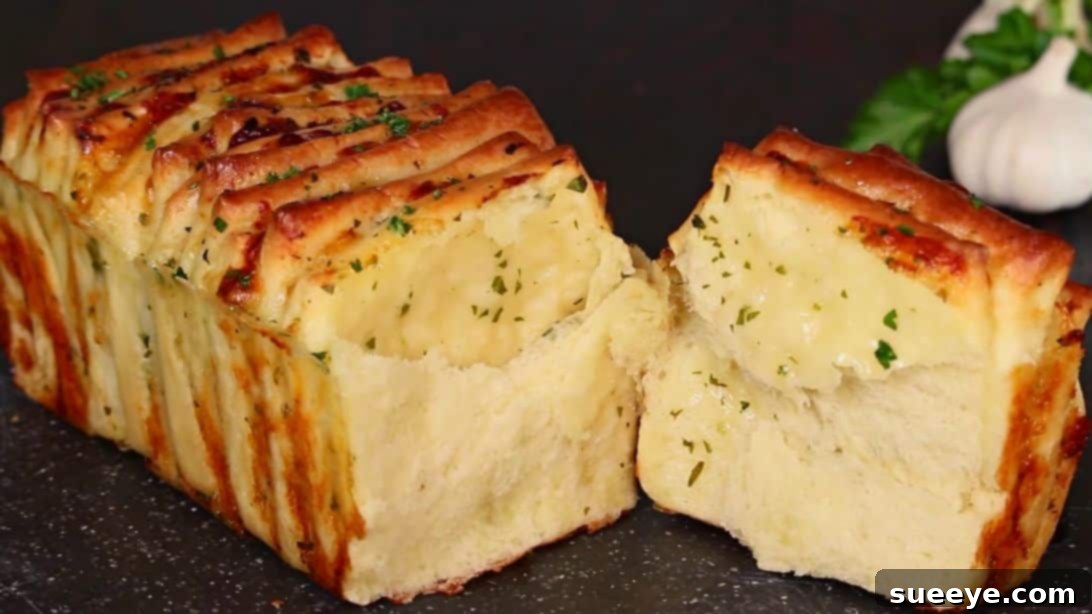
The Ultimate Fluffy & Cheesy Pull-Apart Garlic Bread Recipe
Prepare to fall in love with a bread recipe that will quickly become your new favorite! This sensational pull-apart garlic cheese bread is not just incredibly fluffy and bursting with cheesy goodness, but it’s also surprisingly simple to make. Forget complicated baking tutorials; this recipe delivers maximum flavor with minimal fuss, making it perfect for both seasoned bakers and beginners alike. Imagine a warm, aromatic loaf, where each piece pulls away effortlessly, revealing layers of savory garlic butter and melted cheese. It’s truly a delight that you could enjoy for days without tiring of its irresistible charm.
This recipe is a testament to the fact that homemade bread doesn’t have to be intimidating. We owe a huge thank you to How Tasty on YouTube for sharing such a fantastic and approachable bread recipe that brings so much joy to the table. Get ready to impress your family and friends with this show-stopping side dish or snack!
Why You’ll Love This Pull-Apart Garlic Cheese Bread
- Irresistibly Fluffy Texture: The dough is designed to rise beautifully, resulting in an airy and soft bread that practically melts in your mouth.
- Explosion of Flavor: A savory filling combining butter, garlic, fresh herbs, and two types of cheese ensures every bite is packed with deliciousness.
- Remarkably Easy to Make: Unlike many bread recipes, this one avoids overly complex steps, making it accessible for bakers of all skill levels.
- Perfect for Sharing: The “pull-apart” nature of the bread makes it ideal for communal dining, encouraging everyone to enjoy a piece.
- Versatile Treat: Serve it as a delightful appetizer, a savory side dish with pasta or soup, or even a comforting snack on its own.
- Crowd-Pleaser: This bread is guaranteed to be a hit at parties, potlucks, or family gatherings, disappearing quickly every time.
Before we dive into the creation process, let’s gather our ingredients. Using high-quality, fresh ingredients will always elevate the final taste of your bread. Pay attention to the temperatures specified for certain ingredients, as these play a crucial role in the dough’s development and the bread’s ultimate texture.
Ingredients
For the Dough:
- 3¾ cups (approx. 450g) all-purpose flour: The foundation of our fluffy bread. Ensure it’s fresh for best results.
- 1 teaspoon salt: Essential for flavor and controlling yeast activity.
- 1½ tablespoons granulated sugar: Feeds the yeast and contributes to the golden-brown crust.
- 2 teaspoons active dry yeast or instant yeast: The leavening agent that makes our bread rise. If using active dry, ensure it’s proofed correctly.
- About ¾ cup + 2 tablespoons (approx. 210ml) milk, room temperature: Room temperature milk helps activate the yeast without shocking it. You might need slightly more or less, depending on your flour.
- ¼ cup (56g) unsalted butter, melted: Adds richness, tenderness, and flavor to the dough.
- 1 large egg, beaten and room temperature: Contributes to the richness, color, and structure of the bread.
For the Filling:
- ⅓ cup (75g) unsalted butter, room temperature: Soft butter is crucial for an even spread.
- ½ clove garlic, minced or finely grated; or more if preferred: The star of our garlic bread! Adjust to your taste for a milder or bolder garlic flavor.
- 2 tablespoons Parmigiano Reggiano cheese or Parmesan cheese, grated: Adds a salty, umami depth to the filling.
- 2 tablespoons fresh parsley, coriander, or chives, finely chopped: Adds freshness and a pop of color. Choose your favorite herb or a mix!
- Freshly ground black pepper, to taste: A pinch of pepper enhances the savory notes.
- 7 ounces (approx. 200g) Mozzarella cheese, Cheddar, or Swiss cheese, finely chopped or shredded: The gooey, melty heart of our pull-apart bread. A blend of cheeses can also be delicious.
Having all your ingredients prepped and measured before you begin will make the baking process smoother and more enjoyable. Let’s get started on crafting this irresistible garlic cheese bread!
Directions
Step 1: Preparing the Dough and Filling
Begin by preparing the dough. In a large mixing bowl, combine the all-purpose flour and salt. Use a whisk or a spoon to mix them thoroughly until well combined. This ensures the salt is evenly distributed throughout the flour, preventing direct contact with the yeast which can inhibit its activity. Next, add the granulated sugar and active dry or instant yeast to the flour mixture. Mix these dry ingredients together gently. If you are using active dry yeast that requires activation, you might need to proof it separately in a small bowl with a portion of the room temperature milk and a pinch of sugar for about 5-10 minutes until foamy, then incorporate it into the wet ingredients.
In a separate, medium-sized bowl, gently whisk together the room temperature milk, beaten egg, and melted unsalted butter until they are well combined. The room temperature of these wet ingredients is vital as it provides an optimal environment for the yeast to activate and the dough to rise properly. Gradually pour the wet ingredients into the dry ingredients in the large bowl, mixing with a wooden spoon or your hands. Continue to mix until the dough comes together and becomes slightly sticky. Turn the dough out onto a lightly floured surface or continue to knead it directly in the bowl.
Knead the dough for about 8-10 minutes. You’ll know it’s sufficiently kneaded when it becomes smooth, elastic, and pulls away cleanly from the sides of the bowl or your hands. It should feel soft and springy to the touch. Once kneaded, form the dough into a ball. Lightly grease the mixing bowl with a little oil, place the dough ball back into it, and turn it once to coat all sides with oil. Cover the bowl tightly with plastic wrap or a damp kitchen towel to prevent it from drying out. Place the bowl in a warm, draft-free place to rise. This typically takes about 1 to 2 hours, or until the dough has at least doubled in size. A good warm spot could be inside a slightly warm (but turned off) oven or near a sunny window.
While the dough is rising, prepare the aromatic filling. In a separate medium bowl, combine the softened unsalted butter (ensure it’s at room temperature for easy mixing), finely grated Parmigiano Reggiano or Parmesan cheese, freshly ground black pepper, finely chopped coriander (or your chosen herb like parsley or chives), and the minced garlic clove. Mix all these ingredients thoroughly using a spoon or a small spatula until the mixture is creamy and well combined. This garlic butter mixture is what will infuse our bread with incredible flavor.
Step 2: Shaping and Baking the Pull-Apart Bread
Once your dough has successfully doubled in size, gently punch it down to release the air. Transfer the dough to a lightly floured work surface or a silicone mat. Using a rolling pin, roll the dough out into a large rectangular shape, approximately 20 inches by 13 inches. Aim for an even thickness across the entire rectangle to ensure consistent baking.
Evenly spread the prepared creamy garlic butter filling over the entire surface of the rolled-out dough, leaving a small border (about half an inch) around the edges. This ensures every bite will have that wonderful garlic and herb flavor. Next, generously sprinkle the finely chopped or shredded Mozzarella cheese (or your chosen cheese blend) over the garlic butter layer. Ensure an even distribution for maximum cheesy goodness in every pull-apart piece.
Now, it’s time to create the pull-apart layers. Using a sharp knife or a pizza cutter, cut the large dough rectangle into 5 long, equal strips. Make these cuts parallel to the shorter side of the rectangle. Each strip should be approximately 2.6 inches wide. Carefully stack three of these strips on top of each other. Then, stack the remaining two strips together. You will now have two distinct stacks of dough strips.
Take each stack and cut it crosswise into 4 equal squares. This means each square will be about 3.25 inches by 2.6 inches, depending on your initial strip width. The stacking and cutting method creates the distinct layers and pockets for cheese and garlic butter that make this bread so special.
Prepare a 4.5 x 9-inch loaf pan by lining it with parchment paper. Leave an overhang on the longer sides to create “handles” that will help you lift the baked bread out of the pan easily. Carefully arrange the square stacks into the prepared loaf pan. You can gently spread apart the top of every layer with your hands slightly to encourage more “pull-apart” separation once baked. Don’t press them down too hard; we want to maintain airiness.
Once the squares are arranged in the loaf pan, cover the pan loosely with plastic wrap and then with a clean tea towel. Let it rise at room temperature for another 30 minutes. This second rise, often called “proofing,” is crucial for developing the final light and airy texture of the bread before baking.
While the bread is proofing, preheat your oven to 180°C (350°F). After 30 minutes, remove the plastic wrap and tea towel. Gently brush the top surface of the bread with a little beaten egg. This egg wash will give your bread a beautiful golden-brown, glossy crust. Place the loaf pan into the preheated oven and bake for approximately 30 to 35 minutes. The bread should turn a rich golden brown on top, and the internal temperature should reach around 90-95°C (195-205°F) if you have a thermometer. If the top starts to brown too quickly, you can loosely tent it with aluminum foil.
Once baked, remove the bread from the oven and let it cool in the pan for about 10-15 minutes before carefully lifting it out using the parchment paper handles. Transfer it to a wire rack to cool down further before serving. While it’s tempting to dive in immediately, allowing it to cool slightly helps the cheese set and prevents the bread from collapsing.
Tips for Success with Your Pull-Apart Bread
- Room Temperature Ingredients: Always use room temperature milk, egg, and butter for the dough. Cold ingredients can slow down yeast activity, leading to a longer rise time and a less airy dough.
- Don’t Over-Flour: When kneading or rolling, use as little extra flour as possible. Too much flour can make your bread dry and dense. A slightly sticky dough is often a sign of proper hydration.
- Kneading is Key: Ensure you knead the dough long enough (8-10 minutes). Proper kneading develops the gluten, which is essential for the bread’s structure and elasticity, giving it that characteristic chewiness and fluffiness.
- Warm Rising Environment: Yeast loves warmth. A warm, draft-free spot (like a turned-off oven with the light on, or a warm kitchen corner) is ideal for rising. If your kitchen is cold, rising might take longer.
- Generous Filling: Don’t be shy with the garlic butter and cheese! These are what make this bread so incredibly delicious. Spread the filling evenly for flavor in every bite.
- Parchment Paper is Your Friend: Lining the loaf pan with parchment paper not only prevents sticking but also makes it incredibly easy to lift the baked bread out without damaging its delicate structure.
- Watch Your Oven: Ovens can vary. Keep an eye on your bread, especially towards the end of baking. If it’s browning too quickly, loosely tent it with aluminum foil to prevent burning.
- Cool Before Serving: While tempting, allowing the bread to cool for at least 10-15 minutes helps the cheese to set and the internal structure to firm up, ensuring a better texture and easier pulling apart.
Variations to Try
While the classic garlic and cheese combination is phenomenal, feel free to experiment with these variations to customize your pull-apart bread:
- Herb Medley: Instead of just one herb, try a mix of fresh parsley, chives, and dill for a more complex aromatic profile.
- Spicy Kick: Add a pinch of red pepper flakes to the garlic butter filling for a subtle heat, or finely chopped jalapeños for a bolder spice.
- Different Cheeses: Experiment with other melty cheeses like Gruyère, Provolone, or a sharper aged Cheddar. A combination of cheeses often yields the best results.
- Sun-Dried Tomato & Basil: Mix in finely chopped sun-dried tomatoes (oil-packed, drained) and fresh basil leaves into the filling for a Mediterranean twist.
- Everything Bagel Seasoning: Sprinkle some everything bagel seasoning on top of the dough before baking for an extra layer of flavor and texture.
- Bacon Bits: For a truly indulgent treat, add cooked, crumbled bacon bits to the cheese layer before stacking.
Serving Suggestions
This pull-apart garlic cheese bread is incredibly versatile and pairs wonderfully with a variety of meals:
- Pasta Dinners: A classic accompaniment to spaghetti, lasagna, or any creamy pasta dish.
- Soups and Stews: Perfect for dipping into a hearty bowl of tomato soup, minestrone, or a rich beef stew.
- BBQ & Grilling: A fantastic side for grilled chicken, ribs, or burgers.
- Salads: Adds a savory, satisfying element to a fresh green salad.
- Appetizer: Serve it on its own as a delightful snack or party appetizer with a side of marinara sauce for dipping.
- Breakfast/Brunch: While typically savory, a slice can be surprisingly good alongside scrambled eggs.
Storage Instructions
While this bread is best enjoyed fresh and warm from the oven, you can certainly store leftovers:
- Room Temperature: Store any leftover bread in an airtight container or tightly wrapped in plastic wrap at room temperature for up to 2 days.
- Refrigeration: For longer storage, refrigerate the bread in an airtight container for up to 4-5 days.
- Freezing: This bread freezes well! Once completely cooled, wrap the entire loaf or individual slices tightly in plastic wrap, then aluminum foil. Freeze for up to 2-3 months.
- Reheating: To reheat, thaw frozen bread overnight in the refrigerator if possible. Place the bread on a baking sheet and warm in a preheated oven at 150°C (300°F) for 10-15 minutes, or until heated through and the cheese is melty again. You can also briefly microwave individual pieces, but the oven provides a better texture.
There you have it – a comprehensive guide to making the most delicious, fluffy, and cheesy pull-apart garlic bread. This recipe is a true game-changer, proving that homemade bread can be both impressive and easy. So go ahead, gather your ingredients, follow these steps, and prepare to fill your home with the irresistible aroma of freshly baked bread. Enjoy every savory, cheesy, pull-apart bite!
*All image credit belongs to How Tasty via YouTube. Follow and subscribe to their channel for more incredible recipes!