
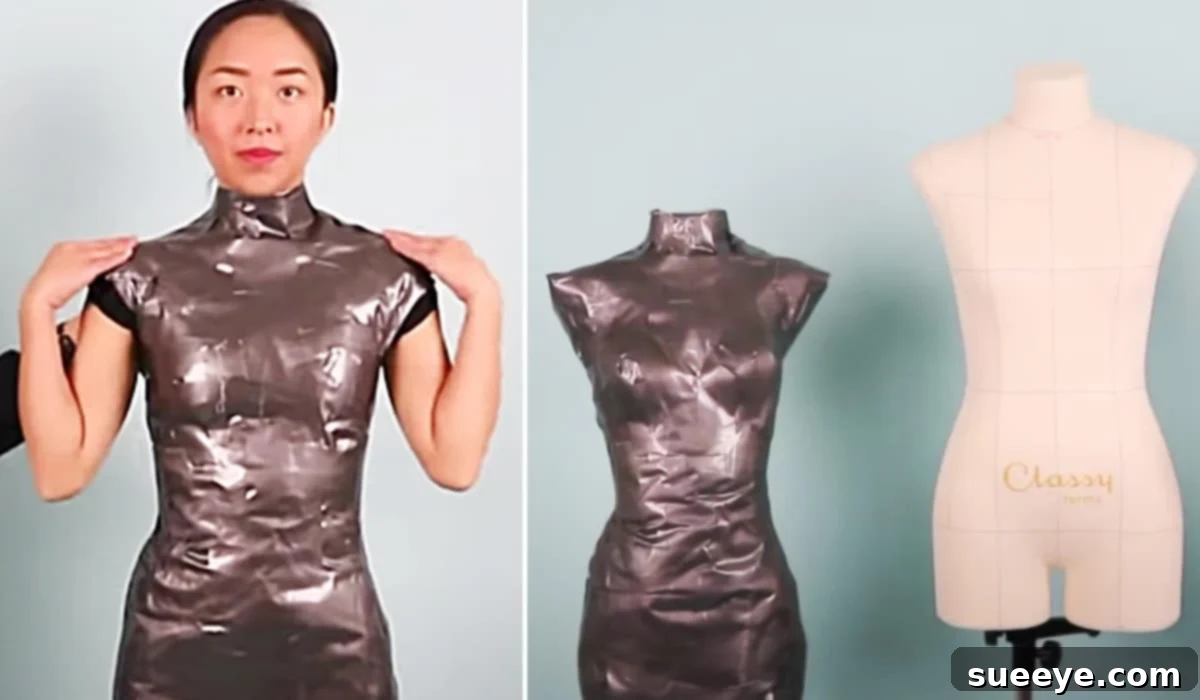
DIY Duct Tape Dress Form: Create Your Own Custom Mannequin for Perfect Garment Fitting
For any enthusiastic sewist, garment maker, or aspiring fashion designer, a dress form is an invaluable tool. It transforms the arduous task of fitting clothing into a streamlined, enjoyable process, allowing you to drape fabrics, refine patterns, and visualize your creations in three dimensions without constantly trying garments on. However, professional dress forms can often come with a hefty price tag, making them inaccessible for many hobbyists or those just starting their sewing journey. This challenge often leads creative minds to seek innovative, budget-friendly alternatives.
Enter the DIY duct tape dress form – a revolutionary solution that promises a custom-fit mannequin molded precisely to your unique body shape, all without emptying your wallet. Inspired by brilliant tutorials like the one from Coolirpa on YouTube, this project is not only incredibly practical but also surprisingly achievable for anyone with a bit of patience and a few common materials. Imagine working on your sewing projects with unparalleled accuracy, confident that every seam, dart, and hem will align perfectly with your figure. This comprehensive guide delves into creating your very own personalized sewing companion, designed to make your garment construction smoother, more precise, and ultimately, more rewarding.
Why a Custom Dress Form is Essential for Every Sewist
While sewing directly on your body or relying on standard commercial mannequins might seem sufficient, a custom dress form offers a multitude of benefits that elevate your sewing projects from good to exceptional:
- Unmatched Accuracy: Commercial dress forms adhere to standardized measurements that rarely match an individual’s unique body contours, posture, or proportions. A custom duct tape form captures every curve, slope, and detail of your physique, ensuring garments fit *you* perfectly.
- Independent Fitting: No more contorting yourself in front of a mirror or relying on a second person to pin seams. With your custom form, you can work independently, adjust fit, and make alterations with ease.
- Draping and Design: For those who enjoy draping fabric directly onto a form to create original designs or experiment with silhouettes, a personalized mannequin provides the ideal canvas, reflecting how the fabric will truly fall on your body.
- Pattern Adjustments: Easily transfer your body measurements and unique variations directly to patterns. See exactly where a dart needs to be moved, a seam needs to be tapered, or extra ease needs to be added.
- Visualizing Garments: Before committing to fabric and extensive sewing, you can drape and pin pattern pieces or mock-ups onto your form to visualize the final look, identify potential issues, and make informed design decisions.
- Saving Time and Fabric: By eliminating endless try-ons and guesswork, a custom form significantly reduces the time spent on fitting and minimizes fabric waste due to ill-fitting mistakes.
In essence, a custom duct tape dress form is an investment in your sewing skill and efficiency, providing a professional-grade tool tailored specifically for you, at a fraction of the cost.
Gathering Your Materials for the Ultimate DIY Dress Form
The beauty of this project lies in its simplicity and the accessibility of its required materials. Most items are readily available, perhaps even lying around your home. Here’s a detailed look at what you’ll need to embark on your custom dress form journey:
- A Large Roll of Duct Tape: This is the cornerstone of your project. Opt for a good quality, strong duct tape as it will form the rigid shell of your mannequin. Depending on your size, you might even consider two rolls to be safe. Some sewists prefer a plain silver, while others use colorful tapes to add personality or differentiate body sections.
- An Old Dress or Long T-Shirt: This garment will serve as the base layer, protecting your skin and hair from the adhesive tape, and eventually becoming an integral part of the dress form itself. Choose something that is snug-fitting but comfortable, allowing you to stand still for an extended period. Make sure it’s an item you’re willing to sacrifice, as it will be cut and taped over. A long t-shirt or an old simple dress that reaches to at least mid-thigh is ideal to capture the hip line accurately.
- Saran Wrap (Cling Film): Crucial for protecting sensitive areas. You’ll use this to cover your neck thoroughly before applying any tape, preventing tape from sticking to hair or irritating skin. Some individuals also choose to wrap their arms or shoulders lightly for extra protection, especially if extending the form beyond the torso.
- Stuffing Material (Newspaper and/or Fabric Scraps): These will give your dress form its volume and firmness.
- Newspaper: Readily available and excellent for initial bulk stuffing. Crumple it tightly to ensure a dense and firm form.
- Fabric Scraps: A more sustainable option, especially for sewists with a stash. Fabric scraps can provide a smoother, more even fill, particularly for the outer layers of stuffing. Consider using poly-fill or quilt batting for the very top layer of stuffing to achieve a smoother, more pinnable surface if desired.
- Cardboard: Essential for sealing the neck and the bottom of your dress form. Sturdy cardboard from old shipping boxes works perfectly. This provides a stable base and top, crucial for mounting and maintaining the form’s shape.
- A Sharpie (Permanent Marker): Used for marking crucial lines on your form, such as center front, center back, waistline, bust line, and hip line, after the taping is complete and before cutting. This ensures you can reassemble it accurately.
- A Pair of Sharp Scissors: You’ll need these to cut the duct tape and eventually cut open the taped form to remove it. Strong, sharp scissors are a must to cleanly cut through multiple layers of tape without struggle.
- A Sturdy Stand (e.g., Long Lamp Base, Coat Rack, or PVC Pipe Assembly): Your finished dress form will need a stable base to stand on. An old floor lamp base, a sturdy freestanding coat rack, or even a custom-built stand from PVC pipes are excellent options. The stand should be heavy enough to prevent the form from tipping over and ideally, adjustable in height for maximum versatility.
- Optional: Shoulder Pads or Bra Cutlets: These can be strategically placed inside the form during the stuffing phase to enhance and accurately replicate the bust area’s shape and fullness, providing a more lifelike representation of your figure.
- Optional: Measuring Tape: While not strictly used in the construction, having one on hand to take initial body measurements (bust, waist, hips, back length) and then compare them to the finished form can help ensure accuracy and guide final stuffing adjustments.
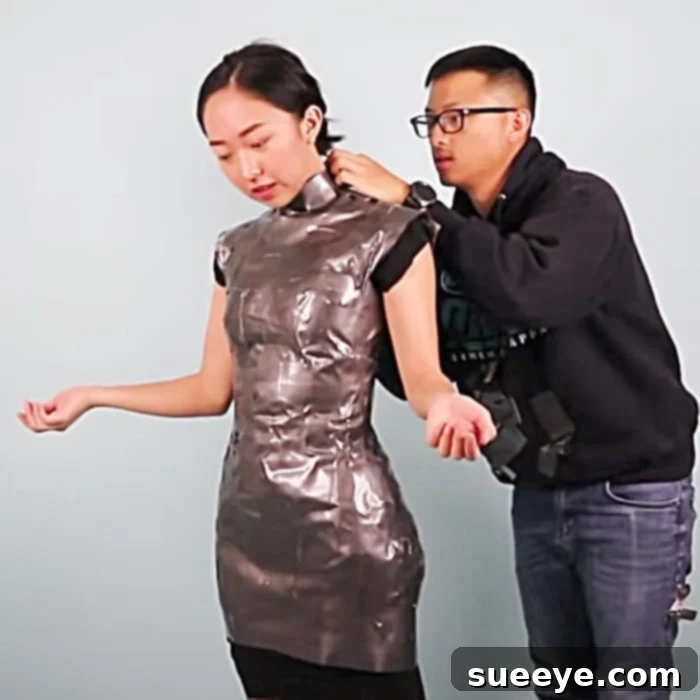
Step-by-Step Guide: Crafting Your Personalized Duct Tape Dress Form
Creating your custom dress form is a collaborative effort that requires careful attention to detail and, ideally, the help of a friend. Follow these steps meticulously to ensure a perfect replica of your torso:
Step 1: Preparation is Key
- Dress for Success (and Sacrifice): Put on the old dress or long t-shirt you’ve chosen. Ensure it’s snug but not restrictive. Wear the undergarments (like your usual bra) that you typically wear when fitting clothes, as these will affect your body shape.
- Protect Your Neck: Wrap your entire neck area thoroughly with saran wrap. This is vital to prevent any duct tape from sticking to your skin or hair, which can be very uncomfortable during removal. Extend the wrap down onto the top of the t-shirt for extra safety.
- Enlist a Helper: This project is significantly easier, and far more accurate, with the assistance of another person. They will be responsible for applying the duct tape smoothly and evenly while you remain still.
Step 2: The Taping Process – Building Your Shell
- Start at the Waist: Your helper should begin applying the duct tape horizontally around your natural waistline. Ensure the tape is taut but not so tight that it compresses your body. Each strip should overlap the previous one by about half its width.
- Work Upwards and Downwards: Once the waist is established, your helper will continue taping upwards to cover the bust, shoulders, and neck area, and then downwards to cover the hips and upper thighs.
- Contouring the Body:
- Bust: For the bust area, the tape needs to be applied carefully to follow the natural curve. Small, diagonal strips of tape can be used to create a smoother, more accurate contour without flattening the bust.
- Shoulders & Arms: Tape should extend over the shoulders and slightly down the arms to capture the shoulder slope accurately. If you desire full armholes, ensure the tape creates a definitive edge here.
- Hips & Thighs: Tape down to at least mid-thigh to get a comprehensive representation of your lower torso and hip curve.
- Smooth and Even Application: Emphasize smooth application to avoid wrinkles and bubbles, which can distort the form. Apply at least two, preferably three, layers of duct tape for sufficient rigidity and strength. The goal is to create a firm, self-supporting shell.
- Maintain Posture: Throughout the entire taping process, you must stand as still as possible in your natural, relaxed posture. This ensures the form accurately reflects your body as it typically appears.
Step 3: Marking and Removal
- Mark Key Lines: Once all layers of tape are applied and the form feels sturdy, use a Sharpie to mark important anatomical lines directly onto the duct tape. This includes:
- Center front and center back lines.
- Natural waistline (often the narrowest part of your torso).
- Bust line (across the fullest part of the bust).
- Hip line (across the fullest part of the hips).
- Side seams (under the arms, down to the hips).
These markings are crucial for accurate reassembly and for future use in pattern making.
- Careful Cutting: Your helper will then carefully cut the duct tape form open. The most common and safest method is to cut a straight line down the center back, from the neck to the bottom hem. Cut *only* through the duct tape layers and the old t-shirt, being extremely cautious not to cut your skin.
- Step Out: Once the cut is complete, you can gently step out of your newly formed duct tape shell. This moment feels incredibly satisfying!
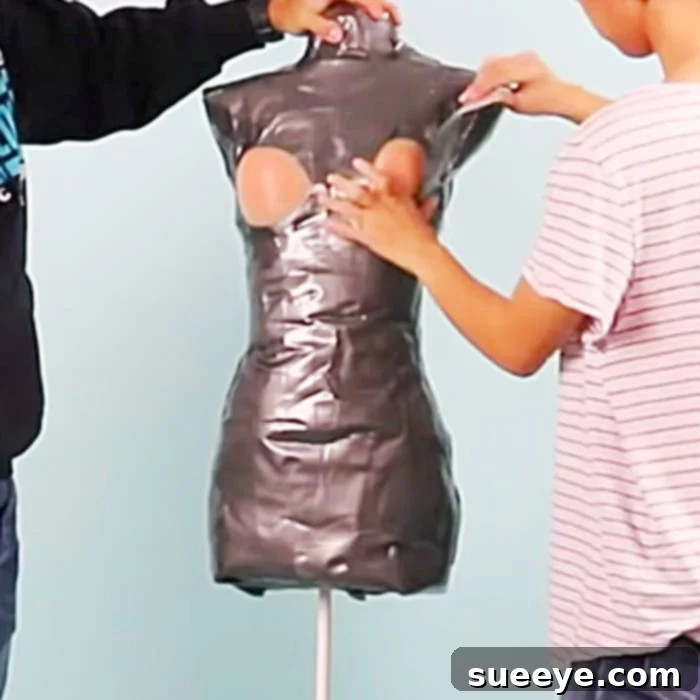
Step 4: Reassembly and Stuffing
- Tape it Back Together: Carefully align the cut edges of the form and use additional strips of duct tape to seal the seam securely. Reinforce this seam with several layers of tape both inside and out to ensure structural integrity.
- Begin Stuffing: Now comes the transformation! Start stuffing your form from the bottom opening. Pack the stuffing material (newspaper, fabric scraps, or poly-fill) firmly and evenly throughout the entire form. The goal is to achieve a dense, solid, and smooth surface.
- Strategic Shaping: For areas like the bust, you can strategically place shoulder pads, bra cutlets, or extra wads of fabric to replicate the fullness and projection accurately, as seen in many tutorials. This is where those optional materials come in handy.
- Even Density: Ensure there are no hollow spots or soft areas. A firmly packed form will hold its shape better and be more pinnable.
- Seal the Bottom: Once the form is fully stuffed to your satisfaction, use a piece of sturdy cardboard to seal the bottom opening. Cut a circle or oval of cardboard that fits snugly, then tape it securely into place with duct tape. This provides a flat, stable base.
Step 5: Sealing the Neck and Mounting Your Form
- Seal the Neck: Similarly, cut a piece of cardboard to fit the neck opening. Tape it securely with duct tape. This creates a finished top and helps contain the stuffing.
- Mount Your Form: Your personalized mannequin is almost ready! Insert your chosen stand (lamp base, coat rack pole, or custom PVC stand) into the bottom of the form, pushing it up into the stuffing until it feels stable and centered. Use additional duct tape to secure the form firmly to the stand, ensuring it won’t wobble or detach during use. Some prefer to run the stand through the entire form, reinforcing it inside.
Tips for Success and Enhancing Your Custom Dress Form
- Seek Assistance: Seriously, this project is nearly impossible to do accurately by yourself. A friend will ensure even tape application and proper posture.
- Posture is Paramount: Stand naturally and relaxed. Avoid slouching or standing overly stiff. Your form should reflect your everyday posture.
- Wear Appropriate Undergarments: Wear the bra and other foundation garments you typically wear for sewing projects. This directly impacts the form’s shape.
- Marking is Critical: Don’t skip marking your key body lines (waist, bust, hips, center front/back) before cutting. These lines are invaluable guides for pattern work.
- Stuffing Density: Experiment with stuffing density. A very firm form is great for draping and pinning, but ensure it’s not so rigid it becomes impossible to insert pins.
- Add a Fabric Cover: Once complete, consider creating a removable fabric cover for your duct tape form. An old pillowcase or a simple muslin cover can be sewn to fit, providing a softer, more professional, and pinnable surface, and protecting the tape from dust and wear.
- Consider Adjustability: While a duct tape form is fixed, you can add padding or adjust stuffing over time if your body measurements change slightly.
- Patience is a Virtue: Rushing any step, especially the taping or stuffing, can lead to a less accurate or less durable dress form. Take your time and enjoy the process.
Unlocking Your Sewing Potential with a Custom Mannequin
The completion of your DIY duct tape dress form marks a significant milestone in your sewing journey. You’ve not only saved a considerable amount of money but have also created a tailor-made tool that is perfectly suited to your unique body. This personalized mannequin will revolutionize the way you approach garment construction, making fitting less stressful and more precise. From intricate pattern adjustments to delicate draping projects, your custom dress form will become your silent, indispensable partner in the studio.
Embrace the freedom and accuracy that comes with having a mannequin that truly understands your body. No more guessing, no more ill-fitting garments – just confident, creative sewing. This project is a testament to the ingenuity and resourcefulness inherent in the sewing community, proving that with a little tape, patience, and a can-do attitude, you can achieve professional results at home. So, gather your materials, enlist a friend, and prepare to elevate your sewing skills to an entirely new level!