
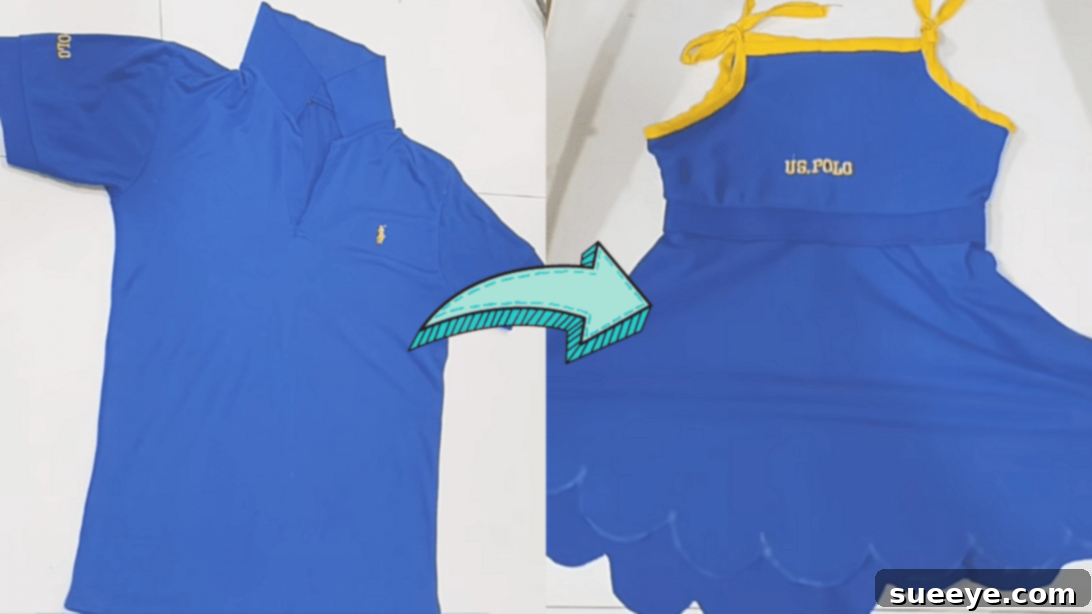
Do you have a closet full of out-of-trend polo shirts that are simply gathering dust? Instead of letting them contribute to landfill waste, imagine transforming them into something utterly new, stylish, and full of character! This simple yet stunning DIY T-Shirt makeover tutorial, inspired by the creative minds at HAND MADE Ideas, will guide you through the exciting process of repurposing those forgotten garments. You’ll be genuinely amazed at the beautiful designer dress you can create with just a little ingenuity and some basic sewing skills.
This project isn’t just about crafting; it’s about embracing sustainable fashion, expressing your unique style, and creating something truly special. Whether you’re looking to make an adorable, one-of-a-kind dress for the children in your life, or you’re an aspiring entrepreneur wanting to sell unique handmade clothing, this tutorial provides the perfect starting point. Dive into this rewarding sewing project and breathe new life into old fabric, all while making a positive impact on your wallet and the environment. Get ready to turn the ordinary into the extraordinary!
Why Upcycle Your Old Clothes? The Benefits of a DIY T-Shirt Makeover
Before we jump into the crafting process, let’s take a moment to appreciate the immense benefits of upcycling and repurposing clothing. In an era where fast fashion dominates, choosing to upcycle offers a refreshing and responsible alternative. Firstly, it’s incredibly eco-friendly. By giving old garments a new purpose, you reduce textile waste, conserve resources that would otherwise be used to produce new materials, and decrease your carbon footprint. It’s a small but significant step towards a more sustainable lifestyle.
Secondly, upcycling is wonderfully cost-effective. Instead of spending money on new fabric or a store-bought dress, you’re utilizing materials you already own. This makes fashion more accessible and allows you to create high-quality, personalized pieces without breaking the bank. Thirdly, the creative satisfaction derived from a DIY t-shirt makeover is immense. Each upcycled piece is unique, reflecting your personal touch and creativity. You’re not just making a dress; you’re crafting a story, transforming an item with history into a garment with a future. It allows for complete customization, ensuring that your final product is truly one-of-a-kind and perfectly suited to your vision. It’s an empowering way to express yourself and discover new skills.
Materials You’ll Need for Your DIY Designer Dress
Gathering your materials is the first exciting step in any creative project. For this fabulous polo shirt transformation, you won’t need an extensive shopping list. Most of these items might already be in your craft box or readily available around your home. Remember, the beauty of DIY is often in making do with what you have!
- Old Polo Shirt: This is the star of our show! Choose a polo shirt that is clean and made from a fabric you enjoy working with. Cotton or cotton blends are usually easy to sew and comfortable to wear. Its size will influence the size of your final dress, so select appropriately for a child’s dress or a smaller adult’s garment.
- Tape Measure: Essential for accurate sizing and cutting. Precision is key in achieving a professional-looking finish.
- Fabric Chalk or Marker: For marking your cutting lines clearly on the fabric. Tailor’s chalk is easily removable, ensuring no permanent marks are left.
- Small Round Container (e.g., a cup, jar lid): This will be your template for creating beautiful scalloped or curved patterns, adding a touch of whimsy to the skirt.
- Fabric Scraps (optional): While the primary material comes from the polo shirt, a small coordinating fabric scrap can be useful for contrasting straps, embellishments, or if you need to extend a piece.
- Fabric Scissors: Sharp scissors specifically designed for fabric will ensure clean, precise cuts, preventing frayed edges and making your work much easier.
- Sewing Machine (or Needle and Thread): A sewing machine will make the process quicker and provide stronger seams, but a hand-sewn dress is absolutely achievable with patience and a good stitch.
- Pins: To hold fabric pieces together securely before sewing.
- Iron and Ironing Board: For pressing seams, which gives your finished garment a neat and professional appearance.
Detailed Directions: Bringing Your Vision to Life
This tutorial breaks down the transformation into manageable steps, focusing on creating both the skirt and the top from your single polo shirt, then joining them to form a lovely dress. Take your time with each stage, and don’t be afraid to pause and adjust as you go.
Pre-Sewing Preparation: Essential Tips for Success
Before you even pick up your scissors, a few preparatory steps can significantly improve your results. Always wash and dry your polo shirt beforehand. This pre-shrinks the fabric, preventing any unwelcome surprises after the first wash of your new dress. It also ensures the fabric is clean and ready to be worked with. When cutting, lay your fabric flat and smooth out any wrinkles to ensure accurate measurements and clean lines. Use sharp fabric scissors; using dull scissors or those used for paper can snag and damage your fabric. Finally, familiarize yourself with your sewing machine settings, especially tension and stitch length, and practice on a scrap piece of fabric if you’re new to sewing.
Step 1: Crafting the Elegant Skirt Section
The skirt is designed to be flowy and charming, giving a beautiful silhouette to your new dress. This section will guide you in creating its unique shape.
To begin, lay your old polo shirt flat and smooth on a large, clean surface. Using your tape measure, identify one of the bottom corners of the shirt. From this precise corner, measure 9 inches up along one side of the shirt. Mark this point with your fabric chalk. This will be your starting reference. Now, keeping your tape measure anchored at the very bottom corner, gently pivot it slightly, adjusting the angle, and measure another 9 inches, making a new mark. Continue this process, making small, incremental marks, each exactly 9 inches from the original bottom corner, until you reach the general area of one of the shirt’s sleeves. What you’re essentially doing is creating a graceful quarter-circle arc. Connect these marks with a smooth, continuous line using your chalk.
Next, to add a delightful “flower-like” or scalloped edge to the hem, take your small round container. Place its rim along the chalk line you just drew for the skirt hem. Carefully draw half-circles, following the curve of the container, along the entire length of your marked quarter-circle. Overlap them slightly if you desire a more intricate pattern. Once your pattern is drawn, carefully cut along these scalloped lines using your sharp fabric scissors. Take your time to ensure clean, precise cuts for a beautiful finished edge.
After achieving your decorative hem, it’s time to define the waistline for the skirt. Go back to the original bottom corner of the polo shirt where you started your measurements. From this same corner, create another quarter-circle arc, but this time with a 6-inch radius. Mark 6 inches from the corner, pivot, and mark again, just as you did for the hem, until you’ve formed a smooth quarter-circle. This 6-inch arc will form the opening for the waist of your skirt. Carefully cut along this inner 6-inch quarter-circle line.
Now you should have a single piece of fabric shaped like a quarter-circle with a decorative outer edge and a smooth inner curve. To complete the skirt, fold this fabric piece in half, ensuring the decorative edges align perfectly. With the fabric folded, sew the two raw straight edges together. Use a straight stitch, about 1/2 inch from the edge. Finish this seam with a zigzag stitch or an overlock stitch to prevent fraying and ensure durability. Press the seam open or to one side for a clean finish. This will form the basic conical shape of your skirt.
Step 2: Designing the Stylish Top Section
The remaining portion of your polo shirt will be transformed into the bodice of your dress. This part requires careful cutting to create a flattering and comfortable fit.
Take the remaining top part of the polo shirt. The first step is to remove the sleeves. Lay the shirt flat, and carefully cut along the sleeve joint, following the existing seam line. Do this for both sleeves, discarding them or saving them for another micro-project. You’ll now have a sleeveless shirt body. Place the front and back pieces of the shirt neatly on top of each other, aligning the shoulders and side seams. Then, fold both layers in half lengthwise, ensuring all edges are perfectly aligned. This symmetrical fold is crucial for creating even cuts.
Now, let’s shape the armholes and neckline. Locate the curve at the armhole end (where the sleeve was removed). From this curved edge, measure 2.5 inches inwards (towards the center fold) and make a mark with your chalk. This will serve as your first reference point for the shoulder strap/neckline. From this 2.5-inch mark, draw a straight line perpendicular to the folded edge, measuring 3 inches downwards. This 3-inch line defines the depth of your new armhole. This is your second reference point.
With these two points established, draw a gentle, smooth curve connecting the first point (2.5 inches in from the armhole end) to the second point (the end of the 3-inch perpendicular line). This curve will form the new armhole. Next, draw a straight line from the highest point of your original neckline (at the shoulder seam) down to the start of your 2.5-inch mark. Cut along this newly drawn curved line for the armhole and the straight line for the neckline. After cutting, unfold the fabric to reveal the symmetrical top pieces. You may need to trim and straighten any remaining raw edges around the armholes and neckline to ensure a clean finish.
To finish the neckline and create a neat edge, cut two rectangular fabric strips from any remaining large scraps of the polo shirt or a coordinating fabric. These strips should be long enough to span the front and back necklines and about 1.5 to 2 inches wide. Fold each strip in half lengthwise and press. Attach these folded strips to the neckline edges (one for the front, one for the back) using a straight stitch, right sides together. Flip the strips to the inside and topstitch for a clean, finished neckline. You can also use a simple hem if you prefer.
Next, place the front and back pieces of your top right sides together and sew the side seams. Use a 1/2-inch seam allowance and finish the raw edges to prevent fraying. For the straps, cut a long rectangular strip of fabric – about 2 inches wide and 18-24 inches long (adjust length as needed for desired strap length and comfort). Fold this strip in half lengthwise, right sides together, and sew along the raw edge to create a tube. Turn the tube right side out (a safety pin or loop turner helps here) and press it flat. Attach the ends of this strap to the shoulders of your top, either at the front or back, to create the desired look. You can create two separate straps or one continuous one that ties.
Step 3: Assembling Your Tiny Designer Dress
Now for the grand finale – uniting the top and skirt to create your beautiful new dress!
Take your finished skirt and your completed top. The waist opening of the skirt might be slightly wider than the bottom edge of the top, which is ideal for creating a gentle gather. Place the top piece inside the skirt piece, aligning the raw waist edges, with right sides of the fabric facing each other. Pin the top and skirt together securely around the entire waistline, distributing any excess fabric in the skirt evenly to create small gathers. If the difference is significant, you might need to run a basting stitch along the skirt’s waist edge and gently pull it to gather it to fit the top.
Once pinned, sew the top and skirt together using a sturdy straight stitch, about 1/2 inch from the raw edge. Go slowly, removing pins as you sew, to ensure a smooth and even attachment. After sewing, trim any excess seam allowance and finish the raw edges with a zigzag stitch or serger to prevent fraying and provide a professional finish. Press the seam upwards towards the bodice for a clean, crisp look.
Congratulations! You now have a unique and charming tiny dress, transformed from a simple polo shirt. Try it on, admire your handiwork, and get ready to show it off!
DIY T-Shirt Makeover: Tips for Customization and Care
Personalize Your Creation
This tutorial provides a fantastic foundation, but don’t stop there! Here are some ideas to further customize your DIY designer dress:
- Embellishments: Add embroidery, patches, appliques, buttons, or fabric paint to make it truly unique. A small embroidered motif on the bodice or a patch on the skirt can add character.
- Ruffles or Pockets: Use leftover fabric scraps to add a small ruffle along the hem or cute patch pockets to the skirt for functionality and style.
- Layering: Experiment with different fabric weights. If you’re using a lighter polo shirt, consider adding a lining made from a soft cotton fabric for added comfort and opacity.
- Different Straps: Instead of simple fabric straps, you could use ribbon, braided fabric, or even adjust the pattern to create wider shoulder straps.
- Two-Tone Design: If you have two old polo shirts of complementary colors, you could use one for the top and another for the skirt, creating a stylish two-tone dress.
Caring for Your Upcycled Dress
To ensure your beautiful new dress lasts, follow these simple care instructions. Since it’s made from an old polo shirt, it should be relatively easy to maintain. Wash in cold water with similar colors, preferably on a gentle cycle, to preserve the fabric and stitching. Tumble dry on low heat or, even better, hang dry to prevent excessive shrinkage and maintain the garment’s shape. Iron on a low-to-medium setting if needed, avoiding any embellishments.
Conclusion: Embrace the Joy of Upcycling
There you have it – a comprehensive guide to turning an old, unused polo shirt into a delightful, stylish designer dress. This DIY t-shirt makeover project is more than just sewing; it’s an act of creativity, sustainability, and personal expression. You’ve transformed something forgotten into something cherished, saving money and reducing waste in the process.
The satisfaction of wearing or gifting a garment you’ve made with your own hands is immeasurable. Each stitch tells a story of ingenuity and care. We encourage you to embark on this sewing adventure and discover the endless possibilities of upcycling. Share your creations, inspire others, and continue to explore the wonderful world of handmade fashion. Happy sewing!