
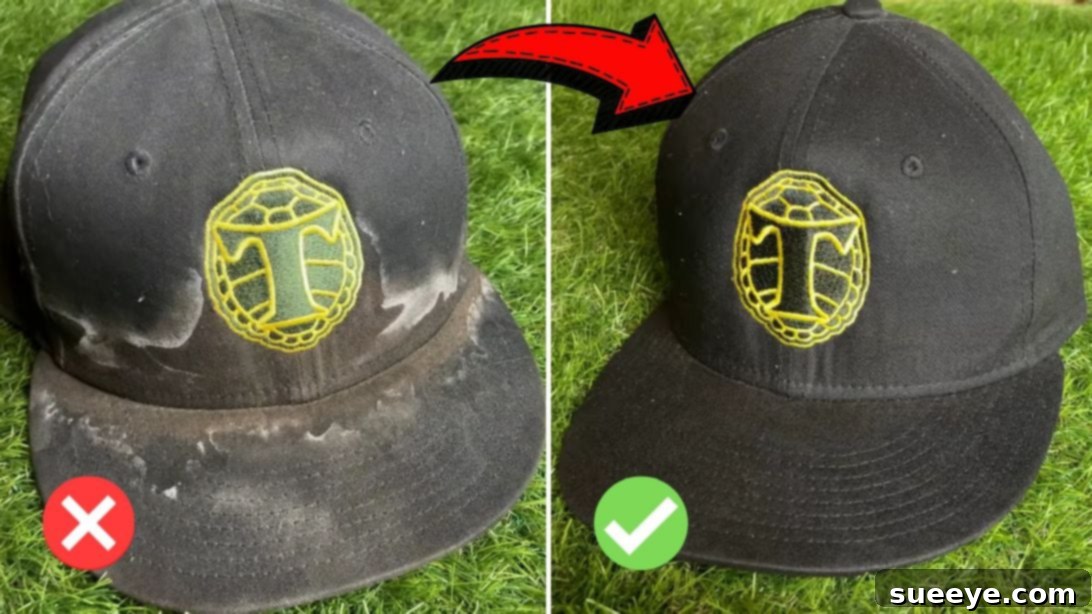
The Ultimate Guide to Cleaning Hats: Remove Sweat Stains and Dirt with a Magic Eraser
Hats are more than just accessories; they’re integral parts of our daily lives and wardrobes. Whether it’s your go-to baseball cap, a stylish golf visor, or a casual everyday hat, these beloved items brave the elements with us, offering protection from the sun, completing an outfit, or displaying team spirit. However, this constant exposure inevitably leads to the accumulation of sweat, dirt, body oils, and grime. These unwelcome blemishes not only diminish your hat’s aesthetic appeal but can also lead to unpleasant odors and significantly shorten its lifespan. For many, cleaning hats has often seemed like a tricky, even daunting task, fraught with concerns about shrinking fabrics, fading colors, or damaging delicate materials in a washing machine. Specialized cleaning products, while promising, can often be expensive and offer limited versatility.
But what if we told you there’s a revolutionary, incredibly simple, and remarkably effective method that utilizes a common, affordable household item to restore your hats to their pristine glory? Thanks to an ingenious technique brilliantly demonstrated by Golf Ascending on YouTube, the days of battling unsightly hat stains are officially over. Their brilliant solution champions the humble magic eraser as the ultimate tool for effortlessly banishing stubborn sweat stains and embedded dirt. This isn’t just another cleaning hack; it’s a genuine game-changer for anyone who values and regularly wears their hats. You no longer need to invest in pricey, single-purpose cleaning agents. Instead, a single magic eraser offers exceptional value, capable of tackling multiple hats and countless other cleaning challenges throughout your home. Prepare to dive into this comprehensive guide, where you’ll learn exactly how to transform your grimy, well-worn hats into spotless, fresh-smelling accessories with unparalleled ease, efficiency, and truly fantastic results.
Why the Magic Eraser is Your Hat’s Best Friend for Cleaning
Before we delve into the step-by-step process of revitalizing your hats, it’s beneficial to understand the science behind why the magic eraser, scientifically known as melamine foam, is so incredibly effective for cleaning hats. Melamine foam is a unique, ultra-fine abrasive material. At a microscopic level, its structure resembles a network of extremely hard, open-cell foam, similar in texture to very fine sandpaper. When activated with just a bit of water, this microscopic abrasive quality allows the magic eraser to act like millions of tiny scrubbers, reaching into the minuscule crevices of fabric fibers.
Its power lies in its ability to gently yet powerfully lift and trap dirt, grime, and even tough, set-in stains like dried sweat, body oils, and makeup. Unlike traditional chemical cleaners that might rely on harsh detergents or bleaches, which can potentially damage certain fabrics or cause colors to bleed, the magic eraser works primarily through mechanical action. It physically scrubs away impurities without the need for aggressive chemicals. This makes it an ideal and considerably safer choice for cleaning a wide range of hat materials, from durable cotton twills and synthetic blends commonly found in athletic caps to more delicate fabrics, provided a small test is performed first.
Furthermore, its non-toxic nature (when used as directed) and widespread availability in almost any grocery or hardware store make it a superior alternative to many conventional, specialized cleaning agents. Not only is it incredibly affordable, often costing just a few dollars for a pack, but its remarkable versatility extends far beyond just hat cleaning, proving its worth as a truly multi-purpose cleaning marvel in any household. By opting for a magic eraser, you’re embracing an economical, highly efficient, and more environmentally conscious approach to maintaining the cleanliness and longevity of your cherished hat collection. It’s a smart choice for smart cleaning.
Materials: What You’ll Need for Effective Hat Cleaning
Gathering all your necessary materials before you begin the cleaning process is a crucial first step that ensures a smooth, uninterrupted, and successful experience. The inherent beauty of this hat cleaning method lies not only in its effectiveness but also in its remarkable simplicity and the widespread accessibility of the required items. You likely already have most, if not all, of these components readily available in your home.
- Magic Eraser: This is, without a doubt, the undisputed star of our hat cleaning show. While various brands produce melamine foam erasers, ensure you have a genuine melamine foam product. Generic or store-brand versions often work just as effectively as the more well-known brands. The most important tip here is to always opt for a new, clean magic eraser for hat cleaning. Using one that has been previously used for other tasks could risk transferring dirt, grease, or cleaning residue onto your hat, which would defeat the purpose.
- Water: Simple, plain tap water is perfectly sufficient for this method. While lukewarm water can sometimes slightly aid in loosening certain types of stains, cold or room-temperature water works absolutely fine and is often preferred to minimize any risk of color bleeding on sensitive fabrics. You’ll need enough water primarily to dampen your magic eraser, and potentially for a final rinse.
- Bowl or Container: A medium-sized to large bowl or any clean, sturdy container will be necessary. Its primary function is to hold water for dipping your magic eraser. Ensure it’s stable and large enough that you can comfortably dip and lightly squeeze the eraser without spilling water.
- Shampoo (optional, but highly recommended for odors or deeper cleaning): This optional step can be a game-changer if your hat has developed a lingering odor or if you desire a more comprehensive clean, especially for the sweatband. A mild shampoo, such as baby shampoo (which is formulated to be gentle), or even a small amount of a gentle, clear dish soap (like Dawn) can be incredibly effective. Avoid harsh detergents, industrial cleaners, or those with strong dyes or heavy perfumes, as these could potentially interact negatively with your hat’s fabric or cause discoloration.
- Clean Towels: While not explicitly listed in some basic guides, having at least two clean, absorbent towels on hand is absolutely crucial for the best results. One towel will be used for blotting excess water from the hat, and another, dry towel will be essential for the air-drying process and for helping your hat maintain its shape.
- Old Toothbrush or Soft Brush (optional): For particularly stubborn or deeply embedded dirt spots, or for meticulously cleaning intricate areas like stitching or embroidered logos, a soft-bristled brush (an old toothbrush is perfect for this) can provide an extra layer of gentle scrubbing power and precision, working in conjunction with or after the magic eraser.
Directions: Step-by-Step Guide to a Spotless Hat
Follow these detailed, easy-to-understand steps to effectively clean your hat, systematically eliminate sweat stains, and remove accumulated dirt, ensuring your favorite headwear looks and smells fresh and vibrant once again. Precision and patience are key to achieving the best results.
Step 1: Preparation and Initial Stain Treatment
Proper preparation is the foundation for any successful cleaning endeavor. Taking a few moments before you dive in will ensure optimal results and help prevent any potential damage to your beloved hat.
- Assess Your Hat’s Material and Construction: Begin by carefully examining your hat. Note its material composition (cotton, polyester, wool, blends, etc.) and any delicate embellishments. While magic erasers are generally safe and gentle, it’s always a wise practice to perform a quick colorfastness test. Lightly dampen a small, inconspicuous area of the hat (such as inside the sweatband or under the brim) with the magic eraser. Blot with a clean white cloth. If any color transfers, proceed with extreme caution or consider an alternative cleaning method. This step is especially important for darker or brightly colored hats, or those made of more delicate natural fibers like wool or felt.
- Brush Off Loose Debris: Before introducing any moisture, use a soft-bristled brush, a lint roller, or even just your hand to gently brush or wipe away any loose dirt, dust, hair, lint, or superficial debris from the hat’s entire surface. This crucial step prevents you from inadvertently spreading surface grime around during the wet cleaning process, making the stain removal more efficient.
- Prepare Your Water: Fill your chosen bowl or container with a modest amount of clean, lukewarm water. You don’t need to overfill it; just enough water to comfortably dampen your magic eraser. Lukewarm water is often preferred as it can help to gently lift dirt without being too aggressive on the fabric.
- Activate the Magic Eraser: Take your new magic eraser and lightly dip one corner or a small section into the prepared water. The goal is to dampen it, not saturate it. Gently squeeze out any excess water with your fingers until the eraser is merely damp, but definitely not dripping wet. An overly wet eraser can unnecessarily drench your hat, making the subsequent drying process much more difficult and increasing the risk of watermarks or mold.
- Target the Sweatband First: The sweatband is typically the area that bears the brunt of sweat, body oils, and sometimes makeup, making it the most stained part of your hat. Begin your cleaning here. Gently rub the damp magic eraser along the entire sweatband, paying close attention to both the inside and outside edges where sweat marks are most visible and concentrated. Use light, controlled circular motions. As you rub, you should visibly notice the sweat stains and grime lifting onto the eraser. Continue to work your way around the band, addressing all affected areas.
- Clean the Crown and Brim: Once the sweatband has been addressed, extend your cleaning efforts to the crown (the main body) and the brim of the hat. For general surface dirt and smudges, use the same gentle rubbing motion. For more concentrated dirt spots or small blemishes on the crown or brim, apply a slightly more focused effort, but always maintain a light, careful hand to avoid inadvertently damaging or abrading the hat’s fabric. Continuously re-dampen the magic eraser as needed, and make sure to rotate to a clean section of the eraser as it picks up dirt. If you notice the eraser becoming heavily soiled, rinse it lightly or even use a fresh piece. For deeply ingrained dirt or older stains, a second, gentle pass over the area might be necessary.
- Monitor Your Progress: As you clean, regularly pause to check the hat’s surface to see the stains disappearing. The magic eraser works effectively by gently abrading and lifting the dirt. Be patient and systematic in your approach, ensuring all areas are evenly treated.
Step 2: Optional Deep Cleaning, Rinsing, and Drying
While the magic eraser is highly effective at removing visible marks and surface dirt, a secondary wash can provide an extra layer of cleanliness, ensuring your hat is not only spotless but also completely fresh-smelling and thoroughly sanitized. This step is particularly beneficial if your hat has developed any persistent odors or if you simply desire a more comprehensive, ‘like-new’ feel.
- Apply Shampoo (Optional but Highly Recommended for Odors): If you choose to incorporate shampoo, apply a very small amount—typically a pea-sized drop is sufficient—directly onto the sweatband and any other areas that might still retain an odor. Gently work the shampoo into a light lather using your fingertips or, for better agitation, a soft brush like an old toothbrush. The shampoo’s primary role here is to help break down residual body oils, bacteria, and any lingering smells that the magic eraser might not have fully addressed, leaving your hat smelling genuinely fresh.
- Gentle Rinse: Once you’re satisfied with the cleaning, it’s time to rinse. Hold the hat under cool, running water. It’s crucial to avoid using hot water, which can cause colors to bleed or certain materials to shrink and distort. Be extremely gentle during this phase; do not twist, wring, or aggressively scrub the hat, as this can severely damage its structure and fabric. Focus on thoroughly rinsing away all traces of shampoo and any loosened dirt. Continue rinsing until the water running from all parts of the hat is completely clear, indicating that all soap residue has been removed.
- Remove Excess Water: After rinsing, the hat will be quite wet. To prevent long drying times and potential watermarks, gently press the hat between several clean, highly absorbent towels. Apply firm but even pressure. Again, avoid any wringing or twisting motions, as these actions are highly likely to distort the hat’s shape, especially the brim and structured crown. The goal is to absorb as much surface water as possible without deforming the hat.
- Shape and Air Dry – A Crucial Step: This is arguably one of the most critical steps to ensure your hat maintains its original shape and integrity. Improper drying can lead to shrinkage, warping, or an ill-fitting hat.
- Stuff the Hat for Shape Retention: To help structured caps retain their original form, gently stuff the crown with clean, dry towels, balled-up paper towels, or even a small, clean t-shirt. Be careful not to overstuff, as this can stretch or misshape the hat. For less structured hats, simply laying them flat may suffice.
- Optimal Air Drying Environment: Place the hat on a clean, dry surface, ideally on a rack where air can circulate freely around it, or hang it on a clothesline if its construction allows without creating creases or stretching. Choose a well-ventilated area that is away from direct sunlight or any artificial heat sources. Direct sunlight can cause hat colors to fade significantly, and high heat from appliances like clothes dryers, radiators, or hair dryers can irreversibly shrink, warp, or damage the hat’s materials and internal components.
- Patience is Key: Allow the hat to air dry completely and naturally. This process can take several hours, or even overnight, depending on the hat’s material, its thickness, and the humidity levels in your environment. It is absolutely vital that the hat is bone dry before you wear it or store it away. Wearing a damp hat can be uncomfortable and encourages the rapid growth of mildew and unpleasant odors.
- Final Inspection: Once your hat is completely dry, give it a thorough inspection. Admire its newfound cleanliness! If, by chance, any minor marks or faint traces of a stain remain, you can gently repeat the magic eraser process on those specific, small spots, followed by a localized rinse and air dry. Your hat should now look, feel, and smell as good as new, ready to be worn with pride!
Hat Care and Preventative Measures: Keep Your Caps Fresh Longer
While the magic eraser technique offers an incredibly effective solution for cleaning already stained hats, proactive care and preventative measures can significantly reduce the frequency of deep cleaning required and extend your hat’s overall life. Incorporating these simple habits into your routine will help keep your hats looking pristine, feeling fresh, and lasting longer, saving you time and effort in the long run.
- Regular Post-Wear Wiping: After each wear, especially after engaging in physical activities or on hot days that induce sweating, make it a habit to give the inside of the sweatband a quick wipe. Use a lightly damp cloth (or even a fresh magic eraser piece, very lightly dampened) to remove fresh sweat and oils before they have a chance to dry and set into stubborn stains. This simple act can make a huge difference.
- Consider Sweat Liners: For those who sweat heavily, or for individuals looking to preserve particularly valuable, vintage, or delicate hats, consider using disposable or washable sweat liners. These ingenious adhesive strips adhere to the inside of the hat’s sweatband, acting as a barrier. They effectively absorb moisture and body oils, directly protecting the hat fabric from direct contact and staining. They are easily replaced or washed, making hat maintenance much simpler.
- Proper Storage is Key: How you store your hats plays a vital role in their longevity and cleanliness. Always store your hats in a cool, dry place away from direct sunlight. Direct sun exposure can lead to color fading over time. Utilize hat boxes, dedicated hat hooks, or simply arrange them neatly on shelves to help them maintain their original shape and prevent dust accumulation. Avoid crushing them under other items or leaving them in humid environments, which can encourage the dreaded growth of mildew and unpleasant musty odors.
- Rotate Your Hat Collection: If you’re fortunate enough to own several hats, make a conscious effort to rotate them. Wearing different hats allows each one ample time to air out thoroughly between wears. This natural aeration process helps to dissipate any accumulated sweat and odors, significantly reducing the build-up that leads to needing a deep clean.
- Avoid Over-Washing: While cleaning is undeniably necessary, excessive or overly frequent washing, especially full immersion, can eventually wear down hat materials, alter their texture, or compromise their structure over time. Utilize the magic eraser method as needed for targeted cleaning, focusing on specific stained areas rather than subjecting the entire hat to a full wash every single time it gets a little dirty. This gentle, targeted approach helps preserve the hat’s integrity.
The Benefits of a Clean Hat: Beyond Appearance
Keeping your hats clean extends far beyond just maintaining their aesthetic appeal. While a pristine-looking hat is certainly a point of pride, the advantages of regular and effective hat cleaning encompass several tangible benefits that contribute to your health, comfort, and the longevity of your beloved headwear.
- Enhanced Hygiene: Hats, particularly the sweatband, are in direct contact with your skin, hair, and scalp. Sweat, body oils, and environmental dirt can quickly create a breeding ground for bacteria and fungi. This can lead to unpleasant odors, and in some cases, potential skin irritations or breakouts on your forehead. Regular cleaning ensures your accessory remains hygienic and safe to wear.
- Extended Lifespan: The corrosive nature of sweat and body oils can, over time, degrade and break down the fabric fibers of your hat. Dirt and grime can also abrade materials. By consistently removing these elements through cleaning, you help preserve the structural integrity and original quality of your hat’s material, significantly extending its usable life. A clean hat is a hat that lasts longer.
- Improved Comfort: There’s nothing quite as uncomfortable as a stiff, crusty, or sticky sweatband caused by dried, caked-on sweat and salt. A clean, soft sweatband is vastly more pleasant and comfortable against your skin, making your hat a joy to wear for extended periods.
- Maintained Appearance and Style: This is the most obvious benefit. A clean hat always looks sharper, more vibrant, and more appealing. It enhances your overall outfit, portrays a sense of care and attention to detail, and ultimately boosts your presentation and confidence. Stains and dirt detract from even the most stylish attire.
- Odor Elimination: Lingering odors are a common issue with well-worn hats. Cleaning effectively removes the source of these odors – bacteria and accumulated oils – leaving your hat smelling genuinely fresh and pleasant. This is particularly important for athletic hats or those worn during strenuous activities.
Conclusion: Your Go-To Hat Cleaning Solution Is Here
Say goodbye to the frustration of unsightly sweat stains and deeply ingrained dirt marring your favorite headwear. The simple yet incredibly powerful magic eraser technique, so brilliantly demonstrated by Golf Ascending, offers an accessible, affordable, and profoundly effective solution for keeping your hats looking their absolute best. This innovative method not only tackles existing stains with remarkable efficiency but also provides a gentle yet powerful way to maintain optimal hygiene and significantly extend the life of your cherished caps and hats.
By diligently following our detailed, step-by-step instructions and integrating the proactive hat care tips into your routine, you can confidently enjoy a collection of fresh, clean hats without the hassle, expense, or uncertainty often associated with professional cleaning services or harsh chemical products. This method empowers you to take control of your hat maintenance with a common household item, yielding results that truly speak for themselves.
We enthusiastically encourage you to try this fantastic cleaning hack for yourself and witness the remarkable transformation that awaits your hats. If you found this comprehensive guide helpful and appreciate the innovative approach, we highly recommend visiting Golf Ascending’s YouTube channel for more insightful tips, brilliant hacks, and engaging tutorials that can simplify various aspects of your life. Give their channel a visit and consider subscribing to discover even further ingenious solutions and practical advice! Happy cleaning, and enjoy your revitalized, fresh-looking hats!
*Many thanks to Golf Ascending via YouTube for all images used here and for the original inspiration behind this fantastic and widely beneficial hat cleaning method. Their insights continue to simplify everyday challenges.