
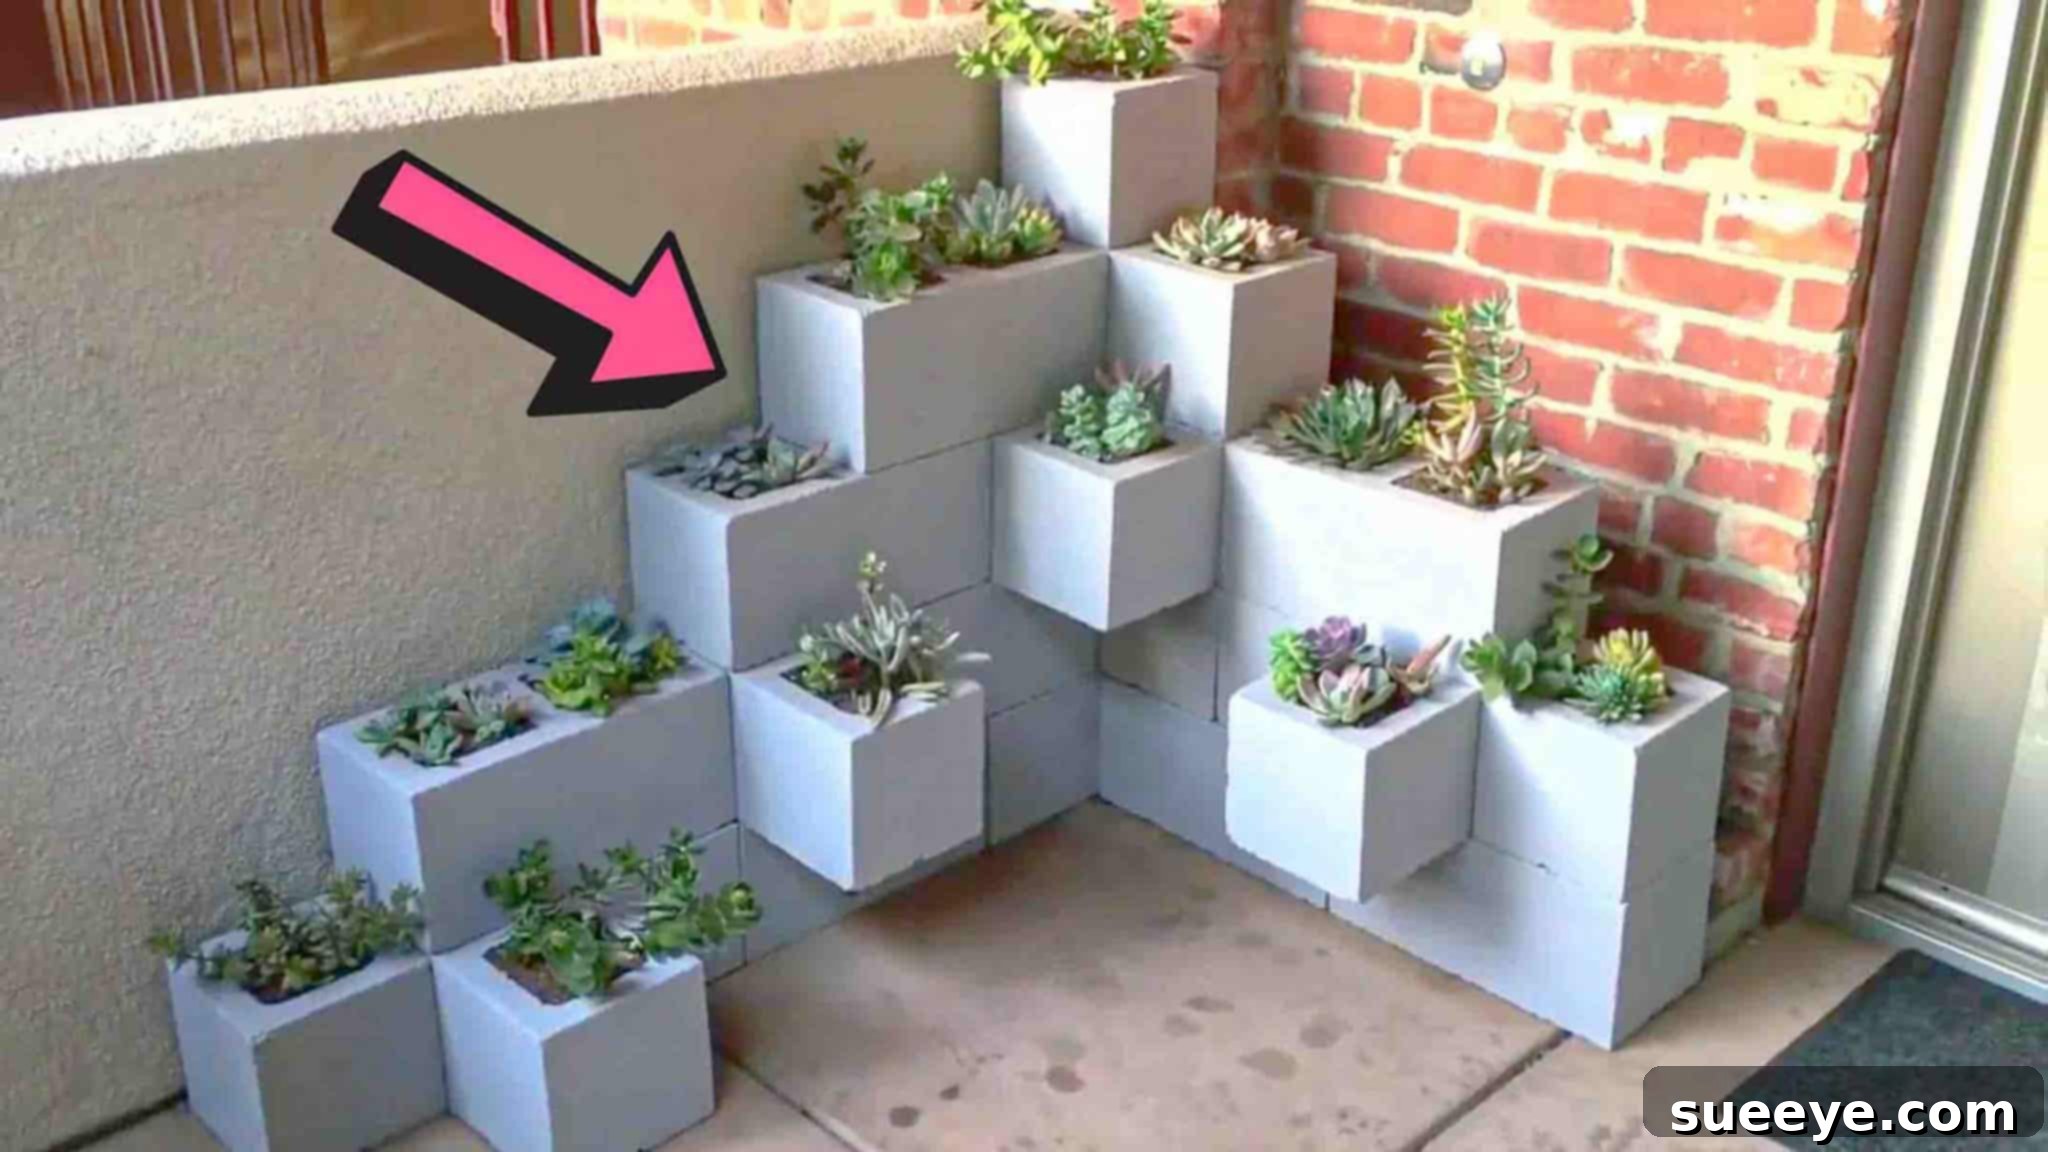
DIY Cinder Block Planter: Transform Your Garden with Creative & Affordable Designs
Are you searching for an inventive, budget-friendly way to elevate your garden’s aesthetic? Look no further than the humble cinder block! These versatile building materials can be transformed into stunning DIY cinder block planters that add a unique, modern touch to any outdoor space. Whether you’re a seasoned gardener or just starting out, this project is simple, rewarding, and guaranteed to make your patio, yard, or balcony burst with charm.
This comprehensive guide will walk you through everything you need to know, from gathering your materials to crafting breathtaking arrangements. We’ll delve into the benefits of using cinder blocks, offer creative design inspiration, and provide essential tips for maintaining your new garden feature. Get ready to unlock the full potential of your outdoor areas and create beautiful focal points with ease!
Why Choose Cinder Blocks for Your Planters?
Cinder blocks might seem like an unconventional choice for gardening, but they offer a multitude of advantages that make them ideal for DIY planters:
- Affordability: Cinder blocks are incredibly inexpensive, making this a budget-friendly project for any gardener. You can often find them at local hardware stores or even salvage yards.
- Durability: Made from concrete, cinder blocks are exceptionally robust and weather-resistant. They can withstand harsh elements, ensuring your planters last for years without degrading.
- Versatility in Design: Their hollow structure and modular nature allow for endless creative arrangements. You can stack them, lay them flat, create vertical gardens, or form intricate geometric patterns.
- Excellent Drainage: The natural porosity of cinder blocks, combined with the open ends, provides superior drainage, which is crucial for the health of many plants, especially succulents and cacti.
- Modern Aesthetic: When left raw or painted in contemporary colors, cinder blocks lend a chic, industrial, or minimalist look to your garden, complementing various design styles.
- Ease of Use: Despite their weight, cinder blocks are relatively easy to work with. They don’t require complex tools or advanced DIY skills.
Planning Your Perfect Cinder Block Garden Oasis
Before you dive into painting and planting, a little planning goes a long way. Consider these aspects to ensure your cinder block planter meets your vision:
Choosing the Right Location
Think about where your planter will reside. Will it be a standalone feature, against a wall, or part of a larger landscaping design? Sun exposure is key – select a spot that gets adequate light for the plants you intend to grow. Also, ensure the ground is level and stable to prevent your arrangement from toppling over.
Designing Your Arrangement
This is where your creativity shines! Cinder blocks offer immense flexibility:
- Single-Tier Layouts: Simple, linear arrangements perfect for borders or defining spaces.
- Multi-Tiered Structures: Stack blocks to create different levels, adding visual interest and maximizing planting space.
- Vertical Gardens: Ideal for small spaces, you can stack blocks vertically and plant in the side openings.
- Geometric Patterns: Arrange blocks in squares, rectangles, or even more complex shapes for a modern art feel.
- Herb Spirals: Create a spiral shape for an attractive and functional herb garden.
Sketching out a few ideas on paper can help you visualize the final result and ensure you have enough blocks.
Selecting Your Plants
Cinder block planters are particularly well-suited for plants that don’t require deep roots and thrive with good drainage. Popular choices include:
- Succulents and Cacti: Their drought-tolerant nature makes them perfect companions for concrete blocks.
- Herbs: Basil, thyme, rosemary, mint, and oregano do wonderfully.
- Small Flowers: Pansies, petunias, marigolds, and alyssum can add vibrant pops of color.
- Groundcovers: Creeping sedum or moss can soften the industrial look.
Ensure your chosen plants have similar light and watering needs for optimal growth.
Materials You’ll Need: Gathering Your Gardening Arsenal
One of the beauties of this DIY project is the relatively short list of materials. Here’s what you’ll need to get started:
- Cinder Blocks: The star of our project! The quantity will depend on your desired arrangement.
- Exterior Primer: Essential for proper paint adhesion and sealing the porous surface of the blocks.
- Exterior Latex or Masonry Paint: Choose a durable, weather-resistant paint. “Cathedral Gray” is a fantastic neutral, but feel free to pick a color that matches your outdoor decor.
- Synthetic Bristle Brush: For detailed painting, corners, and touch-ups.
- Paint Roller & Tray: For quickly and evenly coating the larger surfaces of the blocks.
- Heavy-Duty Scissors or Utility Knife: For cutting landscape fabric.
- Silicone or Construction Adhesive (Weatherproof): To secure the landscape fabric and potentially to bond blocks together for added stability in stacked arrangements.
- Measuring Tape: For precise cutting of the landscape fabric.
- Landscape Fabric (Weed Barrier): Crucial for preventing soil from washing out while allowing water to drain.
- Cactus or Succulent Potting Soil Mix: A well-draining soil is vital for the health of most plants suitable for these planters.
- Your Chosen Plants: Succulents, herbs, or small flowers.
- Gloves and Safety Glasses (Optional but Recommended): For protection during painting and handling materials.
- Drop Cloth or Tarp: To protect your work surface from paint.
Step-by-Step Guide: Building Your Cinder Block Planter Arrangement
Now that you have your materials and a clear vision, it’s time to bring your cinder block planter to life! Follow these steps for a successful and beautiful creation.
Step 1: Prepare and Paint the Cinder Blocks
Starting with clean, dry blocks is key for a lasting finish. If your blocks are dirty, give them a good scrub and let them dry completely.
Prime the Blocks: Apply an even coat of exterior primer to all surfaces of the cinder blocks that will be visible. Primer helps seal the porous concrete, preventing the paint from soaking in too much and ensuring a smooth, durable finish. Allow the primer to dry completely according to the manufacturer’s instructions, typically a few hours.
Paint the Blocks: Once the primer is dry, it’s time for color! Using your paint roller, apply an even coat of your chosen exterior paint (like “Cathedral Gray”) to the main surfaces. Use the synthetic bristle brush for edges, corners, and inside the openings. For best results and optimal durability, you may need to apply a second coat after the first has dried. Ensure all painted surfaces are thoroughly dry before proceeding to the next step.
Step 2: Secure the Base with Landscape Fabric
This step is crucial for preventing soil erosion and ensuring proper drainage. Landscape fabric acts as a barrier, keeping soil in place while allowing excess water to escape.
Measure and Cut: Turn each cinder block over so the openings are facing upwards. Measure the bottom opening of each block. Cut pieces of landscape fabric slightly larger than these measurements (allowing for an overlap of about 1-2 inches on all sides). This extra material will help ensure a secure fit.
Glue Down the Fabric: Apply a generous bead of silicone or construction adhesive around the inner perimeter of each cinder block opening. Carefully press the cut piece of landscape fabric onto the adhesive, making sure it covers the entire bottom of the opening and adheres firmly to the block. Smooth out any wrinkles and allow the adhesive to cure according to the product instructions. This creates a sturdy base for your soil.
Step 3: Arrange Your Cinder Blocks
Now for the exciting part – bringing your design to life! Before you fill them, it’s best to finalize your arrangement.
Pre-Arrange the Blocks: Place the painted and prepared cinder blocks in your desired garden location. Experiment with different layouts – stack them, create a staggered pattern, or form a unique geometric shape. Don’t be afraid to move them around until you find an arrangement you love. This is your chance to fine-tune the aesthetics.
Secure Stacked Blocks (Optional but Recommended): If you’re creating a multi-tiered or vertical arrangement, consider using a weatherproof silicone or construction adhesive between stacked blocks for added stability. Apply a thin bead of adhesive along the touching surfaces of the blocks, press them together, and allow it to cure. This will prevent your planter from shifting or toppling over, especially in windy conditions or if pets/children are around.
Step 4: Fill and Plant Your Cinder Block Planters
With your blocks perfectly arranged, it’s time to add life to them!
Fill with Soil: Carefully fill each opening of your cinder blocks with the cactus or succulent potting soil mix. Fill them to about 1-2 inches below the rim to allow space for watering and to prevent soil from overflowing. If you’re using other types of plants, ensure you use the appropriate potting mix.
Plant Your Succulents (or other plants): Gently remove your chosen plants from their nursery pots. Create small indentations in the soil and carefully place each plant, backfilling around the roots with more soil. Lightly pat the soil around the base of the plants to secure them. Remember to give your plants adequate spacing so they have room to grow and breathe.
Initial Watering: Once all your plants are in place, give them a good initial watering. For succulents, allow the soil to dry out completely between waterings to prevent root rot. Your beautiful DIY cinder block planter arrangement is now complete and ready to be admired!
Creative Design Variations for Your Cinder Block Planters
The basic cinder block planter is just the beginning! Unleash your inner designer with these creative variations:
- Painted Patterns: Go beyond solid colors. Use painter’s tape to create geometric patterns, stripes, or two-tone designs on your blocks.
- Integrated Seating: Combine blocks with sturdy wooden planks to create benches integrated into your garden design, with planters on either side.
- Vertical Herb Garden: Stack blocks on their sides to form a tall, narrow structure, perfect for growing a variety of herbs in a small footprint.
- Pebble or Rock Accents: Fill empty pockets or gaps between blocks with decorative pebbles, river rocks, or glass gems for added texture and visual appeal.
- Lighting Integration: Place solar-powered string lights or small LED puck lights within certain openings to create a magical ambiance at night.
- Water Features: For advanced DIYers, a small, self-contained water feature could be integrated into a larger cinder block structure.
- Mixed Materials: Combine cinder blocks with other materials like reclaimed wood, metal sheets, or even old tires for an eclectic look.
Maintenance and Care Tips for Your Cinder Block Planters
Once your beautiful planter is complete, a little ongoing care will keep it thriving for years to come:
- Watering: The frequency of watering depends heavily on your plants, climate, and soil. Succulents generally need less water, while herbs might require more frequent attention. Always check the soil moisture before watering.
- Drainage: Cinder blocks provide excellent drainage, but ensure that water isn’t pooling excessively around the base of your planter.
- Sunlight: Monitor your plants’ response to sunlight. If they appear scorched, move the planter to a slightly shadier spot, or if they’re stretching, they might need more sun.
- Fertilization: Most plants in containers benefit from occasional fertilization during their growing season. Use a balanced liquid fertilizer diluted to half strength.
- Pest Control: Regularly inspect your plants for signs of pests and address them promptly with appropriate organic or chemical treatments.
- Winterization: If you live in a region with freezing winters, consider moving frost-sensitive plants or the entire planter indoors, or cover it to protect the blocks from extreme freeze-thaw cycles that could cause cracking.
- Cleaning: Over time, cinder blocks might accumulate dirt or moss. A simple scrub with a brush and water, or a gentle pressure wash, can keep them looking fresh.
Frequently Asked Questions About Cinder Block Planters
Q: Are cinder blocks safe for growing edible plants?
A: Yes, generally. Modern cinder blocks are made from concrete (cement, aggregate, water) and do not typically leach harmful chemicals into the soil that would contaminate edible plants. However, if you are concerned, you can line the entire interior of the planting pockets with heavy-duty plastic sheeting before adding soil and plants, ensuring drainage holes are still present.
Q: Do I really need to prime and paint the cinder blocks?
A: Priming is highly recommended as it seals the porous concrete, preventing moisture absorption and allowing the paint to adhere better and last longer. Painting is optional, but it significantly enhances the aesthetic appeal, allows for personalization, and adds another layer of protection to the blocks.
Q: Can I use regular potting soil instead of cactus/succulent mix?
A: While you can, it’s not ideal for plants that prefer well-draining conditions like succulents. Regular potting soil retains more moisture, which can lead to root rot in drought-tolerant plants. If you must use regular potting soil, consider mixing in perlite or sand to improve drainage.
Q: How long will a cinder block planter last?
A: Cinder blocks are extremely durable and can last for decades. With proper painting and maintenance, your cinder block planter should remain a beautiful and functional part of your garden for many years.
Q: Can I move my cinder block planter once it’s built?
A: Moving a completed planter filled with soil and plants can be very heavy and challenging. It’s best to plan your arrangement and location carefully before filling the blocks. If you anticipate needing to move it, consider building smaller, individual cinder block planters or using a dolly.
Start Your DIY Cinder Block Planter Project Today!
Transforming your garden doesn’t have to be complicated or expensive. With the simple, sturdy cinder block, you have the power to create a captivating and highly functional garden feature that reflects your personal style. Whether you opt for a minimalist arrangement of succulents or a vibrant, multi-tiered display of flowers and herbs, this DIY project is incredibly rewarding.
So, gather your materials, pick your favorite paint color, and get ready to unleash your creativity. You’ll be amazed at how easily these humble blocks can turn into a stunning focal point in your outdoor sanctuary. Share your beautiful creations with us – happy gardening!