
Mastering Marbleized White Chocolate Dipped Strawberries: Your Guide to Edible Elegance
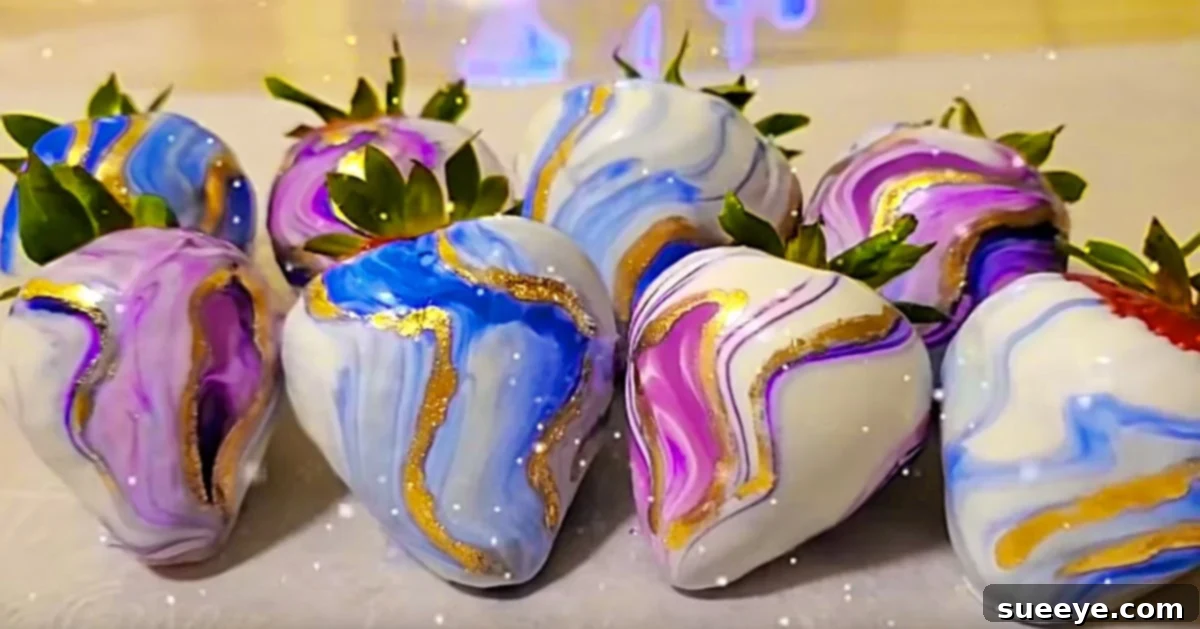
As special occasions like Valentine’s Day approach, or whenever you simply wish to impress with a touch of gourmet elegance, nothing quite captivates like a beautifully crafted dessert. While store-bought chocolate-covered strawberries are a delightful treat, creating your own offers an unparalleled level of freshness, flavor, and personalization. Imagine elevating that experience to an art form with stunning marbleized white chocolate dipped strawberries. This isn’t just a dessert; it’s a statement.
When we first encountered the concept of marbleized strawberries, the visual impact was instant and truly breathtaking. The delicate swirls of color against a pristine white chocolate canvas seemed like something only a professional patissier could achieve. Yet, upon diving into the recipe, we discovered a joyful truth: these exquisite treats are surprisingly simple to make at home. The process is not only straightforward but also incredibly rewarding, promising delicious results that will undoubtedly “wow” your loved ones and guests. Forget the ordinary; it’s time to unleash your inner artisan and craft these edible masterpieces.
Why Choose Marbleized Strawberries?
Beyond their undeniable beauty, marbleized white chocolate dipped strawberries offer several compelling reasons to make them your go-to special occasion dessert:
- Gourmet Appeal: They look sophisticated and professionally made, elevating any dessert spread.
- Customization: The ability to choose your own color palette makes them perfect for any theme or holiday.
- Freshness: Homemade means you control the quality of ingredients, ensuring the freshest strawberries and best-tasting chocolate.
- Personal Touch: Gifting a box of these handcrafted beauties shows thoughtfulness and effort, making them an incredibly personal present.
- Fun to Make: The process is engaging and creative, making it a wonderful activity for all ages, including kids!
Essential Ingredients for Your Marbleized Masterpiece
Crafting these visual delights requires a few key ingredients. Quality matters, as does understanding the role each component plays in achieving that perfect marbleized finish and delicious taste.
- Fresh Strawberries: One carton of firm, ripe, and vibrant strawberries. Look for berries that are bright red, free of blemishes, and have their green caps intact. Size can vary, but medium to large berries are generally easier to dip and present beautifully.
- Dipping Sticks: Wilton brand sticks, or any sturdy lollipop/candy sticks, work exceptionally well. These provide a clean, mess-free way to handle and dip your strawberries.
- White Candy Melts: Approximately 10-12 ounces. Candy melts are formulated to melt smoothly and set quickly without requiring tempering, making them ideal for dipping. High-quality white chocolate chips can also be used, but you might need to add a touch of paramount crystals or additional coconut oil to achieve the right dipping consistency without compromising the set.
- Oil-Based Candy Color: Any desired color. This is CRUCIAL. Oil-based colors blend seamlessly with chocolate without causing it to seize or thicken, unlike water-based food colorings. A few drops are usually sufficient for vibrant streaks.
- Coconut Oil: 1 tablespoon, or slightly more if needed. Melted coconut oil helps thin the candy melts to a perfect, smooth dipping consistency, ensuring a thin, even coating on your strawberries.
- Cake Decorating Sanding Sugar: (Optional) For a sparkling, glittery finish on some berries. Choose a color that complements your marble design.
- Gold Icing Dust (Edible Luster Dust): From the cake decorating section of craft stores. This fine edible dust provides a beautiful metallic sheen.
- Thin Food-Safe Brush: Essential for applying the gold detailing with precision.
- Liquor: 1 tablespoon of clear, high-proof alcohol (e.g., vodka, brandy, or clear vanilla extract for a non-alcoholic option). This acts as a solvent to turn the gold icing dust into a paint-like consistency.
Equipment You’ll Need:
- Microwave-safe bowl (or a double boiler setup)
- Parchment paper or wax paper
- Baking sheet or flat tray
- Small bowls for mixing gold paint
- Toothpicks or a small skewer (for swirling color)
- Spatula or spoon for stirring chocolate
Step-by-Step Directions: Crafting Your Marbleized Strawberries
The magic begins with careful preparation and a creative touch. Follow these detailed steps to achieve stunning results.
1. Prepare Your Strawberries for Dipping
The first and most critical step for perfect chocolate-dipped strawberries is proper preparation. Begin by gently washing your carton of strawberries under cool running water. After washing, meticulously dry each strawberry. This step cannot be overstated: any moisture on the strawberries will cause the chocolate to seize and create a clumpy, unappealing coating. You can air dry them on a paper towel-lined tray, or gently pat them dry with paper towels. Once completely dry, insert a dipping stick into the stem end of each strawberry. Push the stick firmly but carefully, ensuring it’s secure enough to hold the strawberry during dipping without piercing through to the tip.
2. Melt the White Candy Melts and Create the Marble Effect
Next, it’s time to prepare your white chocolate base. Place your white candy melts (or high-quality white chocolate chips) into a microwave-safe bowl. Add 1 tablespoon of coconut oil to the bowl. Microwave the mixture on a low power setting (50-60% power) in 30-second intervals, stirring thoroughly after each interval. This gradual melting process prevents the chocolate from overheating and becoming grainy or seized. Continue until the candy melts are fully melted and perfectly smooth with a fluid, dippable consistency. If the mixture is too thick, add another half teaspoon of coconut oil and stir until smooth.
Once your white chocolate is ready, it’s time for the artistic part! Add a few small streaks of your chosen oil-based candy color directly across the surface of the melted white chocolate. Do NOT stir the chocolate completely. Instead, take a toothpick or a small skewer and gently swirl the color into the white chocolate just 2-3 times. The goal is to create distinct ribbons of color, not to fully mix it into a uniform shade. Work quickly here, as the chocolate will start to cool.
Immediately dip a prepared strawberry into the marbleized chocolate, twisting it gently to coat completely. Lift the strawberry and allow any excess chocolate to drip off. Place each finished marbleized strawberry onto a sheet of wax or parchment paper on a baking sheet. Repeat this process with the remaining strawberries, swirling the color gently again in the bowl if needed between dips to maintain the marble pattern.
3. Add Elegant Gold Detailing and Allow to Set
After your marbleized strawberries have set (this usually takes about 10-20 minutes at room temperature, or faster in the refrigerator), you can add the final touch of luxury: gold detailing. In a small, clean bowl, mix a small amount of your edible gold icing dust with a few drops of liquor (brandy works well due to its slight stickiness, but clear vodka or even lemon extract will also work). Stir until you achieve a paint-like consistency – not too thick, not too watery. You can adjust the ratio as needed.
Using a thin, food-safe brush, carefully trace around the prominent swirls and patterns on your marbleized strawberries. You can create delicate lines, small dots, or even more elaborate designs, allowing your creativity to shine. Let the gold paint dry completely on the strawberries, which happens relatively quickly as the alcohol evaporates. If you plan to add sanding sugar for a glittery effect, do so immediately after dipping the strawberries in step 2, while the chocolate is still wet, before applying the gold details.
Once all your strawberries are complete and the gold detailing is dry, your stunning marbleized masterpieces are ready to be admired and devoured!
Tips for Achieving Perfect Marbleized Strawberries Every Time
Even with a simple recipe, a few expert tips can make all the difference in achieving bakery-quality results:
- Temperature Control is Key: Ensure your melted chocolate is warm enough to be fluid but not so hot that it “burns” or becomes gritty. Constant stirring and low heat in the microwave are your best friends.
- Work Quickly with Color: Once you add the oil-based candy color, the clock starts ticking. The chocolate will begin to cool and set, making it harder to create distinct swirls. Dip immediately after lightly swirling the color.
- Don’t Over-Swirl: The beauty of marble lies in its imperfect, organic patterns. Over-swirling the color will cause it to blend too much with the white chocolate, resulting in a muted, uniform color rather than distinct streaks.
- Quality Over Quantity: Use high-quality candy melts or white chocolate for the best flavor and melting properties. Cheap chocolate can be challenging to work with.
- Mind the Humidity: Chocolate and high humidity do not mix well. If it’s a humid day, your chocolate may appear thicker or take longer to set. Try to work in a cool, dry environment.
- Chill for a Quick Set: While they can set at room temperature, placing the dipped strawberries in the refrigerator for 5-10 minutes can speed up the setting process, especially if you’re in a hurry.
Creative Variations and Personalization
The beauty of this recipe lies in its adaptability. Here are some ideas to make these marbleized strawberries uniquely yours:
- Color Themes: Experiment with different color combinations. Use reds and pinks for Valentine’s Day, pastels for Easter, blues and silvers for winter themes, or bright, bold colors for a festive summer treat.
- Multiple Colors: Instead of just one candy color, try adding two or three complementary colors for a more complex marble effect.
- Extra Toppings: While the marble effect is gorgeous on its own, consider adding a sprinkle of edible glitter, finely chopped nuts, or a contrasting drizzle of dark or milk chocolate over some berries once the white chocolate has set.
- Flavor Infusion: Add a drop or two of food-grade extract (like almond, raspberry, or orange) to your melted white chocolate for an extra layer of flavor. Ensure it’s oil-based or an alcohol-based extract so it doesn’t seize the chocolate.
- Chocolate Base Variations: While white chocolate creates the most striking marble contrast, you can experiment with milk or dark chocolate as the base. Keep in mind the marble effect might be less pronounced.
Serving and Storage Suggestions
These exquisite marbleized white chocolate dipped strawberries are best enjoyed fresh, ideally within 1-2 days of preparation. To store them, place them in a single layer in an airtight container and refrigerate. If stacking is necessary, separate layers with parchment paper to prevent sticking and damage to the delicate chocolate coating. Allow them to come to room temperature for about 15-20 minutes before serving for the best flavor and texture.
They make an incredible standalone dessert, a stunning addition to a dessert platter, or a memorable homemade gift. Package them in a beautiful box lined with tissue paper for a truly luxurious presentation.
The Irresistible Allure of Homemade Marbleized Strawberries
There’s a special joy in creating something beautiful and delicious with your own hands. These marbleized white chocolate dipped strawberries are more than just a sweet treat; they are a delightful fusion of culinary art and simple pleasure. The elegant swirls, the vibrant colors, and the touch of shimmering gold transform a humble strawberry into a show-stopping delicacy. Whether you’re celebrating a special occasion, looking for a unique homemade gift, or simply indulging in a moment of creative dessert making, this recipe offers a path to truly unforgettable results. So, gather your ingredients, unleash your creativity, and prepare to impress with these remarkably gorgeous and utterly delicious marbleized strawberries!