
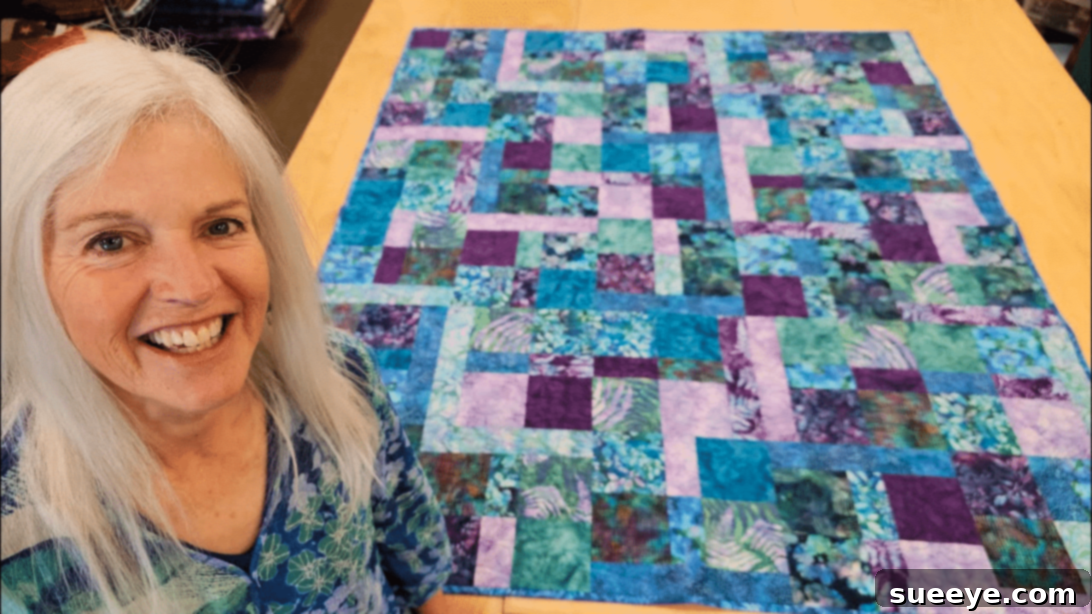
Embark on a delightful quilting journey with the Serenity Patchwork Quilt, an exceptionally easy and rewarding project brought to you by the renowned Jordan Fabrics. Perfect for both absolute beginners and seasoned quilters seeking a quick, satisfying creation, this quilt design eliminates the complexities often associated with intricate patchwork. Instead of wrestling with challenging fabric cuts or elaborate block constructions, you’ll work with simple fat quarters, transforming them into charming squares and strips that piece together effortlessly. This straightforward approach ensures a smooth, enjoyable quilting experience from start to finish.
The beauty of the Serenity Patchwork Quilt lies in its simplicity. Many aspiring quilters are often intimidated by complicated patterns and precise measurements, but this design by Jordan Fabrics, expertly demonstrated on their YouTube channel, proves that beautiful quilts don’t have to be difficult. It’s an ideal project for those looking to dip their toes into the world of quilting or for experienced crafters who appreciate a project that comes together quickly, allowing more time for the pure joy of creation.
RELATED: Dive deeper into the world of beginner-friendly quilting with this Cool Retro Quilt Tutorial for Beginners, offering another fantastic entry point into the hobby.
Designed with accessibility in mind, the Serenity Patchwork Quilt is often a project that can be completed within a single day, making it incredibly gratifying. This rapid turnaround is a huge motivator for beginners, providing a tangible sense of accomplishment without a long-term commitment. If you’ve ever considered quilting as a potential hobby but felt daunted, this tutorial is your perfect starting point. The process is not only simple but deeply enjoyable, offering a therapeutic escape into colors, textures, and the rhythmic hum of your sewing machine. Discover the fun and relaxation of quilting by following the detailed video tutorial and step-by-step guide below.
Why Choose the Serenity Patchwork Quilt for Your Next Project?
The Serenity Patchwork Quilt isn’t just easy; it’s a gateway to the fulfilling world of fabric artistry. Here’s why it stands out as an excellent choice:
- Perfect for Beginners: The simplified cutting and piecing techniques build confidence without overwhelming new quilters. You’ll master basic skills like accurate cutting, consistent seam allowances, and efficient pressing, which are fundamental to all quilting projects.
- Quick Completion: With its straightforward design, many quilters find they can finish the quilt top, or even the entire quilt, in a single dedicated crafting session. This rapid gratification is incredibly encouraging and motivates further creative endeavors.
- Utilizes Fat Quarters: Fat quarters are pre-cut fabric bundles (typically 18″ x 22″) that offer a diverse palette of coordinating fabrics without requiring you to buy large yardages. This makes fabric selection easy and often more economical.
- Versatile Design: While simple, the design is highly adaptable. You can create vastly different looks by simply changing your fabric choices – from vibrant and playful to subtle and sophisticated.
- Relaxing and Therapeutic: The repetitive yet creative actions of cutting, piecing, and pressing can be incredibly meditative. It’s a wonderful way to unwind, focus your mind, and create something beautiful with your hands.
Essential Materials for Your Serenity Patchwork Quilt:
Gathering your materials is the first exciting step in any quilting adventure. For the Serenity Patchwork Quilt, you’ll need a few standard quilting supplies, ensuring a smooth and enjoyable crafting process. Quality materials will always enhance your finished product and make the journey more pleasant.
- Fat Quarters: These pre-cut fabric pieces are the heart of this project. Choose a coordinating bundle for a cohesive look, or mix and match prints and solids for a more eclectic feel. The number of fat quarters will depend on the desired size of your quilt, so refer to the pattern for specific quantities.
- Backing Fabric: This fabric forms the underside of your quilt, providing warmth and stability. Select a fabric that complements your quilt top in color and pattern, and ensure it’s large enough to extend a few inches beyond the quilt top on all sides for ease of quilting.
- Binding Fabric: The binding is the narrow strip of fabric that finishes the edges of your quilt, framing your beautiful work. Choose a durable fabric that contrasts or harmonizes with your quilt top, often a solid color that pulls from the fat quarter collection.
- Marking Pen, Pencil, or Chalk: Essential for transferring pattern lines or making temporary marks on your fabric. Ensure your chosen tool is fabric-friendly and easily removable.
- Ruler: A clear, acrylic quilting ruler (preferably with clear markings) is indispensable for accurate cutting. A variety of sizes can be helpful, but a general 6″ x 24″ ruler is a good start.
- Scissors or Rotary Cutter and a Cutting Mat: For precise and efficient fabric cutting. A rotary cutter paired with a self-healing cutting mat is highly recommended for quilters as it offers speed and accuracy, especially for cutting strips and squares. Sharp fabric scissors are also useful for smaller cuts or trimming.
- Fabric Pins: Used to hold fabric pieces together before stitching, ensuring alignment and preventing shifting. Long, fine pins with flat heads are often preferred by quilters.
- Needle and Thread: High-quality 100% cotton thread is ideal for piecing quilt tops, as it’s durable and blends well with cotton fabrics. Keep a few spools of neutral colors (like white, cream, or grey) on hand.
- Iron, for Pressing: A good steam iron is critical for achieving flat, precise seams. Pressing is often considered as important as stitching in quilting, as it impacts the overall look and lie of your quilt.
- Sewing Machine: A reliable sewing machine with a straight stitch function is your best friend for this project. Ensure it’s clean and well-maintained.
- Pattern (Click here to download the pattern): While the general steps are provided here, the official pattern from Jordan Fabrics will provide specific dimensions and block layout diagrams, crucial for achieving the exact design.
How to Make the Serenity Patchwork Quilt: A Step-by-Step Guide
Creating your Serenity Patchwork Quilt is an enjoyable process, broken down into manageable steps. Remember to take your time, press frequently, and enjoy the journey of bringing your fabric to life.
Step 1: Fabric Selection, Preparation, and Precision Cutting
Begin by carefully selecting your fat quarters. Consider how the colors and patterns will interact to create your desired aesthetic. Once chosen, it’s often recommended to pre-wash and press your fabrics to prevent shrinkage later and ensure a crisp, flat surface for cutting. Refer to your pattern for the exact dimensions required for your squares and strips. Using your rotary cutter and ruler on a cutting mat, meticulously cut out all your fabric pieces. Accuracy in this stage is paramount for well-fitting blocks. A common technique involves cutting your fat quarters into larger squares and then further subdividing them into smaller squares and specific width strips according to the pattern’s instructions. Keep your cut pieces organized by size and type.
For the Serenity Patchwork Quilt, the design typically involves larger squares that frame a narrower strip, creating a visually appealing contrast. Double-check your measurements before making cuts to avoid waste. This precision will save you time and frustration during the assembly phase.
Step 2: Assembling Your Quilt Blocks
With your fabric pieces prepared, you can start assembling the individual quilt blocks. Lay out two of your cut squares, placing a small long strip of fabric centrally between them. This strip acts as a connecting element and often provides a pop of contrasting color or pattern. Ensure all edges align perfectly. Carefully stitch these three pieces together using a consistent 1/4-inch seam allowance. This seam allowance is standard in quilting and helps ensure your blocks fit together precisely.
After stitching, take your block to the ironing board. Press the seams nicely. For this design, you might choose to press seams open to reduce bulk, or press them to one side (usually towards the darker fabric) to help them nest together neatly in subsequent steps. Consistent pressing is key to flat blocks and a professional-looking quilt top. Repeat this process to create additional rows or units as specified in the pattern, often involving another set of rows and a long horizontal strip at the bottom to form a complete block unit.
Step 3: Creating Multiple Blocks and Arranging Your Layout
Once you’ve mastered the construction of a single block, create more, experimenting with different combinations of your fat quarters. This allows for a dynamic and varied look across your quilt. As you finish each block, press it flat. Once you have a good number of blocks, it’s time for the exciting step of arranging them. Lay out all your completed blocks on a design wall, a large floor space, or a big table, as shown in the Jordan Fabrics video tutorial. Experiment with different arrangements, rotating blocks, and swapping positions until you achieve a layout that you love. This design phase is where your creative vision truly comes to life, allowing you to visualize the final quilt top.
Take a step back and view your layout from a distance to ensure color balance and flow. Don’t be afraid to rearrange until it feels just right. Once satisfied, take a picture of your layout with your phone for reference, then carefully stack your blocks in column order to maintain the desired arrangement as you move to the next step.
Step 4: Stitching Blocks into Rows
With your layout finalized, begin stitching your blocks together to form horizontal rows. Take the first two blocks of your first row, place them right sides together, pin carefully, and stitch them with a consistent 1/4-inch seam allowance. Continue adding blocks to the row in the same manner until the entire row is complete. After each seam, return to your ironing board to press the seams. For rows, you might consider pressing alternating seams in opposite directions (e.g., seams in row 1 pressed left, seams in row 2 pressed right). This technique, known as “nesting seams,” helps the seams of adjacent rows interlock perfectly, leading to flatter intersections.
Repeat this process for all your rows until you have a stack of completed, pressed rows ready to be joined into the full quilt top.
Step 5: Joining Rows to Form the Quilt Top
Now that you have all your individual rows, it’s time to connect them to create the complete quilt top. Take your first two rows, place them right sides together, aligning the seams where the blocks meet. Use pins liberally, especially at these seam intersections, to ensure they match up perfectly. Stitch along the length of the row using your 1/4-inch seam allowance. As always, press the newly sewn seam open or to one side (consistently with your previous choices) to maintain a flat quilt top.
Continue adding each subsequent row, carefully aligning and pinning before stitching. The precision of your cutting, piecing, and pressing will truly shine in this stage, resulting in a beautifully flat and square quilt top. Once all rows are joined, give the entire quilt top a final, thorough press from the front and back to ensure it lies perfectly flat.
Step 6: Creating the Quilt Sandwich and Basting
With your quilt top complete, the next step is to assemble the “quilt sandwich.” This involves layering your backing fabric, batting, and quilt top. First, lay your backing fabric wrong side up on a clean, flat surface, smoothing out any wrinkles. Tape it down if needed to keep it taut. Next, place your batting smoothly over the backing fabric, ensuring it extends a few inches beyond the quilt top on all sides. Finally, center your quilt top (right side up) over the batting. Smooth out all layers carefully, making sure there are no puckers or wrinkles.
Now, you need to baste the layers together. This temporarily secures all three layers so they don’t shift during quilting. Common basting methods include safety pins (placed every 4-6 inches across the quilt), basting spray adhesive, or hand-basting with long stitches. Choose the method you are most comfortable with, ensuring all layers are securely fastened.
Step 7: Quilting Your Layers
Quilting is the process of stitching through all three layers (top, batting, backing) to hold them together permanently and add texture to your quilt. For a beginner-friendly project like the Serenity Patchwork Quilt, simple quilting designs are perfect. You could “stitch in the ditch,” which means stitching along the seam lines of your pieced blocks. Alternatively, simple straight lines, either horizontally, vertically, or diagonally across the quilt, can be very effective. A gentle meander or stipple pattern (a continuous, flowing curve) can also add beautiful texture.
Use your sewing machine with a walking foot (highly recommended for quilting, as it helps feed all layers evenly) or consider free-motion quilting if you’re feeling adventurous. Take your time, maintain a consistent stitch length, and enjoy the process of adding dimension to your creation. Once the quilting is complete, trim any excess batting and backing fabric, leaving a consistent border around your quilt top.
Step 8: Attaching the Binding and Finishing Your Quilt
The final step in completing your Serenity Patchwork Quilt is to add the binding, which provides a clean, durable edge and frames your beautiful work. Prepare your binding strips by joining them end-to-end to create one long strip, then press it in half lengthwise. Attach the raw edge of the binding to the raw edge of your quilt top, stitching with a 1/4-inch seam allowance around the entire perimeter of the quilt. Pay special attention to creating neat mitered corners for a professional finish.
Once stitched to the front, fold the binding over to the back of the quilt. You can then hand-stitch the binding down for an invisible finish or machine-stitch it for a quicker, more durable result. Give your finished quilt a final press and admire your handcrafted Serenity Patchwork Quilt!
Tips for a Flawless Serenity Patchwork Quilt
- Accuracy is Key: Invest in a good rotary cutter, mat, and ruler, and always cut carefully. Precise cutting leads to precise piecing.
- Press, Don’t Iron: When quilting, lift and place your iron rather than sliding it, which can stretch and distort your fabric. Pressing creates crisp seams.
- Consistent Seam Allowance: A perfect 1/4-inch seam allowance is crucial. Practice on scrap fabric if necessary to achieve consistency.
- Use Quality Thread: A good quality 100% cotton thread will be stronger and produce less lint in your machine.
- Change Your Needle: A fresh, sharp needle can make a world of difference, preventing skipped stitches and fabric snags.
- Listen to Your Machine: If something sounds off, stop and check your tension or thread.
- Take Breaks: Quilting should be enjoyable, not stressful. Step away if you feel frustrated.
- Embrace Imperfections: Especially as a beginner, remember that handmade items have character. Don’t strive for unattainable perfection.
Personalizing Your Serenity Quilt
While the Serenity Patchwork Quilt pattern is simple, it offers immense potential for personalization. Consider these ideas to make your quilt uniquely yours:
- Fabric Play: Experiment with themed fabric bundles (e.g., seasonal, holiday, or specific color palettes). Use novelty prints for a whimsical touch or sophisticated batiks for an elegant statement.
- Block Rotation: Even with the same fabrics, rotating individual blocks can create secondary patterns and visual interest.
- Quilting Designs: Beyond simple lines, explore different quilting motifs. Custom quilting can transform the entire look and feel of your quilt.
- Add Borders: Incorporate one or more decorative borders to frame your patchwork and increase the quilt’s size.
- Embellishments: For a decorative touch, consider adding simple embroidery, fabric paint accents, or even small appliques after the quilting is complete.
The Serenity Patchwork Quilt is more than just a craft project; it’s an opportunity to create a cherished item, whether for your home or as a thoughtful gift. Its ease of construction makes it accessible, while its adaptable design ensures endless creative possibilities. So, gather your materials, watch the inspiring tutorial from Jordan Fabrics, and prepare to discover the pure joy of quilting!
*All image credit belongs to Jordan Fabrics via YouTube. Follow and subscribe to her channel for more inspiring and easy-to-follow quilting tutorials!
Easy Serenity Patchwork Quilt Tutorial – Conclusion
The Serenity Patchwork Quilt stands as a testament to the fact that quilting doesn’t need to be daunting. With its straightforward approach and the guiding hand of Jordan Fabrics, beginners can confidently create a beautiful, finished quilt. This project fosters a love for the craft, building fundamental skills while delivering the immense satisfaction of creating something tangible and warm. Whether you’re looking for a new hobby, a quick gift, or a relaxing creative outlet, the Serenity Patchwork Quilt offers a perfect blend of simplicity and charm. Happy quilting!