
Master the Four-Patch Quilt: A Beginner-Friendly Guide to Your First Quilt Project
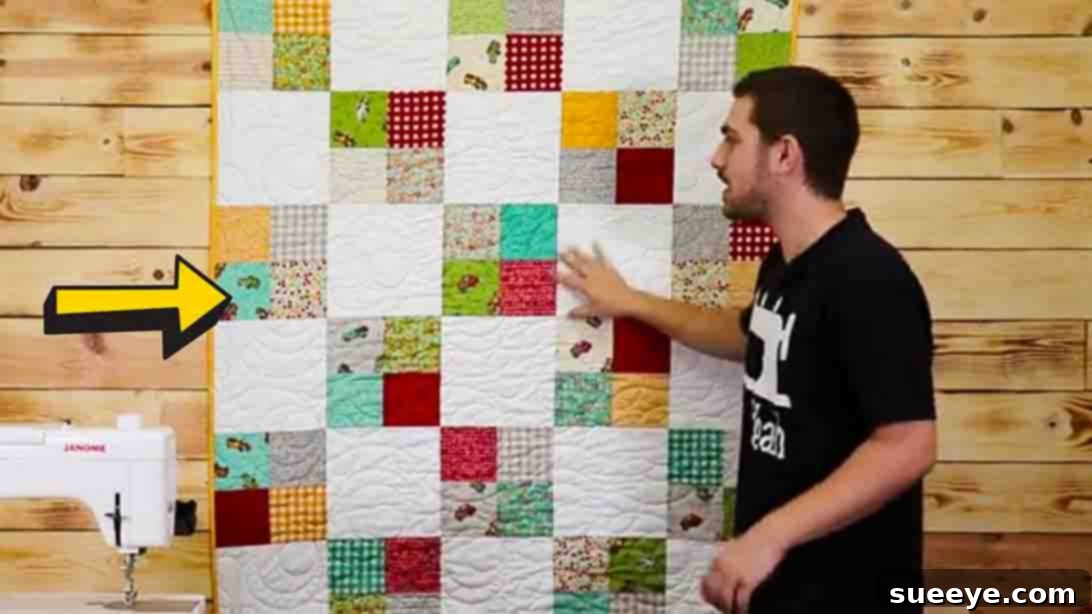
Embarking on the rewarding craft of quilting can feel daunting at first, but with the right guidance, it becomes an incredibly satisfying journey. My own adventure into quilting began with a simple, yet profoundly versatile pattern: the four-patch quilt. It was through a fantastic tutorial by Sew Yeah on YouTube that I learned the fundamental techniques, transforming fabric squares into my very first complete quilt top. This particular pattern stood out because of its remarkable simplicity, making every step clear and manageable for a complete novice like me.
RELATED: Unlock More Creativity with the Magic Four-Patch Quilt Pattern
Even after gaining more experience and tackling complex designs, the four-patch remains a cherished staple in my quilting repertoire. It’s my go-to project when I need a quick, satisfying sew, or simply want to unwind with my sewing machine. It’s also an excellent method for auditioning new fabric combinations or putting those beautiful charm packs to good use, allowing me to visualize how different prints and colors interact. If you’re searching for the perfect pattern to create your very first finished quilt, I wholeheartedly recommend starting with the four-patch. Its straightforward nature builds confidence, and the results are consistently charming. Trust me, you won’t regret diving into this classic design. Let’s get started on this exciting creative endeavor!
Why the Four-Patch Quilt is Perfect for Beginners
The four-patch quilt block is more than just a simple design; it’s a foundational building block in the world of quilting. Its beauty lies in its elegant simplicity, making it an ideal starting point for anyone new to the craft. Here’s why this pattern is a must-try for your initial quilting projects:
- Ease of Construction: The four-patch involves sewing just a few squares together, making it incredibly straightforward. There are no complex curves, intricate angles, or fussy piecing techniques to master right away.
- Teaches Fundamental Skills: As you create four-patch blocks, you’ll practice crucial quilting techniques such as accurate cutting, maintaining a consistent 1/4-inch seam allowance, and proper pressing – skills that are essential for any future quilting project.
- Versatility in Design: While simple, the four-patch is incredibly versatile. By varying fabric choices, colors, and arrangements, you can create a myriad of looks, from modern and minimalist to traditional and scrappy. It’s also a perfect block to combine with other, more complex blocks as you advance.
- Great for Fabric Scraps and Charm Packs: This pattern is a fantastic way to utilize leftover fabric scraps, giving new life to cherished remnants. It’s also perfectly suited for charm packs (pre-cut 5-inch squares), which are often a quilter’s first foray into collecting beautiful fabric collections.
- Quick Gratification: Because it’s relatively fast to piece together, you’ll see your quilt top come together quickly, providing a wonderful sense of accomplishment and motivating you to continue your quilting journey.
Materials You’ll Need for Your Four-Patch Quilt
Before we begin sewing, gathering all your materials is crucial for a smooth and enjoyable quilting experience. High-quality fabric and precise tools will make a significant difference in the final outcome of your quilt. Here’s a detailed list of what you’ll need:
- Binding Fabric: 1/2 yard. This will be used to create the finished edges of your quilt, giving it a polished look.
- Free Pattern: Click here to download the free, printable four-patch quilt pattern. Having a reference for cuts and measurements is always helpful.
Fabric A (Charm Pack – Assorted Prints)
- Quantity: Approximately two charm packs, or an equivalent amount of fabric.
- Requirement: 72 – 5″ x 5″ squares. These will form the colorful, patterned sections of your four-patch blocks. Feel free to mix and match various prints and colors for a vibrant, scrappy look, or choose a cohesive color palette for a more coordinated design. Quality cotton quilting fabric is recommended for durability and ease of sewing.
Fabric B (Background – Solid or Subtle Print)
- Quantity: 1 1/2 yards. This fabric will provide a visual break and make your four-patch blocks pop. A solid white, cream, or light grey is often chosen for a clean, classic aesthetic, but you can experiment with any color that complements Fabric A.
- Cutting Instructions:
- Cut 5 – 9 1/2″ x WOF (Width of Fabric) strips. The WOF typically refers to the selvage-to-selvage width of your fabric, usually around 42-44 inches.
- From these strips, subcut 17 – 9 1/2″ x 9 1/2″ squares. These larger squares will alternate with your four-patch blocks to create the overall quilt design.
Additional Tools You Might Need:
- Rotary Cutter: For precise and efficient cutting of fabric.
- Quilting Ruler: A clear, acrylic ruler with marked measurements is essential for accurate cutting and trimming.
- Self-Healing Cutting Mat: Protects your work surface and your rotary blade.
- Sewing Machine: A reliable machine with a 1/4-inch piecing foot (if available) is highly recommended.
- Iron and Ironing Board: Crucial for pressing seams, which contributes significantly to the flatness and accuracy of your quilt.
- Thread: High-quality cotton thread that matches or blends with your fabrics.
- Fabric Scissors, Pins, and Seam Ripper: Standard sewing notions that are always good to have on hand.
Step-by-Step Guide to Sewing Your Four-Patch Quilt
Now that you have all your materials ready, let’s dive into the exciting part: constructing your four-patch quilt! Follow these detailed instructions carefully to ensure a beautiful and successful outcome.
Step 1: Prepare Fabrics and Create Four-Patch Units
Embarking on your quilting journey begins with precise preparation. First, meticulously cut all your fabric pieces according to the provided pattern, ensuring crisp, accurate dimensions – this precision is paramount for a successful quilt. Once cut, organize these pieces and set them aside. Now, dive into the exciting part of selecting and arranging your 5″ x 5″ squares (Fabric A). This is where your creativity shines! Feel free to mix and match various patterns and colors to create a ‘scrappy’ yet harmonious look for your individual four-patch blocks. With your squares chosen, take two pairs of squares and place them right sides together. Using your sewing machine, stitch them with a consistent 1/4-inch seam allowance. This precise seam allowance is crucial in quilting for blocks to fit together perfectly. After sewing each pair, gently press the seams to one side (typically towards the darker fabric to prevent ‘shadowing’ through lighter fabrics). Then, join the two sewn pairs together, aligning the central seams carefully to ensure your four-patch meets cleanly in the middle. Stitch again with that precise 1/4-inch seam allowance. Once this block is complete, press the final seams. To ensure uniformity and crisp edges, trim your newly formed four-patch block down to a perfect 6 1/2″ x 6 1/2″ square using a rotary cutter and quilting ruler. This squaring-up step is vital for assembling a flat, even quilt top. Repeat these steps diligently until you have created all the necessary four-patch units for your quilt.
Step 2: Assemble the Quilt Top
With all your four-patch units beautifully created and squared up, it’s time to bring your quilt top to life! This stage is like watching a puzzle come together, piece by piece. Begin by laying out your finished four-patch blocks and your 9 1/2″ x 9 1/2″ background squares (Fabric B) on a flat surface, such as your floor or a large table. Arrange them in alternating fashion: a four-patch block, followed by a background square, then another four-patch, and so on, to create your first row. Pay close attention to the orientation of your four-patch blocks to ensure the design flows as you envision. Once you are satisfied with the arrangement of your first row, carefully pick up the blocks in sequence, maintaining their order, and sew them together using that consistent 1/4-inch seam allowance. When pressing the seams for each row, alternate the direction for adjacent seams; for example, press seams in the first row to the left, and in the second row to the right. This technique, known as “nesting seams,” will allow the seams to lock together when you join the rows, creating perfectly aligned points where the blocks meet – a hallmark of a meticulously crafted quilt. Repeat this process for all subsequent rows, ensuring each one is assembled with the same care and precision. Finally, with all your individual rows completed, it’s time to join them together. Carefully align each row, nesting the seams where they meet, and stitch them with your 1/4-inch seam allowance. Take your time, pinning generously if needed, to keep everything aligned. As you connect each row, you’ll see your quilt top rapidly taking shape, transitioning from individual blocks to a complete, cohesive design. Once all rows are sewn, give your finished quilt top a final, thorough press to flatten all seams and ensure it lies perfectly flat.
Essential Tips for Beginners on Their Quilting Journey
Quilting is a journey of continuous learning, and even the simplest patterns offer opportunities to refine your skills. Here are some invaluable tips to help you achieve success with your four-patch quilt and build a strong foundation for future projects:
- Accurate Cutting is Key: In quilting, the adage “measure twice, cut once” is incredibly important. Even a slight inaccuracy in your initial cuts can lead to blocks that don’t fit together perfectly, resulting in wavy seams or an uneven quilt top. Invest in a good quality rotary cutter, ruler, and mat, and always double-check your measurements before cutting.
- Consistent 1/4-inch Seam Allowance: This is arguably the most critical skill in piecing quilt blocks. Practice sewing a perfect 1/4-inch seam using a ruler to mark lines on scrap fabric. Many sewing machines come with a 1/4-inch foot, which can be a huge asset. Your blocks will fit together seamlessly only if this allowance is consistent.
- Pressing vs. Ironing: Understand the difference. When quilting, we generally “press” seams, which means lifting the iron, placing it down firmly, and then lifting it again. “Ironing” involves pushing the iron back and forth, which can stretch and distort your fabric, especially bias edges. Always press seams to the dark side when possible, or open, depending on the pattern’s requirements, to avoid “shadowing” of darker fabrics through lighter ones.
- Nesting Seams for Perfect Points: When joining two blocks or rows where seams meet, press the seams in opposite directions. This allows the seam allowances to “nest” or lock together, ensuring that your points and intersections align perfectly, creating a crisp, professional finish.
- Chain Piecing: To save time and thread, use the chain piecing method. Instead of cutting your thread after each seam, feed the next set of fabric pieces directly into your machine. This creates a “chain” of sewn units that you can snip apart later.
- Use Good Quality Thread: While it might seem like a small detail, using good quality cotton thread can prevent breakage, lint buildup in your machine, and ensures strong, durable seams for your quilt.
- Take Your Time and Enjoy the Process: Quilting is a craft that requires patience. Don’t rush through steps. If a seam isn’t right, use your seam ripper and redo it. The joy of quilting comes not just from the finished product, but from the mindful process of creation.
Beyond the Quilt Top: Completing Your Quilt
While this tutorial focuses on constructing the beautiful four-patch quilt top, remember that a complete quilt involves a few more essential steps:
- Basting: This is the process of temporarily securing your three layers (quilt top, batting, and backing) together so they don’t shift during quilting. You can baste with safety pins, spray adhesive, or by hand-stitching.
- Quilting: This is where you stitch through all three layers to add texture, design, and durability to your quilt. For a beginner four-patch, simple “stitch-in-the-ditch” (quilting along the seam lines) or straight-line quilting can be very effective and manageable.
- Binding: The final step involves attaching strips of fabric around the edges of your quilt to enclose the raw edges and give it a clean, finished border.
Each of these steps is a project in itself, but there are countless resources and tutorials available to guide you through them once your four-patch quilt top is complete.
How to Sew a Four-Patch Quilt: Your Journey Begins!
Congratulations on taking the first step towards creating your very own four-patch quilt! This classic pattern is an ideal entry point into the wonderful world of quilting, offering both simplicity and immense satisfaction. By following the detailed instructions and embracing the tips provided, you’ve gained valuable skills that will serve as the foundation for countless future projects.
The four-patch quilt is more than just fabric and thread; it’s a testament to patience, precision, and creativity. Whether you’ve crafted it as a cozy blanket, a decorative wall hanging, or a thoughtful gift, your handmade quilt carries a unique story and a piece of your heart. Don’t be afraid to experiment with different fabric combinations, colors, and arrangements to truly make each quilt your own. The beauty of quilting lies in its endless possibilities.
Now that your stunning four-patch quilt top is complete, you’re ready to move on to the next exciting phases of basting, quilting, and binding. Each step brings you closer to a fully finished masterpiece. We encourage you to share your beautiful creations with us and the wider quilting community. Happy quilting, and may your sewing machine hum with joy!