
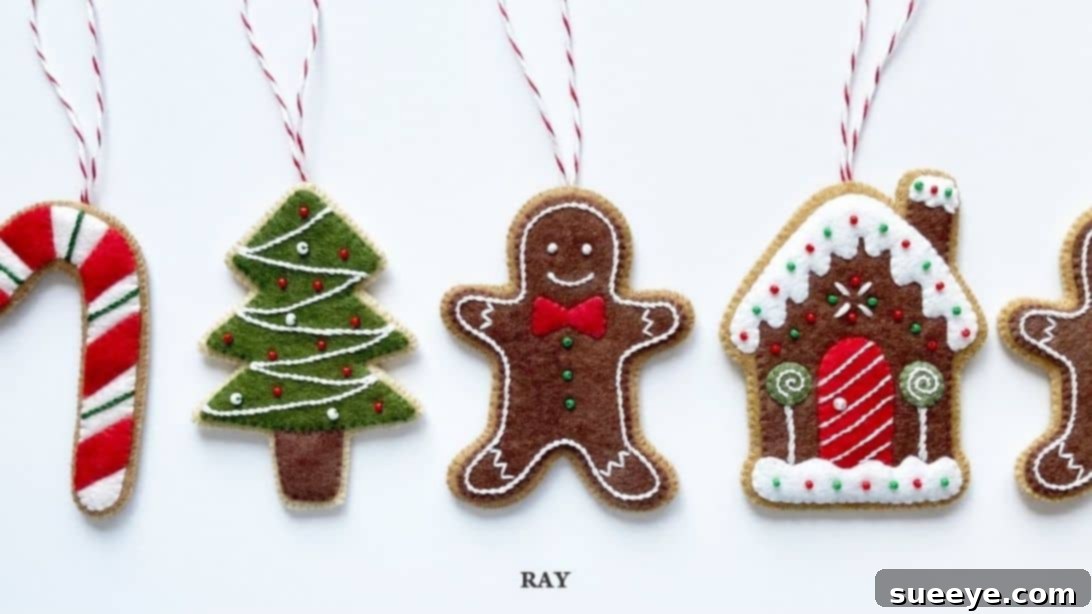
DIY Felt Gingerbread Man Ornament: A Charming Handmade Christmas Decoration
As the festive season rapidly approaches, the joy of decorating our homes with unique and heartwarming touches becomes a cherished tradition. If you’re searching for last-minute DIY Christmas ornament ideas that are not only simple and quick to make but also incredibly charming, then look no further! This delightful felt gingerbread man ornament project is the perfect solution. It’s a fun and engaging activity that allows for endless creativity, enabling you to craft a variety of festive symbols like sparkling Christmas trees, jolly snowmen, classic candy canes, or any other holiday icon that captures your imagination.
Creating handmade Christmas decorations adds a special warmth and personal touch to your holiday display that store-bought items simply can’t replicate. These DIY felt ornaments are not just decorations; they are little tokens of love and creativity, perfect for adorning your own tree, gifting to loved ones, or even selling at craft fairs. This particular project, inspired by the wonderful tutorials from RAY – Felt & Craft on YouTube, offers a straightforward yet utterly adorable sewing experience suitable for crafters of all skill levels, including beginners and families looking for a fun holiday activity together.
Why Choose Felt for Your Christmas Ornaments?
Felt is an incredibly versatile and forgiving material, making it an ideal choice for DIY Christmas ornaments. Its unique properties make crafting a breeze, even for those new to sewing. Unlike many other fabrics, felt doesn’t fray when cut, eliminating the need for hemming and simplifying your project significantly. It’s soft to the touch, available in a vast array of vibrant colors that beautifully capture the festive spirit, and remarkably durable, ensuring your handmade decorations will last for many Christmases to come. Furthermore, felt is generally inexpensive and easy to find at most craft stores, making this an accessible and budget-friendly craft option. Its pliable nature also means it’s easy to cut intricate shapes, stitch through, and embellish, allowing your creative visions to come to life with minimal effort.
Beyond the Gingerbread Man: Endless Felt Ornament Ideas
While the gingerbread man is a classic and beloved Christmas figure, the techniques you’ll learn in this tutorial can be easily adapted to create a whole host of other festive felt ornaments. Don’t limit your imagination! Here are just a few ideas to inspire your next handmade Christmas decoration:
- Jolly Snowmen: Cut out round or oval felt shapes, add tiny embroidered eyes and carrot noses, and complete them with miniature felt hats and scarves.
- Sparkling Christmas Trees: Craft simple tree shapes and embellish them with tiny beads, sequins, or embroidered ‘lights’ for a truly magical effect.
- Classic Candy Canes: Use red and white felt strips to create the iconic swirl, or simply cut out a candy cane shape and add embroidered stripes.
- Elegant Stars: From simple five-pointed stars to more intricate snowflake designs, felt stars can be adorned with glitter or metallic thread for a celestial touch.
- Friendly Reindeer: Give your reindeer distinctive antlers, a bright red nose, and perhaps a tiny jingle bell for extra charm.
- Santa Claus or Elves: For a more ambitious project, try crafting small felt figures of Santa or his elves, complete with tiny hats and rosy cheeks.
- Festive Bells and Baubles: Create traditional bell shapes or round baubles, decorating them with contrasting felt overlays or intricate stitching patterns.
The beauty of felt crafting lies in its adaptability. You can experiment with different sizes, colors, and embellishments to create a truly personalized collection of holiday decorations that reflect your unique style and bring joy to your home.
Materials for Your DIY Felt Gingerbread Man Ornament:
Gathering your materials is the first exciting step in any crafting journey. For this charming gingerbread man ornament, you’ll need a few basic supplies, most of which you likely already have on hand or can easily acquire from any craft store. Choosing good quality felt and vibrant threads will make a significant difference in the final look and durability of your handmade Christmas decorations.
- 1pc Felt, Light Brown: This will form the main body of your gingerbread man. Consider a nice, warm tone that mimics baked gingerbread.
- 1pc Felt, Dark Brown: Used for creating a layered ‘icing’ effect or adding subtle contrasts, giving depth to your ornament.
- 1pc Felt, Red: Perfect for a festive bow tie, heart accents, or rosy cheeks.
- Embroidery Thread: Essential for adding details, outlines, and facial features. Opt for contrasting colors like white, black, or even a brighter brown for outlining, and red for the bow tie.
- Cardboard Paper: A small piece of stiff cardboard will serve as an internal stabilizer, giving your ornament structure and preventing it from flopping.
- Fabric Glue (or Hot Glue Gun with low temp setting): For securing layers, especially the cardboard, and attaching small embellishments.
- Hand Sewing Needle: A sharp, appropriately sized needle for working with felt and embroidery thread.
- General Sewing Thread: To attach beads or tiny embellishments where the thread color should match the bead.
- A Pair of Sharp Scissors: Crucial for clean and precise cuts, especially when working with smaller details.
- Pen or Fabric Marker: For tracing your templates onto the felt. A silver or white gel pen works well on darker felt.
- String or Ribbon: For creating a loop to hang your finished ornament. Twine, thin ribbon, or clear fishing line are all good options.
- White Paper: For drawing and cutting out your initial gingerbread man templates.
- Small Beads (for buttons): Choose tiny buttons or seed beads in colors like white, red, or green to act as the gingerbread man’s buttons.
Optional Materials for Enhanced Customization:
- Sequins or Glitter Glue: To add a touch of sparkle and festive glamor.
- Tiny Buttons: Real miniature buttons can be used instead of beads for a different texture.
- Fabric Paint or Puffy Paint: For drawing intricate ‘icing’ designs or adding dimension.
- Small Ribbons or Bells: For extra embellishments on the bow tie or elsewhere.
- Stuffing (Polyester Fiberfill): For a plump, 3D gingerbread man (if you choose to stuff it instead of using cardboard).
Step-by-Step Directions: Crafting Your Festive Felt Gingerbread Man Ornament
Follow these detailed instructions to bring your adorable felt gingerbread man to life. Take your time with each step, and remember that slight imperfections often add to the handmade charm!
Step 1: Preparing Your Templates and Cutting Felt Pieces
The foundation of a beautiful ornament lies in precise cutting. Begin by preparing your templates, which will guide your felt cutting. This crucial first step ensures that all your pieces fit together perfectly, laying the groundwork for a stunning handmade Christmas decoration.
- Create Your Templates: On a piece of white paper, draw a gingerbread man shape. Make sure it has distinct arms, legs, and a head. This will be your main template. Then, draw a slightly smaller version of the gingerbread man, ensuring it fits neatly within the outline of the larger one; this will be for the decorative ‘icing’ layer. Finally, draw a small bow tie shape for the neck. If drawing isn’t your forte, don’t hesitate to search online for “gingerbread man ornament template printable” to find ready-made designs.
- Cut Main Body Pieces: Take your larger gingerbread man template and place it on the light brown felt. Pin it securely in place to prevent slipping, then carefully trace around the template with a pen or fabric marker. Cut out two identical pieces of this light brown felt. These will form the front and back of your ornament.
- Cut Decorative Layer: Next, use your smaller gingerbread man template. Place it on the dark brown felt, pin it, and trace. Cut out one piece of this darker felt. This piece will be placed on the front light brown felt to create a charming, layered effect, mimicking the look of gingerbread with a slightly darker ‘baked’ center or a decorative border.
- Cut Bow Tie: Take your bow tie template, place it on the red felt, pin it, trace, and cut out one piece. This vibrant red bow tie will add a delightful pop of color and character to your gingerbread man.
- Prepare Cardboard Stiffener: Place your smaller gingerbread man template onto a piece of cardboard paper. Trace and cut it out. This cardboard piece will be inserted between the front and back felt layers to give your ornament stability and a firm structure, preventing it from bending or drooping on your Christmas tree. Set it aside for later.
Step 2: Assembling and Adding Core Details with Stitching
Now that your felt pieces are cut, it’s time to bring your gingerbread man to life with some basic sewing techniques. Stitching adds texture, defines features, and truly elevates the handmade quality of your ornament.
- Layer and Secure the ‘Icing’ Layer: Carefully stack the smaller dark brown felt piece (your ‘icing’ layer) on top of one of the larger light brown felt pieces, ensuring it’s centered and aligned. Using an embroidery thread in a contrasting color (like white or cream to mimic actual icing), begin to sew these two pieces together. A whip stitch is ideal here; it’s a simple, neat stitch that wraps around the edge, creating a lovely finished look. Work your way around the entire perimeter of the smaller felt piece.
- Embroider the Gingerbread Man Outline: Take three strands of your chosen embroidery thread (perhaps a slightly darker brown or a contrasting white for a more defined look). Starting from the ‘icing’ layer, sew an outline around the gingerbread man’s body. This outline will give your gingerbread man a distinct, polished look. For the arms and legs, switch to a single strand of embroidery thread and use a straight stitch to create a more delicate outline, mimicking subtle joint lines or cookie edges.
- Attach the Bow Tie: Position the red felt bow tie at the neck area of your gingerbread man. Using red sewing thread (or embroidery thread if you prefer a bolder look), sew around the edges of the bow tie with a whip stitch to securely attach it to the front of the ornament.
Step 3: Embellishing Your Gingerbread Man and Final Assembly
This is where your gingerbread man truly gets its personality! Adding facial features, buttons, and preparing the ornament for hanging are the final steps to completing your charming Christmas decoration.
- Create Eyes and Mouth: Get six strands of embroidery thread (black for eyes, red for mouth work well). Use a French knot stitch to create small, raised dots for the eyes and mouth. The French knot provides a lovely, dimensional effect perfect for facial features. If you’re new to French knots, practice on a scrap piece of felt first! Alternatively, you can use tiny black beads or simply straight stitch for a simpler look.
- Attach Buttons: Take your small beads (white, red, or green for a festive touch) and position them down the center of the gingerbread man’s body, where buttons would typically go. Using a normal sewing thread that matches the color of your beads (or the felt, if preferred for a less noticeable stitch), sew each bead securely in place. You can use 2-3 beads for a classic look.
- Insert Stiffener and Hanging Loop: Take your light brown felt back piece. Apply a thin layer of fabric glue to one side of the cardboard gingerbread man you cut earlier. Carefully position this glued cardboard piece onto the center of the wrong side of the felt back piece. Before you completely seal the ornament, take a piece of string or ribbon (about 6-8 inches long), fold it into a loop, and position the ends between the top of the front felt piece and the back felt piece (where the cardboard is), making sure the loop extends upwards to become the hanger. Secure the ends of the string with a dab of glue or a few stitches to prevent it from pulling out.
- Final Sealing Stitch: Carefully align the front felt piece (with all its details and the cardboard inside) with the remaining plain light brown felt piece. Make sure all edges are perfectly matched. Starting from an inconspicuous spot, begin to whip stitch around the entire perimeter of the gingerbread man. This stitch will securely join the front and back pieces, enclosing the cardboard and the hanging loop, and neatly finish the edges of your ornament. Ensure your stitches are snug and even for a professional finish.
Tips for Success and Customization
To ensure your felt gingerbread man ornament turns out perfectly and to encourage even more creativity, consider these helpful tips:
- Practice Your Stitches: If you’re new to sewing, practice your whip stitch and French knot on a scrap piece of felt before working on your actual ornament. This builds confidence and ensures neater results.
- Use Good Lighting: Good lighting is essential for seeing your stitches clearly and preventing eye strain, especially with smaller details.
- Experiment with Colors: Don’t be afraid to deviate from traditional colors. Imagine a pink gingerbread man with a green bow tie, or a white gingerbread man with silver details!
- Add Scent: For an extra sensory experience, you can lightly mist your finished felt ornament with a gingerbread-scented room spray (ensure it’s safe for fabric) or tuck a tiny, thin sachet of dried spices inside before fully sealing.
- Personalize It: Use a fabric marker to write a name and the year on the back of the ornament, turning it into a cherished keepsake.
- Make a Set: Create a whole family of gingerbread people in various sizes or with different expressions to adorn your tree.
- Safety First: When crafting with children, always supervise them closely, especially when using needles and scissors. Consider using blunt-tip needles for younger crafters.
Caring for Your Handmade Felt Ornaments
To ensure your beautiful DIY felt gingerbread man ornaments bring joy for many Christmases to come, proper care and storage are key. Store them flat in an airtight container or box to protect them from dust, moisture, and pests. Placing tissue paper between layers can prevent embellishments from snagging or flattening. Avoid direct sunlight when displaying them, as prolonged exposure can fade felt colors. With a little care, these charming handmade decorations will become treasured heirlooms.
Congratulations! You’ve successfully crafted an adorable DIY felt gingerbread man ornament. This easy sewing project is a fantastic way to add handmade charm to your holiday decor, create personalized gifts, or simply enjoy a relaxing crafting session. Remember, the true beauty of DIY lies in the unique imperfections and the love poured into each creation. We extend our sincere gratitude to RAY – Felt & Craft on YouTube for sharing such inspiring and amazing felt-related tutorials. Be sure to follow their channel for more creative ideas that will keep your craft basket full all year long! Happy crafting and Happy Holidays!