
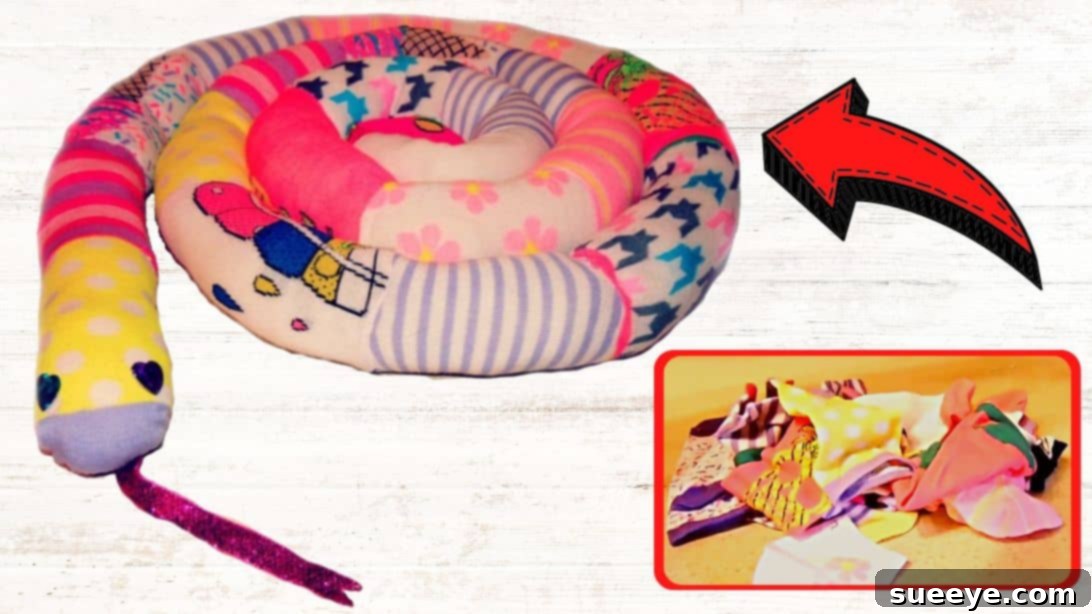
Embark on a delightful and incredibly simple sewing adventure by creating your very own adorable DIY sock snake! This ingenious project, originally shared by Chasing Siberia on YouTube, transforms ordinary socks into a charming, huggable companion that’s perfect for gifting or keeping. Whether you’re a seasoned crafter or a complete beginner looking for an accessible introduction to sewing, this tutorial offers an enjoyable and rewarding experience. Imagine the joy on a child’s face receiving a handmade animal plush, crafted with love and creativity, or adding a unique, quirky touch to your own decor. I personally tried my hand at this project, crafting a soft and snuggly sock snake, which became an instant favorite with my nephew who adores stuffed animals. It’s not just a project; it’s an inexpensive gift idea that brilliantly utilizes a few spare socks and a piece of ribbon, proving that you don’t need fancy materials to create something truly special. Dive into this tutorial and discover how effortlessly you can bring a delightful sock snake to life!
Materials for Your DIY Sock Snake Project
Before you begin this exciting sewing journey, gather the following essential materials. Most items are likely already in your home, making this a wonderfully budget-friendly craft!
- A Collection of Socks: The heart of your project! Choose various colors, patterns, and even sizes to create a unique and visually interesting snake. Older, clean socks work perfectly for upcycling. The number of socks needed will depend on your desired snake length.
- A Piece of Ribbon (Red Recommended): This will form the iconic forked tongue of your snake. While red is traditional, feel free to experiment with other vibrant colors to match your snake’s personality. A length of about 6-12 inches (15-30 cm) should suffice.
- Sharp Scissors: Essential for precise cutting of fabric. Ensure your scissors are sharp enough to cut through sock material cleanly without fraying.
- Needle and Thread: For hand-sewing the various sections of your snake. Opt for a durable thread that matches or complements your sock colors. A basic sewing kit usually contains everything you need.
- Poly-fil Fiberfill or Stuffing Material: This is what will give your sock snake its plush, huggable form. You can purchase Poly-fil at any craft store, or alternatively, repurpose stuffing from old pillows or even use fabric scraps for a more eco-conscious approach.
- Fabric Pins or Clips: These are incredibly helpful for holding fabric pieces together securely while you sew, ensuring your seams are neat and aligned.
- Sparkly Beads or Buttons (for the eyes): These add character and life to your snake. Small, shiny beads (around 5-10mm) are ideal. If making for very young children, consider embroidering eyes instead to eliminate potential choking hazards.
- Hot Glue Gun and Glue Sticks: For securely attaching the eyes and sealing the ribbon tongue. Always exercise caution when using a hot glue gun, especially with children present.
Step-by-Step Directions to Sew Your Cute Sock Snake
Follow these detailed steps to transform your collection of socks into a charming and cuddly sock snake. Take your time with each step, and don’t hesitate to personalize your creation!
Step 1: Preparing the Head and Assembling the Body Sections
Begin by carefully selecting the sock that will serve as the head of your snake. This sock will set the tone for your creature, so choose a pattern or color you love! Take your scissors and cut straight across the heel of this sock, effectively removing the heel portion. Next, snip off the very tip of the toe part. Now, turn the sock inside out. This preparation ensures a clean finish once sewn. Grab your chosen piece of ribbon – the future tongue – and decide on its desired length, trimming if necessary. Insert one end of the ribbon into the inside-out sock, ensuring it’s lined up precisely with the seam of the toe opening. This positioning is crucial for a neat finish. Using your needle and thread, carefully sew the toe opening shut, securely enclosing the ribbon within the seam. A simple running stitch or backstitch will work well here, ensuring durability. Once the head is prepared, it’s time to build the body. Take another sock and cut it across both the toe and the heel, creating a tube. Turn this second sock right side out. Now, link this body segment to the sock head you just prepared. Align their open seams together, using fabric pins or clips to hold them in place. This will ensure a smooth connection. With careful stitching, sew these two seams together. Repeat this process: take another sock, cut off the toe and heel to create a tube, turn it right side out, and sew it onto the previous segment. Continue adding sock segments in this manner until your snake reaches the desired length, remembering to keep all body sections right side out before attaching. Each connection should be neat and secure to ensure a sturdy and long-lasting plush toy.
Step 2: Finishing the Tail, Stuffing, and Embellishing Your Snake
Now that your snake’s body has reached its full length, it’s time to craft the tail and add the finishing touches. For the very last part of your snake, the tail segment, make a crucial adjustment: cut only across the heel, but leave the toe section completely intact. This preserved toe will form a nicely rounded tail tip. Before sewing this last segment completely shut, ensure you leave a small opening along the seam. This crucial gap will be your entry point for stuffing the entire snake. With your body structure complete, it’s time to bring your snake to life with stuffing. Begin feeding the Poly-fil fiberfill into the opening, starting from the tail end and gently pushing it all the way up towards the head. Use a dowel, a chopstick, or even the blunt end of a pencil to evenly distribute the stuffing, ensuring there are no lumpy areas and that your snake is firm but still cuddly. Once your snake is plump and shapely, carefully sew the opening shut with a ladder stitch or whipstitch for an invisible and secure closure. Next, focus on the snake’s face. Using your hot glue gun, apply a small dab of hot glue to the back of your chosen sparkly beads or buttons. Carefully adhere these to the head of the snake, positioning them symmetrically to create a pair of expressive eyes. Hold them in place for a few seconds until the glue sets. If you are making this for a baby or toddler, it is highly recommended to embroider the eyes using black thread instead of using beads, which could pose a choking hazard. Finally, address the ribbon tongue. Trim the ends of the ribbon into a V-shape or a slight fork to give it that classic snake-like appearance. To prevent the ribbon from fraying over time, apply a tiny amount of hot glue to the very ends of the trimmed ribbon. This will seal the fabric and ensure your snake’s tongue stays perfectly pointy. Your adorable, huggable sock snake is now complete and ready for its new home!
*These amazing images are all credited to Chasing Siberia via YouTube. Check her other content and follow for more inspiring DIY projects!
Tips for a Perfect Sock Snake Every Time
To ensure your sock snake project is a resounding success, consider these helpful tips:
- Sock Selection Matters: Experiment with different types of socks. Crew socks, knee-highs, or even tights can create varying lengths and thicknesses. Consider fun patterns, stripes, or even mismatched socks for a truly unique look.
- Even Stuffing: Take your time to stuff the snake evenly. Over-stuffing can make it rigid, while under-stuffing makes it floppy. Aim for a firm yet squeezable texture.
- Secure Stitching: Since this toy might be played with extensively, use strong, tight stitches. A backstitch is more durable than a simple running stitch for seams that will bear stress.
- Embellishment Safety: If making the snake for small children, always opt for embroidered eyes instead of beads or buttons, which can become choking hazards. Ensure any other embellishments are very securely attached.
- Pre-Wash Socks: For hygiene and to prevent future shrinkage, it’s a good idea to wash and dry your socks before beginning the project.
- Creative Tongues: Beyond ribbon, consider using felt, craft foam, or even a piece of scrap fabric for the tongue.
The Wonderful Benefits of Making a DIY Sock Snake
Creating a sock snake is more than just a craft; it offers a multitude of benefits:
- Eco-Friendly Upcycling: This project is a fantastic way to give new life to old, lonely, or mismatched socks that might otherwise end up in landfills. It promotes sustainable crafting practices.
- Budget-Friendly Fun: Using materials you likely already have at home, this craft is incredibly inexpensive. It proves that creativity doesn’t have to come with a hefty price tag.
- Beginner-Friendly Sewing: It serves as an excellent introduction to basic sewing techniques for absolute beginners. The simple straight seams are perfect for practicing stitches without intimidation.
- Unleashes Creativity: From choosing sock patterns to adding unique embellishments, this project offers ample opportunities for personal expression and creative decision-making.
- Heartfelt Handmade Gifts: A handmade sock snake makes a thoughtful and personal gift for children, friends, or even pets. The effort and love put into a handmade item are truly cherished.
- Engages Children: Older children can actively participate in parts of this project (with supervision), fostering fine motor skills, patience, and a sense of accomplishment.
- Stress Relief: Engaging in a simple, repetitive craft like hand-sewing can be a wonderfully meditative and stress-relieving activity for adults.
Creative Variations and Customization Ideas
Once you’ve mastered the basic sock snake, unleash your imagination with these ideas:
- Patterned Body: Alternate solid-colored socks with patterned ones to create striking stripes or checkerboard effects along the snake’s body.
- Textural Details: Sew on small felt shapes to create scales, spots, or even fins for a more whimsical creature. You could also use different textured socks to add sensory appeal.
- Rattle or Crinkle Snake: For babies and toddlers, insert a small rattle or crinkly material (like a clean plastic bag) into one of the body segments before stuffing to add auditory stimulation.
- Embroidered Features: Instead of hot-glued beads, use embroidery floss to stitch on eyes, nostrils, or even a tiny smile for a softer, child-safe finish.
- Multi-Headed Snake: For a fantastical creature, attach two “head” socks to a central body segment to create a two-headed snake.
- Varying Lengths: Make a family of snakes – one long and slithery, others short and stubby – by adjusting the number of body segments.
- Weighted Snake: For a sensory toy, you can include small bags of dried beans or plastic pellets (securely sewn inside an inner pouch) in some sections along with the fiberfill to give the snake a comforting weight.
Safety First: Important Considerations for Your Craft
While this is a fun and simple project, always prioritize safety, especially if the sock snake is intended for children:
- Choking Hazards: Small beads, buttons, or any other tiny embellishments can pose a choking risk for infants and toddlers. Always choose embroidered features for very young recipients.
- Hot Glue Gun Use: Hot glue guns can cause burns. Ensure proper ventilation, use a heat-resistant mat, and always supervise children if they are assisting with this step.
- Sharp Objects: Scissors and needles are sharp. Keep them out of reach of small children and always use them carefully.
- Non-Toxic Materials: Ensure all materials, especially any dyes in the socks or glues, are non-toxic, particularly if the toy is for a child who might put it in their mouth.
Unleash Your Creativity with a DIY Sock Snake
The DIY sock snake project is a testament to the fact that creativity doesn’t require complex skills or expensive materials. It’s a wonderful opportunity to transform discarded items into something new, useful, and absolutely adorable. This project, inspired by the innovative ideas of Chasing Siberia, offers a therapeutic escape into crafting while producing a charming result. Whether you’re making it as a personalized gift for a loved one, a new favorite toy for a child, or simply a whimsical decoration for your home, the process is as rewarding as the finished product. So, gather your socks, thread your needle, and prepare to be charmed by the simple joy of creating your very own huggable sock snake. We encourage you to try this delightful craft and share your unique creations! Happy sewing!