
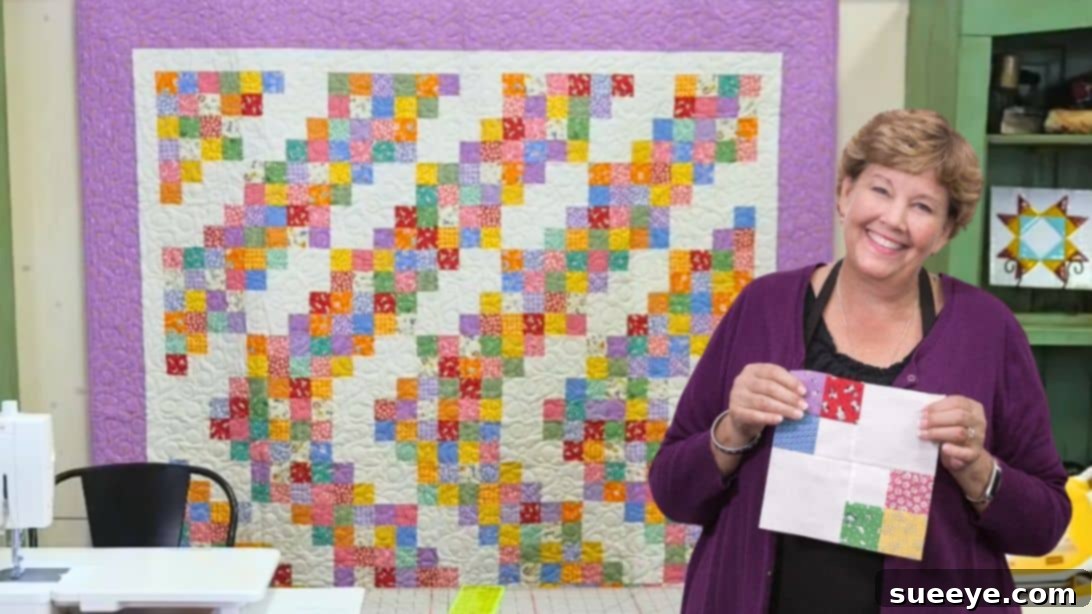
Master the Vintage 4×4 Quilt Pattern: A Beginner-Friendly Guide to Arrow-Shaped Blocks
Embark on a delightful quilting journey with a pattern that promises both simplicity and a stunning visual impact! If you’re searching for an easy-to-follow, festive, and truly rewarding quilting project, look no further than this ingenious 4×4 quilt pattern, popularized by the experts at Missouri Star Quilt Company. This design is a true gem, perfect for quilters of all skill levels, especially those just starting out. What makes this quilt so captivating is how simple four-patch blocks magically transform into dynamic arrow-like patterns, adding an unexpected twist and a playful elegance to your quilt top. It’s an incredibly efficient way to utilize your existing stash of four-patch blocks or a perfect excuse to create a fresh batch!
This particular 4×4 quilt pattern is celebrated for its clever construction, relying on just two distinct types of blocks that are remarkably straightforward to create. The first is a versatile 16-patch block, effortlessly assembled from four individual four-patch units. The second block introduces a touch of contrast, combining two four-patch blocks with two precisely cut 4 1/2-inch background squares. Both components are incredibly beginner-friendly, eliminating any need for complex techniques or intimidating steps. You’ll be amazed at how quickly these simple units come together to form a intricate-looking design. Prepare to infuse your home with warmth and charm, or craft a cherished gift that speaks volumes. For a comprehensive visual guide and step-by-step demonstration, be sure to watch the full tutorial video provided by Missouri Star. Get ready to enjoy the fulfilling process of happy quilting!
If you’re eager to explore more foundational quilting techniques, consider diving into these related patterns:
- Four Patch Stars Quilt With Jenny Doan
- Easy Split 4-Patch Quilt Block Tutorial
Essential Materials for Your Vintage 4×4 Quilt
Gathering your materials is the exciting first step in any quilting project. For this charming 4×4 quilt, the following supplies will set you up for success. Choosing your fabrics is where your personal style truly shines, so pick colors and patterns that resonate with you!
- 1 roll of 2 1/2″ print strips: Often known as “jelly rolls,” these pre-cut strips are a fantastic time-saver and come in coordinated collections, making fabric selection a breeze. They ensure consistency and speed up the piecing process significantly.
- 1 3/4 yards of background fabric (includes inner border): This fabric will provide contrast and visual breathing room, allowing your colorful four-patch blocks to truly pop. A neutral color like cream, white, or light gray is a classic choice, but don’t be afraid to experiment with a subtle print or a soft hue that complements your main fabrics.
- 1 1/4 yards of outer border fabric: The outer border frames your quilt, providing a polished finish. Choose a fabric that ties all your block colors together or introduces a new, harmonious element to the design.
- 3/4 yards of binding fabric: Binding is the final touch that protects the edges of your quilt and adds a decorative frame. Often, a fabric from your block collection or a contrasting solid is used to make the binding stand out.
- 5 yards of backing fabric: This is the fabric for the back of your quilt. It should be comfortable, durable, and complementary to your quilt top. Wide-back fabrics can eliminate the need for piecing, making this step quicker.
- Basic quilting supplies: Don’t forget your rotary cutter, cutting mat, quilting ruler, sewing machine, thread, pins, and an iron!
Step-by-Step Guide: Crafting Your Beautiful 4×4 Quilt
Preparation Tips for Quilting Success
Before diving into the actual piecing, a few preparatory steps can make all the difference in achieving a professional-looking quilt. Precision is key in quilting, and these initial tips will help you maintain accuracy throughout the project:
- Pre-wash your fabrics (optional but recommended): This helps prevent future shrinking and color bleeding. If you choose not to pre-wash, be consistent with all your fabrics.
- Accurate cutting: Use a sharp rotary blade and a reliable quilting ruler. Measure twice, cut once! Even a slight deviation can throw off your block sizes.
- Consistent seam allowance: A perfect 1/4-inch seam allowance is crucial. Practice on scraps if you’re new to your machine, ensuring your needle position and fabric alignment are spot on.
- Pressing: Pressing is not ironing. Lift and place your iron, don’t slide it, to avoid distorting your fabric. Consistent pressing will result in flat, beautiful blocks.
Step 1: Constructing Your Foundation Four-Patches
The journey to your stunning 4×4 quilt begins with the humble yet essential four-patch block. These small, versatile units are the building blocks of both major quilt blocks in this pattern. To start, select two contrasting colored strips from your 2 1/2″ roll. Lay one strip on top of the other, right sides together, and carefully sew them lengthwise along one edge with a precise 1/4-inch seam allowance. After stitching, gently press the seam open or to one side – choose a consistent direction for all your strip sets to ensure flatter blocks later on. A common technique is to press towards the darker fabric to prevent lighter fabrics from showing through. Once pressed, your strip set should be nice and flat. Now, take your ruler and rotary cutter and cut these strip sets into 4 1/2-inch units. The more accurate your cuts are here, the better your final blocks will look. Repeat this process with various color combinations from your strip roll, aiming to create a vibrant assortment of these two-strip units. Remember, variety is the spice of life in quilting, so mix and match your prints!
Step 2: Forming the Four-Patch Units
With your two-strip units prepared, it’s time to transform them into proper four-patch blocks. Take two of your 4 1/2-inch units. Arrange them so that when sewn together, the colors alternate – meaning you don’t want the same color touching itself across the seam. For example, if you have a red/blue strip and a green/yellow strip, you might arrange them so that the red meets the yellow and the blue meets the green. Place these two units right sides together, aligning the raw edges and, crucially, aligning the seam lines where the two original strips were joined. Pin carefully at these seam intersections to ensure they meet perfectly. Sew them together with a consistent 1/4-inch seam allowance. Once sewn, press the seam again. Many quilters find it helpful to “nest” the seams (pressing one seam to the left and the other to the right) to reduce bulk at the intersection. The goal is a perfectly flat four-patch block. Continue making as many of these well-pressed four-patch units as needed for your quilt, ensuring they are all uniform in size and flatness.
Step 3: Precise Cutting and Component Separation
Now that your four-patch units are taking shape, we need to make a specific cut to prepare some pieces for the second block design. Return to your freshly pressed four-patch unit from the previous step. You’re going to make a strategic cut: fold the first unit from the strip set, then cut a 2 1/2-inch strip from the edge of the four-patch. This cut will yield two specific pieces: a 2 1/2″ x 4 1/2″ strip and a remaining piece. Repeat this cutting technique across all your prepared four-patch units. The goal is to produce several of those 2 1/2″ x 4 1/2″ strips. These specific dimensions are vital for the construction of your second block. Set aside all the 2 1/2″ x 4 1/2″ pieces carefully. These will be integral to creating the contrasting elements that form the arrow effect in your quilt design, demonstrating how different sized cuts from a single block can create varied visual components.
Step 4: Assembling the First Block – The 16-Patch Powerhouse
The first major block of your quilt is a visually rich 16-patch unit, and it’s surprisingly simple to create from your existing four-patch blocks. For each 16-patch block, you will need four individual four-patch blocks that you created in Steps 1 and 2. The magic happens in the arrangement: lay out your four four-patch blocks in a 2×2 grid. Pay close attention to the colors and patterns. The key here is to arrange them so that no identical colors or patterns are directly beside each other, either horizontally or vertically. This creates a balanced and interesting visual flow within the larger 16-patch block. Once you’re happy with the arrangement, sew the two top four-patch blocks together, then sew the two bottom four-patch blocks together. Press these seams. Finally, sew the top row to the bottom row, carefully aligning the center seams to ensure a perfect match. Again, pinning at the intersections will aid in accuracy. Press this final seam. Congratulations, you’ve completed your first main block – a beautiful 16-patch unit!
Step 5: Preparing for the Second Block – Background Contrast
The second block is where the distinctive arrow pattern begins to emerge, thanks to the strategic use of background fabric. For this block, you’ll be making new strip sets. This time, take one of your chosen colored strips (2 1/2″ wide) and pair it with a 2 1/2″ wide strip of your background fabric. Place them right sides together and sew along the long edge with your consistent 1/4-inch seam allowance. Press the seam open or towards the darker fabric. Once your background strip sets are complete, cut them into 2 1/2-inch segments. Each second block will require two of these new background-infused segments. The contrast between the print and the background fabric is crucial here, as it will highlight the directional elements of your quilt design.
Step 6: Integrating Components for the Second Block
Now we combine elements to build the unique four-patch components for our second block. Take two of the 2 1/2″ x 4 1/2″ strips that you diligently set aside in Step 3. These pieces, originating from your initial four-patch units, are now ready to be joined with your new background segments. Take one 2 1/2″ x 4 1/2″ strip and sew it to one of the 2 1/2″ segments you just created in Step 5. Ensure that you’re aligning the 2 1/2″ sides. Press the seam open. Repeat this for the second set of pieces. What you should now have are two new four-patch-like units, each featuring a blend of your original print and the new background fabric. These are not traditional four-patches but rather elongated units that will contribute to the arrow’s “point” when combined with the full background squares. Accuracy in sewing and pressing here is just as important as in previous steps.
Step 7: Assembling the Second Block – The Arrow Creator
The final assembly of the second block is where the magic of the arrow pattern truly starts to take shape. For each second block, you will need two 4 1/2″ background squares (cut from your background fabric) and the two distinct four-patch-like units you assembled in Step 6. Lay out these four pieces in a 2×2 grid. The arrangement is critical for forming the arrow:
- Place your two 4 1/2″ background squares diagonally opposite each other (e.g., top-left and bottom-right).
- Place your two four-patch units in the remaining diagonal positions (top-right and bottom-left).
Crucially, make sure that the background squares are positioned so that they touch the background sections of your four-patch units. This creates a continuous flow of the background fabric, which will define the “empty” space around the arrow. Once you are satisfied with the arrangement, sew the top two pieces together, and then the bottom two pieces together. Press your seams. Finally, sew the top row to the bottom row, carefully aligning all intersections. Press one last time. You now have your second distinct block, a masterpiece of negative space and clever arrangement, ready to be integrated into the quilt top! This block, when oriented correctly, is the key to creating the striking arrow motif.
Step 8: Assembling the Quilt Top – Bringing the Arrows to Life
With all your first (16-patch) and second (arrow-creating) blocks ready, it’s time for the exciting stage of assembling your quilt top. This is where the overall design truly emerges. The “4×4” refers not just to the small squares, but to a block arrangement that produces a larger visual matrix. For this specific pattern, the placement and orientation of your second block are paramount to creating the mesmerizing arrow effect. Here’s how to lay out your rows:
- Row 1: Begin with the first block (the 16-patch), followed by the second block. Alternate these blocks across the row, ensuring the row ends with a first block. For example: Block 1 – Block 2 – Block 1 – Block 2 – Block 1.
- Row 2: Start with the second block, then alternate with the first block. This row will look like: Block 2 – Block 1 – Block 2 – Block 1 – Block 2.
- Row 3: Repeat the pattern of Row 1.
- Row 4: Repeat the pattern of Row 2.
- Row 5: Now, for a significant visual shift! Start with the second block, but this time, rotate it 180 degrees. The goal is to have the background sections of the second block touch each other across the row, creating a continuous line of white (or whatever your background color is). Alternate blocks as before, ensuring each second block is rotated correctly.
- Remaining Rows: Continue alternating rows, always starting the “odd” rows (like Row 5, 7, etc.) with the rotated second block and the “even” rows with the non-rotated second block. Ensure that for all the bottom rows (from Row 5 onwards), the second block maintains this new, consistent rotated orientation.
Throughout these first four rows, it’s crucial to maintain the exact same orientation for your second blocks. Do not rotate them yet.
Once all your rows are sewn, press them carefully. Then, sew your rows together, aligning the seams as precisely as possible. This step completes your quilt top, ready for borders, batting, backing, and binding. Take a step back and admire how the simple arrangement of these two blocks creates such a complex and beautiful arrow design!
Finishing Touches and Design Variations
After your quilt top is assembled, you’ll add the borders. First, attach the inner border strips (cut from your background fabric) to frame the pieced center. Then, add the outer border strips (from your outer border fabric) for a complete, professional finish. Next comes the quilting! You can opt for simple stitch-in-the-ditch quilting or explore more intricate free-motion designs. Finally, create and attach your binding, which encases the raw edges of your quilt and adds that last touch of craftsmanship.
This 4×4 quilt pattern is incredibly versatile. Experiment with different fabric combinations: use all solids for a modern look, a mix of prints for a scrappy aesthetic, or choose a monochromatic palette for subtle elegance. Consider making the quilt larger or smaller by adjusting the number of blocks you create and rows you assemble. The possibilities are endless, allowing you to truly personalize this classic design.
Learn to Make a 4×4 Quilt with Jenny Doan
For those who benefit from visual instruction, learning directly from a quilting master like Jenny Doan of Missouri Star Quilt Company is an invaluable experience. Jenny’s clear, encouraging teaching style makes even complex patterns accessible to beginners. Her video tutorials break down each step, offering practical tips and showing exactly how to achieve precision in your cuts and stitches. By following along with her, you’ll gain confidence in your quilting skills and discover clever techniques that will improve all your future projects. Don’t hesitate to check out her full tutorial on the 4×4 quilt pattern; it’s the perfect companion to this written guide and will help you visualize every stage of this delightful project. Happy quilting!