
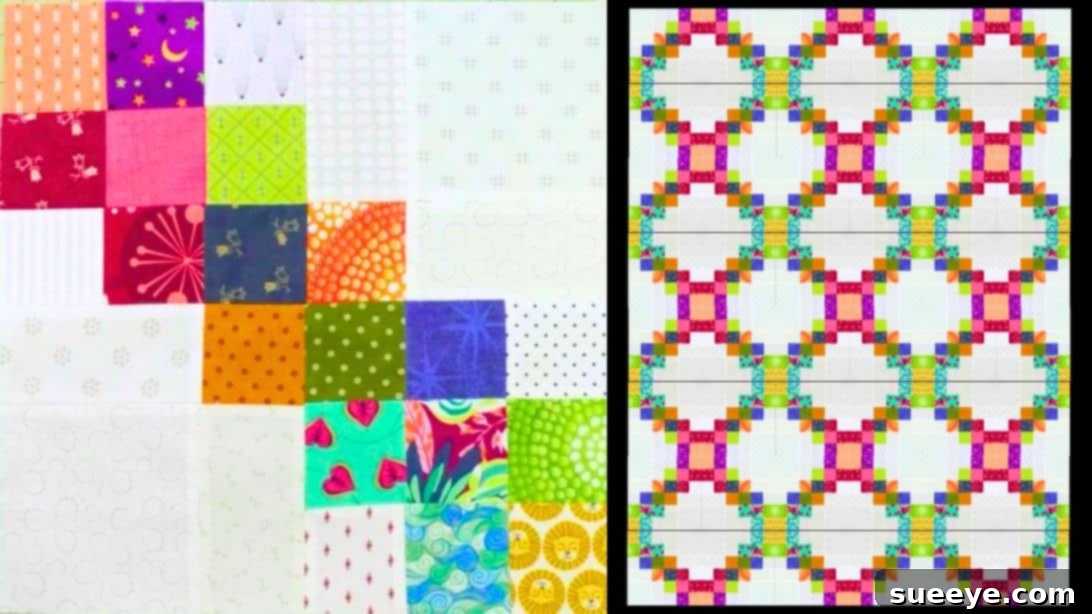
Embark on a delightful quilting adventure this weekend with the charming and beginner-friendly Garden Path Quilt Block! If you’re looking for a perfect scrap-buster project that delivers beautiful results, look no further. This project is not only incredibly fun to create but also designed to be accessible for even novice quilters. With the expert guidance of Carol Thelen’s comprehensive video tutorial on YouTube and a readily available free pattern guide, you’ll be able to master this stunning block with confidence. Say goodbye to worries about perfection on your first try – this tutorial ensures you’ll create a perfectly pieced quilt block, making it an ideal starting point for your quilting journey. Let’s transform your fabric scraps into a masterpiece!
What You’ll Need: Essential Materials for Your Quilt Block
Before diving into the fun of cutting and stitching, gather your essential quilting supplies. Having everything ready will ensure a smooth and enjoyable crafting experience. Here’s what you’ll need to create your beautiful Garden Path Quilt Block:
- Assorted Fabric Scraps: Dive into your stash and pick out a variety of print fabrics that complement each other. These will form the “path” elements of your block. Don’t be afraid to experiment with different colors and patterns to create a unique visual effect.
- Background Fabric: Choose a solid or subtle print fabric that will serve as the backdrop for your assorted scraps. A neutral color like white, cream, or a light gray often works best to make your colorful prints pop.
- Marking Pen, Pencil, or Chalk: Essential for accurately marking your fabric for cutting and stitching lines. Choose one that is easily visible on your chosen fabrics and disappears or washes out after use.
- Scissors or Rotary Cutter and a Cutting Mat: For precise fabric cutting. A rotary cutter and self-healing mat offer speed and accuracy, especially when cutting multiple pieces. If using scissors, ensure they are sharp and dedicated for fabric only.
- Quilting Ruler: A clear acrylic ruler with grid lines is indispensable for accurate measurements and straight cuts, especially when paired with a rotary cutter.
- Needle and Thread: High-quality polyester or cotton thread that matches your fabric or is a neutral color like white or gray. Ensure your machine needle is sharp and suitable for quilting cotton.
- Iron, for pressing: A well-heated iron and ironing board are crucial for pressing seams open or to the side. Proper pressing creates flat blocks and helps align future seams accurately.
- Sewing Machine: A reliable sewing machine is key for stitching your fabric pieces together. Ensure it’s in good working order and you have fresh needles.
- Free Pattern Guide: Don’t forget to download and print the essential pattern guide provided by Carol Thelen. This guide includes all the specific measurements and layouts you’ll need for this project. (Click here to download the pattern)
Step-by-Step Guide: Crafting Your Garden Path Quilt Block
Creating the Garden Path Quilt Block involves a series of straightforward steps that build upon each other. Precision in cutting and pressing is key to achieving crisp points and perfectly aligned seams. Follow these detailed instructions, referring to Carol Thelen’s video for visual clarity, and you’ll soon have a beautiful block ready to incorporate into your next project.
Step 1: Preparation and the First Block Layout
Begin by carefully printing the provided pattern guide. Accuracy here is paramount, so ensure your printer settings are correct (e.g., 100% scale) to avoid distorted measurements. Once printed, use your ruler and rotary cutter (or scissors) to meticulously cut all your fabric pieces to the sizes indicated in the pattern. This includes both your assorted print squares and your background squares.
Now, let’s lay out the components for your first block. Take four of your print squares and arrange them into two rows. Imagine a 3×3 grid for this block. Place one print square in the lower-right corner of this imaginary grid. Then, position another print square directly to the left of it, and a third print square directly above the lower-right square. This forms an ‘L’ shape of print squares in the corner. For the remaining spaces within this 3×3 layout, carefully fill them with your chosen background squares. The goal is to create a distinct pattern that will form part of the Garden Path design. Take your time to ensure all pieces are oriented correctly according to the pattern guide and your visual preference.
Step 2: Stitching the First Block and Commencing the Second
With your first block layout complete, it’s time to bring it to life with your sewing machine. Starting with the rows you’ve laid out, stitch the fabric squares together, using a consistent ¼-inch seam allowance. This precise seam allowance is fundamental in quilting for ensuring all your blocks fit together perfectly. After stitching each row, take it to your ironing board. Carefully press the seams open. Pressing seams open helps to reduce bulk, creating a flatter block that will lie smoother when joined with others. Once your rows are pressed, stitch these rows to each other, again maintaining that accurate ¼-inch seam. Press these connecting seams open as well. Congratulations, your first block is now complete!
Next, we will begin constructing the second distinct block component for our Garden Path design. This block features strips and a large background square. Start with one large background square. Position a background strip vertically along one side of this large background square. Below this vertical strip, place a single print square. Then, position another background strip horizontally along the bottom edge of the large background square, extending out to align with the bottom of the print square. This creates a different configuration of fabric elements that will interlock with your first block to form the characteristic “path.”
Step 3: Completing the Second Block and Final Assembly
Just as you did with the first block, stitch the components of this second block together, ensuring your ¼-inch seam allowance is consistent. As always, once stitched, take your newly formed block to the ironing board and press the seams open to maintain flatness and reduce bulk. Now you have two different types of quilt blocks ready for assembly!
The magic of the Garden Path Quilt Block comes alive as you arrange these completed blocks. Refer closely to Carol Thelen’s video tutorial for the precise arrangement. The video demonstrates how these two block variations interlock to create the flowing “path” design. Lay out your blocks on a flat surface, such as a design wall or the floor, to visualize the pattern and ensure all blocks are oriented correctly. This crucial step helps prevent mistakes before you commit to stitching.
Once you are satisfied with your layout, begin stitching the blocks together, first by rows, and then connecting the rows to each other. As you stitch, make sure to press your seams consistently. This continuous pressing as you go ensures that your finished quilt block is flat, even, and has crisp, professional-looking seams. Take your time to align points and seams where blocks meet for a truly polished finish. With careful attention to detail, you will create a stunning Garden Path Quilt Block that showcases your newfound or improved quilting skills.
Pro Tips for a Perfect Garden Path Quilt Block
Achieving a beautiful and professional-looking quilt block is within your reach, especially with a few key tips:
- Precision is Paramount: Always cut your fabric pieces as accurately as possible. Even a tiny deviation can throw off your block’s dimensions and make matching seams difficult. Use a sharp rotary cutter and a reliable quilting ruler.
- Consistent Seam Allowance: Master the ¼-inch seam allowance. Practice stitching on scrap fabric if needed. A consistent seam is the secret to blocks that fit together perfectly.
- Pressing, Not Ironing: When pressing seams, lift and place the iron rather than sliding it, which can distort your fabric. Press seams open to reduce bulk and ensure your block lies flat.
- Chain Piecing: For efficiency, especially when making multiple blocks, use chain piecing. Stitch several sets of pieces one after another without lifting the presser foot or cutting the thread in between.
- Test Your Design: Before stitching all your blocks together to form a larger piece, lay them out on a design wall, floor, or bed. This allows you to check the pattern, color balance, and identify any misoriented blocks.
- Don’t Rush: Quilting is a journey, not a race. Take your time with each step, enjoy the process, and don’t be afraid to unpick and restitch if something isn’t quite right.
Unleash Your Creativity: Variations and Beyond
The Garden Path Quilt Block is a fantastic foundation for endless creativity. Once you’ve mastered the basic block, consider these ideas to make it uniquely yours:
- Fabric Play: Experiment with different color palettes. Use bright, cheerful prints for a modern look, or opt for muted, traditional fabrics for a vintage feel. Consider seasonal themes (e.g., fall colors, holiday prints).
- Background Variations: While a solid background provides contrast, try a tone-on-tone background print for added texture without distracting from the “path.”
- Project Expansion: This single block can be the start of many projects. Make a few to create a charming table runner or placemat. Create a larger number to assemble a stunning throw quilt, a baby blanket, or even a decorative pillow cover.
- Quilt Borders: Once you have a quilt top made from multiple Garden Path blocks, think about adding complementary borders to frame your design and increase the quilt’s size.
Conclusion: Your Journey to a Beautiful Handmade Quilt Block
You’ve now completed a beautiful and intricate-looking Garden Path Quilt Block! This project is a testament to how simple shapes, when combined with precision and care, can create truly stunning textile art. It’s an ideal way to utilize those beloved fabric scraps and develop essential quilting skills, proving that even beginners can achieve impressive results.
We extend our sincere gratitude to Carol Thelen via YouTube for her excellent tutorial and for providing the wonderful images used here. Her clear instructions and encouraging approach make quilting accessible to everyone. If you enjoyed creating this quilt block, we highly recommend visiting her YouTube channel for more inspiring projects and valuable quilting tips. Subscribe to her channel to stay updated on her latest creations and continue your quilting journey with confidence and joy!