
Easy Easter Egg Placemat: A Reversible Quilted Sewing Tutorial for All Skill Levels
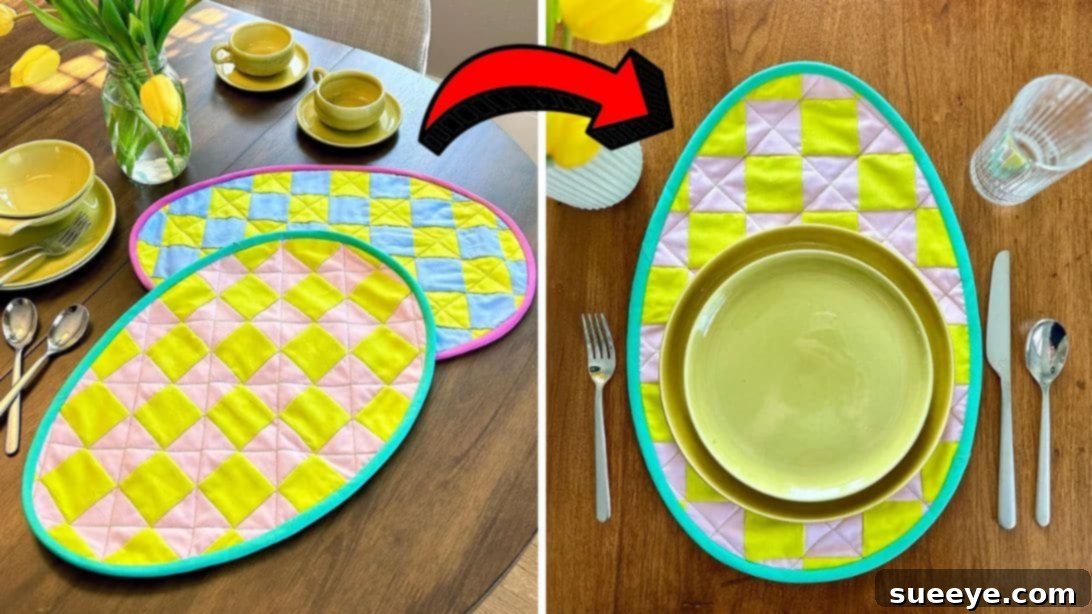
Transform your table settings with this charming and versatile egg-shaped placemat, an ingenious design by Happy Hour Stitches on YouTube. Perfect for adding a festive touch to your dining room or a decorative accent to a side table, this placemat is a true year-round essential. What makes it truly special? It’s completely reversible, offering two distinct looks in one, ensuring it complements various seasons and occasions, not just Easter.
RELATED: Easy Fabric Eggs Sewing Tutorial
This project stands out for its simplicity and accessibility, making it an ideal choice for beginner sewers looking to expand their skills. The comprehensive video tutorial is accompanied by a free pattern, streamlining your crafting process from start to finish. Dive into this delightful sewing project today, and discover the joy of creating a beautiful, quilted placemat that you and your loved ones will adore. Let’s get started and bring this elegant design to your home!
Why Craft Your Own Reversible Egg Placemat?
Embarking on a DIY sewing project like this reversible egg placemat offers numerous benefits beyond just decorating your home. Firstly, it allows for unparalleled personalization. You get to select fabrics that perfectly match your existing décor or introduce new color schemes for a fresh look. Whether you prefer vibrant prints for spring, subtle pastels for a serene ambiance, or bold solids for modern appeal, the choice is entirely yours. This level of customization is rarely found in store-bought items.
Secondly, handmade items carry a unique charm and warmth. Each stitch reflects your effort and creativity, making the placemat not just a functional item but a piece of art. It’s a wonderful way to express your personal style and add a touch of individuality to your living spaces. Moreover, crafting can be incredibly therapeutic. The focused, repetitive motions of sewing, combined with the satisfaction of seeing a project come to life, can be a great stress reliever and a fulfilling hobby.
Thirdly, this particular placemat is designed to be reversible, essentially giving you two placemats in one! This feature significantly increases its value and versatility. You can switch between patterns or colors depending on your mood, the season, or the specific table setting you’re aiming for. Imagine a bright floral pattern for spring and summer, flipped to a rich autumnal tone or a holiday-themed fabric for cooler months. This adaptability makes it a practical and economical choice for year-round use.
Finally, this tutorial is specifically tailored for beginners, providing a fantastic opportunity to learn fundamental sewing techniques in a manageable and rewarding project. From cutting fabric strips and piecing them together to quilting and binding, you’ll gain valuable skills that can be applied to many future sewing endeavors. Plus, the satisfaction of saying “I made this!” is truly incomparable.
Essential Materials for Your Quilted Placemat Project
Gathering the right materials before you begin is key to a smooth and enjoyable sewing experience. For this project, a curated selection of fabrics and tools will help you achieve a professional finish. Here’s a detailed look at what you’ll need and why:
- Fat Quarter, 2 Contrasting Colors: These pre-cut fabric pieces (typically 18×22 inches) are perfect for smaller projects and offer a cost-effective way to get a variety of prints or solids. Choosing two contrasting colors is crucial for creating the visually appealing grid pattern that forms the placemat’s top. The contrast allows the design to pop and adds depth to your finished piece.
- Backing Fabric: This fabric will form the reverse side of your placemat, so select something that complements or contrasts nicely with your top fabrics, especially if you intend to use the reversible feature often. It should be durable and washable, just like your top fabrics.
- Batting Fabric: Batting is the soft, fluffy layer sandwiched between your top and backing fabrics. It provides structure, insulation, and the quilted texture that makes the placemat feel substantial and luxurious. A cotton or cotton-blend batting is often recommended for its breathability and ease of quilting.
- Binding Fabric: The binding fabric is used to finish the raw edges of your placemat, providing a clean, durable, and decorative border. Choose a fabric that harmonizes with both the front and back of your placemat for a cohesive look. Often, a coordinating solid or a subtle stripe works beautifully.
- Ruler: A clear acrylic quilting ruler (preferably with ¼-inch markings) is indispensable for accurate cutting and measuring, ensuring your fabric strips are precise and your final placemat is symmetrical.
- Marking Pen, Pencil, or Chalk: These tools are used to transfer pattern lines onto your fabric. A water-soluble fabric marker or tailor’s chalk is ideal as it can be easily removed after stitching.
- Scissors or Rotary Cutter and a Cutting Mat: A good pair of fabric shears is essential, but a rotary cutter paired with a self-healing cutting mat offers unparalleled speed and precision, especially when cutting long strips of fabric. This combination is highly recommended for quilters.
- Hera Marker Tool: This specialized tool creates temporary crease lines on fabric without leaving any residue, making it perfect for marking quilting lines without the need for ink or chalk. It’s particularly useful for straight lines and grids.
- Needle and Thread: A universal sewing machine needle (size 80/12 or 90/14) and good quality all-purpose polyester thread that matches or blends with your fabrics will be needed for construction.
- Iron, for Pressing: An iron is a quilter’s best friend! Pressing seams open or to one side creates flat, professional-looking joins, which are crucial for accurate piecing and a smooth finish. Don’t skip this step!
- Sewing Machine: Any standard home sewing machine capable of a straight stitch will work perfectly for this project. Ensure it’s well-maintained and threaded correctly.
- Egg Template (Click here to download the template): This downloadable pattern is essential for achieving the perfect egg shape. Print it at 100% scale to ensure the correct size.
Preparing for Your Sewing Journey: Getting Started
Before you even make your first cut, a little preparation goes a long way in ensuring a successful and enjoyable sewing experience. Taking these preliminary steps will set you up for success and help avoid common beginner pitfalls.
1. Set Up Your Workspace
Designate a clear, well-lit area for your sewing. Ensure your sewing machine is set up correctly, with a fresh needle and wound bobbins. Having all your tools within easy reach will prevent interruptions and keep your focus on the project.
2. Pre-wash Your Fabrics
It’s always a good practice to pre-wash and dry all your fabrics before cutting. This helps to pre-shrink them and remove any excess dye, preventing potential shrinkage or color bleeding after your placemat is complete. Press them thoroughly after drying to remove any wrinkles, as a smooth surface is essential for accurate cutting.
3. Download and Prepare the Template
Access the free egg template by clicking the provided link. Print it at 100% scale – check your printer settings to ensure no scaling or “fit to page” options are selected. Once printed, carefully cut out the template pieces and tape them together to form the complete egg shape. This template will be your guide for cutting the final placemat form.
Step-by-Step Guide: How to Sew an Easter Egg Placemat
Follow these detailed steps to create your stunning reversible egg placemat. Take your time, focus on accuracy, and enjoy the creative process!
Step 1: Fabric Strip Preparation and Piecing
Begin by carefully cutting your two contrasting fat quarters into fabric strips. The width of these strips will determine the size of your grid squares, so aim for consistency. Lay them out alternately in a row on your cutting mat or ironing board, visualizing your desired pattern. This step is crucial for planning your design. Once satisfied with the arrangement, take two adjacent strips and place them right sides together. Using your sewing machine, stitch them along one long edge with a precise ¼-inch seam allowance. Repeat this process, adding one strip at a time, until all your strips are sewn together into a single panel.
After each seam is sewn, it’s vital to press the seams. For this project, press the seams towards one of the contrasting colors. For example, if you have light and dark strips, consistently press all seams towards the darker fabric. This technique helps to “nest” the seams in the next step, ensuring less bulk and flatter joins. Once your strip set is complete and pressed, use your ruler and rotary cutter to carefully square up the edges, removing any unevenness. Finally, sub-cut this wider strip set into narrower strips, perpendicular to your original seams. The width of these new strips should match the width of your initial fabric strips, creating perfect squares when assembled.
Step 2: Assembling the Placemat Top
Now that you have your sub-cut strips, it’s time to create the beautiful grid pattern. Rearrange these newly cut strips alternately, shifting each subsequent strip by one square to form a staggered, woven, or grid-like appearance. Again, lay them out to visualize the final effect before sewing. Once the arrangement is finalized, sew these strips together, one by one, using a consistent ¼-inch seam allowance, just as you did in Step 1. Remember to press your seams after each join, alternating the direction of the seam allowance for each row (e.g., press seams up for row 1, down for row 2, up for row 3, etc.). This “nesting” technique allows the seams to align perfectly when sewn, creating crisp intersections and a much flatter placemat top. Once all strips are sewn, press the entire piece thoroughly from the front to create a perfectly flat and smooth placemat top. Set this pieced top aside for a moment.
Next, prepare your backing and batting. Lay the backing fabric on your work surface with its right side facing down. Smooth it out completely, ensuring there are no wrinkles or creases. Center the batting fabric directly on top of the backing fabric. Finally, place your beautifully pieced placemat top on top of the batting, ensuring its right side is facing up. Take care to center all three layers evenly. Smooth all layers once more to eliminate any puckers or wrinkles. You can use a few pins or basting spray to temporarily hold these layers together, especially if you’re new to quilting, to prevent shifting during the next step.
Step 3: Quilting, Shaping, and Finishing
With your fabric sandwich (backing, batting, and top) layered and smoothed, it’s time to add the quilting. Using your Hera marker tool, mark diagonal lines across all the lighter-colored squares on your placemat top. Refer to the video tutorial by Happy Hour Stitches for a clear visual guide on how to make these markings precise. The Hera marker creates a visible crease without permanent marks, which is perfect for quilting. Once your diagonal lines are marked, take your layered piece to the sewing machine. Carefully stitch over these crease lines, creating a beautiful quilted texture that not only enhances the design but also secures the batting in place, adding durability and loft to your placemat. You can also opt for straight lines, cross-hatching, or simple “stitch-in-the-ditch” quilting along your seam lines if you prefer. This quilting step transforms the flat fabric into a more substantial, professional-looking piece.
After quilting, it’s time to give your placemat its signature egg shape. Place your previously assembled egg template directly on top of your quilted placemat. Position it carefully to ensure the quilted design is centered within the egg shape. Using your marking pen, pencil, or chalk, trace around the entire shape of the egg template onto your quilted fabric. Once traced, use sharp fabric scissors or a rotary cutter (if comfortable with curves) to carefully cut along the drawn line. This will give you the finished egg shape. Finally, the last step is to bind the edges. This involves attaching strips of binding fabric around the raw edges of your newly cut egg shape, enclosing them neatly and professionally. There are various methods for binding (single-fold, double-fold, machine-bound, hand-stitched), but for a beginner-friendly approach, the video tutorial will likely demonstrate a straightforward method. This binding not only finishes the edges beautifully but also adds another decorative element and protects the placemat from fraying, ensuring its longevity.
Creative Variations & Customization Ideas
While the classic egg shape and grid quilting are delightful, don’t hesitate to infuse your placemats with personal flair. Here are a few ideas to spark your creativity:
- Fabric Choices: Experiment with different fabric types! While cotton is ideal for its washability, consider adding a touch of linen for texture, or even a subtle metallic print for a festive sparkle. Think beyond Easter – use autumn leaves, winter snowflakes, or summer fruits for year-round themes.
- Quilting Patterns: Instead of diagonal lines, try straight lines that follow the seams (“stitch in the ditch”), free-motion quilting with swirls or loops, or even a simple cross-hatch pattern across the entire placemat. Each quilting style will give a unique look and feel.
- Embellishments: For a more decorative touch, consider adding small appliqued shapes (like a bunny silhouette or a small flower) to a corner before quilting. Decorative stitches from your sewing machine could also be used along the binding or within certain squares.
- Shape Variations: While the egg shape is charming, you could adapt the technique to other simple shapes like circles, rectangles with rounded corners, or even a leaf shape, by simply changing the template you use for cutting the final form.
- Matching Sets: Create a full set of placemats for a coordinated dining experience. You could even make matching coasters using smaller versions of the egg shape.
Tips for Beginner Sewers
Embarking on a new sewing project can be both exciting and a little daunting. Here are some friendly tips to help beginners navigate this project with confidence:
- Read Through Everything First: Before you even touch your fabric, read the entire tutorial, including all steps and tips. Watch the video from Happy Hour Stitches once or twice. This gives you a clear overview of the process and helps you anticipate each step.
- Practice Makes Perfect: If you’re new to sewing with a ¼-inch seam allowance, practice on scrap fabric first. Consistent seam allowance is key to accurate piecing in quilting. You can even draw lines on your sewing machine’s throat plate with a washable marker to help guide your fabric.
- Pressing is Paramount: Do not underestimate the power of pressing. A well-pressed seam lies flat, makes subsequent sewing easier, and contributes significantly to the professional look of your finished placemat. Always use a hot iron and plenty of steam (if your fabric allows).
- Pin, Pin, Pin: Don’t be shy with pins. Use them generously to hold fabric layers together, especially when joining strips or layering the placemat sandwich. This prevents shifting and helps maintain accuracy.
- Sharp Tools Matter: Use sharp scissors or a fresh rotary cutter blade. Dull tools can lead to frayed edges and inaccurate cuts, making the entire process more frustrating.
- Go Slow: There’s no rush! Take your time with each step, especially when cutting, piecing, and quilting. Slow and steady wins the race in sewing.
- Troubleshooting: Don’t get discouraged by mistakes. Sewing is a learning process. If something goes wrong, take a deep breath. Often, a seam ripper is your best friend. Learning how to fix errors is an important part of developing your skills.
Caring for Your Handmade Placemat
To ensure your beautiful, handmade egg placemat lasts for many seasons to come, proper care is essential. Since it’s made from fabric, it will occasionally need cleaning. We recommend washing your quilted placemat on a gentle cycle with cold water and a mild detergent. Using cold water helps to prevent further shrinkage and preserves the vibrant colors of your fabrics. After washing, reshape the placemat and lay it flat to air dry. If you prefer to machine dry, use a low heat setting and remove it while still slightly damp to minimize wrinkles, then lay flat to finish drying. Ironing on a medium setting can help smooth out any creases and restore its crisp appearance. Avoid harsh chemicals or bleach, as these can damage the fabric and alter the colors. With mindful care, your reversible placemat will continue to adorn your table beautifully for years.
Conclusion: Enjoy Your Beautifully Crafted Placemats!
Congratulations on completing your reversible egg-shaped placemat! You’ve not only created a beautiful and functional piece of home decor but also honed valuable sewing skills. This project, courtesy of the clear instructions from Happy Hour Stitches, demonstrates how simple steps can lead to stunning results, making it truly perfect for anyone from eager beginners to seasoned crafters. Whether you’re setting a festive Easter table, adding a cozy touch to your everyday meals, or simply enjoying the satisfaction of a handmade item, this quilted placemat offers versatility and charm. Don’t stop here! Use the techniques you’ve learned to explore more sewing projects, experiment with different fabrics, and continue to personalize your living space with unique, handmade creations. Enjoy your wonderfully crafted placemats!
*All image credit belongs to Happy Hour Stitches via YouTube. Follow and subscribe to her channel for more inspiring DIY sewing tutorials!