
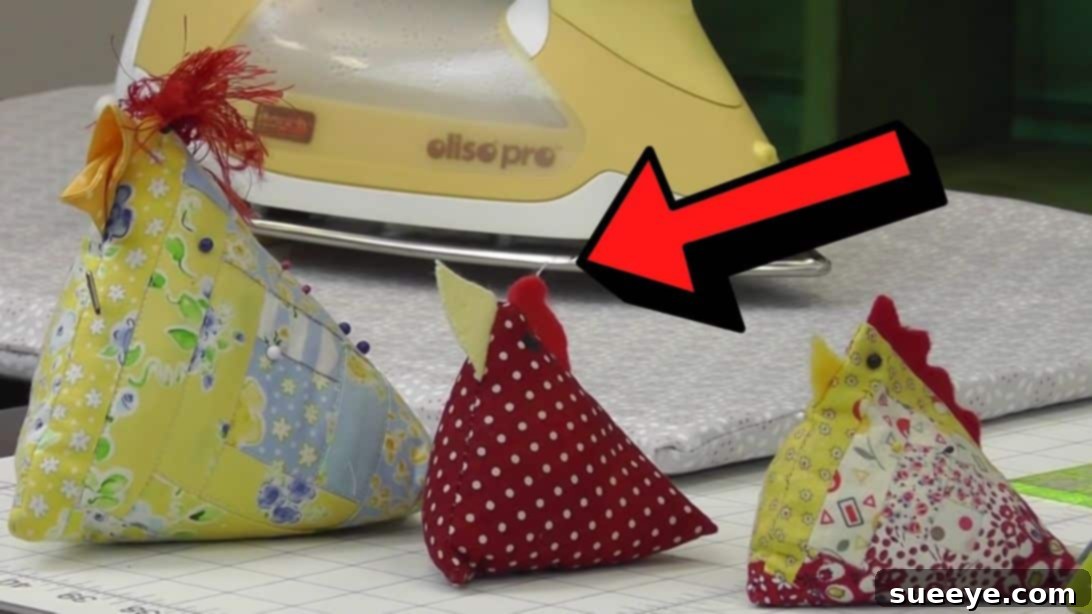
Are you a passionate quilter or a sewing enthusiast with a growing pile of beautiful fabric scraps? Instead of letting those precious remnants gather dust, why not transform them into something both charming and incredibly useful? This delightful sewing project, inspired by a fantastic tutorial from the Missouri Star Quilt Company on YouTube, teaches you how to create an adorable chicken-shaped pincushion. It’s an ideal way to repurpose your leftover fabrics, adding a touch of rustic charm and practicality to your sewing space. This project is not only super easy and quick to complete, making it perfect for beginners, but it also allows for creative freedom with your fabric choices and fillings. Imagine a cute flock of these little chickens keeping your pins organized and ready for your next creative endeavor!
Why Every Sewer Needs a Chicken Pincushion
A pincushion might seem like a simple accessory, but a handmade chicken pincushion offers numerous advantages beyond mere functionality. Firstly, it’s an excellent eco-friendly solution for managing fabric waste. Every quilter knows the struggle of accumulating small fabric pieces that are too beautiful to discard but too small for larger projects. This chicken pincushion project provides a perfect home for those treasured scraps, turning them into a practical item that embodies sustainability.
Secondly, its unique chicken shape brings a whimsical and personalized touch to your sewing area. Unlike generic store-bought pincushions, your handmade version will reflect your style and creativity, possibly sparking joy every time you reach for a pin. It’s a conversation starter and a testament to your crafting skills.
Thirdly, this project is remarkably accessible for sewers of all skill levels. With straightforward steps and minimal materials, even those new to sewing can achieve fantastic results. It’s an ideal project for practicing basic sewing machine skills, such as straight stitching, pivoting, and turning corners. Furthermore, the completed pincushion makes a thoughtful and unique gift for fellow crafters, friends, or family members who appreciate handmade items.
Finally, the choice of filling allows for customization based on your needs. Traditional fillings like crushed walnut shells not only provide weight and stability but also help sharpen your pins and needles, keeping them gliding smoothly through fabric. Alternatively, you can use beans, rice, or poly-fill, each offering different textures and weights. This versatility ensures your chicken pincushion is perfectly suited to your preferences.
Essential Materials for Your Chicken Pincushion
Gathering your materials is the first exciting step in bringing your chicken pincushion to life. Most of these items are likely already in your sewing kit, making this a budget-friendly project. The beauty of using fabric scraps means you can mix and match prints and colors to create truly unique poultry pals.
- 2 square fabrics: These will form the main body of your chicken. Choose two pieces of the same size, ideally around 5-7 inches square, depending on your desired pincushion size. Quilting cotton is an excellent choice for its durability and ease of handling.
- 1½ inch square fabric: This small piece will be transformed into the chicken’s adorable beak. A contrasting solid color or a small print can make it pop.
- 2½ inch square fabric: This slightly larger scrap is designated for the tail. Consider a vibrant print or a complementary solid to add character.
- 1¼ x 2½ inches strip: This narrow strip will create the distinctive comb of your chicken. Red or a bright color is traditional, but feel free to experiment!
- Fabric pins or clips: Essential for holding your fabric pieces securely in place before stitching.
- Needle and thread: For closing the opening after stuffing and for any minor hand-stitching adjustments.
- Sharp scissors: For precise fabric cutting and trimming threads.
- Rotary cutter and a cutting mat: Highly recommended for accurate and efficient cutting of your fabric squares and strips. This ensures your pieces are perfectly sized, which is crucial for a neat finish.
- Iron, for pressing: An indispensable tool for creating crisp folds and flat seams, which significantly improves the overall appearance of your finished pincushion.
- Sewing machine: For stitching the fabric pieces together quickly and securely.
- Pincushion filling: Options include crushed walnut shells (excellent for pin sharpening), rice, beans, sand, or polyester fiberfill.
- Optional: Black head pins or embroidery floss for adding eyes.
Step-by-Step Guide to Crafting Your Chicken Pincushion
Follow these detailed instructions to sew your charming chicken pincushion. Precision in cutting and pressing will make a significant difference in your final product.
Step 1: Preparing Your Fabric Components
The foundation of a beautiful pincushion lies in careful preparation. Begin by accurately cutting all your fabric pieces to the specified dimensions using your rotary cutter and mat for the best results. Once cut, it’s time to shape the chicken’s key features.
- Prepare the Comb: Take your 1¼ x 2½ inch comb fabric strip. Fold it in half lengthwise, right sides together, and press firmly with your iron. This will create a neat, folded edge for the comb. Set it aside.
- Prepare the Tail: Grab your 2½ inch square fabric for the tail. Fold it in half diagonally, pressing it down to create a crisp triangle. Then, fold it again in half, creating a smaller, symmetrical triangle. Press once more. This double-fold gives the tail body and shape. Set it aside.
- Prepare the Beak: Take your 1½ inch square fabric for the beak. Repeat the folding process similar to the tail: fold it in half diagonally, press, and then fold it again in half into a smaller triangle, pressing well.
- Assemble the First Side: Lay one of your main square body fabrics right side facing up on your work surface. This will be the outer front of your chicken.
- Position the Beak: Place the prepared beak piece onto the left side of this main square. The pointed side of the beak should face inwards towards the center of the square, and the folded raw edges should align with the raw edge of the main square. Position it approximately ¼ inch down from the top edge of the main square. Pin the beak securely in place, ensuring it won’t shift during sewing.
- Position the Comb: Now, place the prepared comb strip along the top edge of the main square, right sides facing down (the folded edge should be pointing inwards). Position it about ¼ to ½ inch away from the beak, ensuring it’s centered along the top edge or slightly offset to create the desired look. Pin the comb firmly in place.
- Layer the Second Side: Carefully place the second main square fabric piece directly on top, right side facing down. Ensure all raw edges align perfectly with the first main square, sandwiching the beak and comb pieces in between. Pin all layers together securely around the edges, paying extra attention to where the beak and comb are inserted to prevent them from moving.
Step 2: Sewing, Stuffing, and Finishing Your Chicken
This phase brings your chicken pincushion to life, transforming flat fabric into a delightful three-dimensional form. Precision in sewing and careful stuffing are key to a professional finish.
- Stitch the Top and Left Side: Using your sewing machine and a ¼ inch seam allowance, carefully sew along the top edge of your pinned squares, securing the comb in place. Pivot at the corner, and continue sewing down the left side, securing the beak. Backstitch at the beginning and end of your seams to reinforce them.
- Prepare for Tail Insertion: Once the top and left sides are sewn, gently pull the layers apart and turn the piece right side out. Examine the shape and locate the open side where the tail needs to be inserted – this will be the bottom edge.
- Sew the Bottom with an Opening: Turn the piece back to its wrong side. Stitch along the bottom edge, again using a ¼ inch seam allowance, but remember to leave an opening of about 1½ inches in the center. This gap will be used for turning and stuffing. Backstitch at the start and end of this opening.
- Insert the Tail: With the piece still wrong side out, pull the two unsewn raw edges (the remaining right side of the main body) apart so that the previously sewn seams on the top and bottom edges match up in the middle. Carefully insert the prepared tail piece into this opening, ensuring its pointed end is facing inwards and its raw edges align with the raw edges of the main body opening. Match the midpoint of the tail with the midpoint of the opening for even placement. Pin the tail securely in place.
- Complete the Final Seam: Stitch this remaining side straight down, securing the tail firmly into the seam. Once sewn, reinforce with backstitching.
- Trim and Turn: Carefully trim the corners to reduce bulk, being careful not to cut through your stitches. Now, turn the entire chicken pincushion right side out through the 1½ inch gap you left at the bottom. Use a point turner or a chopstick to gently push out all the corners and curves, creating a well-defined chicken shape.
- Stuff Your Chicken: It’s time to give your chicken its plump form! Fill the pincushion with your chosen material (crushed walnut shells are highly recommended for their weight and pin-sharpening properties). Fill it generously but ensure it’s firm enough to hold pins without being overly stiff. Use a funnel or a spoon to help with smaller fillings like walnut shells or rice.
- Close the Opening: Once adequately stuffed, hand-stitch the opening closed using a ladder stitch (invisible stitch). This creates a neat and almost imperceptible seam, giving your chicken a professional finish.
- Add the Eyes (Optional): For a final touch of personality, insert a pair of black-headed pins on either side of the chicken’s head to serve as eyes. Alternatively, you could use a small amount of black embroidery floss to stitch two small French knots for a permanent eye solution.
Tips for a Perfect Chicken Pincushion
Achieving a flawless pincushion is easier with a few expert tips:
- Pre-wash your fabrics: If you’re mixing new fabric with scraps, pre-washing ensures all fabrics shrink consistently and prevents color bleeding.
- Accurate Seam Allowances: Consistently using a ¼ inch seam allowance is vital for the chicken’s final shape. Consider using a ¼ inch foot on your sewing machine.
- Pressing is Key: Don’t skip the pressing steps! Ironing after each fold and seam helps to set stitches, create sharp edges, and ensures your pieces fit together perfectly.
- Experiment with Fillings: While walnut shells are excellent, feel free to use other dense materials like rice, beans, or even small stones for weight, or poly-fill for a softer, lighter pincushion. Ensure your chosen filling is dry to prevent mold or odors.
- Hand-stitching the Opening: Take your time with the ladder stitch (also known as invisible stitch) to close the opening. This will make the seam virtually disappear, giving your chicken a professional, polished look.
- Customize Your Chicken: Don’t be afraid to personalize! Use buttons for eyes, add a small bow, or embroider unique details to make your chicken truly one-of-a-kind.
Creative Variations and Customization Ideas
Once you’ve mastered the basic chicken pincushion, the possibilities for customization are endless:
- Size Adjustments: Easily scale the pattern up or down by adjusting the size of your initial square fabric pieces. A larger chicken can hold more pins, while smaller ones can become adorable keychain charms or even decorative ornaments.
- Themed Fabrics: Create themed chicken pincushions for holidays (e.g., festive prints for Christmas, pastels for Easter) or seasons (e.g., floral prints for spring, warm tones for autumn).
- Embellishments: Add tiny buttons for eyes instead of pins, or use embroidery floss to create more detailed features like eyelashes or wings. A small piece of lace or ribbon tied around the neck can add an elegant touch.
- Weighted Base: For extra stability, consider adding a small, flat weight (like a washer covered in fabric) inside the base of your chicken before stuffing.
- Aromatherapy Pincushion: Mix a small amount of dried lavender or cedar shavings with your filling for a subtly fragrant pincushion that also deters pests.
Conclusion
And there you have it – a charming, functional, and utterly adorable chicken pincushion, lovingly crafted from your very own fabric scraps! This project is a testament to how simple materials and a bit of creativity can yield something truly special. Not only will your new chicken friend keep your pins organized and ready for action, but it will also add a unique handmade touch to your sewing space. It’s a wonderful way to practice your sewing skills, reduce fabric waste, and create a heartfelt gift. We extend our gratitude to the Missouri Star Quilt Company for providing such a wonderful and inspiring tutorial. Now, gather your scraps, fire up your sewing machine, and get ready to welcome this feathered friend into your crafting journey!