
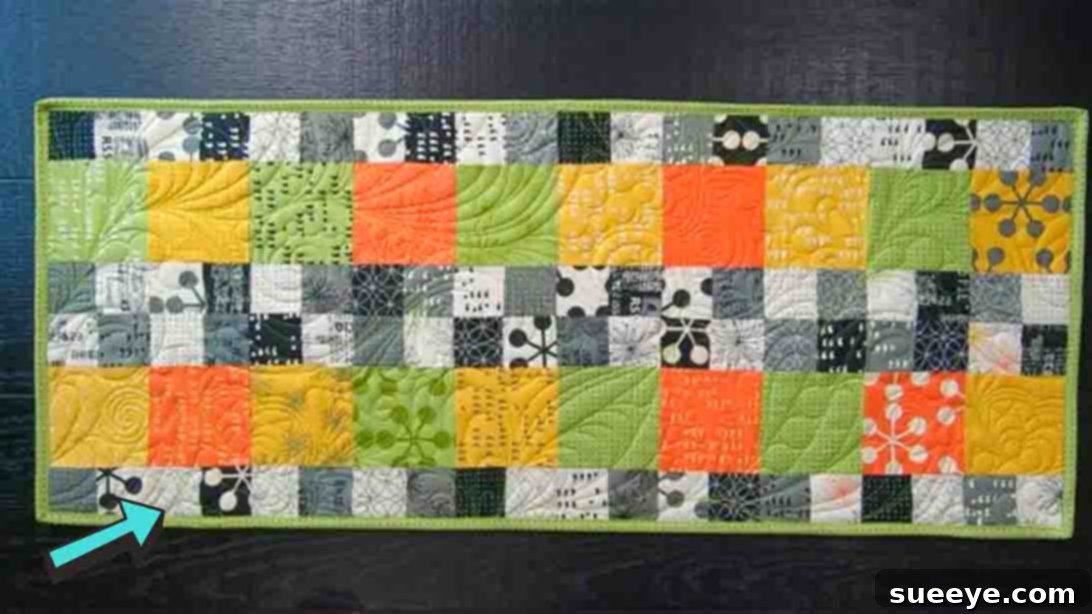
Are you searching for your next engaging and rewarding quilting adventure? Look no further! We highly recommend this delightful quilted table runner project, inspired by a fantastic tutorial from Moonkin Stitchery on YouTube. This project stands out as a remarkably quick and easy make, perfect for quilters of all skill levels. What makes it even better? You can bring this beautiful piece to life with just a single charm pack! That’s right, those convenient pre-cut 5-inch squares are all you need. And if you have a stash of fabric scraps that are also 5 inches in size, this is an excellent opportunity to put them to good use, transforming them into a charming and practical item for your home.
This project is designed with the beginner in mind, offering a straightforward approach to quilting that builds confidence and delivers stunning results. However, its appeal isn’t limited to newcomers. Even seasoned quilters will find immense satisfaction in this table runner, especially if you’re seeking a relaxing, mindful project to unwind and pass the time. Sometimes, it’s refreshing to step away from larger, more intricate lap or throw quilts and focus on a smaller, yet equally fulfilling creation. A table runner provides that perfect break, allowing you to experiment with new techniques or simply enjoy the meditative rhythm of stitching. Below, you’ll find the complete written instructions, offering a clear, step-by-step guide to crafting your very own “Fusion Gridlock” Charm Pack Quilted Table Runner.
RELATED PROJECT: Easy Strips Quilted Table Runner Tutorial
Fusion Gridlock Charm Pack Quilt Tutorial: Create a Stunning Table Runner
Elevate your home decor with a touch of handmade charm! This Fusion Gridlock Quilted Table Runner tutorial offers an accessible path into the world of quilting, utilizing the popular and versatile charm pack. Whether you’re a complete novice or a seasoned stitcher looking for a quick and satisfying project, this guide will walk you through every step to create a beautiful, durable table runner that adds personality and warmth to any space. Learn how to transform simple fabric squares into an intricate-looking design with ease.
Why a Quilted Table Runner is the Perfect Project
Quilted table runners are fantastic projects for many reasons. They are small enough to be completed relatively quickly, providing instant gratification and a tangible sense of accomplishment. Unlike larger quilts, which can take weeks or even months, a table runner can often be finished in a weekend, or even a single afternoon if you’re efficient. This makes them ideal for last-minute gifts, seasonal decor changes, or simply to try out a new pattern or technique without a huge commitment. Furthermore, table runners are incredibly versatile. They protect your surfaces, add a decorative accent, and can be easily swapped out to match different seasons, holidays, or interior design themes. They also make wonderful, heartfelt gifts for friends and family, showcasing your craftsmanship and thoughtfulness.
The Magic of Charm Packs for Quilters
Charm packs are a quilter’s best friend, especially for projects like this table runner. These delightful fabric bundles consist of 42 pre-cut 5-inch by 5-inch squares from a designer’s collection. This means all the fabrics are coordinated, eliminating the guesswork of choosing matching prints and colors. For beginners, this is a huge advantage, allowing you to focus on cutting and sewing techniques rather than agonizing over fabric selection. For experienced quilters, charm packs offer a convenient way to get started quickly, experiment with new fabric lines, or simply create cohesive projects without having to buy yardage of many different prints. They are also excellent for busting your stash of leftover fabrics if you have 5-inch squares from previous projects. This “Fusion Gridlock” pattern truly showcases how a simple set of squares can be transformed into a dynamic and visually interesting design.
Essential Materials for Your Quilted Table Runner:
To embark on this exciting quilting journey, gather the following supplies. Having everything ready before you begin will ensure a smooth and enjoyable crafting experience.
- One Charm Pack (42 x 5″ squares) or 5″ Fabric Scraps: This is the heart of your project! If using scraps, ensure they are precisely 5 inches x 5 inches for best results.
- Rotary Cutter: A sharp rotary cutter is indispensable for accurate and efficient fabric cutting, far superior to scissors for straight lines.
- Self-Healing Cutting Mat (Rotating Mat Recommended): A self-healing mat protects your work surface and extends the life of your rotary blade. A rotating mat is a game-changer for cutting squares and trimming blocks without constantly repositioning your fabric.
- Quilt Rulers (Various Sizes): Essential for precise measuring and cutting. A 6.5″ x 24″ ruler is great for long cuts, while a smaller square ruler (e.g., 6.5″ x 6.5″) is useful for trimming blocks.
- Sewing Machine: A reliable machine with a quarter-inch foot (or knowledge of your 1/4″ seam allowance) is crucial for consistent seams.
- Quality Thread: Choose a good quality 100% cotton thread that matches or blends with your fabrics.
- Iron and Ironing Board/Pressing Mat: Proper pressing is just as important as sewing for crisp, flat blocks and seams.
- Fabric Scissors: For snipping threads and occasional fussy cutting.
- Pins or Fabric Clips: To hold fabric pieces together securely while sewing.
- Batting (approx. 18″ x 50″): A layer of soft material that gives your table runner warmth, body, and allows for quilting.
- Backing Fabric (approx. 18″ x 50″): The fabric for the underside of your table runner.
- Binding Fabric (approx. 1/3 yard): Strips of fabric used to finish the raw edges of your table runner.
Step-by-Step Guide to Crafting Your Quilted Table Runner:
Step 1: Precision Cutting for Perfect Pieces
The foundation of a beautiful quilt lies in accurate cutting. Begin by organizing your charm pack (or 5″ scrap squares). For this project, you will need a total of 40-42 squares. First, separate your 5″ squares into two distinct piles, with approximately 20-21 pieces in each pile. This initial sorting helps streamline the subsequent cutting process.
Next, take one of these piles (approximately 20-21 squares) and carefully trim each square down to 4 1/2″ squares. Precision is key here; use your rotary cutter and quilt ruler to ensure clean, straight cuts. These will form the central elements of your quilt blocks.
Now, take the remaining pile of 5″ squares (again, about 20-21 pieces). From each of these 5″ squares, you will subcut them into smaller 2 1/2″ squares. This means each 5″ square will yield four 2 1/2″ squares. This step will provide you with a significant number of smaller squares, which will be used to create the “gridlock” effect in your design.
Once all your squares are cut to size – a pile of 4 1/2″ squares and a larger pile of 2 1/2″ squares – it’s time to start assembling the initial components. Select four of your 2 1/2″ squares. To create visual interest and a dynamic “fusion” look, choose squares with mixed prints or contrasting colors. Arrange these four small squares in a 2×2 grid. Sew them together, using a consistent 1/4-inch seam allowance. When joined, these four squares will form a single 4 1/2″ x 4 1/2″ unit. However, for this project’s specific “gridlock” element, you will actually be sewing them into a strip first: sew two 2 1/2″ squares together side-by-side to create a 2 1/2″ x 4 1/2″ rectangle. Then, repeat with two more 2 1/2″ squares. Finally, sew these two 2 1/2″ x 4 1/2″ rectangles together, ensuring your seams align, to form a combined 4 1/2″ x 4 1/2″ unit.
Wait, let’s re-read the original instructions for Step 1 carefully: “select four 2 1/2″ squares in mixed prints and sew them together to form a 2 1/2″ x 8 1/2″ rectangle. Repeat these steps until you have a total of twenty 2 1/2″ x 8 1/2″ rectangles.” This is a crucial clarification.
Let’s correct the process: Once you have your piles of 4 1/2″ squares and 2 1/2″ squares, you will begin assembling the long “gridlock” units. From your pile of 2 1/2″ squares, select four distinct squares, mixing prints and colors for visual appeal. Arrange these four 2 1/2″ squares in a single row. Sew them together, one after another, using a precise 1/4-inch seam allowance. When sewn end-to-end, these four 2 1/2″ squares will create a longer rectangle measuring 2 1/2″ x 8 1/2″. Press your seams carefully after each join, either open or to one side, whichever you prefer for flatter results. Repeat this process until you have a total of twenty (20) of these 2 1/2″ x 8 1/2″ rectangles. This step might feel a bit repetitive, but consistency here will pay off in the final look of your table runner. You’ll need a total of 80 individual 2 1/2″ squares for these units.
Step 2: Assembling Your Unique Quilt Blocks
With your carefully cut pieces ready, it’s time to bring them together into individual quilt blocks. Each block will incorporate two of your 4 1/2″ squares and two of the 2 1/2″ x 8 1/2″ rectangles you created in Step 1.
Take two of your 4 1/2″ squares. These will serve as the central elements of your block. Now, take two of the longer 2 1/2″ x 8 1/2″ rectangles. Imagine creating a sandwich: place one 4 1/2″ square, then one 2 1/2″ x 8 1/2″ rectangle, followed by another 4 1/2″ square, and finally the second 2 1/2″ x 8 1/2″ rectangle.
To assemble the block, you will sew these units together in a specific sequence. First, sew one 2 1/2″ x 8 1/2″ rectangle to one side of a 4 1/2″ square, again maintaining your precise 1/4-inch seam allowance. Press the seam. Then, sew the other 2 1/2″ x 8 1/2″ rectangle to the opposite side of that same 4 1/2″ square. You now have a strip: 2 1/2″ x 8 1/2″ rectangle – 4 1/2″ square – 2 1/2″ x 8 1/2″ rectangle.
Next, you will sew the two 4 1/2″ squares together to form a horizontal row. Let’s re-evaluate the original instruction for clarity: “Next, take two 4 1/2″ squares and place them in the middle of two 2 1/2″ x 8 1/2″ rectangles. Sew them together to create your quilt block. After this, sew the 4 1/2″ squares together to form a row, then sew all the rows together to complete an 8 1/2″ square quilt block. Continue with these steps until you have a total of ten quilt blocks.” This suggests a slightly different construction sequence.
A clearer interpretation for assembling one 8 1/2″ square quilt block:
1. Take two of your 2 1/2″ x 8 1/2″ rectangles (from Step 1).
2. Take two of your 4 1/2″ squares.
3. Lay out the pieces: Rectangle, Square, Square, Rectangle. You’re aiming for a final block that is 8 1/2″ x 8 1/2″.
4. Sew one 2 1/2″ x 8 1/2″ rectangle to the top edge of one 4 1/2″ square. Press the seam.
5. Sew the second 4 1/2″ square to the bottom edge of the *same* 2 1/2″ x 8 1/2″ rectangle. This forms a vertical strip: Rectangle – Square – Square. Wait, this doesn’t create an 8.5″ square easily.
Let’s interpret the original instruction as forming a block by joining rows. The phrasing “sew the 4 1/2″ squares together to form a row, then sew all the rows together to complete an 8 1/2″ square quilt block” points to an assembly method.
The most straightforward way to make an 8 1/2″ square block with these components, following the original instruction “take two 4 1/2″ squares and place them in the middle of two 2 1/2″ x 8 1/2″ rectangles. Sew them together to create your quilt block,” would be:
1. Create three rows for each block.
2. Row 1: One 2 1/2″ x 8 1/2″ rectangle.
3. Row 2: Sew one 4 1/2″ square to another 4 1/2″ square, creating a 4 1/2″ x 8 1/2″ row.
4. Row 3: One 2 1/2″ x 8 1/2″ rectangle.
5. Now, sew Row 1 to Row 2. Then sew Row 3 to the bottom of the combined (Row 1 + Row 2). This creates one complete 8 1/2″ x 8 1/2″ quilt block.
Once you have successfully assembled your first block, repeat this process. You will need a total of ten (10) identical quilt blocks. Take your time, focus on matching seams, and press carefully after each seam is sewn. Consistent seam allowances are vital here to ensure your blocks fit together perfectly in the next step. Chain piecing can be very efficient for this stage: sewing multiple similar seams in a continuous string without lifting your presser foot between pieces, then snipping them apart.
Step 3: Bringing Your Table Runner to Life – Assembly, Quilting, and Binding
Now that you have ten beautifully crafted 8 1/2″ square quilt blocks, the final structure of your table runner will quickly emerge!
Begin by laying out all ten blocks on a clean, flat surface – your design wall, a large table, or even the floor. Arrange them in a 2 x 5 layout, meaning two rows of five blocks each. This is a crucial step for visualizing your final design and making any last-minute adjustments to the placement of blocks to achieve the most pleasing aesthetic. Take a moment to step back and observe the flow of colors and patterns.
Once you are satisfied with your layout, carefully pick up the blocks for the first row (five blocks) and sew them together end-to-end, again using your consistent 1/4-inch seam allowance. Press the seams for this row, alternating the direction of the seam allowance if you plan to “nest” your seams for perfect points. Repeat this for the second row of five blocks.
With your two completed rows, you now need to join them. Carefully align the top row with the bottom row, paying special attention to matching the seams where the blocks meet. Pin generously at these intersections to prevent shifting. Sew the two long rows together with a 1/4-inch seam. Once sewn, press this final long seam. You now have a complete quilt top for your table runner!
Your table runner top now measures approximately 16 1/2″ x 40 1/2″ (factoring in seam allowances).
Preparing for Quilting: The Quilt Sandwich
To transform your quilt top into a finished table runner, you need to create a “quilt sandwich.”
- Lay your backing fabric wrong side up on a clean, flat surface, smoothing out any wrinkles.
- Place your batting on top of the backing, centering it.
- Finally, lay your quilt top right side up on top of the batting, again ensuring it’s centered and smooth.
- Secure these three layers together. You can use basting pins (curved safety pins designed for quilting), temporary fabric adhesive spray, or hand-basting stitches. The goal is to keep all three layers from shifting during the quilting process.
Quilting Your Table Runner
Now for the actual quilting – the stitching that holds all three layers together and adds texture. For a beginner-friendly approach, consider straight-line quilting. You can quilt straight lines either horizontally, vertically, or diagonally across your table runner. You can use a walking foot on your sewing machine to help feed all layers evenly. Stitch-in-the-ditch (quilting directly in the seam lines) is another subtle option that defines your blocks. Choose a quilting pattern that complements your fabric and skill level.
Adding the Binding
The final step is to bind the edges of your table runner. Binding protects the raw edges and provides a neat, professional finish.
- Cut strips of your binding fabric, typically 2 1/4″ or 2 1/2″ wide, and join them end-to-end to create one long strip.
- Fold this long strip in half lengthwise and press.
- Sew the raw edge of the binding to the raw edge of your table runner, starting on one side, usually the back. Miter the corners for a crisp finish.
- Once sewn to the edge, wrap the folded binding around to the front of the table runner and hand-stitch or machine-stitch it down.
Tips for Quilting Success:
- Pressing vs. Ironing: When quilting, “pressing” involves lifting and placing the iron, rather than sliding it, to avoid distorting your fabric pieces.
- Consistent Seam Allowance: A perfect 1/4-inch seam allowance is the cornerstone of accurate piecing. Practice makes perfect!
- Sharp Tools: Always use a sharp rotary blade and sewing machine needle. Dull tools can lead to inaccurate cuts and skipped stitches.
- Take Your Time: Quilting is a journey, not a race. Enjoy the process, and don’t be afraid to unpick if something isn’t quite right.
- Watch the Video: For visual learners, Moonkin Stitchery’s YouTube tutorial provides an excellent step-by-step demonstration that complements these written instructions.
Your Finished Fusion Gridlock Table Runner!
Congratulations! You have successfully created a beautiful “Fusion Gridlock” Charm Pack Quilted Table Runner. This project not only adds a personal, handcrafted touch to your home but also serves as a fantastic way to develop your quilting skills. Display it on your dining table, coffee table, or even a dresser to add a pop of color and texture. It makes a wonderful gift for weddings, housewarmings, or any special occasion.
We hope you enjoyed this tutorial and feel inspired to continue your quilting journey. Remember, every stitch tells a story, and your handmade creations bring joy and warmth wherever they go. Share your finished table runners with us – we’d love to see your unique fabric choices and the beautiful results of your hard work! Happy quilting!