
The Effortless Brick House Quilt: A Perfect Project for Fat Quarters
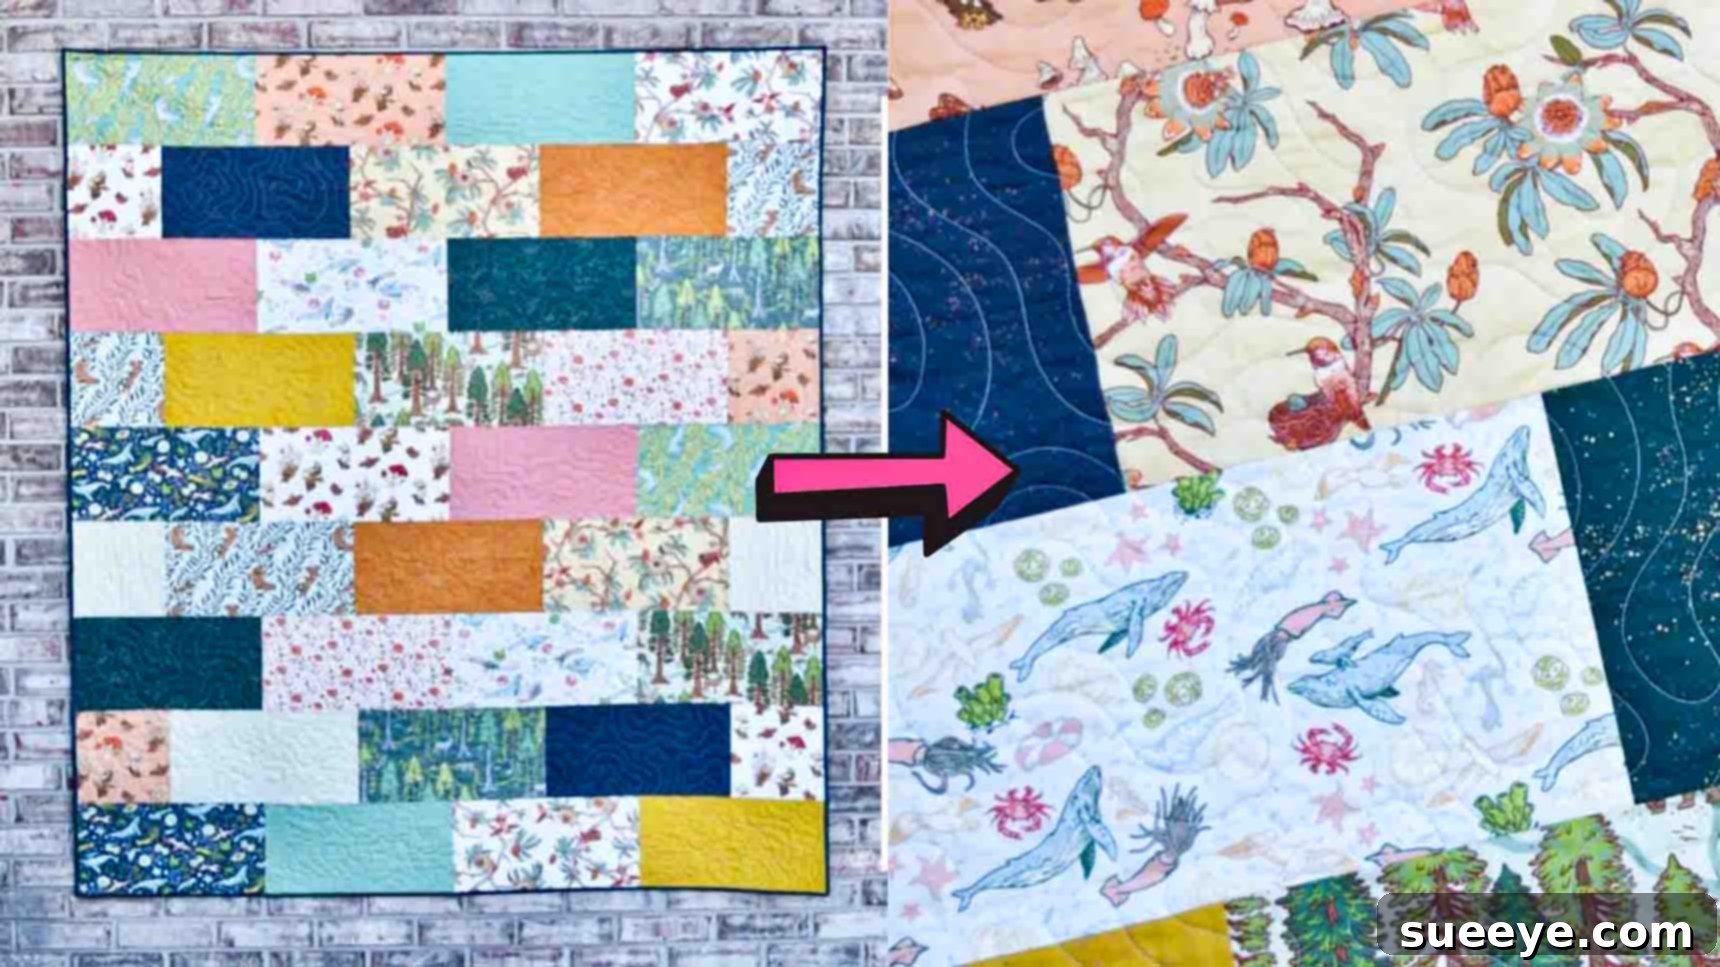
Are you a quilting enthusiast looking for a charming project that’s both satisfying and quick to complete? Or perhaps you’re a beginner eager to dive into the rewarding world of quilting? Look no further! This delightful Brick House Quilt pattern, inspired by the fantastic tutorials from Material Girl Quilts on YouTube, is designed with simplicity and speed in mind. It’s an ideal choice for anyone with a collection of beautiful fat quarters, especially those larger print fabrics you’ve been hesitant to cut into smaller pieces. This pattern allows those gorgeous designs to truly shine, transforming them into a striking and cozy quilt that measures approximately 64 by 72 inches – a perfect throw size.
The “Brick House” design is classic yet versatile, creating an illusion of stacked bricks with its staggered block layout. This particular adaptation is renowned for its straightforward construction, making it an excellent stepping stone for new quilters to build confidence in cutting and piecing. Even seasoned quilters will appreciate how rapidly this project comes together, offering a satisfying finish in a short amount of time. Get ready to turn your beloved fat quarters into a functional work of art. Follow our comprehensive, step-by-step guide below to create your very own Brick House Quilt, from selecting your fabrics to adding the final binding.
Essential Materials for Your Brick House Quilt
Before you embark on your quilting journey, gathering all your materials is crucial. This ensures a smooth and uninterrupted creative process. The beauty of the Brick House Quilt lies in its adaptability, allowing you to play with various fabric combinations and create a truly unique piece.
- 18 Fat Quarters: These are the stars of your quilt! Fat quarters are pre-cut fabric pieces, typically 18 by 22 inches (or half a yard of fabric cut lengthwise). For this pattern, they are perfect for showcasing larger prints. Consider selecting a harmonious palette, or go bold with contrasting colors for a vibrant effect. A mix of lights, mediums, and darks will add depth and visual interest to your “bricks.”
- 4 Yards of Backing Fabric: The backing fabric not only gives your quilt stability but also provides an opportunity to add another layer of design. Choose a fabric that complements your fat quarters. Wide-back fabrics (usually 108 inches wide) can often be used as a single piece, avoiding the need for a seam. If using standard 44/45-inch wide fabric, you will need to piece two lengths together to achieve the necessary width for your 64×72 inch quilt.
- ½ Yard of Binding Fabric: The binding fabric frames your quilt and protects its raw edges. This small but significant detail can either blend seamlessly with your quilt top or provide a sharp, contrasting border. A solid color that pulls from one of your fat quarters is often a safe and beautiful choice.
Recommended Tools for Precision Quilting
While the material list covers your fabric needs, having the right tools on hand will significantly enhance your quilting experience and the accuracy of your finished product. These tools are standard for most quilters and are excellent investments.
- Rotary Cutter: A sharp rotary cutter (45mm or 60mm) is essential for making precise, clean cuts quickly.
- Quilting Ruler: A long, clear acrylic ruler (at least 6×24 inches) is indispensable for accurate measuring and cutting straight lines.
- Self-Healing Cutting Mat: Protect your work surface and your rotary blade with a large self-healing cutting mat.
- Sewing Machine: A reliable sewing machine with a ¼-inch presser foot will help maintain consistent seam allowances.
- Thread: High-quality polyester or cotton thread that matches or blends with your fabrics.
- Iron and Ironing Board: Crucial for pressing seams flat and keeping your fabric neat.
- Pins or Fabric Clips: To hold fabric pieces together before sewing.
- Fabric Scissors: For any quick snips or trimming.
- Quilting Batting: (Not listed in original materials, but essential for a finished quilt). Choose a batting type (cotton, polyester, blend) that suits your desired warmth, drape, and care instructions. Approximately 68×76 inches would be a good size to allow for shrinkage and trimming.
Step-by-Step Directions to Create Your Brick House Quilt
Step 1: Precision Cutting Your Fat Quarters
Accuracy in cutting is paramount for a beautifully pieced quilt. Take your time with this step, as well-cut pieces will fit together effortlessly, saving you frustration later on. Out of your 18 fat quarters, you will divide them into two groups for distinct cuts.
- Prepare Your Fabric: Before cutting, it’s often recommended to press your fat quarters to remove any wrinkles or creases. If you pre-washed your fabrics, ensure they are thoroughly dry and pressed flat.
- Initial Straight Edge: Lay one fat quarter on your cutting mat, ensuring one edge is perfectly straight and aligned with a grid line on your mat. This straight edge will be your baseline for all subsequent cuts. If your fat quarter has uneven edges, use your ruler and rotary cutter to trim a perfectly straight line along one side.
- Cutting the Bulk (14 Fat Quarters): Select 14 of your 18 fat quarters. From each of these 14 fat quarters, you will cut two (2) rectangles, each measuring 8½ inches by 16½ inches.
- Place your prepared fat quarter on the cutting mat with the straight edge aligned at the “0” mark.
- Measure and cut the fabric at the 8½-inch mark across the width of the fabric. This will give you your first “brick” rectangle.
- Shift your fabric or ruler, and then measure and cut again, this time to achieve the 16½-inch length for each rectangle.
- Repeat this process for all 14 fat quarters, yielding a total of 28 large rectangles.
- Cutting the Edge Blocks (4 Fat Quarters): For the remaining four (4) fat quarters, you’ll make slightly different cuts. From each of these four fat quarters, you will cut one (1) rectangle measuring 8½ inches by 16½ inches, and two (2) squares, each measuring 8½ inches by 8½ inches.
- From each of these four fat quarters, first cut one 8½-inch x 16½-inch rectangle using the same method as above.
- With the remaining fabric from these four fat quarters, cut two 8½-inch x 8½-inch squares. These squares are crucial as they will form the “half-brick” ends of certain rows, creating the characteristic staggered look of the Brick House pattern.
- Organize Your Pieces: Once all your pieces are cut, it’s a good practice to stack them neatly, perhaps by size (rectangles in one pile, squares in another) or by the original fat quarter, to keep everything organized for the layout stage. You will have a total of 32 rectangles (28 + 4) and 8 squares (4 x 2).
Step 2: Laying Out and Assembling Your Quilt Top
With all your fabric pieces precisely cut, the next exciting phase is bringing your quilt design to life. This stage involves laying out your blocks to form the “brick house” pattern and then sewing them into rows, eventually assembling the complete quilt top. The key here is organization and consistent seam allowances.
- Design Wall or Floor Space: Find a large, clean surface—a design wall, a clean floor, or a large table—to lay out your quilt blocks. This allows you to visualize the pattern and arrange your fabrics before sewing, ensuring you achieve the desired aesthetic and color distribution.
- Creating the Rows (Total of Nine Rows): The Brick House Quilt features an alternating row pattern, creating its signature staggered look. You will construct a total of nine rows for your quilt top.
- Rows with All Rectangles (5 Rows): Five of your rows will consist entirely of the 8½-inch x 16½-inch rectangles. Each of these rows will contain four (4) rectangles laid side-by-side.
- Rows with Squares (4 Rows): The remaining four rows will incorporate the 8½-inch squares at the ends. Each of these rows will contain three (3) of the 8½-inch x 16½-inch rectangles and two (2) of the 8½-inch squares. The squares will be placed at the beginning and end of the row, flanking the three rectangles in the middle.
- Alternating Pattern: Alternate these two types of rows as you lay them out. For example, Row 1 (all rectangles), Row 2 (with squares), Row 3 (all rectangles), and so on, until you have all nine rows configured. Take this opportunity to adjust fabric placement, distributing colors and prints evenly or creating intentional focal points.
- Sewing Your Rows: Once you are satisfied with your layout, begin sewing the pieces together within each row.
- Working with one row at a time, take the first two pieces, align them with right sides together, and sew along one 16½-inch edge using a consistent ¼-inch seam allowance. Precision here is crucial for accurate block alignment.
- Press your seams. A common practice for this pattern is to press seams open or to one side. Pressing open helps reduce bulk, while pressing to one side (alternating directions for adjacent rows) can make nesting seams easier when joining rows.
- Continue adding pieces to complete each row, pressing after each seam.
- Joining the Rows: After all nine individual rows are pieced and pressed, it’s time to join them to form the full quilt top.
- Place Row 1 and Row 2 with right sides together, carefully aligning all seam lines and raw edges. Pin generously, especially at the seam intersections, to ensure everything lines up perfectly.
- Sew along the long edge using a ¼-inch seam allowance.
- Press the newly sewn seam. If you pressed seams to one side in the previous step, press this new seam in the opposite direction to help them nest and create flat intersections.
- Continue this process, adding one row at a time until your entire quilt top is assembled.
- Final Quilt Top Dimensions: Your completed quilt top should measure approximately 64 inches by 72 inches. Give it a final press to ensure it lays perfectly flat and square. Congratulations, the most intricate part of your quilt is complete!
Step 3: Basting Your Quilt Layers
Basting is the crucial step of temporarily securing the three layers of your quilt together: the quilt top, the batting, and the backing. Proper basting prevents shifting during the quilting process, ensuring a smooth, wrinkle-free finish.
- Prepare Your Batting and Backing: Your batting and backing fabric should be at least 4-6 inches larger than your quilt top on all sides. This gives you extra room to maneuver during quilting and allows for any shrinkage or shifting. Press both the batting and backing fabric to remove any creases.
- Set Up Your Workspace: Find a large, clean, flat surface. The floor is often the easiest place to baste a large quilt.
- Layering:
- Backing: Lay your backing fabric face down on your prepared surface. Smooth it out completely, taping the edges to the floor or securing it with painter’s tape to keep it taut and wrinkle-free.
- Batting: Center the batting over the backing fabric. Smooth it out gently, working from the center outwards, ensuring there are no bumps or wrinkles.
- Quilt Top: Finally, center your finished quilt top face up over the batting. Again, smooth it meticulously from the center outwards, ensuring all three layers are perfectly aligned and wrinkle-free.
- Basting Method: There are several popular basting methods:
- Pin Basting: Use curved safety pins (designed for quilting) to secure all three layers. Start from the center and work outwards, placing pins every 4-6 inches across the entire quilt. Ensure you pierce all three layers with each pin.
- Spray Basting: Use a temporary fabric adhesive spray. Lift sections of your quilt top and spray the batting, then smooth the quilt top back down. Repeat for the batting and backing. Follow the manufacturer’s instructions carefully for ventilation and drying times.
- Thread Basting: For a more traditional approach, use a long needle and sturdy thread to make large running stitches across the quilt in a grid pattern.
Step 4: Quilting Your Project
Quilting is the process of stitching through all three layers (quilt top, batting, and backing) to secure them permanently and add texture to your quilt. This is where your quilt truly takes shape and becomes a durable, cuddly masterpiece.
- Choose Your Quilting Design: For a beginner-friendly project like the Brick House Quilt, simple quilting patterns are often the most effective and least intimidating.
- Stitch-in-the-Ditch: This involves stitching along the seam lines of your pieced quilt top. It’s subtle, effective, and helps define the “brick” blocks.
- Straight-Line Quilting: Quilt parallel lines across the quilt, either horizontally, vertically, or diagonally. You can use masking tape or a walking foot guide for even spacing.
- Free-Motion Quilting: If you’re feeling adventurous, free-motion quilting allows you to draw designs with your machine. Start with simple meandering or stippling patterns.
- Set Up Your Machine: Use a fresh needle appropriate for quilting (often a topstitch or quilting needle). If machine quilting, a walking foot is highly recommended, especially for straight lines, as it helps feed all three layers evenly through the machine. Reduce your stitch length slightly from your piecing length.
- Start Quilting: Begin quilting from the center of your quilt and work your way outwards in all directions. This helps prevent pushing fabric and minimizes puckering.
- If using stitch-in-the-ditch, guide your needle precisely in the valleys of your seams.
- For straight lines, keep your lines consistent.
- Remove Basting: As you quilt, remove basting pins or thread only when you are about to quilt over that area. For spray basting, there’s no need to remove anything.
Step 5: Binding Your Quilt for a Professional Finish
The final step in completing your Brick House Quilt is adding the binding. This not only gives your quilt a neat, finished edge but also protects the raw edges from fraying.
- Trim Your Quilt: After quilting, lay your quilt flat and square up all its edges. Use your long ruler and rotary cutter to trim away excess batting and backing fabric, ensuring all four sides are perfectly straight and your corners are 90 degrees. Your quilt should now be back to its final 64×72 inch dimensions.
- Prepare Your Binding Strips: From your ½ yard of binding fabric, cut 2.5-inch wide strips. For a quilt this size (perimeter is 64+64+72+72 = 272 inches), you will need approximately 7-8 strips (depending on fabric width) to create enough continuous binding. Sew these strips together end-to-end using diagonal seams to reduce bulk. Press seams open. Fold the long strip in half lengthwise, wrong sides together, and press.
- Attach the Binding:
- Starting in the middle of one side of your quilt, align the raw edge of your folded binding strip with the raw edge of your quilt top. Leave an 8-10 inch tail of binding unbound.
- Sew the binding to the quilt using a ¼-inch seam allowance. When you approach a corner, stop ¼ inch from the edge, backstitch, and cut your thread. Fold the binding strip up at a 45-degree angle, then fold it back down along the next edge, creating a mitered corner. Start sewing again from the edge.
- Continue around the entire quilt. When you reach the starting point, leave another 8-10 inch tail. Trim the tails to overlap by about 4-5 inches, then join them with a diagonal seam to create a continuous loop. Finish sewing the remaining binding to the quilt.
- Finish the Binding: Flip the folded binding to the back of the quilt. You can either hand-stitch the binding in place for a traditional, invisible finish, or machine-stitch it for a quicker, more durable result. Whichever method you choose, ensure your stitches catch the back of the binding securely.
Tips for a Perfect Finish
- Consistent Seam Allowance: The most important tip in quilting is to maintain a precise ¼-inch seam allowance throughout your piecing. This ensures all your blocks and rows fit together perfectly.
- Pressing is Key: Pressing your seams after each step, rather than ironing, will help your blocks lie flat and square. Avoid dragging the iron, as this can stretch the fabric.
- Trim Threads: Trim loose threads as you go to prevent them from getting caught in seams or showing through lighter fabrics.
- Take Your Time: Quilting is a journey, not a race. Enjoy the process, and don’t be afraid to unpick and redo if something isn’t quite right.
- Watch the Video: For visual learners, the original Material Girl Quilts YouTube tutorial provides excellent visual guidance for each step.
Why You’ll Love This Easy Brick House Quilt
This Brick House Quilt is more than just a collection of fabric scraps; it’s a testament to the joy of creation. Its beginner-friendly nature makes it accessible to anyone yearning to try quilting, while its swift completion offers immense satisfaction. It’s an ideal pattern for showcasing those large-scale prints you adore, allowing their designs to be appreciated without being chopped into tiny pieces. The finished 64 by 72-inch size is perfect for snuggling on the couch, adding a cozy layer to a bed, or gifting to a loved one. The classic brick pattern creates a timeless aesthetic that will complement a wide range of home decor styles, from modern farmhouse to contemporary chic.
Final Thoughts & Call to Action
You now have all the tools and instructions needed to craft a beautiful and functional Brick House Quilt. This project from Material Girl Quilts is a fantastic introduction to the fundamental techniques of quilting, offering a blend of simplicity and stunning visual impact. We encourage you to gather your favorite fat quarters, set up your sewing machine, and embark on this rewarding creative adventure. Don’t forget to share your finished Brick House Quilt with us and the quilting community online! Happy quilting!