
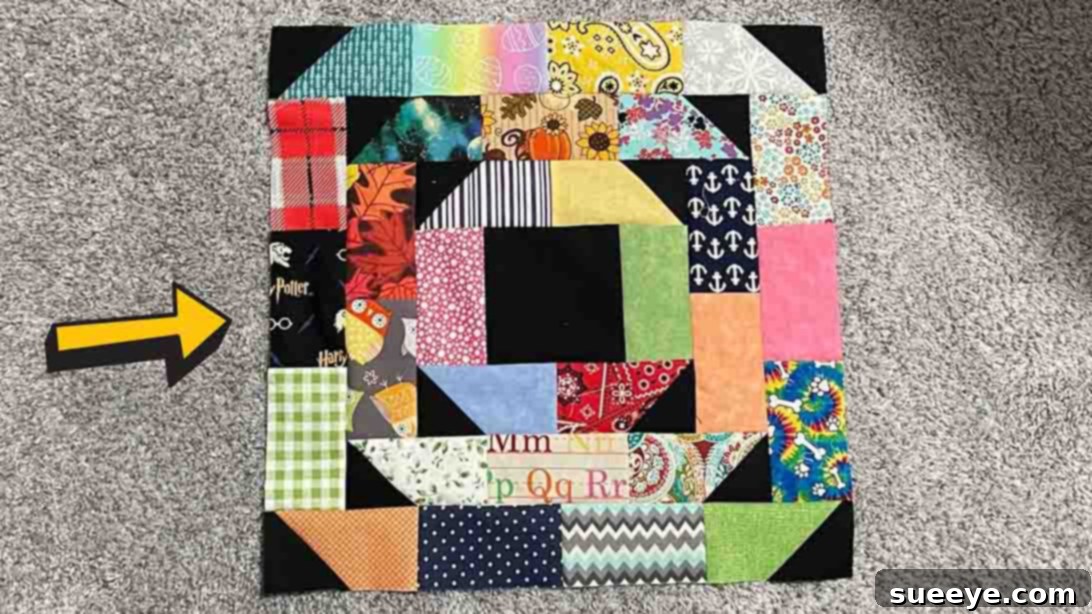
Scrappy Folded Corners Quilt Block: The Ultimate Beginner-Friendly Scrap Busting Project
Are you a passionate quilter always searching for your next inspiring project, especially one that helps tackle that ever-growing stash of fabric scraps? Or perhaps you’re a beginner eager to dive into the world of quilting with an achievable and rewarding design? Look no further! This comprehensive tutorial will guide you through creating the delightful Scrappy Folded Corners Quilt Block, a fantastic and versatile design inspired by the creative minds at Cut and Create. It’s a quick, easy, and incredibly satisfying project that makes perfect use of your beloved fabric remnants.
The beauty of the Scrappy Folded Corners Quilt Block lies in its simplicity and striking visual appeal. It’s not just a wonderful way to give new life to your leftover fabrics; it’s also designed with accessibility in mind, making it an ideal choice for those new to quilting. However, don’t let its ease fool you – even seasoned quilters will appreciate the efficiency and charm of this pattern, adding it to their repertoire of go-to scrap-busting techniques. If you’re ready to transform your fabric scraps into something truly beautiful, let’s get started on this exciting quilting adventure today!
RELATED: Scrappy Split Stripe Quilt Block Tutorial
Why Choose the Scrappy Folded Corners Quilt Block?
This particular quilt block stands out for several compelling reasons, making it a favorite among quilters of all skill levels:
- Excellent for Scrap Busting: If your scrap bin is overflowing, this pattern is your perfect ally. It’s designed to incorporate small pieces of fabric, turning what might seem like unusable remnants into a cohesive and charming design.
- Beginner-Friendly: The techniques involved are straightforward, primarily focusing on accurate cutting and straight-line sewing. This makes it an unintimidating entry point into quilting for novices.
- Quick to Assemble: Once your pieces are cut, the assembly process for each block is remarkably fast, offering instant gratification and a sense of accomplishment.
- Visually Dynamic: The “folded corners” create an illusion of depth and movement, adding a sophisticated touch to your finished projects without complex piecing.
- Versatile: A single block can become a mug rug, multiple blocks can form a table runner, and a collection of blocks can create a stunning quilt top of any size.
Materials You’ll Need:
Before diving into the creative process, ensure you have all the necessary tools and materials at hand. Having everything ready will make your quilting experience smoother and more enjoyable.
- Fabric Scraps: This is the star of our show! Gather a variety of colors, patterns, and textures. For this block, you’ll need pieces large enough to cut 2 1/2″ x 4 1/2″ rectangles, 2 1/2″ squares, and one 4 1/2″ square for the center. Don’t be afraid to mix and match; the more variety, the scrappier and more interesting your block will be! Consider pre-washing your fabrics to prevent potential shrinking or color bleeding later.
- Coordinating Fabric (Often a Solid or Low Volume): While the block is “scrappy,” a consistent background or accent color (like the black used in the original tutorial) for the folded corners helps unify the design and make the scraps pop. You’ll need enough for twelve 2 1/2″ squares.
- Sewing Machine: A basic sewing machine capable of a straight stitch is all you need. Ensure it’s in good working order, threaded with an all-purpose cotton or polyester thread, and equipped with a fresh needle (a universal 80/12 or 90/14 is usually sufficient for quilting cottons).
- Rotary Cutter: This essential tool will ensure precise and efficient cutting. A 45mm rotary cutter is standard, but a smaller 28mm can be useful for intricate cuts. Always use it with a self-healing cutting mat.
- Quilting Ruler: A clear acrylic ruler, ideally 6″ x 12″ or larger, with clear measurements and a 45-degree line, is crucial for accurate cutting.
- Iron and Ironing Board (or Pressing Mat): Proper pressing is just as important as accurate sewing in quilting. An iron with steam functionality is preferred, but a dry iron works too. A flat, stable surface for pressing is a must.
- Basic Sewing Notions:
- Fabric Scissors: Sharp scissors dedicated solely to fabric.
- Pins or Fabric Clips: To hold fabric pieces together before sewing.
- Seam Ripper: For those inevitable “oops” moments. Don’t worry, every quilter uses one!
- Thread: High-quality 50wt cotton thread is standard for piecing quilt blocks. Choose a neutral color like white, grey, or ecru, or a color that blends with your fabrics.
Step-by-Step Directions: Creating Your Scrappy Folded Corners Quilt Block
Precision is key in quilting, so take your time with each step, especially when cutting and pressing. The finished block will be worth the effort!
Step 1: Preparing Your Fabric Pieces and Building the Core Units
This initial stage involves careful cutting and assembling the foundational components of your quilt block. Accuracy here will significantly impact the final look of your block.
- Gather and Organize Your Scraps: Lay out your chosen fabric scraps. Think about how colors and patterns will interact. For the main body of the block, you’ll need a variety of prints and colors. For the “folded corners,” a consistent fabric (often a solid or low-volume print) will provide a cohesive look.
- Precise Cutting: Using your rotary cutter, self-healing mat, and quilting ruler, carefully cut the following pieces. Remember to double-check your measurements for accuracy:
- Thirty (30) rectangles: 2 1/2″ x 4 1/2″ from your assorted fabric scraps. These will form the main body of the block.
- Twelve (12) squares: 2 1/2″ x 2 1/2″ from your chosen accent fabric (e.g., black, as in the original tutorial). These squares will be used to create the “folded corners.”
- One (1) center square: 4 1/2″ x 4 1/2″ from an assorted scrap or a coordinating fabric. This will be the focal point of your block.
- Creating the “Folded Corner” Units (Half-Square Triangle lookalikes): This is a signature element of the block. You’ll be creating units that resemble half-square triangles, but with a unique construction.
- Take six of your 2 1/2″ x 4 1/2″ rectangles and six of your 2 1/2″ x 2 1/2″ accent squares.
- For the “Right-Folding” Corners (6 units):
- Place one 2 1/2″ x 2 1/2″ accent square on one end of a 2 1/2″ x 4 1/2″ rectangle, right sides together. Align the edges precisely.
- Using a ruler and a fabric marker (or simply eyeballing for experienced quilters), draw a diagonal line from the top-left corner of the square to the bottom-right corner. This line will determine your sewing path.
- Sew directly on this drawn diagonal line.
- Trim away the excess fabric, leaving a 1/4″ seam allowance beyond your stitched line. This cut-off triangle can be discarded or saved for other tiny scrap projects.
- Press the seam open or towards the darker fabric (if applicable). The accent square will now “fold” down to the right, creating a triangle shape at the corner of your rectangle. Repeat this for six units.
- For the “Left-Folding” Corners (6 units):
- Take another six of your 2 1/2″ x 4 1/2″ rectangles and six of the remaining 2 1/2″ x 2 1/2″ accent squares.
- This time, place the accent square on one end of the rectangle, right sides together, and draw a diagonal line from the top-right corner of the square to the bottom-left corner.
- Sew directly on this diagonal line.
- Trim away the excess fabric, leaving a 1/4″ seam allowance.
- Press the seam open or towards the darker fabric. These accent squares will now “fold” down to the left. Repeat for six units.
You should now have twelve (12) rectangles with an accent triangle on one end – six folding to the right and six folding to the left.
- Assembling the Center Row Units:
- Take your single 4 1/2″ x 4 1/2″ middle square.
- Attach two of the remaining 2 1/2″ x 4 1/2″ plain rectangles (without any folded corners) to opposite sides of the middle square. For example, sew one rectangle to the left side and another to the right side of the central square. Use a 1/4″ seam allowance.
- Press the seams open or towards the darker fabric to reduce bulk. You now have a three-piece unit that will form the central horizontal row of your block.
Step 2: Assembling the Quilt Block
With all your individual units prepared, it’s time to bring them together to form the complete Scrappy Folded Corners Quilt Block. A design wall or even a clear floor space can be incredibly helpful for this step.
- Lay Out Your Block: This is a crucial visual step to ensure correct placement and a balanced design.
- Start by placing the assembled center row unit (the 4 1/2″ square with two 2 1/2″ x 4 1/2″ rectangles attached) in the middle of your design area.
- Now, arrange your “folded corner” units around this center. Refer closely to the image provided in the original tutorial for guidance on placement. The key is to create the distinctive “folded” pattern.
- The top and bottom rows will consist of three units each: two folded corner units and one plain 2 1/2″ x 4 1/2″ rectangle in the middle. Pay close attention to the direction of the folded corners – they should create a mirrored effect on the top and bottom.
- The two remaining plain 2 1/2″ x 4 1/2″ rectangles (without any folded corners) will go on the left and right sides of your center row unit, completing the overall nine-patch layout.
- Take a moment to step back and observe your layout. Ensure the black corners (or your chosen accent color) are positioned correctly to form the desired visual effect.
- Sew the Rows Together: Once you are satisfied with your layout, it’s time to sew the pieces into rows.
- Starting with the top row, carefully pick up the three pieces in order, keeping them aligned. Sew them together, using a consistent 1/4″ seam allowance. Pinning at intersections can help ensure points match up nicely.
- Repeat this process for the middle row (which you’ve already partially assembled, you just need to ensure your side rectangles are included correctly if you haven’t done so) and the bottom row.
- After sewing each row, press the seams. For the top and bottom rows, you might press the seams in opposite directions to allow for nesting when you join the rows. For example, press the top row seams towards the left, and the bottom row seams towards the right. Press the middle row seams open or outwards.
- Join the Rows to Form the Block: Now, you’ll connect your three completed rows.
- Take your top row and place it right sides together with your middle row. Carefully align the seams and use pins generously, especially at the intersections where the block units meet. This is critical for keeping your block square and your points sharp.
- Sew these two rows together with a 1/4″ seam allowance.
- Repeat the process, attaching the bottom row to the joined top and middle rows.
- Once all rows are sewn, press the final seams. Many quilters prefer to press these long seams open to reduce bulk, or press towards the darker fabric if it helps to hide the seam allowance.
Step 3: Finishing Your Block
After assembling the block, there’s one final step to ensure it’s perfectly prepared for your larger project.
- Final Pressing: Give your finished Scrappy Folded Corners Quilt Block a thorough press. This helps to flatten the seams and ensure the block lies flat and square. Use steam if your fabric allows, and gently press rather than iron (gliding the iron) to avoid distorting the fabric.
- Squaring Up (Optional but Recommended): For a professional finish, use your quilting ruler and rotary cutter to trim your block to its final desired size (e.g., 12.5″ unfinished or whatever size the block should measure). This ensures all blocks are perfectly uniform, making it easier to join them into a quilt top.
Tips for Quilting Success:
Even with simple patterns, a few universal quilting tips can elevate your results:
- Accurate 1/4″ Seam Allowance: This is the golden rule of quilting. A consistent seam allowance is critical for blocks to fit together perfectly. Test your machine’s 1/4″ foot or use a seam guide.
- Pressing Matters: Don’t underestimate the power of a good press. Pressing helps seams lie flat, reduces bulk, and keeps your block square. Avoid ironing back and forth, as this can stretch and distort your fabric.
- Chain Piecing: To save time when sewing multiple folded corner units or rows, use chain piecing. Sew one unit, then feed the next unit directly under the needle without cutting the thread in between. This speeds up the process and saves thread.
- Fabric Selection: While “scrappy” encourages variety, try to stick to similar fabric types (e.g., all quilting cottons) to ensure they behave similarly during sewing and washing.
- Don’t Fear the Seam Ripper: Mistakes happen! A seam ripper is a quilter’s best friend. It’s always better to unpick and re-sew a section than to leave a mistake that will bother you later.
Projects to Make with Your Scrappy Folded Corners Quilt Blocks:
Once you’ve mastered this block, the possibilities are endless! Here are some ideas for turning your beautiful blocks into cherished projects:
- Sampler Quilt: Combine this block with other favorite scrap-friendly patterns for a diverse and exciting sampler quilt.
- Full Quilt Top: Make a series of these blocks, join them together, add sashing or borders, and you’ll have a stunning quilt top ready for quilting and binding.
- Pillows/Cushion Covers: A single block or a few blocks can be transformed into a cozy and decorative pillow cover, perfect for adding a handmade touch to your home decor.
- Table Runners or Placemats: A row of two or three blocks can make a charming table runner, while individual blocks can be quilted and bound to create unique placemats.
- Tote Bags or Pouches: Integrate a block into the front panel of a tote bag or a small zippered pouch for a personalized accessory.
Conclusion: Embrace the Joy of Scrap Quilting
Congratulations! You’ve successfully created a gorgeous Scrappy Folded Corners Quilt Block. This project not only helps you beautifully manage your fabric stash but also provides a fantastic opportunity to practice fundamental quilting skills in a fun and engaging way. Whether you’re a beginner taking your first stitches or an experienced quilter looking for a quick and satisfying make, this block is a testament to the joy and creativity found in every scrap of fabric.
We encourage you to experiment with different color combinations, play with the direction of your “folded corners” for varied effects, and most importantly, enjoy the process. Every unique block you create tells its own story, contributing to a larger narrative of craftsmanship and passion. So, gather your scraps, fire up your sewing machine, and continue your journey into the wonderful world of quilting!
Share your creations with us, and happy quilting!