
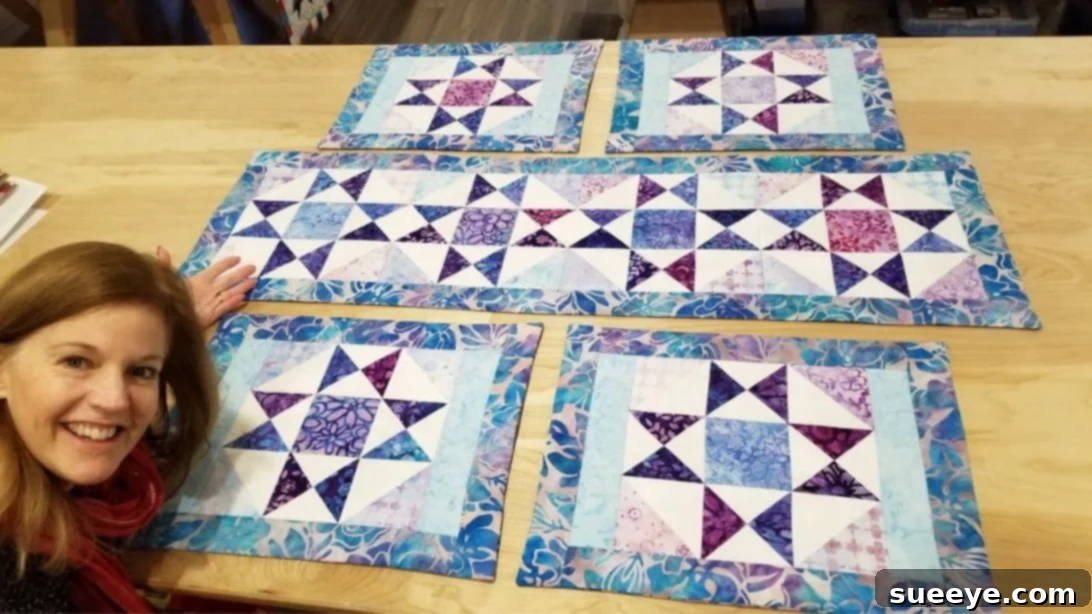
Elevate your dining experience and infuse your home with a touch of handmade charm by creating these stunning star quilt table runners and placemats. Inspired by the beautiful designs from Jordan Fabrics, this project is a fantastic way to introduce vibrant colors and intricate patterns to your table setting. Whether you’re hosting a dinner party or simply enjoying a family meal, these quilted pieces are guaranteed to spark conversation and admiration. What makes this project truly special is its accessibility: it’s designed with the beginner quilter in mind, utilizing fundamental techniques like half-square triangles (HSTs) and quarter-square triangles (QSTs). If you’re just starting your quilting journey, or even if you’re an experienced sewer looking for a quick and rewarding project, this detailed tutorial will guide you every step of the way to create your own set of captivating table decor. Get ready to transform your fabric scraps into functional art that brightens any room!
Essential Materials and Tools for Your Charming Star Quilt Project
Before diving into the exciting world of quilting, gathering all your necessary materials and tools is crucial. Preparation ensures a smooth and enjoyable crafting experience, allowing you to focus on the creative process. For this charming star quilt table runner and placemat set, you’ll be working with a delightful selection of fabrics and standard quilting equipment.
- Fabric Selection:
- 40 pieces of 5″ charm squares (assorted dark prints): These will form the points and darker elements of your star design. Choose a variety of patterns and shades within a specific color palette for a cohesive yet dynamic look.
- 32 pieces of 5″ charm squares (light prints for background): These lighter squares will create the striking contrast necessary for your stars to pop. Opt for subtle patterns or solids that complement your dark prints without competing with them.
- 1/3 yard of coordinating fabric for placemat inner borders: This fabric will provide a subtle frame for your placemat blocks, helping to transition to the outer border.
- 1 yard of coordinating fabric for placemat outer borders and table runner border: A more substantial border fabric that ties the entire design together. Consider a print or solid that harmonizes with both your dark and light charm squares.
- 2 yards of backing fabric: This fabric will form the underside of your placemats and runner. Choose a soft, durable fabric that complements the top side, enhancing the overall finish of your quilted pieces.
- Approximately 2 yards of batting: Batting is the crucial middle layer of your quilt sandwich, providing warmth, structure, and the characteristic puffy texture when quilted. You can purchase batting by the yard or pre-cut rolls suitable for placemats and runners.
- Essential Quilting Tools:
- Sewing Machine: A reliable machine with a 1/4″ seam foot is highly recommended for achieving consistent seam allowances, which are vital in quilting.
- Rotary Cutter, Self-Healing Mat, and Quilting Ruler: These tools are indispensable for precise and efficient fabric cutting, ensuring all your pieces are perfectly square and sized correctly. A 6×24 inch ruler is versatile, and smaller square rulers (like 6.5×6.5 or 12.5×12.5) are excellent for trimming.
- Iron and Pressing Mat: Proper pressing at each stage is key to flat seams and accurate block construction.
- Fabric Scissors or Snips: For trimming threads and making small cuts.
- High-Quality Thread: Polyester or cotton thread that matches or blends with your fabrics. Ensure it’s strong enough for quilting.
- Fabric Marking Pen or Pencil: Essential for drawing diagonal lines for half-square and quarter-square triangles. A water-soluble or heat-erasable pen works best.
- Straight Pins or Fabric Clips: To hold fabric layers together securely before sewing.
- Safety Pins or Temporary Spray Adhesive: For basting your quilt sandwich (holding the three layers – top, batting, and backing – together) before quilting.
Step-by-Step Guide: Crafting Your Charming Star Quilt Table Runner and Placemats
Creating these beautiful quilted pieces is a rewarding journey, and precision is your best friend. Take your time with each step, and don’t hesitate to pause and ensure your cuts and seams are accurate. Let’s begin!
Step 1: Constructing Half-Square Triangle (HST) Units
Half-square triangles are foundational units in quilting, forming the basis of many intricate patterns, including our charming stars. You’ll begin by preparing the first set of these versatile units. Start by selecting 16 light-colored 5″ charm squares and 16 dark-colored 5″ charm squares. Lay one light square on your work surface, then take a fabric marking pen or pencil and draw a precise diagonal line from one corner to the opposite corner on the wrong side of the fabric. This line will serve as your guide. Next, place this marked light square on top of a dark square, right sides together, ensuring all edges are perfectly aligned. With your sewing machine, sew a seam 1/4″ away from each side of the drawn diagonal line. Accuracy here is paramount for perfectly sized HSTs. Once sewn, carefully cut along the original drawn diagonal line. Open the two resulting fabric units, and you’ll find you have two half-square triangles. Press the seam allowances towards the darker fabric to reduce bulk and create a crisp edge. Finally, using your quilting ruler and rotary cutter, trim each HST unit to a precise 4 5/8″ square. This trimming step is crucial for ensuring all your blocks will fit together seamlessly later. Repeat this process for the remaining squares until you have a total of 32 perfect half-square triangle units.
Step 2: Crafting Quarter-Square Triangle (QST) Units
Building upon the HST technique, quarter-square triangles (QSTs) add another layer of design complexity and visual interest to your star blocks. For this step, you will be transforming your previously created HSTs into QSTs. Take two of your freshly pressed and trimmed 4 5/8″ half-square triangle units. Place one HST unit on top of another, right sides together. Pay close attention to the orientation: the diagonal seam of the top HST should run in the opposite direction from the diagonal seam of the bottom HST. This alignment is critical for forming the QST. On the wrong side of the top HST, draw a new diagonal line that runs perpendicular to the existing stitched seams (meaning it connects the other two corners). Again, sew a seam 1/4″ away from each side of this newly drawn line. Once sewn, cut along the drawn line. You will now have two raw quarter-square triangle units. Carefully open these units, press the seams open or to one side (often to the darker side for consistency), and then meticulously trim each QST unit to measure exactly 4 1/4″ square. This precision trimming ensures your QSTs will integrate flawlessly into your star blocks. Repeat this process until you have a total of 32 quarter-square triangle units.
Step 3: Creating Additional Half-Square Triangle Units for Block Variety
To add depth and varying elements to your charming star blocks, you’ll need a smaller set of HSTs. For this step, gather 15 light-colored 5″ charm squares and 16 dark-colored 5″ charm squares. Unlike the previous steps where you cut first, for these, you’ll work directly with the 5″ squares. Repeat the exact same half-square triangle construction process described in Step 1. That is, draw a diagonal line on the back of each light square, place it right sides together with a dark square, sew 1/4″ from both sides of the line, cut along the line, open, press, and then trim the resulting HSTs. Ensure these particular units are trimmed to a final size of 4 1/4″. This will yield a total of 16 half-square triangle units, which will be strategically placed within your star blocks to create specific design elements and contrast.
Step 4: Preparing Solid Center and Corner Squares
Every star needs a center, and your charming quilt blocks are no exception. These solid squares will provide a grounding element for your intricate star points. Take 8 pieces of dark-colored 5″ charm squares. Instead of cutting these into smaller units for triangles, you will simply trim them to a specific size. Using your rotary cutter and ruler, cut each of these 8 dark 5″ charm squares into precise 4 1/2″ squares. These squares will serve as the central focal point of some of your star blocks, as well as potential corner squares, creating areas of rest within the dynamic triangle patterns. Accuracy in this step ensures that when you assemble your blocks, all pieces align perfectly.
Step 5: Assembling Your Charming Star Quilt Blocks
Now comes the exciting part: seeing your star designs emerge as you combine all the units you’ve painstakingly prepared. For this project, you will create a total of 8 identical charming star blocks. Arrange your 32 QST units, 16 HST units (from Step 3), and 8 solid 4 1/2″ dark squares according to the visual diagram provided below, or a similar nine-patch layout that forms a star pattern. Typically, a star block combines a central square, four HSTs for the star points, and four corner squares (which could be plain or QSTs, depending on the specific star design). Pay close attention to the orientation of each triangle; a slight rotation can drastically change the final look. Once you are satisfied with your arrangement, carefully sew these units together into rows. Press your seams after each row is sewn, alternating the direction of your seam allowances from row to row to help the seams “nest” when you join the rows. This technique significantly reduces bulk at intersections. Finally, sew the rows together to complete your block. After pressing, each finished block should measure 11 3/4″ square. Take your time to ensure each of the 8 blocks is consistent in size and appearance, as this will contribute to a professional finish for your table runner and placemats.
Step 6: Adding Borders and Preparing Backing for Placemats and Runner
Borders not only frame your beautiful quilt blocks but also add stability and help achieve your desired finished size. This step details how to prepare and attach borders for both your placemats and the table runner, as well as cutting your backing fabric.
For the Placemats:
- Inner Border: Take your coordinating fabric designated for the inner border (1/3 yard). From this, cut 3 strips, each 2 1/2″ wide across the width of the fabric (WOF). Sub-cut these strips into 8 pieces, each measuring 11 3/4″ long. Carefully sew one 11 3/4″ inner border strip to two opposite sides of each of your 4 placemat blocks. Press the seams towards the border fabric.
- Outer Border: Using the fabric designated for the outer border (1 yard), cut 8 strips, each 2 1/2″ wide across the WOF. Sub-cut these strips into 16 pieces, each measuring 15 3/4″ long. Attach these outer border strips to the remaining two sides of each placemat block (the sides without the inner border yet). After attaching these, cut another set of 8 pieces at 2 1/2″ WOF and sub-cut to 16 pieces of 15 3/4″ (this might be a typo in the original or implies more strips). Let’s re-interpret this as follows for clarity: Sew two 15 3/4″ outer border strips to the top and bottom of each placemat block. Then, cut 8 additional pieces of 2 1/2″ WOF, sub-cutting these into 8 pieces of 15 3/4″ to attach to the two remaining sides (left and right) of each placemat block, completing the border. This ensures all four sides have outer borders. Press seams towards the border.
- Placemat Backing: For the backing of your individual placemats, take your backing fabric (2 yards). Cut 2 strips, each 18″ wide across the WOF. Then, sub-cut these strips to create 4 pieces, each measuring approximately 18″ by 20″. These pieces will be slightly larger than your finished placemat tops to allow for easy trimming later.
For the Table Runner:
- Assembling the Runner Top: Take the remaining 4 charming star blocks you created in Step 5. Arrange them in a single row, carefully aligning their edges. Sew these 4 blocks together, one after another, to form the main body of your table runner. Press seams open or to one side.
- Runner Border: Using your outer border fabric, cut 4 strips, each 2 1/2″ wide across the WOF. Sew these strips to all four sides of your assembled table runner top. For the longer sides, you will likely need to join two 2 1/2″ WOF strips together to achieve the necessary length. Trim excess border fabric even with the runner top. Press seams towards the border.
- Runner Backing: For the table runner backing, take your backing fabric (2 yards). Cut 2 pieces, each 17″ wide across the WOF. Sew these two 17″ wide pieces together along their long edge to create one larger backing piece. This will ensure you have enough fabric to cover the entire runner top and batting.
Step 7: Finishing Your Quilted Placemats and Table Runner
The final steps involve layering, quilting, and binding your projects, transforming them from pieced tops into durable and beautiful finished pieces ready for your dining table.
Finishing the Placemats:
For each placemat, you will create a “quilt sandwich.” Lay one of your prepared 18″ x 20″ backing pieces on a flat surface, right side up. Place a piece of batting (cut slightly larger than your placemat top, roughly 17″x19″) on top of the backing. Finally, center your pieced placemat top, right side down, on top of the batting. This layering technique, known as the “flip finish” or “pillowcase method,” eliminates the need for traditional binding, making it very beginner-friendly. Secure all three layers with pins around the edges to prevent shifting. Sew around all four edges of the layered placemat, leaving a 4″ opening unstitched along one side. This opening is crucial for turning the placemat right side out. Before turning, carefully trim off any excess batting and backing fabric, especially clipping the seam allowances diagonally at the corners to remove bulk. This ensures sharp, crisp corners when turned. Gently flip the placemat right side out through the 4″ opening. Use a blunt tool, like a chopstick or point turner, to gently push out the corners. Press all the edges flat, ensuring the unstitched opening is neatly folded inwards. Now, stitch the opening closed using a ladder stitch (invisible stitch) for a clean finish, or simply topstitch very close to the edge. Finally, “quilt” your placemat. This can be as simple as stitch-in-the-ditch along your seams, or more elaborate free-motion quilting. Simple straight lines across the placemat or around the star motifs add texture and secure the layers. Finish with a final steam press to set the stitches and give your placemats a polished, professional appearance.
Finishing the Table Runner:
The table runner will also utilize the efficient “flip finish” method. Place your assembled table runner backing (the long piece created in Step 6) on a flat surface, right side up. Lay your batting (cut slightly larger than your runner top) on top of the backing. Center your completed table runner top, right side down, on top of the batting. Pin all three layers securely around the perimeter. Similar to the placemats, sew around all four edges of the runner, leaving an approximate 6″ to 8″ opening along one long side for turning. Trim excess batting and backing, and clip corners to reduce bulk. Carefully turn the entire table runner right side out through the opening. Use a point turner for sharp corners and edges. Press all edges flat, ensuring the raw edges of the opening are tucked neatly inside. Stitch the opening closed using an invisible ladder stitch. Now for the quilting! Given its larger size, you might consider more extensive quilting for your table runner. Straight line quilting, grid quilting, or even simple wavy lines can add beautiful texture and securely hold the layers together. Use a walking foot on your sewing machine if you plan on straight-line quilting to help feed all layers evenly. Once quilted, give your table runner a final steam press to ensure it lies perfectly flat and looks impeccable.
Your Completed Charming Star Quilt Table Runner and Placemats
Congratulations! You’ve successfully crafted a stunning set of Charming Star Quilt Table Runner and Placemats. These handmade pieces are more than just table decor; they are a testament to your creativity, patience, and growing quilting skills. The beautiful star design, made accessible through easy half-square and quarter-square triangle techniques, is sure to be admired by all. Whether you display them proudly on your own dining table, gift them to a loved one, or simply enjoy the satisfaction of a project well done, these quilted creations bring warmth and character to any home. Feel free to experiment with different fabric color schemes and quilting patterns on future projects to truly make them your own. Happy quilting, and enjoy your beautiful new table setting!