
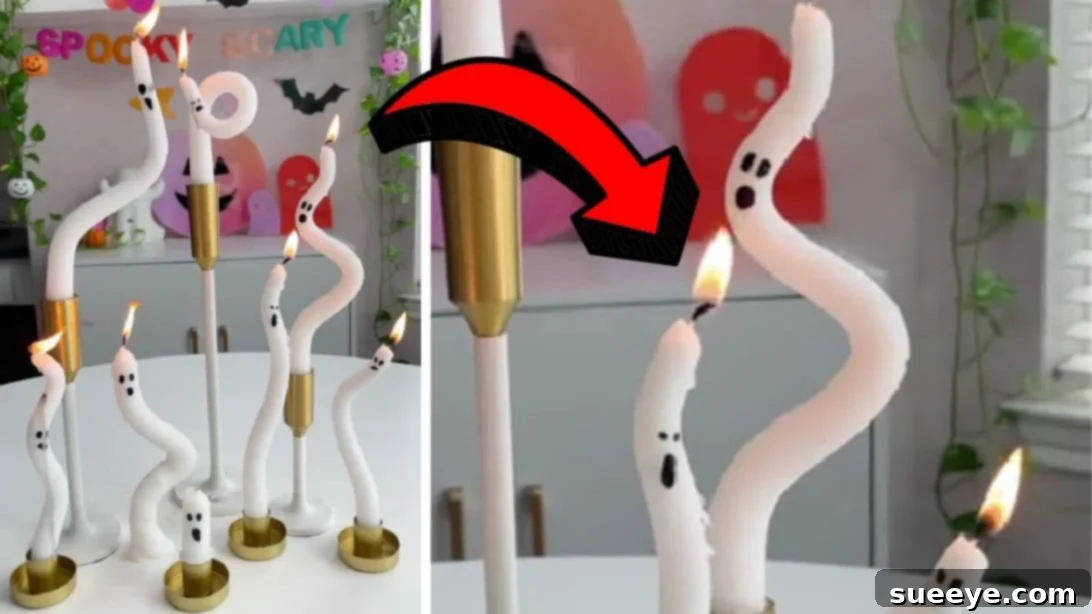
As the air turns crisp and the scent of pumpkin spice fills the air, our thoughts inevitably drift to Halloween—a time for spooky fun, creative costumes, and, of course, enchanting decor. If you’re searching for a quick, impactful, and delightfully whimsical DIY project to elevate your seasonal ambiance, look no further than the viral sensation of bendy ghost candles. This ingenious craft, popularized by TikTok creator kailochic, offers an incredibly simple yet charming way to transform ordinary taper candles into adorable, spectral figures that will undoubtedly capture attention and smiles.
What makes this DIY ghost candle project so universally appealing? It’s the perfect trifecta of convenience, affordability, and sheer adorableness. Whether you’re a seasoned crafter or a complete beginner, the process is straightforward, requiring minimal materials and just a few minutes of your time. This makes it an ideal choice for anyone looking to infuse their home with Halloween spirit without extensive planning or expense. Moreover, these versatile little ghosts can seamlessly integrate into virtually any Halloween theme you’ve envisioned for your home, from subtly spooky to playfully eerie.
Imagine a mantelpiece adorned with a collection of these playfully bent candles, their soft glow casting dancing shadows, or a dining table centerpiece that evokes a whimsical haunted house. The beauty of this project lies in its simplicity and the boundless possibilities for personalization. You can experiment with candles of various colors, creating a vibrant spectrum of ghostly hues that perfectly match your decor palette. Ready to dive into this bewitching craft? Let’s explore the magic behind making candles bend without a single drop of melted wax, starting with the inspiring video that brought this idea to life.
@kailochic Watch the original TikTok by @kailochic to see the mesmerizing bending process in action! This video inspired countless DIY enthusiasts to create their own unique spooky decor and perfect their “recipe” for bendy ghost candles. The simplicity and charm of these little figures make them an absolute must-try for your Halloween festivities. #halloweendecorations #halloweendiy #dollartreediy #makeitwithmichaels #candlemaking #halloweencrafts
♬ Halloween ・ cute horror song – PeriTune
Why Craft Your Own Spooky Candles? The Benefits of DIY Halloween Decor
Beyond the sheer enjoyment of a creative project, making your own bendy ghost candles comes with a host of advantages that make it a standout choice for Halloween decorating:
- Budget-Friendly Fun: Taper candles are widely available and often inexpensive, especially when purchased in multi-packs. This project requires minimal additional supplies, making it one of the most cost-effective ways to add high-impact decor to your home.
- Personalized Perfection: Store-bought decorations, while convenient, often lack that unique touch. Crafting your own allows you to infuse each ghost with its own personality through varied bends and facial expressions, ensuring your decor is truly one-of-a-kind.
- Eco-Conscious Choice: If you’re looking for ways to reduce your environmental footprint, DIY projects like this encourage thoughtful consumption and can sometimes even utilize items you already have on hand.
- Stress-Relieving Activity: Engaging in simple, hands-on crafts can be incredibly therapeutic. The repetitive action of warming and gently bending the wax, followed by the artistic touch of drawing faces, can be a wonderfully calming and satisfying experience.
- Quick & Easy Transformation: With busy schedules, finding time for elaborate decorations can be a challenge. These ghost candles can be made in under an hour, providing instant Halloween charm with minimal effort.
- Versatile & Adaptable: Whether your aesthetic is cute, creepy, or elegantly eerie, these simple shapes can be adapted. Use white for classic ghosts, black for a shadowy effect, or vibrant colors for a modern, playful twist.
The Secret to Bendy Candles: A Simple, No-Melt Technique
The magic behind these bendy ghost candles lies in a simple, yet ingenious technique: using a warm water bath to soften the paraffin wax without melting it completely. Wax has a relatively low melting point, but before it turns liquid, it becomes pliable and flexible when exposed to consistent warmth. The key is controlled heat, allowing the wax molecules to loosen just enough for shaping, then solidifying once cooled. This method is not only safe but also prevents the mess and potential hazards associated with direct heat sources or completely melting and re-molding wax.
Materials You’ll Need for Your Hauntingly Good Candles:
- Paraffin Wax Taper Candles: These are crucial. Paraffin wax responds best to this warming technique. Standard dinner candles work perfectly. Consider buying a multi-pack for maximum ghostly fun.
- Deep Container (or Baking Dish): Large enough to fully submerge your candles horizontally without them touching each other excessively. A baking dish, a sturdy plastic container, or even a clean bucket will do.
- Hot Tap Water: The hotter your tap water can get, the better. You don’t need boiling water, just consistently hot water from the faucet.
- Acrylic Paint Pen (or Permanent Marker): For drawing the adorable (or spooky) ghost faces. Black is classic, but feel free to experiment with other colors.
- Paper Towels or a Clean Cloth: For drying the candles.
Step-by-Step Guide to Creating Your Ghostly Tapers:
Follow these detailed instructions to craft your very own collection of bendy ghost candles. Patience and a gentle touch are your best friends throughout this process!
Step 1: Preparing the Candles with a Warm Water Bath
This crucial step softens the candles to make them pliable without melting them. It involves a series of warm water baths to gradually increase the temperature of the wax. The goal is to make the wax soft and flexible, similar to warm clay, rather than gooey or melted.
- First Soak (5 minutes): Fill your chosen container with the hottest tap water you can safely manage. Carefully place your paraffin wax taper candles into the hot water, ensuring they are fully submerged horizontally. Allow them to soak undisturbed for approximately 5 minutes. This initial bath begins to gently warm the wax through.
- Second Soak (5 minutes): After the first 5 minutes, carefully remove the candles from the container. Discard the now-cooler water and immediately refill the container with a fresh batch of hot tap water. Place the candles back into this fresh hot bath and let them soak for another 5 minutes. This ensures a consistent and increasing warmth throughout the candle.
- Third Soak (10 minutes): For the final softening phase, again remove the candles, empty the water, and refill the container with new hot tap water. Submerge the candles for a longer period this time, allowing them to sit for about 10 minutes. By now, the candles should be noticeably softer and more flexible. You can gently test the pliability of one end with your fingers while it’s still in the water; it should have a rubbery, bendable feel. If not, you may need a slightly longer soak or hotter water for the next attempt.
Step 2: Gently Bending into Ghostly Shapes
This is where your ghost candles truly come to life! The key here is to work slowly and deliberately, allowing the wax to respond to your touch.
- Slow and Steady Bending: With the candles still warm and pliable from the bath, carefully remove one at a time. While the wax is still warm and flexible, begin to slowly and gently bend the candle into your desired ghostly shape. You can create gentle waves, sharp angles, or whimsical spirals. The original TikTok video creator mentioned their video was sped up 8x, emphasizing just how slowly you should move. Rushing this step can cause the wax to crack or break. If a candle starts to cool and stiffen while you’re shaping it, simply place it back into the hot water for a few more minutes to reheat and soften it.
- Drying and Solidifying: Once you’ve achieved your desired bend for each candle, carefully remove it from the water. Gently pat it dry with a paper towel or clean cloth. Set the bent candles aside on a flat, protected surface (like wax paper or a baking sheet) to cool completely. As they cool, the wax will re-solidify, holding its new, bendy shape. Ensure they are fully hardened before moving to the next step to prevent accidental reshaping.
Step 3: Bringing Your Ghosts to Life: Drawing Faces
Now for the fun part – giving your ghostly creations their unique personalities!
- Drawing Faces: Once the candles are completely dry and rigid in their new shapes, it’s time to draw on the eyes and mouth using an acrylic paint pen or a permanent marker. You can opt for classic round eyes and an oval mouth for a friendly ghost, or experiment with different shapes and expressions to create a range of emotions – from mischievous to melancholic. Feel free to add rosy cheeks, eyebrows, or even little ghostly tears for extra character.
- Displaying Your Spooky Creations: Your bendy ghost candles are now complete and ready for display! Place them in candleholders to add height and stability, or arrange them creatively on a tray, mantel, windowsill, or bookshelf. You can choose to light them up for a warm, flickering glow, or simply use them as enchanting decorative accents. If you choose to burn them, always place them on a heat-safe surface and never leave burning candles unattended.
Customizing Your Ghost Candles: Beyond the Basics
While the classic white bendy ghost is undeniably charming, there’s ample room to unleash your creativity and customize your candles to perfectly match your Halloween vision.
- Color Play: Setting the Mood: Don’t limit yourself to white candles! Explore taper candles in other Halloween-appropriate hues:
- Black: For a more sophisticated or subtly spooky look.
- Orange: To evoke pumpkin patches and autumn warmth.
- Purple or Green: For a witchy, magical, or Frankenstein-esque vibe.
- Metallic or Glitter Candles: If you want your ghosts to sparkle and shine.
Mixing and matching colors can create a dynamic and visually interesting display.
- Adding Extra Flair: Once the faces are drawn and dried, consider these embellishments:
- Glitter: A dusting of fine glitter (applied with spray adhesive) can give your ghosts a shimmering, ethereal quality.
- Ribbons or Twine: Tie small bows around the “neck” of your ghosts or adorn them with rustic twine for a different aesthetic.
- Acrylic Paint: Instead of just a pen, use small brushes and acrylic paint for more detailed facial expressions or to add blush.
- Thematic Elements: Attach tiny plastic spiders, bats, or fall leaves with a small dab of hot glue for added thematic details.
- Exploring Different Shapes: Beyond simple waves, try different bending techniques:
- Spirals: Gently twist the candle while bending to create a spiraling effect.
- Intertwined Pairs: Soften two candles and carefully twist them together for a ghostly embrace.
- Dramatic Curls: Create tight curls at the top or bottom for a more whimsical look.
Safety First: Enjoying Your Candles Responsibly
While these bendy ghost candles are primarily decorative, if you choose to light them, always prioritize safety:
- Never Leave Unattended: This is the golden rule of candle burning. Always extinguish candles before leaving a room or going to sleep.
- Use a Stable Holder: Ensure your bent candles are placed in sturdy, non-flammable candleholders that can support their new shape and catch any wax drips.
- Keep Away from Flammables: Place candles away from curtains, papers, decorations, and anything that can easily catch fire.
- Out of Reach: Keep burning candles away from children and pets.
- Trim Wicks: Before each burn, trim the wick to about 1/4 inch to ensure a clean, even burn and prevent excessive flickering.
- Mind the Drip: Taper candles, especially bent ones, are prone to dripping. Use a tray or plate underneath your candleholders to protect surfaces.
Frequently Asked Questions (FAQ) About Bendy Ghost Candles
Q: Can I use any type of candle for this project?
A: Paraffin wax taper candles work best because paraffin becomes pliable at a lower temperature compared to other waxes (like soy or beeswax) and holds its shape well once cooled. While you might have some success with other wax types, paraffin is highly recommended for reliable results.
Q: How long do the bendy shapes last?
A: Once the wax has cooled and solidified, the bent shape is permanent. They will retain their ghostly form indefinitely, making them excellent reusable decorations for years to come.
Q: What if my candle cracks when I try to bend it?
A: Cracking usually indicates that the candle wasn’t warm enough, or you tried to bend it too quickly or forcefully. Return the candle to the hot water bath for a longer period (an extra 5-10 minutes) and then try bending it again, applying less pressure and moving much more slowly.
Q: Can I use an oven or microwave to soften the candles?
A: No, it is strongly advised against using ovens or microwaves. These methods can cause the wax to melt unevenly, create a fire hazard, or result in a messy, unusable candle. The warm water bath is the safest and most effective method.
Q: How many candles can I soften at once?
A: It depends on the size of your container. You can soften several candles at a time, but ensure they have enough space to be fully submerged and don’t press against each other too tightly. It’s often easier to work with a few at a time to manage the bending process before they cool.
Thanks to kailochic via TikTok for all the inspiration and images used here. If you love this creative project idea, then you’ll surely love her other DIY videos too, so give her channel a visit and subscribe for more fantastic crafting inspiration!
Your Next Favorite Halloween DIY: Super Easy DIY Ghost Candle Tutorial
Creating these bendy ghost candles is more than just a craft; it’s an opportunity to add a touch of personal charm and whimsy to your Halloween celebrations. Their simplicity makes them accessible to everyone, while their unique character ensures they’ll be a conversation starter. Gather your supplies, embrace your inner ghost maker, and get ready to impress your friends and family with these delightful, spooky creations. Happy crafting, and have a wonderfully haunted Halloween!