
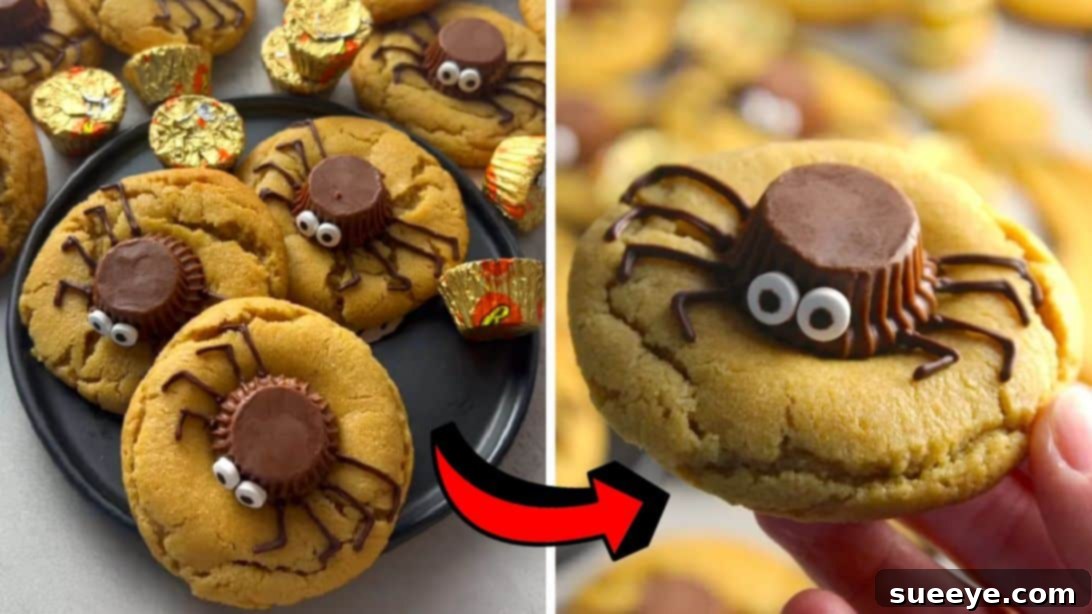
Get ready to delight both kids and adults with a batch of these utterly adorable and irresistibly delicious peanut butter spider cookies! Forget plain, ordinary cookies; these delightful treats, inspired by the creative genius of thesqueakymixer on TikTok, bring a playful spookiness to your dessert table. Perfect for Halloween parties, school events, or just a fun baking day at home, these spider cookies are guaranteed to be the star attraction. They’re so scrumptious, you can expect clean plates and happy faces long after the last crumb is gone.
Transforming a simple peanut butter cookie into a whimsical spider is an enchanting way to celebrate the season. Imagine soft, chewy peanut butter cookies topped with a rich chocolate ganache and playful candy eyes – it’s a recipe for instant joy. This comprehensive guide will walk you through every step, ensuring your baking adventure is as smooth and enjoyable as the finished product, making you a Halloween baking hero!
@thesqueakymixer The only kind of Spiders I’m happy to be around 😂 Peanut Butter Spider Cookies for the WIN! 🥜 Find the full recipe on my website link in bio 🤎 #bakingtiktok #bakingtiktoks #recipe #bakingszn #yummy #peanutbutter #cookies #halloweencookies #halloweenrecipe #thesqueakymixer #recipes #halloweenbaking
♬ Halloween ・ cute horror song(191109) – PeriTune
Spooktacular Peanut Butter Spider Cookies: An Easy Halloween Recipe
Embrace the spooky season with these utterly delightful peanut butter spider cookies! This recipe transforms a classic favorite into a festive treat that’s perfect for Halloween parties, fall gatherings, or simply a fun baking project with the family. Inspired by the viral sensation from The Squeaky Mixer on TikTok, these cookies combine the irresistible flavor of peanut butter with a charming, albeit slightly creepy, spider design. Get ready to bake up some magic and watch these sweet spiders disappear faster than you can say “boo!”
The Allure of Halloween Spider Cookies: Why They’re a Must-Try Treat
There’s something inherently charming about a treat that plays on a spooky theme without being genuinely scary. Peanut butter spider cookies perfectly hit this sweet spot. They take a beloved flavor – the creamy, nutty goodness of peanut butter – and pair it with a whimsical design that captivates imaginations. For children, the idea of eating a “spider” is thrilling and fun, especially when that spider is made of delicious cookie and chocolate. For adults, it’s a nostalgic nod to classic Halloween festivities, offering both comfort and a touch of seasonal cheer.
Beyond their visual appeal, these cookies are incredibly satisfying to eat. The base is a soft, chewy peanut butter cookie, rich with flavor and boasting those characteristic criss-cross marks if you choose to add them. Topped with a mini peanut butter cup for the spider’s body and adorned with chocolate legs and playful candy eyes, each bite offers a delightful combination of textures and tastes. They are substantial enough to be a satisfying dessert yet light enough that one is rarely enough! These cookies are not just desserts; they are edible pieces of art that bring smiles and a touch of Halloween magic to any table.
Ingredients for Your Spooky Cookie Creation
Creating these enchanting cookies begins with gathering the right ingredients. Quality matters, so choose your peanut butter and chocolate wisely for the best flavor and texture. This recipe yields approximately 15-20 cookies, perfect for a small gathering or a family treat. If you’re hosting a larger event or want to share the joy, consider doubling the batch!
- 1¾ cups of all-purpose flour: This is the primary structural component of our cookies. Sifting it ensures a lighter texture.
- 1 tsp of baking soda: A key leavening agent that helps the cookies rise and achieve that desirable soft, chewy texture, preventing them from being too dense.
- ¼ tsp of salt: Essential for balancing the sweetness of the sugars and enhancing all the other flavors, making the peanut butter taste even richer.
- ½ cup of unsalted butter, at room temperature: Crucial for a rich, tender crumb. Room temperature butter creams beautifully with sugar, incorporating air for a lighter cookie.
- ½ cup of light brown sugar: Adds moisture, depth of flavor (with notes of caramel), and contributes significantly to the chewiness of the cookies.
- ½ cup of granulated sugar: Helps achieve those slightly crisp edges and ensures the cookies spread just right, contributing to their classic shape.
- ½ cup of smooth peanut butter: The undeniable star ingredient, bringing that iconic nutty flavor and distinctive texture. Opt for smooth, processed peanut butter (like Jif or Skippy) for consistent results in baking, as natural peanut butter can sometimes separate and alter dough consistency.
- 1 large egg: Acts as a binder, holding all the ingredients together, and adds richness and moisture to the cookie dough.
- 2 tsp of vanilla extract: A crucial flavor enhancer that complements the peanut butter beautifully and adds a warm, inviting aroma. Don’t skip this!
- 1 tbsp of whole milk: Helps achieve the perfect dough consistency, ensuring moist cookies that aren’t too dry or crumbly.
- 15-20 mini peanut butter cups: These delightful candies form the adorable, plump bodies of our spiders. Remember to unwrap them all before you start the decorating phase!
- ¼ cup of semi-sweet chocolate chips (or melting wafers): Used for melting and piping the delicate spider legs. Semi-sweet provides a good balance with the peanut butter.
- 30-40 candy eyes: The final, most charming touch that truly brings our spiders to life! These are widely available during the Halloween season.
Step-by-Step Directions for Crafting Your Spooktacular Peanut Butter Spider Cookies
Follow these detailed instructions to create your own batch of delightful peanut butter spider cookies. Precision in baking often leads to perfect results and the most satisfying treats!
Step 1: Preparing the Cookie Dough Base
Begin by gathering your dry ingredients. In a medium-sized mixing bowl, add the all-purpose flour, baking soda, and salt. Use a whisk to combine them thoroughly until they are uniformly mixed. This crucial step ensures that the leavening agents and salt are evenly distributed throughout the dough, which is vital for consistent texture and flavor in every cookie. Once combined, set this bowl aside for later use.
Next, move to your wet ingredients. In a large mixing bowl (or the bowl of a stand mixer fitted with a paddle attachment), add the softened unsalted butter and both types of sugar: the light brown sugar and the granulated sugar. Beat these together on medium speed until the mixture becomes wonderfully light, creamy, and fluffy. This process, known as creaming, is essential as it incorporates air into the butter and sugar, which in turn contributes significantly to the cookies’ tender and airy texture. Throughout this step, make sure to scrape down the sides of the bowl periodically with a spatula to ensure all ingredients are well combined and no butter or sugar is left unmixed at the bottom.
Now, add the smooth peanut butter to the creamed butter and sugar mixture. Continue to beat until it’s fully incorporated, and the mixture appears even lighter and fluffier. This step ensures a uniform and rich peanut butter flavor throughout every bite of your cookie dough. Following this, beat in the egg and vanilla extract, mixing only until they are just combined. Overmixing at this stage can sometimes lead to tougher cookies, so gentle incorporation is key.
Finally, pour in the whole milk and continue to mix until the mixture is smooth and any remaining lumps are completely gone. With your mixer on low speed, gradually add the reserved dry flour mixture to the wet ingredients. Mix continuously until everything is fully combined and a soft, cohesive dough forms. As soon as the flour disappears into the mixture, stop mixing. This prevents overdeveloping the gluten in the flour, which can result in cookies that are tough rather than delightfully chewy.
Step 2: Chilling the Dough and Baking Your Cookies
Once your dough is perfectly mixed, cover the bowl tightly with plastic wrap. Place it in the refrigerator and let it chill for at least 2 hours. Chilling the dough is a crucial step that offers multiple benefits: it prevents the cookies from spreading too much in the oven (resulting in thicker, chewier cookies), deepens their flavor by allowing the ingredients to meld, and makes the dough much easier to handle and scoop. For maximum convenience and flavor development, you can even chill the dough overnight.
When you’re ready to bake, preheat your oven to 375°F (190°C). Line two baking sheets with parchment paper; this prevents sticking and makes for incredibly easy cleanup, ensuring your cookies slide right off. Set these prepared sheets aside. Using a cookie scoop (approximately 2 tablespoons in size) or a spoon, scoop out uniform dough balls. Gently roll them between your palms to form smooth, round spheres. Arrange these dough balls on the prepared baking sheets, ensuring they are spaced about 2 inches apart. This spacing is vital to allow for proper spreading during baking without the cookies merging into one another. Once arranged, place the baking sheets into the preheated oven.
Step 3: Finishing and Decorating Your Adorable Spider Cookies
Bake the cookies for approximately 10 to 12 minutes, or until their edges are lightly golden brown and the centers appear just set. It’s perfectly normal for them to look slightly underdone in the middle; they will continue to firm up as they cool on the hot baking sheet. It is crucial not to overbake, as this can lead to dry, crumbly cookies! Once baked, carefully remove the sheets from the oven and let the cookies sit on the baking sheets for about 3 to 5 minutes. This brief resting period allows them to set fully and makes them less fragile before handling.
While the cookies are still warm and soft from baking, gently place one mini peanut butter cup into the center of each cookie, pressing down slightly. The residual warmth of the cookie will slightly melt the base of the peanut butter cup, helping it adhere perfectly and creating the ideal “spider body.” Let the cookies cool completely on a wire rack with the peanut butter cups in place. Cooling completely is absolutely essential before decorating with chocolate; otherwise, the chocolate will melt and run, ruining your spooky designs.
To prepare the chocolate for the “legs,” melt the semi-sweet chocolate chips (or wafers) in a microwave-safe bowl. Heat in short 30-second intervals, stirring thoroughly after each interval, until the chocolate is smooth and fully melted. Be extremely careful not to overheat the chocolate, as it can seize and become unusable. Once melted, transfer the chocolate to a piping bag. If you don’t have a piping bag, a small zip-top bag with a tiny corner snipped off will work just as effectively.
Now for the fun part: decorating! Pipe the melted chocolate onto each cookie to create the spider legs. Aim for 4 legs on each side of the peanut butter cup “body,” curving them slightly outwards to give a more realistic and playful spider-like appearance, as beautifully demonstrated in the original TikTok video. Immediately after piping the legs, attach two candy eyes to the front of each peanut butter cup “head.” If the chocolate from the legs isn’t enough to secure the eyes, use a tiny dab of melted chocolate as “glue.” Let the chocolate set completely before serving. You can speed up this setting process by placing the cookies in the refrigerator for a few minutes. Once the chocolate is firm, your adorable and spooky peanut butter spider cookies are ready to be devoured!
Expert Tips for Perfect Spooky Spider Cookies Every Time
Achieving bakery-quality spider cookies is easy with a few expert tips and tricks. These pointers will help ensure your cookies turn out perfectly delicious and picture-perfect:
- Don’t Skip the Chill Time: The 2-hour minimum chilling period for the dough is absolutely non-negotiable. It’s vital for preventing the cookies from spreading excessively in the oven, helps the flavors meld beautifully, and makes the dough significantly easier to handle and roll.
- Measure Accurately: Especially when it comes to flour, precision is key in baking. Use a kitchen scale for the most accurate measurement, or if using cups, spoon the flour into the measuring cup and then level it off with a straight edge, rather than scooping directly from the bag.
- Ensure Room Temperature Ingredients: Always ensure your butter and egg are at room temperature. This allows them to emulsify smoothly with other ingredients, creating a more uniform dough and contributing to a superior cookie texture.
- Avoid Overmixing: Once you add the flour to the wet ingredients, mix only until they are just combined and no streaks of flour remain. Overmixing develops gluten, which can lead to tougher, less tender cookies.
- Use Evenly Sized Dough Balls: For consistent baking and a professional look, use a cookie scoop to ensure all your dough balls are the same size. This also ensures they cook evenly.
- Know Your Oven: Ovens can vary significantly in temperature. Keep a close eye on your cookies during the last few minutes of baking. They should be lightly golden at the edges, but still appear soft in the center when you pull them out.
- Cool Completely Before Decorating: Patience is key in the decorating phase! If cookies aren’t fully cooled, your melted chocolate for the legs and eyes will melt and run, creating a messy rather than spooky effect.
- Piping Bag Alternatives: No specialized piping bag? No problem at all! A small zip-top bag with a tiny corner snipped off (start with a very small snip, you can always make it bigger) works just as well for piping the chocolate legs.
- Melt Chocolate Carefully: When melting chocolate, use low heat and stir frequently. Overheated chocolate can seize or burn, becoming thick and unusable for piping.
Creative Variations and Customizations for Your Spider Cookies
While the classic peanut butter spider cookie is fantastic and a crowd-pleaser, don’t hesitate to get creative and put your own spin on these spooky treats! Here are some ideas to customize your spider cookies and make them uniquely yours:
- Different Cookie Bases: Not a peanut butter fan, or just want to try something new? You can easily adapt this spider cookie idea to other cookie bases such as classic chocolate chip cookies, sugar cookies, gingerbread cookies for a spicier kick, or even soft oatmeal cookies for a different flavor profile.
- Alternative Spider Bodies: The mini peanut butter cup is iconic, but there are other fun options! Consider using Mini Oreos, chocolate-covered cherries, small truffles (homemade or store-bought), or even a dollop of chocolate frosting as the spider’s body.
- Leg Alternatives for Texture and Flavor: For an extra crunch, use thin pretzel sticks or chocolate-covered pretzel sticks for the spider legs. Black licorice laces can also make for a fun, chewy leg alternative. For a striking visual contrast, you could even pipe white chocolate legs.
- Colorful Eyes: While classic candy eyes are great, get creative with colors! Use different colored candy eyes for a more whimsical or vibrant look. Alternatively, use small dots of colored frosting (black, green, red) with a tiny chocolate chip or edible pearl in the center.
- Nut-Free Version: If you need to cater to nut allergies, you can easily make these cookies nut-free. Substitute the peanut butter with a sunflower seed butter (like SunButter). For the chocolate elements, ensure you use a certified nut-free chocolate brand for both the cups and the melting chocolate. Always double-check ingredient labels carefully.
- Add a Web Design: For an extra spooky and artistic touch, before adding the spider body, try piping a delicate chocolate web design onto the top of the cookie base. This adds another layer of visual interest and spooky charm.
- Flavor Boosters: A pinch of cinnamon or nutmeg in the cookie dough can add warmth, especially for fall baking. For a richer chocolate flavor, use dark chocolate chips for the legs.
Serving and Storage Suggestions for Maximum Freshness
These delightful peanut butter spider cookies are incredibly versatile, making them perfect for various occasions. They are best served fresh, but they also store remarkably well, which is excellent news if you plan to prepare them in advance for parties or simply want to enjoy them over several days.
- Serving: Arrange your finished peanut butter spider cookies artfully on a platter with other Halloween treats like ghost-shaped brownies or witch-hat cupcakes to create a truly impressive spooky dessert spread. They make a fantastic, eye-catching centerpiece for any Halloween-themed table. For a truly festive experience, pair them with a tall glass of cold milk, a mug of warm hot chocolate, or even a comforting spiced apple cider. They are also excellent additions to school parties, office potlucks, or family movie nights during the autumn season.
- Storage: To maintain their optimal freshness and prevent the chocolate legs from smudging, store the cooled and fully decorated cookies in an airtight container at room temperature. They will remain delicious for up to 3-4 days. If you need to stack them, place a sheet of parchment paper or wax paper between each layer to protect the delicate chocolate decorations.
- Freezing Baked Cookies: You can extend the life of your baked and decorated cookies by freezing them for up to 2 months. To do this, first place the decorated cookies in a single layer on a baking sheet and freeze them solid for about an hour. Once firm, transfer them to an airtight freezer-safe container or a heavy-duty freezer bag. When you’re ready to enjoy them, simply thaw them at room temperature for an hour or two before serving.
- Freezing Unbaked Dough: For ultimate convenience, you can also freeze the unbaked cookie dough balls. Scoop and roll the dough as directed, then arrange the balls on a baking sheet and freeze until solid. Once frozen, transfer them to a freezer-safe bag or container, where they will keep for up to 3 months. When you’re ready to bake, place the frozen dough balls directly on a prepared baking sheet and bake from frozen, adding a few extra minutes (usually 2-4 minutes) to the original baking time. This is a fantastic way to have fresh, warm cookies whenever the craving strikes!
Why These Are The Ultimate Halloween Treat
In a season often filled with store-bought candy and elaborate costumes, these homemade peanut butter spider cookies stand out as a delightful creation that perfectly embodies the spirit of Halloween. They are simple enough for even beginner bakers to tackle with confidence, yet visually impressive enough to wow any crowd, from the smallest trick-or-treaters to the most discerning adult guests.
The timeless combination of classic peanut butter flavors and a playful, festive spider design makes them universally appealing. They offer a comforting taste of home baking blended with the excitement of the spooky season. Whether you’re hosting a ghoulish gathering, contributing a dish to a potluck, or simply looking for a fun and engaging activity to do with family members of all ages, these cookies deliver on all fronts. They are a guaranteed conversation starter, a palate pleaser, and a joyful, delicious expression of the autumn festivities. Get ready to bake a batch that everyone will rave about and remember long after the Halloween decorations are put away!
Frequently Asked Questions (FAQ) About Peanut Butter Spider Cookies
- Can I use crunchy peanut butter instead of smooth?
- While smooth peanut butter is generally recommended for a more consistent dough texture and a classic peanut butter cookie, crunchy peanut butter can certainly be used if you prefer the added texture of peanut pieces in your cookies. Just be aware it might slightly alter the dough’s consistency, making it a bit less smooth, and the final cookie’s chewiness.
- How far in advance can I make these cookies for a party?
- You can prepare the cookie dough up to 2 days in advance and keep it well-chilled in the refrigerator. The baked and fully decorated cookies can be stored in an airtight container at room temperature for 3-4 days, making them excellent for preparing ahead of time. For longer storage, refer to the freezing tips provided in the “Serving and Storage Suggestions” section.
- What if I don’t have candy eyes? Are there any alternatives?
- Absolutely! If you don’t have candy eyes, don’t let that stop your creativity. You can easily use small dots of white or colored frosting with a tiny chocolate chip (or a sprinkle) pressed into the center for the pupils. Mini M&M’s, particularly brown or black ones, can also make adorable eyes.
- My melted chocolate for the legs isn’t piping smoothly. What should I do?
- This can happen if the chocolate is too thick or has seized. Ensure your chocolate is fully melted and smooth. If it’s too thick to pipe, you can try adding a tiny amount (start with ½ teaspoon and add more as needed) of coconut oil or vegetable shortening and stir it in until it reaches a more pipeable consistency. If the chocolate has become clumpy and grainy, it likely overheated or got a tiny bit of water in it, and unfortunately, it might be beyond saving for piping.
- Can I make these peanut butter spider cookies gluten-free?
- Yes, it’s generally possible to make these cookies gluten-free. You can substitute the all-purpose flour with a high-quality 1:1 gluten-free baking flour blend. For best results, ensure your chosen blend already contains xanthan gum, or add about ½ teaspoon per cup of gluten-free flour to help with the dough’s structure and elasticity.
- Do I have to chill the dough for 2 hours?
- While 2 hours is the minimum recommended time for optimal results, chilling the dough is highly recommended. It significantly improves the cookie’s texture by reducing spread, making them thicker and chewier, and allows the flavors to deepen. If you’re really short on time, even 30-60 minutes in the freezer can help, but for the best outcome, stick to the 2-hour minimum.
*All image credit belongs to thesqueakymixer via TikTok. Follow and subscribe to her channel for more amazing recipes and creative ideas!