
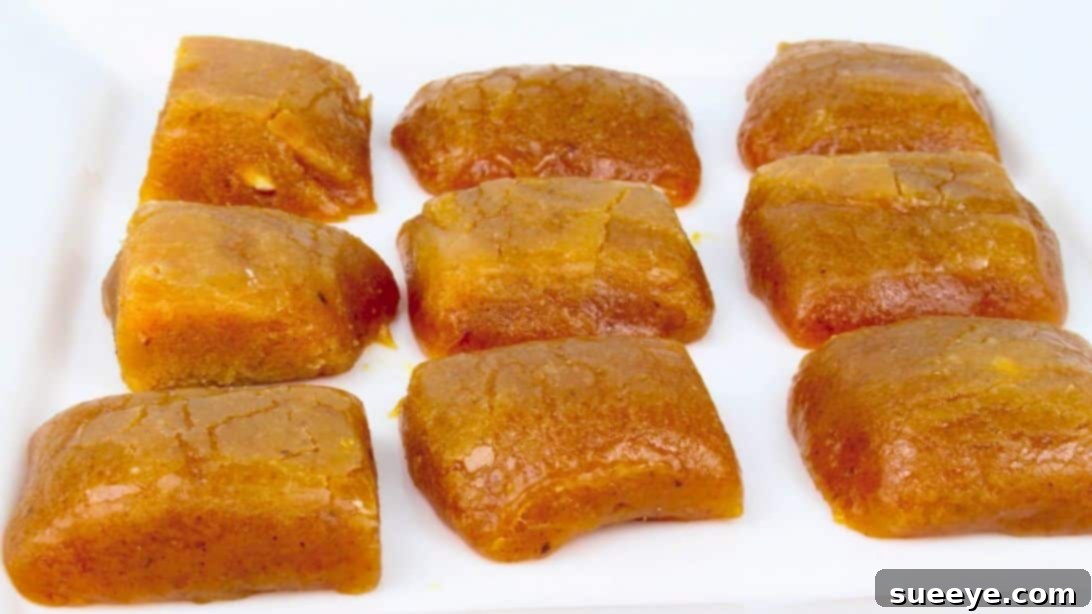
Easy Homemade Pumpkin Fudge: Your Go-To Fall & Halloween Dessert
As the vibrant colors of autumn begin to paint the landscape and a delightful chill fills the air, there’s a unique craving for all things warm, cozy, and pumpkin-spiced. What better way to immerse yourself in the flavors of the season than with a batch of incredibly smooth, sweet, and utterly delicious homemade pumpkin fudge? If you’ve never experienced the pure joy of pumpkin-flavored fudge, prepare for a delightful culinary revelation. This recipe isn’t just a treat; it’s a celebration of the harvest season, making it perfect for fall gatherings, festive Halloween parties, or simply a comforting evening indulgence. Be warned: its irresistible creamy texture and delightful blend of spices make it wonderfully addicting!
This particular recipe, inspired by the culinary creativity of Todd’s Kitchen, simplifies the fudge-making process significantly. It ensures that even novice home bakers can achieve spectacular, professional-tasting results. Forget complicated candy thermometers and endless stirring; this method is refreshingly straightforward and incredibly foolproof. It’s designed for maximum flavor and velvety texture with minimal fuss, making it accessible to everyone eager to dive into autumn baking.
Beyond its incredible taste, this easy pumpkin fudge stands out for its sheer simplicity. You won’t need to rummage through your pantry for obscure ingredients or dedicate hours of your precious time to kitchen work. In fact, it requires just a handful of common items you might already have on hand, transforming them into a luxurious seasonal confection. It’s quick to prepare, incredibly satisfying, and yields a generous batch of perfectly bite-sized delights that are guaranteed to impress anyone who tries them. Even if you consider yourself a pumpkin skeptic, we are confident this sweet, spiced confection will undoubtedly convert you into a true fan!
If you’re looking to expand your repertoire of autumn-inspired treats, we have a few more delightful suggestions that capture the essence of the season:
- Related Fall Favorite: Indulge in the perfectly spiced sweetness of these Pumpkin Spice Donut Holes for another quick and utterly delicious snack that screams fall.
- Classic Cookie Combo: For cookie enthusiasts, our Pumpkin Chocolate Chip Cookies offer a comforting and flavorful twist on a timeless classic, perfect with a warm cup of coffee or cider.
Key Ingredients for Delicious Homemade Pumpkin Fudge
Crafting the perfect batch of creamy, flavorful pumpkin fudge begins with selecting a few quality, simple ingredients. This recipe ingeniously combines these everyday staples to create a rich, smooth, and perfectly spiced autumn treat. Here’s a detailed breakdown of what you’ll need to gather before you start cooking:
- Evaporated Milk: 2/3 cup. This is an essential component for achieving the fudge’s signature creamy, smooth texture. Its concentrated nature helps create a rich consistency, so do not substitute it with regular milk, as this will drastically alter the fudge’s final set and texture.
- White Granulated Sugar: 2 1/2 cups. As the primary sweetener, white sugar provides the classic, delightful sweetness expected in traditional fudge. Ensure it’s fully dissolved during the cooking process to prevent a grainy texture.
- Canned Pumpkin Puree: 3/4 cup. It is crucial to use pure pumpkin puree, not pumpkin pie filling. Pie filling contains added spices, sugars, and thickeners that will negatively impact the flavor balance and consistency of your fudge. Look for cans labeled “100% Pure Pumpkin.”
- Ground Cinnamon: 1 teaspoon. This quintessential fall spice adds a comforting warmth and aromatic depth to the fudge. Feel free to adjust the amount to your personal preference, or enhance the spice profile further by adding a pinch of ground nutmeg, ginger, or allspice for a richer, more complex “pumpkin pie spice” blend.
- Mini Marshmallows: 7 ounces (approximately 4 cups). These delightful little puffs are the secret ingredient for effortlessly achieving a smooth, velvety texture without the need for a candy thermometer. They melt beautifully and contribute to both the sweetness and the perfect, soft chewiness of the fudge.
- Unsalted Butter: 2 tablespoons. The butter adds a luxurious richness and helps prevent the mixture from sticking to the pot. It also contributes significantly to the overall decadent mouthfeel of the fudge.
- White Chocolate Chips or Bar: 1 cup (roughly 6 oz). Opt for high-quality white chocolate for the best flavor and smoothest texture. While chips are convenient and melt easily, a good quality white chocolate bar, finely chopped, can often melt even more smoothly and impart a superior taste.
- Pure Vanilla Extract: 1 teaspoon. A vital flavor enhancer, vanilla extract beautifully complements the pumpkin and spices, adding a subtle warmth and a layer of aromatic complexity that truly elevates the fudge.
Step-by-Step Guide: Crafting Your Perfect Homemade Pumpkin Fudge
Creating this irresistible pumpkin fudge is a surprisingly simple and rewarding process when broken down into these easy-to-follow steps. Precision, attentive stirring, and a little patience are your best friends in achieving that perfectly smooth, melt-in-your-mouth consistency.
Step 1: Combine and Heat the Fudge Base
Begin by combining the 2 1/2 cups of white granulated sugar and 2/3 cup of evaporated milk in a sturdy, heavy-bottomed pot or saucepan. Place this pot over medium heat. Stir the mixture continuously with a wooden spoon or a heat-resistant spatula until the sugar fully dissolves into the milk. This initial stirring is critical to prevent a grainy texture in your finished fudge. Once the sugar has completely dissolved and the mixture is smooth, bring it to a gentle, rolling boil. Continue to stir occasionally, ensuring even heating across the bottom of the pot and preventing any sticking.
Step 2: Infuse with Pumpkin & Spice
Once the sugar and milk mixture has reached a light boil, carefully stir in the 3/4 cup of pure mashed pumpkin puree and the 1 teaspoon of ground cinnamon. Stir thoroughly to fully incorporate these wonderful seasonal flavors throughout the base. Continue to cook the mixture, bringing it back to a gentle boil, and remember to stir occasionally. This step allows the pumpkin and cinnamon to meld deeply with the sugary base, enriching the overall flavor profile of your fudge.
Step 3: Add Marshmallows & Butter, Then Simmer
Reduce the heat slightly to medium-low. Now, add the 7 ounces of mini marshmallows and the 2 tablespoons of unsalted butter to the pot. Stir gently but consistently until both the marshmallows and butter are completely melted and smoothly integrated into the warm pumpkin mixture. Once everything is thoroughly melted and well combined, bring the mixture back to a high simmer – it should be bubbling consistently, but not boiling vigorously. Allow it to simmer for precisely 15 minutes. During this crucial simmering period, it is vital to stir frequently, especially scraping the bottom and sides of the pot, to prevent any scorching or burning. Promptly remove the pot from the heat source immediately after the 15 minutes are up.
Step 4: Incorporate White Chocolate & Vanilla
With the pot immediately removed from the heat, swiftly add the 1 cup of white chocolate chips (or your finely chopped white chocolate bar) and the 1 teaspoon of pure vanilla extract. Stir vigorously and continuously until the white chocolate is completely melted and the entire mixture is smooth, glossy, and uniform in appearance. The residual heat retained within the fudge base will be sufficient to melt the chocolate perfectly. Work quickly during this step to ensure everything is fully incorporated before the mixture begins to cool and thicken too much.
Step 5: Prepare for Setting
Prepare your baking pan (an 8×8-inch pan will yield thicker fudge, while a 9×13-inch pan will result in thinner pieces) by lightly greasing it, then lining it with a large sheet of parchment paper. Ensure the parchment paper significantly overlaps on all sides – these overhangs will serve as convenient “handles” for effortlessly lifting the set fudge out of the pan later. Carefully pour the hot fudge mixture evenly into the prepared pan. Use a spatula to spread it smoothly into the corners and achieve a uniform thickness across the surface. Allow the fudge to sit undisturbed for a minimum of a few hours at room temperature, or for quicker setting, place it in the refrigerator for 2-3 hours until firm.
Step 6: Cut, Serve & Store
Once the fudge is completely cooled and firmly set (it should no longer be sticky to the touch and feel solid throughout), utilize the overhanging parchment paper to gently lift the entire block of fudge out of the pan. Transfer it to a clean cutting board. Using a large, sharp knife, cut the fudge into your desired bite-sized pieces. For exceptionally clean and neat cuts, you can warm your knife slightly with hot water and wipe it thoroughly dry between each slice. Serve your delectable homemade pumpkin fudge and savor the delightful flavors of your hard work! For any delicious leftovers (should there be any!), place them in an airtight container. The fudge can be stored at room temperature for up to one week, or in the refrigerator for up to two weeks, which helps maintain its freshness and delightful texture.
Expert Tips for the Best Homemade Pumpkin Fudge
While this pumpkin fudge recipe is wonderfully forgiving and straightforward, incorporating a few expert tips can truly elevate your creation from merely good to absolutely extraordinary. Follow these pointers for a consistently perfect, velvety batch every single time:
- Always Use Pure Pumpkin Puree: This cannot be stressed enough. Always double-check your can to ensure you’re using 100% pure pumpkin puree, not pumpkin pie filling. Pie filling contains pre-added spices, sugars, and thickeners that will negatively affect the delicate flavor balance and the setting consistency of your fudge.
- Stir Consistently: Especially during the initial stages of combining the sugar and evaporated milk, and throughout the entire 15-minute simmering phase, consistent and thorough stirring is paramount. This prevents scorching on the bottom of the pot and helps the sugar dissolve fully, which is essential for achieving a smooth, non-grainy fudge texture.
- Don’t Rush the Boil: Allow the sugar and milk mixture to come to a gentle, rolling boil naturally. Rushing this initial heating can lead to undissolved sugar crystals remaining in the mixture, resulting in an undesirable gritty texture in your final fudge.
- Precise Simmering Time: The 15-minute simmering time for the marshmallow and pumpkin mixture is critical for the fudge to properly set. Do not cut this time short or extend it significantly. Use a kitchen timer to ensure accuracy.
- Opt for Quality White Chocolate: The better the quality of your white chocolate chips or bar, the superior your fudge will taste. Whenever possible, avoid “melting wafers” or “compound chocolate,” as these often contain less cocoa butter and can result in a waxier, less satisfying texture.
- Parchment Paper is Your Best Friend: Never skip the step of greasing your pan and lining it with parchment paper that overhangs the edges. This simple trick makes removing the entire block of set fudge incredibly easy, clean, and completely mess-free.
- Patience is a Virtue (for Setting): Resist the urge to cut into your fudge before it is completely cooled and fully set. Allowing it to cool thoroughly, either at room temperature or in the refrigerator, is vital for achieving clean, sharp cuts and a firm, stable texture.
- Achieve Clean Cuts: For perfectly neat and attractive squares, use a large, very sharp knife. For even cleaner cuts, run the knife under hot water, wipe it completely dry, and then slice through the fudge. Repeat this process for each cut to prevent sticking and dragging.
Creative Variations & Customizations for Your Pumpkin Fudge
While this classic pumpkin fudge recipe is absolutely fantastic on its own, it also serves as a wonderful and versatile base for countless creative variations. Feel free to experiment with these ideas and make this delicious treat uniquely your own:
- Spiced Up: Elevate the spice profile by adding an extra pinch of ground nutmeg, ginger, cloves, or a pre-made pumpkin pie spice blend along with the cinnamon. Adjust to your preferred level of warmth and aroma.
- Nutty Crunch: For an added layer of delightful texture and a rich, earthy flavor, fold in about 1/2 cup of finely chopped pecans, walnuts, or almonds at the same time you incorporate the white chocolate chips.
- Elegant Chocolate Swirl: After pouring the pumpkin fudge into your prepared pan, gently drizzle a small amount of melted dark or semi-sweet chocolate over the top. Use a knife or a skewer to delicately swirl it through the fudge for a beautiful marbled effect.
- Cream Cheese Swirl: For a tangy and incredibly rich contrast, prepare a simple cream cheese frosting (made with softened cream cheese, powdered sugar, and a touch of vanilla extract) and swirl it into the fudge before it sets.
- Darker Chocolate Base: If you prefer a richer chocolate flavor, replace some or all of the white chocolate with milk chocolate or semi-sweet chocolate chips for a deeper, more intense chocolate-pumpkin combination.
- Delightful Toppings Galore: Before the fudge completely sets, sprinkle the top generously with coarse sea salt, crushed graham crackers, mini chocolate chips, toasted coconut flakes, or even a light dusting of cinnamon sugar for added visual appeal and flavor.
Serving and Storing Your Homemade Pumpkin Fudge
Once your delectable pumpkin fudge is perfectly set and cut into inviting squares, it’s ready to be savored and shared! These delightful autumn treats are incredibly versatile and excellent for a variety of occasions:
- Festive Holiday Platters: They make a vibrant, colorful, and utterly delicious addition to any Thanksgiving dessert spread, Christmas cookie platters, or other seasonal celebrations.
- Potlucks & Parties: Easy to transport and guaranteed to be a crowd-pleaser, your homemade pumpkin fudge will be the star of any social gathering or potluck.
- Thoughtful Edible Gifts: Package these beautiful squares in pretty boxes, cellophane bags, or decorative tins for a truly thoughtful and much-appreciated homemade gift during the autumn season or holidays.
- Everyday Indulgence: Keep a secret stash for yourself! These treats are perfect for a quick, sweet pick-me-up with your morning coffee, afternoon tea, or as a late-night snack.
To ensure your homemade pumpkin fudge remains fresh, soft, and delicious for as long as possible, proper storage is key. Store the pumpkin fudge in an airtight container at cool room temperature for up to one week. For extended freshness, you can keep it in the refrigerator for up to two weeks; chilling often gives it a firmer, chewier texture that some prefer. If you need to stack pieces within the container, always place a sheet of parchment paper between layers to prevent them from sticking together. For even longer preservation, you can freeze fudge for up to three months. To do this, wrap individual pieces tightly in plastic wrap, then place them in a freezer-safe bag or an airtight container. When you’re ready to enjoy, simply thaw the frozen fudge at room temperature for a few hours before serving.
Conclusion: Indulge in the Spirit of Fall with Homemade Pumpkin Fudge
This easy homemade pumpkin fudge recipe is truly more than just a simple dessert; it’s a heartfelt invitation to savor the cozy, comforting, and nostalgic flavors of autumn. With its incredibly creamy texture, perfectly balanced warm spices, and undeniable sweetness, it stands as the ultimate treat to brighten any crisp fall day or to add a wonderfully festive touch to your Halloween celebrations. So, roll up your sleeves, gather your simple ingredients, and prepare to create a batch of this irresistible pumpkin fudge that will undoubtedly have everyone asking for your secret recipe. Happy baking and immerse yourself in the delightful spirit of fall!