
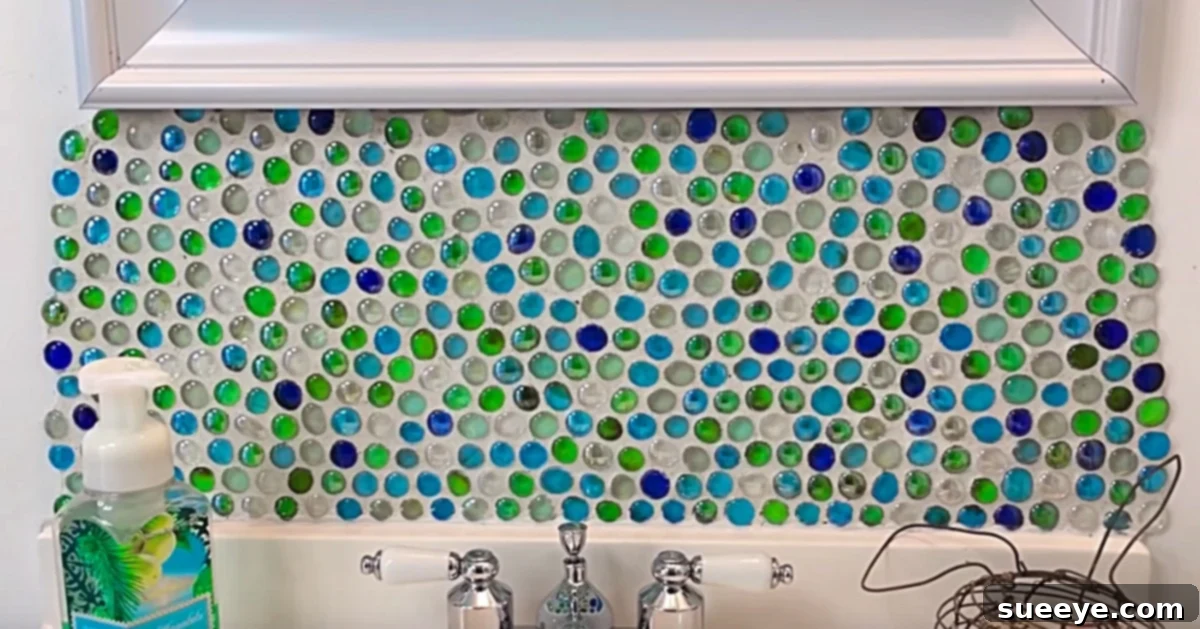
Transform Your Bathroom with a Stunning DIY Dollar Store Gemstone Backsplash
Every home has those small areas that could use a touch of personality, a splash of color, or simply a practical upgrade. For us, it was the wall above the sink in our most frequently used downstairs bathroom. Constant splatters and splashes meant it was always looking a bit worn, no matter how much we cleaned. We knew a backsplash was the ideal solution, offering both protection and an aesthetic boost. However, after pricing various options, we quickly realized that traditional tile backsplashes could be quite expensive, far exceeding our modest budget for a simple bathroom refresh.
Determined to find an affordable yet stylish alternative, I turned to YouTube, a treasure trove of DIY ideas. It didn’t take long before I stumbled upon a truly brilliant concept: a gemstone backsplash crafted from inexpensive finds at the Dollar Store! The idea immediately captivated me. It promised a unique, sparkling finish that looked far more luxurious than its actual cost. I excitedly shared the discovery with my husband, who was equally thrilled by the prospect. Without hesitation, he headed to Home Depot to gather essential supplies like grout and caulk, while I made a quick dash to The Dollar Store to stock up on bags of beautiful, colorful gemstones. Within a short time, we were back home, brimming with enthusiasm and ready to embark on our exciting new DIY project.
Why Choose a DIY Gemstone Backsplash?
Opting for a DIY gemstone backsplash, especially one sourced from a Dollar Store, offers a multitude of compelling benefits that make it an attractive choice for homeowners on a budget or those simply seeking a unique touch:
- Unbeatable Affordability: This is perhaps the most significant advantage. Traditional tile backsplashes often involve costly materials, cutting tools, and sometimes professional installation fees. By utilizing inexpensive gemstones, you drastically cut down on material costs, making a stylish update accessible to almost any budget.
- Unique Aesthetic Appeal: Unlike uniform tiles, gemstones offer a varied, organic look. Each stone has its own character, creating a mosaic effect that is visually rich and truly one-of-a-kind. The way light catches the faceted surfaces adds a subtle sparkle that can elevate any space.
- Personalization and Creativity: With a DIY project, you have complete control over the design. You can choose specific colors, mix and match different gemstone types, or even create patterns. This allows for a level of personalization that pre-made backsplashes simply cannot offer, ensuring your finished product perfectly reflects your style.
- Relatively Simple Installation: While it requires attention to detail, the process of installing a gemstone backsplash is generally less intimidating than traditional tiling. You don’t need specialized tile cutters, and working with individual gems can be quite forgiving.
- Enhanced Home Value and Enjoyment: A well-executed backsplash, even an affordable DIY one, adds a custom, finished look to your bathroom or kitchen. This not only makes your home more enjoyable for you but can also be a significant selling point should you ever decide to move.
- Durability and Protection: Once properly installed and sealed with grout and caulk, a gemstone backsplash provides an excellent protective barrier against water splatters and stains, preserving the integrity of your walls for years to come.
Materials for Your Gemstone Backsplash Project:
Before you begin, gathering all your supplies is crucial for a smooth and efficient installation. Here’s a detailed look at what you’ll need and why:
- Gemstones: The star of your project! Look for flat-backed or relatively flat-sided decorative gemstones. The Dollar Store often carries bags of these in various colors and sizes, typically used for vase fillers or craft projects. The quantity you’ll need depends on the size of your backsplash area; it’s always wise to buy a few extra bags than you think you’ll need.
- Grout (Your Mix: 1 cup of grout powder to 1/2 cup water, mixed): Grout is essential for filling the spaces between your gemstones, securing them in place, and providing a waterproof barrier. For this project, a sanded grout is generally recommended for wider gaps and better adhesion. Always follow the specific mixing instructions on your grout package, but a good starting ratio is usually two parts powder to one part water. Mix thoroughly until it reaches a consistency similar to peanut butter or thick cake batter. Avoid making it too watery, as it will be difficult to work with.
- Mastic Pre-Made Tile Adhesive: This is the glue that will hold your gemstones firmly to the wall. Pre-made mastic is incredibly convenient for DIY projects as it requires no mixing. It provides strong adhesion and is easy to apply. Ensure you choose one suitable for wet areas if installing in a bathroom or kitchen.
- Caulk: Caulk is vital for sealing the edges of your backsplash where it meets the counter and any adjacent walls. This creates a waterproof seal, preventing moisture from seeping behind your beautiful new surface. Opt for a silicone or acrylic latex caulk with silicone, ideally one that is mildew resistant, especially for bathrooms.
- Painter’s Tape: This tape is used to define the exact boundaries of your backsplash, protect surrounding surfaces from adhesive and grout, and create crisp, clean lines. Choose a good quality tape that won’t pull off paint when removed.
- A Large Sponge: You’ll need this for cleaning off excess grout and smoothing the grout lines. Have at least one clean, large sponge dedicated to this task, and be prepared to rinse it frequently.
- A Trowel: Specifically, a small fine-tooth trowel is ideal for applying the mastic adhesive evenly in thin layers. For grout application, a rubber grout float is recommended, but a small trowel can also work for smaller areas if you apply it carefully.
- Bucket or Mixing Container: For mixing your grout powder and water.
- Stirring Stick or Drill Mixer Attachment: To ensure your grout is thoroughly mixed.
- Safety Glasses and Gloves: Always recommended when working with adhesives and grout to protect your eyes and skin.
- Measuring Tape and Pencil/Marker: For accurately marking out your backsplash area.
- Clean Cloths: For wiping up any spills or cleaning tools.
Step-by-Step Directions for Your Gemstone Backsplash:
Creating your dazzling gemstone backsplash is a rewarding process. Follow these detailed steps to ensure a professional-looking finish:
Step 1: Plan and Outline Your Backsplash Area
Before any adhesive touches the wall, careful planning is essential. Start by thoroughly cleaning the wall surface where the backsplash will be installed. It should be free of dust, grease, and any loose debris to ensure optimal adhesion. Once clean and dry, use a measuring tape and a pencil to precisely mark the desired height and width of your backsplash. For a sleek finish, use painter’s tape to create a crisp border along these pencil lines. This tape acts as a guide and protects the surrounding wall and countertop from adhesive and grout. Double-check that your lines are level and plumb for a perfectly aligned backsplash.
Step 2: Apply Adhesive and Set Your Gemstones
Now for the fun part! Using your fine-tooth trowel, apply a small, even layer of mastic tile adhesive to a manageable section of your outlined area. Work in small sections, roughly 1 to 2 square feet at a time, to prevent the adhesive from drying before you can place your gems. Carefully pick up each gemstone and press it firmly into the mastic. You can arrange them randomly for an organic look or try to create a subtle pattern. Aim for consistent spacing between the gems, as these gaps will later be filled with grout. Continue this process, section by section, until your entire backsplash area is covered with gemstones. Allow the adhesive to cure according to the manufacturer’s instructions, typically 24-48 hours, before moving to the next step. This ensures your gems are securely bonded.
Step 3: Grout Over the Entire Surface
Once the adhesive has fully dried and your gemstones are secure, it’s time to grout. Following the mixing ratio provided (e.g., 1 cup grout powder to 1/2 cup water, adjusting as needed for desired consistency), prepare your grout in a clean bucket. Use your trowel or a rubber grout float to generously apply the grout over the entire surface of your gemstone backsplash. Work in diagonal motions, pressing the grout firmly into all the spaces between the gems. Ensure every gap is thoroughly filled, and aim for a smooth, consistent layer of grout across the surface. Don’t worry about getting grout on the gems themselves at this stage; you’ll clean it off shortly.
Step 4: Clean and Smooth the Grout Lines
After applying the grout, allow it to set for approximately 15-30 minutes, or as per the manufacturer’s instructions. This is crucial; if you clean too soon, you’ll pull too much grout out of the joints; if you wait too long, it will be too hard to clean. Once the grout has slightly firmed up, dampen your large sponge with warm water, wring out most of the excess so it’s only slightly damp, and gently wipe over the surface in circular motions. This will remove excess grout from the face of the gemstones and start to smooth the grout lines. Rinse your sponge frequently in a bucket of clean water. You’ll likely need to make several passes, using a clean side of the sponge each time, until the gems are clean and the grout lines are neat and even. Be gentle to avoid dislodging any gems or pulling grout out of the joints.
Step 5: Remove Tape and Caulk the Edges
Allow the grout to fully cure, which can take anywhere from 24 to 72 hours, depending on the type of grout and humidity levels. Once cured, carefully peel away the painter’s tape that defined your backsplash edges. Work slowly and at an angle to avoid pulling up any fresh grout or paint. Now, apply a neat bead of caulk along all the seams where your new gemstone backsplash meets the countertop and any adjacent walls. Use a caulk gun for precise application and smooth the bead with a wet finger or a caulk tool for a clean, professional finish. This final step is vital for creating a waterproof seal and giving your DIY gemstone backsplash a polished, finished look.
Tips for a Flawless Gemstone Backsplash
- Practice Layout: Before applying any adhesive, lay out some gems on a flat surface or even dry-fit them on your wall with painter’s tape to visualize your pattern and spacing.
- Work in Sections: This applies to both adhesive and grout. Working in small, manageable sections prevents materials from drying out too quickly and allows you to maintain control.
- Don’t Rush Drying Times: Adhering to the manufacturer’s recommended drying and curing times for mastic and grout is crucial for the longevity and durability of your backsplash.
- Ventilation is Key: Ensure good ventilation when working with adhesives and grout, as they can emit fumes.
- Consider a Grout Sealer: For added protection against stains and moisture, especially in high-splash areas, consider applying a grout sealer after the grout has fully cured (usually after 72 hours).
- Keep Supplies Handy: Have all your tools, sponges, and a bucket of clean water within arm’s reach while grouting and cleaning.
Maintaining Your Beautiful Gemstone Backsplash
Once your DIY Dollar Store gemstone backsplash is complete, proper maintenance will ensure it stays sparkling for years to come. For routine cleaning, simply wipe it down with a soft cloth or sponge dampened with warm water and a mild, non-abrasive cleaner. Avoid harsh chemicals, abrasive scrubbers, or acidic cleaners, as these can damage the grout or even some types of gemstones. If you’ve applied a grout sealer, reapply it periodically as recommended by the product manufacturer to maintain its protective qualities. Keep an eye on the caulk lines; if they start to show signs of cracking or mildew, recaulk as needed to maintain a watertight seal.
Benefits Beyond Beauty: Why This DIY is a Must-Try
Beyond the undeniable visual appeal, embarking on this DIY gemstone backsplash project offers a range of gratifying benefits. You’ll gain a unique and personalized feature in your home that stands out from standard store-bought options. The significant cost savings achieved by using Dollar Store materials means you can achieve a high-end look without the high-end price tag. Furthermore, there there’s the immense satisfaction of creating something beautiful with your own hands. This project is not just about decorating a wall; it’s about adding character to your home, expressing your creativity, and proving that stunning home upgrades don’t have to break the bank. It was a real nice upgrade to our home, giving our bathroom a fresh, custom feel that we absolutely love, all thanks to a few products from Home Depot and The Dollar Store.
Frequently Asked Questions (FAQ) About Gemstone Backsplashes
- Q: Can I use this gemstone backsplash in my kitchen?
- A: Yes, absolutely! A Dollar Store gemstone backsplash can be a fantastic and budget-friendly addition to your kitchen. Just ensure that it’s properly sealed with grout and caulk, especially in areas prone to splashes from the sink or stovetop, to protect against grease and water.
- Q: How long does a DIY gemstone backsplash typically last?
- A: With proper installation and maintenance, a gemstone backsplash can last for many years. The longevity depends on the quality of the adhesive, grout, and caulk used, as well as regular cleaning and periodic sealing of the grout lines.
- Q: What if a gemstone falls off after installation?
- A: If a gemstone happens to come loose, it’s usually an easy fix. Simply scrape away any old adhesive from the wall and the back of the gem, apply a small dab of fresh mastic adhesive, press the gem back into place, and allow it to dry. If the grout around it is also damaged, apply a small amount of new grout once the adhesive has cured.
- Q: Are there different types of Dollar Store gemstones I can use?
- A: Dollar Stores often carry various types of decorative gems, usually made of acrylic or glass. Look for flat-backed options or those with at least one relatively flat side for easier adhesion. You can experiment with different colors, shapes, and sizes to create unique patterns or a mosaic effect.
- Q: Is the gemstone backsplash completely waterproof?
- A: When installed correctly with appropriate tile adhesive, grout, and caulk, your gemstone backsplash will be highly water-resistant and provide excellent protection against splashes. The grout fills the gaps between the gems, and the caulk seals the edges, creating a barrier against moisture.