
Sparkle & Shine: Transform Ordinary Jars into Exquisite Glittered Metallic Masterpieces!
Are you searching for truly unique and special containers to house a beautiful bouquet for a beloved friend, or perhaps to elevate your home decor with a touch of personalized elegance? Look no further! These dazzling glittered metallic mason jars are not just stunningly beautiful with flowers; they are incredibly versatile and infuse any space or gift with an irresistible charm. Imagine the delight on your friend’s face when they receive flowers presented in such a thoughtfully crafted and exquisite vessel!
The beauty of these embellished mason jars extends far beyond floral arrangements. Their captivating sparkle makes them perfect for an array of uses around your home. From organizing your makeup brushes and pencils to serving as sophisticated holders for kitchen utensils or even as unforgettable packaging for gifts, the possibilities are truly endless. I’ve already crafted a few for my own bathroom, and they instantly transformed the space with their chic, organized, and glamorous presence. Giving one to a friend filled with flowers left her absolutely ecstatic over the thoughtful presentation – a moment of pure joy for both of us! Now, that fancy mason jar holds her makeup brushes, a daily reminder of a special moment and a beautiful, functional piece of decor.
The versatility of this crafting technique is what makes it so incredibly appealing. Whether your home boasts modern metallic accents, classic black and white themes, or vibrant bohemian styles, these jars can be customized to complement any aesthetic. A striking black embellished jar, for instance, adds a powerful and sophisticated statement, perfect for rooms with darker accents or industrial touches. Once you master this simple technique, you’ll find yourself envisioning countless design variations and applications throughout your home and for every gift-giving occasion.
Unleashing Creativity: The Myriad Uses for Your Dazzling Jars
These aren’t just pretty faces; their functionality is as impressive as their aesthetics. Let’s explore some popular ways to integrate these shimmering jars into your life:
- Exquisite Floral Displays: The primary inspiration! Whether it’s a single elegant rose or a vibrant bouquet, the metallic sheen and glittered base of these jars provide a luxurious backdrop that makes any flower arrangement truly pop. They elevate simple flowers into an art form, making them ideal for centerpieces or a thoughtful “just because” gift.
- Stylish Storage Solutions: Declutter with glamour! Use them to neatly store makeup brushes, cotton swabs, or Q-tips on your vanity. In the office, they’re perfect for pens, pencils, and other desk essentials. In the kitchen, they can hold small utensils, stirrers, or even packets of sugar or tea bags, adding a touch of sparkle to your countertops.
- Unforgettable Gift Packaging: Move beyond basic gift bags! Present homemade treats, small jewelry items, or even a collection of pampering essentials inside a decorated jar. It transforms the gift into a two-in-one present – a beautiful container and its precious contents. This personal touch makes any gift feel incredibly special and memorable.
- Chic Party & Event Decor: Planning a special occasion? These jars make fantastic centerpieces, holding candles (consider battery-operated LED candles for safety), or even serving as unique utensil holders for a buffet. They can be themed for holidays, weddings, or birthdays, adding instant festive flair.
- Bathroom & Vanity Organizers: Beyond makeup brushes, use them to store hair ties, clips, or even small soaps, keeping your bathroom tidy and stylish. The metallic finish adds a touch of spa-like luxury.
With a little imagination, these jars can become functional works of art, proving that DIY decor can be both beautiful and practical.
Gathering Your Arsenal: Essential Materials for Crafting Your Glittered Jars
The beauty of this project lies in its simplicity and the readily available materials. Here’s what you’ll need to create your own collection of sparkling jars:
- Mason Jars: Any size will do, from small jelly jars to large canning jars. Ensure they are clean, dry, and free of any labels or adhesive residue. Wide-mouth jars are often easier to paint and work with.
- Mod Podge: This decoupage glue, sealer, and finish is your magic adhesive. While many types exist, the classic Gloss finish or a Hard Coat Mod Podge works beautifully for this project. If you anticipate any moisture exposure, a Dishwasher Safe Mod Podge might be an option, but for most decorative purposes, standard Mod Podge is perfect.
- Glitter: This is where the magic truly happens! The original creator recommends Martha Stewart Glitter, renowned for its fine quality and stunning array of colors. Opt for fine glitter for a smooth, even sparkle, or chunky glitter for a more dramatic, textured effect. Metallic glitters (gold, silver, rose gold) complement the metallic paint beautifully, but don’t hesitate to experiment with iridescent or bold colors for a unique look.
- Metallic or Black Paint: Spray paint is highly recommended for its ease of application and smooth, even finish. Look for metallic spray paints in shades like gold, silver, bronze, rose gold, or even a bold chrome. Black spray paint offers a sleek, modern alternative. If using acrylic craft paint, you may need a primer first, and multiple thin coats will be necessary to achieve full coverage.
- Sponge Brush (or Foam Brush): Ideal for applying Mod Podge smoothly and evenly without leaving brush strokes.
- Newspaper or Drop Cloth: Essential for protecting your workspace from paint overspray and glitter fallout. Laying down a generous amount will save you significant cleanup time.
- Optional: Painter’s Tape: While not strictly necessary (the creator eyeballs her lines beautifully!), painter’s tape can be invaluable for achieving perfectly crisp, straight lines or intricate designs.
- Optional: Clear Sealant Spray: A clear acrylic sealant spray (like Rust-Oleum or Krylon clear coat) can be applied over the dried glitter to minimize shedding and add an extra layer of durability and shine. This is highly recommended for jars that will be handled frequently.
Consider setting up your crafting station outdoors or in a well-ventilated area like a garage, especially when using spray paint, to ensure good air circulation and minimize fumes and mess.
Step-by-Step Guide: Crafting Your Dazzling Glittered Mason Jars
This project is surprisingly straightforward, even for beginner crafters. Follow these steps, and you’ll have your own collection of sparkling jars in no time!
Step 1: Prepare Your Workspace and Jars
First, lay down plenty of newspaper or a drop cloth to protect your surfaces. Ensure your mason jars are spotlessly clean and completely dry. Any grease or residue will prevent the paint from adhering properly. Remove any labels and adhesive with warm soapy water or rubbing alcohol.
Step 2: The Foundation – Painting Your Jars
This is where your jars begin their transformation. If using spray paint, shake the can well. Hold the can about 6-8 inches away from the jar and apply thin, even coats of paint. It’s crucial to apply several thin coats rather than one thick coat to avoid drips and achieve a smooth, professional finish. Rotate the jar as you spray to ensure full coverage. Allow each coat to dry to the touch (usually 15-30 minutes) before applying the next. For a durable finish, aim for 2-3 coats. If using acrylic paint, apply a thin layer, let it dry, and repeat until you achieve opaque coverage. Allow the painted jars to dry completely, ideally for at least 2-4 hours, or even overnight, before moving to the next step. Patience here is key for a lasting finish.
Step 3: The Magic Adhesive – Applying Mod Podge
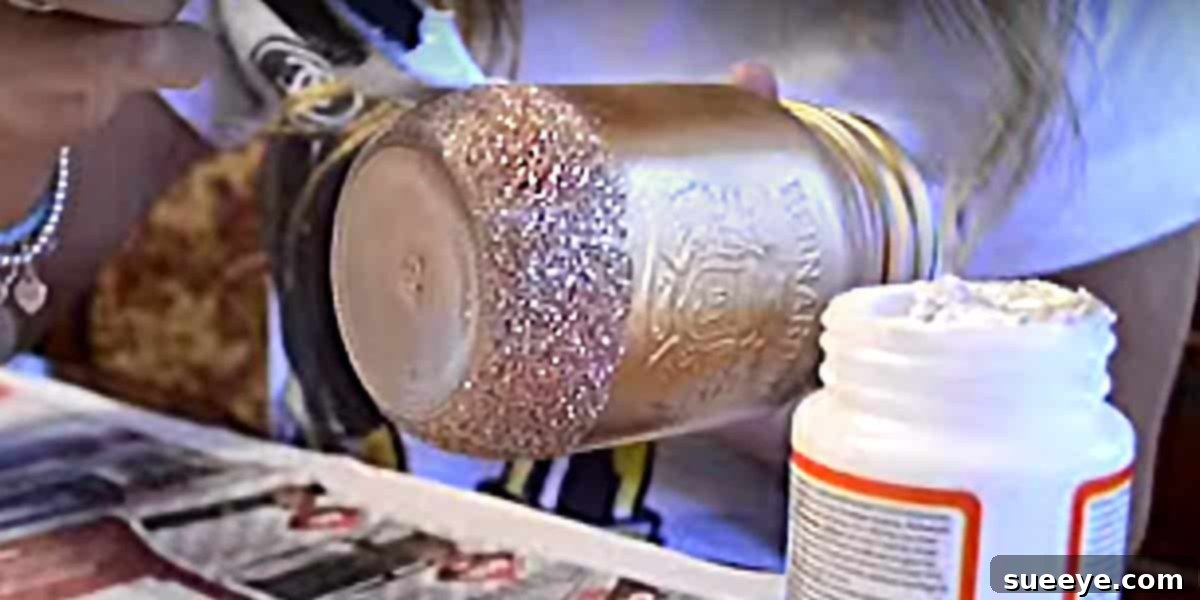
Once your painted jars are thoroughly dry, it’s time for the Mod Podge. Dip your sponge brush into the Mod Podge. For a clean, straight glitter line around the bottom of the jar (as seen in the inspiration), carefully apply a line of Mod Podge all the way around the circumference of the jar. You can eyeball it for a rustic, organic look, or for a perfectly crisp line, use painter’s tape to mark off the area you want to glitter. Apply a generous but not dripping layer of Mod Podge within your desired design area. You can create various designs – horizontal stripes, vertical bands, chevron patterns, polka dots, or even freehand swirls – let your creativity guide you!
Step 4: The Sparkle Factor – Glitter Application
Immediately after applying the Mod Podge (before it dries!), generously sprinkle your chosen glitter over the wet Mod Podge. You can hold the jar over your newspaper and gently rotate it while sprinkling, ensuring full coverage of the adhesive. For a truly dense glitter application, some crafters like to gently roll the Mod Podge-covered area in a tray filled with glitter. Once you’ve applied enough glitter, gently tap the jar to shake off any excess glitter onto your newspaper. This excess glitter can often be funneled back into its container for future projects, minimizing waste.
Step 5: Drying and Sealing the Shine (Recommended)
Allow the Mod Podge and glitter to dry completely. This can take several hours, or even overnight, depending on humidity and the thickness of your Mod Podge application. Once completely dry, if you desire extra durability and to prevent glitter shedding, apply a clear sealant spray. Hold the sealant can about 8-10 inches away and apply a light, even coat over the glittered area. Allow it to dry fully before handling extensively. For additional protection, a second light coat can be applied after the first has dried.
Tips for Perfection and Troubleshooting Your Craft
- Achieving Crisp Lines with Tape: If using painter’s tape, press it down firmly to prevent Mod Podge from seeping underneath. Remove the tape gently while the Mod Podge is still slightly wet (but not sticky), immediately after glitter application, to ensure a clean line. If you wait until it’s fully dry, the glittered Mod Podge might tear.
- Minimize Glitter Mess: Work inside a box or on a large baking sheet lined with newspaper. This helps contain glitter and makes cleanup much easier.
- Patience is a Virtue: Rushing the drying process for paint or Mod Podge can lead to smudges, peeling, or an uneven finish. Allow ample time for each layer to cure properly.
- Even Paint Coverage: Always opt for multiple thin coats of spray paint rather than one thick coat. This prevents drips and ensures a smooth, professional-looking base.
- Cleaning Your Jars: While Mod Podge is water-resistant, these jars are best suited for decorative purposes. If you must clean them, gently wipe them with a damp cloth; avoid soaking or scrubbing, especially the glittered area. Hand-wash only if absolutely necessary for the unglittered parts.
- Experiment with Glitter Combinations: Try applying two different colors of glitter in sections, or mix fine and chunky glitters for a textured, multidimensional look.
Beyond the Basics: Advanced Design Ideas and Customization
Once you’re comfortable with the basic technique, feel free to unleash your inner artist!
- Ombre Effect: Apply Mod Podge from the bottom up, gradually fading it out. Then apply two different glitter colors, blending them where they meet for a beautiful ombre transition.
- Stenciled Designs: Use vinyl stencils to create intricate patterns or initial monograms before applying Mod Podge and glitter.
- Layering Colors: Apply a base glitter color, let it dry, then apply Mod Podge in a different pattern over it and add a second, contrasting glitter color.
- Adding Embellishments: Once your jars are completely dry, tie a coordinating ribbon around the neck, add a small charm, or affix decorative tags for an extra personalized touch.
- Themed Jars: Create seasonal jars (e.g., gold and silver for holidays, pastels for spring) or jars for specific events like weddings or baby showers.
This simple technique opens up a world of creative possibilities, allowing you to personalize your decor and gifts in truly unique ways.
Ignite Your Crafting Spirit: The Joy of DIY Sparkle!
The satisfaction of transforming a plain mason jar into a glittering work of art is immense. These DIY glittered metallic mason jars are more than just craft projects; they are expressions of creativity, thoughtful gestures, and charming additions to any home. They offer a beautiful way to upcycle common items, inject personal style into your living space, and create truly memorable gifts that speak volumes.
So, gather your materials, set aside some creative time, and prepare to be amazed at how easily you can add a touch of sparkle and sophistication to your world. Whether adorning your vanity, brightening your kitchen, or delighting a friend with a heartfelt gift, these embellished jars are sure to bring joy and a whole lot of shine. Dive into this fun and rewarding project today – your home and your friends will thank you for the dazzling results!