
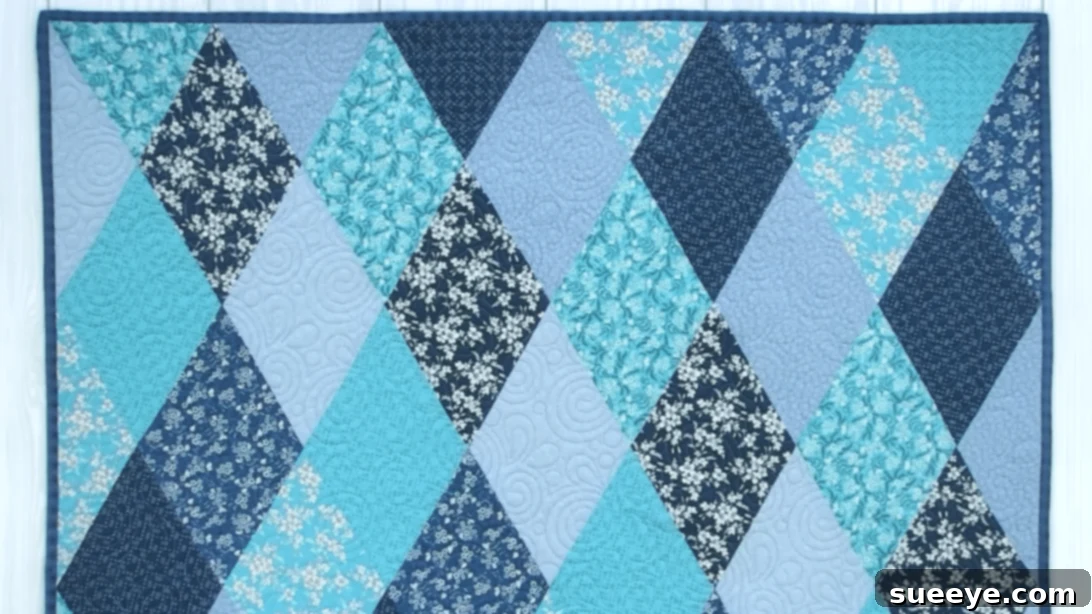
Crafting the Beautiful Diamond Daze Quilt: Your Ultimate Beginner-Friendly Guide
Embark on a delightful quilting journey with the beautiful Diamond Daze Quilt, a fantastic creation by the renowned Fat Quarter Shop on YouTube. This pattern stands out as an exceptionally simple and quick project, designed to be completed in as little as a single day. Its elegant design is incredibly versatile, allowing you to explore an endless array of fabric combinations or opt for perfectly coordinated prints that speak to your personal style. With clear, easy-to-follow steps, this project is an absolute dream for beginners and seasoned quilters alike, promising a rewarding experience from start to finish. If you’re new to the world of quilting, prepare to fall in love with a hobby that combines creativity, precision, and the joy of making something beautiful with your own hands.
RELATED: Easy Diamond Layered Lattice Quilt Block Tutorial
The timeless appeal of the diamond motif makes this quilt design wonderfully adaptable to nearly any project imaginable. Imagine creating stunning table toppers, elegant table runners, cozy lap blankets, or even full-sized bed quilts – the possibilities are truly limitless. This captivating pattern is poised to become your new favorite, offering both aesthetic appeal and a straightforward construction process. To guide you every step of the way, we’ve laid out detailed written instructions below. We highly recommend watching the accompanying video tutorial from Fat Quarter Shop as well, as visual demonstrations often clarify techniques beautifully. Let’s dive into the world of fabric, thread, and creative expression to bring your own Diamond Daze Quilt to life!
Why The Diamond Daze Quilt Is Your Next Must-Make Project
For anyone looking to dive into quilting, or simply seeking a fresh, enjoyable project, the Diamond Daze Quilt offers numerous advantages:
- Beginner-Friendly Design: The pattern is specifically structured with simplicity in mind, making it perfect for those taking their first stitches in quilting. The techniques are basic, yet the final result looks intricate and professional.
- Quick & Rewarding: Unlike larger, more complex quilts that can take weeks or months, this project is genuinely designed for speed. You can start and finish it in a surprisingly short amount of time, giving you the immediate satisfaction of a completed, beautiful item.
- Incredibly Versatile: Its diamond motif translates beautifully across various applications. Whether you need a decorative accent for your home, a thoughtful handmade gift, or a functional piece, this pattern fits the bill.
- Endless Fabric Possibilities: The design truly shines with different fabric choices. From vibrant, contrasting colors that make the diamonds pop, to subtle, coordinating tones that create a soft, harmonious effect, you have full creative control to personalize your quilt.
- Skill Building: While simple, this quilt helps build fundamental quilting skills such as accurate cutting, precise piecing, and effective pressing – all essential for future quilting endeavors.
Essential Materials for Your Stunning Diamond Daze Quilt
Gathering your materials is the first exciting step in any quilting project. For the Diamond Daze Quilt, you’ll need a thoughtful selection of fabrics and standard quilting tools. Here’s a detailed list to ensure you’re well-prepared:
- 8 Coordinating Print Fabrics: The magic of this quilt lies in its fabric choices. Select 8 different print fabrics that complement each other. Think about color families, patterns (florals, geometrics, solids), and how they will interact when cut into triangles and diamonds. High-quality cotton fabrics are recommended for their ease of use and durability. Pre-washing your fabrics is a good practice to prevent shrinkage and color bleeding later.
- Binding Fabric: This fabric will frame your quilt, giving it a neat, professional edge. Choose a color that either matches one of your coordinating prints or provides a striking contrast. Approximately 1/2 to 3/4 yard is typically sufficient for a standard throw quilt size.
- Backing Fabric: The back of your quilt should be as beautiful as the front! Select a fabric that coordinates with your quilt top. Often, quilters choose a single fabric for the backing, but pieced backs can also be very creative. Ensure you have enough fabric to cover the entire back of your quilt, plus a few inches extra on all sides for ease during the quilting process.
- Marking Pen, Pencil, or Chalk: Essential for transferring pattern lines onto your fabric. A water-soluble pen or tailor’s chalk is ideal as it can be easily removed.
- Quilting Ruler (Acrylic): A clear acrylic ruler, preferably 6×24 inches, is indispensable for accurate cutting and squaring up your fabric pieces.
- Fabric Scissors or Rotary Cutter and a Cutting Mat: While sharp fabric scissors work, a rotary cutter combined with a self-healing cutting mat will significantly speed up your cutting process and ensure perfectly straight lines, which is crucial for precise piecing.
- Fabric Pins or Wonder Clips: To hold fabric pieces together securely before stitching. Pins are standard, but Wonder Clips can be very useful for bulkier seams.
- Needle and Thread: High-quality 100% cotton thread is usually preferred for piecing quilts. Match the thread color to your fabrics as closely as possible, or use a neutral color like light gray or cream.
- Iron and Ironing Board, for Pressing: Pressing seams open or to one side is a fundamental quilting technique that impacts the flatness and overall appearance of your quilt. A hot iron with steam is your best friend.
- Sewing Machine: A reliable sewing machine with a quarter-inch foot (if available) will make stitching accurate seams much easier.
- Official Diamond Daze Quilt Pattern (Click here to download the free PDF pattern): This pattern from Fat Quarter Shop will provide all the necessary cutting dimensions and detailed layout instructions. Don’t skip downloading this essential guide!
How to Master the Diamond Daze Quilt: A Comprehensive Step-by-Step Guide
Creating the Diamond Daze Quilt is a process that combines precision with creativity. Follow these detailed steps to construct your beautiful quilt top, from initial fabric preparation to the final touches of binding and backing. Remember, patience and attention to detail are key to a successful project!
Step 1: Preparation and Precise Fabric Cutting
Before any cutting begins, ensure all your fabrics are pre-washed, dried, and thoroughly pressed to remove any wrinkles or creases. This prevents unexpected shrinkage after your quilt is finished. Next, refer to your downloaded Diamond Daze quilt pattern for exact cutting dimensions. Using your rotary cutter, ruler, and cutting mat, carefully cut all your print fabrics into the required triangle and diamond shapes. Precision here is paramount; even slight inaccuracies in cutting can lead to misalignment when piecing. Take your time, double-check your measurements, and make clean, crisp cuts. Organizing your cut pieces by fabric type or intended placement can be very helpful.
Step 2: Planning Your Design and Fabric Layout
This is where your creative vision truly comes to life! The pattern will guide you on arranging the triangle and diamond fabrics together. Lay out all your cut pieces on a design wall or a large flat surface (like a clean floor) according to the pattern’s diagram. Experiment with different arrangements of your 8 coordinating fabrics to achieve a look you love. Pay close attention to how colors and patterns interact to form the diagonal units. This planning stage is crucial for ensuring visual harmony and confirming that all pieces are oriented correctly before you start sewing. Take a photo of your planned layout for reference!
Step 3: Piecing the Diagonal Units with Precision
Once your layout is finalized, begin assembling the smaller diagonal units. The pattern typically involves stacking two pieces (a triangle and a diamond, or two triangles) right sides together. Carefully align the edges, using pins to secure them in place, especially at corners or where seams intersect. Stitch these pieces together using a consistent ¼ inch seam allowance. This quarter-inch seam is standard in quilting and maintaining it accurately across all seams is vital for your blocks to come out the correct size. After stitching each seam, press the seams open or to one side, as instructed by the pattern. Pressing helps your quilt lie flat and prevents bulk in certain areas. Continue this process until all your individual diagonal units are sewn and pressed.
Step 4: Assembling Your Quilt Top
With all your diagonal units prepared, it’s time to assemble them into the full quilt top. Following your planned layout, begin stitching the units together, typically into rows first, and then joining the rows. Again, use that precise ¼ inch seam allowance. Pay special attention to nesting your seams at intersections if you pressed them to opposite sides; this helps the points align perfectly. As you complete each row or section, press the seams again. This continuous pressing contributes significantly to a flat, professional-looking quilt top. Once all rows are joined and the quilt top is complete, give it one final, thorough press.
Step 5: Squaring Up and Layering the Quilt Sandwich
After your quilt top is assembled, it’s a good idea to square it up. Using your large quilting ruler and rotary cutter, trim any uneven edges to ensure the quilt top is perfectly rectangular or square, depending on your desired final shape. This step is often overlooked but creates a neat foundation for the next stage. Next, prepare your “quilt sandwich.” This involves three layers: the backing fabric (wrong side up), a layer of batting (the fluffy middle layer), and your finished quilt top (right side up). Lay these layers out smoothly, ensuring there are no wrinkles or puckers. Secure them together temporarily using basting pins, safety pins, or a temporary fabric adhesive spray. Evenly spacing your pins (every 3-4 inches) is essential to prevent shifting during quilting.
Step 6: Quilting Your Diamond Daze Design
Now comes the quilting itself – the stitching that holds all three layers of your quilt sandwich together and adds texture and dimension. For a beginner-friendly approach, consider “stitch in the ditch,” where you sew along the existing seam lines of your pieced quilt top. Alternatively, simple straight lines or diagonal lines across the diamonds can be very effective and easy to execute. You can use your sewing machine for this, or if you prefer a more traditional touch, hand quilting is an option. If machine quilting, consider using a walking foot on your sewing machine, which helps feed all three layers evenly to prevent puckering. Take your time, keep your stitches consistent, and enjoy watching your quilt take on a new life.
Step 7: Adding the Binding: A Professional Finish
The binding is the fabric strip that finishes the raw edges of your quilt. Cut your binding fabric into strips (usually 2.5 inches wide) and piece them together to create one continuous long strip. Fold this strip in half lengthwise and press. Attach the binding to the front of your quilt, aligning the raw edges of the binding with the raw edges of the quilt. Stitch with a ¼ inch seam allowance, mitering the corners for a crisp look. Once sewn to the front, fold the binding over to the back of the quilt and either machine stitch it down for durability or hand stitch for an invisible finish. This step gives your quilt a clean, polished, and durable edge.
Step 8: The Final Touches and Enjoying Your Masterpiece
With the binding complete, your Diamond Daze Quilt is officially finished! Give your quilt one last inspection, snip any stray threads, and enjoy the satisfaction of your creation. Many quilters also like to add a personalized label to the back of their quilt, noting the maker, date, and any special occasion. Finally, consider giving your quilt a gentle wash to soften the fabric and bring out the beautiful texture created by the quilting stitches. Your beautiful, handmade Diamond Daze Quilt is now ready to be cherished, displayed, or gifted, bringing warmth and beauty wherever it goes.
We hope this detailed tutorial empowers you to confidently create your very own Diamond Daze Quilt. This pattern is not just a project; it’s an opportunity to develop new skills, express your creativity, and produce a lasting piece of textile art. The simplicity of the design, combined with the comprehensive guidance from Fat Quarter Shop, makes this an incredibly accessible and enjoyable endeavor for anyone eager to explore the wonderful world of quilting.
*All these amazing images and the original pattern concept are thanks to Fat Quarter Shop via YouTube. We extend our sincere gratitude to them for sharing such inspiring and accessible quilting content. Do visit their channel to see more incredible videos like this and discover a treasure trove of quilting resources!
Your Journey into Quilting: The Beginner-Friendly Diamond Daze Quilt Tutorial
The Diamond Daze Quilt truly exemplifies how a simple design can yield spectacular results, especially for those just starting their quilting adventure. With its clear steps, minimal complexity, and the ability to achieve a finished product quickly, it serves as an excellent foundational project. This tutorial, drawing inspiration from the expert guidance of Fat Quarter Shop, aims to provide you with all the information needed to confidently tackle this beautiful quilt. Whether you’re looking to create a cherished heirloom, a thoughtful gift, or simply enjoy the process of making, the Diamond Daze Quilt offers an accessible and deeply satisfying creative outlet. Grab your fabrics, thread your machine, and let the dazzling diamonds come to life under your hands!