
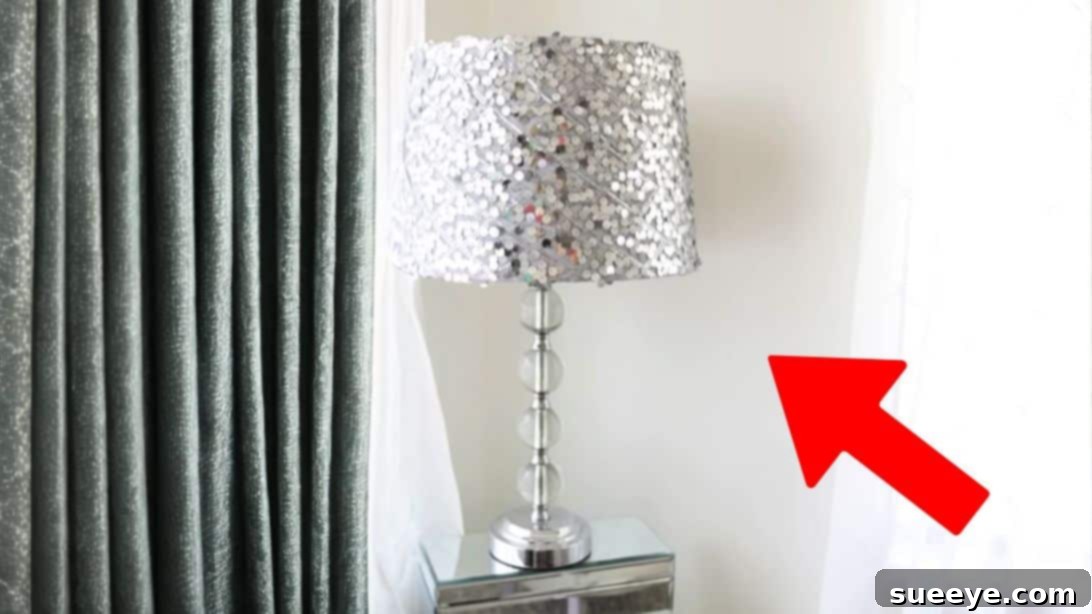
Dazzling DIY: Transform Your Old Lampshade with a Sequin Makeover
Give your home decor a sparkling update! Learn how to revitalize an old, plain lampshade into a stunning focal point with this easy-to-follow DIY tutorial inspired by the creative vision of Christine Kobzeff. This project is not just about covering a lampshade; it’s about injecting personality, glamour, and a touch of bespoke elegance into your living space. Whether you’re aiming for a lavish aesthetic, a subtle shimmer, or a bold statement piece, a sequin lampshade offers unparalleled versatility. Ditch the drab and embrace the fab as we guide you through each step to create a custom, high-end look without breaking the bank.
This comprehensive guide will equip you with all the knowledge and tips you need, from selecting the perfect sequin fabric to flawlessly adhering it to your lampshade. We’ll delve into essential preparation, precise application techniques, and crucial finishing touches that ensure a professional and long-lasting result. Imagine the soft glow of your lamp enhanced by the playful dance of light reflecting off hundreds of sequins – an instant mood elevator and conversation starter. While we focus on the breathtaking appeal of sequin fabric, remember that this versatile method can also be adapted for other captivating materials like floral prints, sophisticated geometric patterns, or abstract designs, allowing your creativity to truly shine.
Before you begin, we encourage you to watch Christine Kobzeff’s inspiring video for a visual walkthrough, but for a detailed written guide with expanded tips and insights, continue reading below. Let’s embark on this exciting journey to create a lampshade that truly reflects your unique style and brightens your home with its renewed splendor.
Materials You’ll Need
Gathering the right materials is the first crucial step to a successful DIY project. For this sequin lampshade transformation, you’ll need a few common items, some of which you might already have on hand. Quality materials will contribute to a more polished and durable finish, so consider investing a little extra in the fabric and adhesive for the best results.
- Plain Lampshade: This is your canvas. An old, tired lampshade is perfect for this project. Drum-shaped shades are often the easiest to work with due to their simple cylindrical form, but tapered or empire shades can also be covered with a bit more patience and careful fabric cutting. Ensure the lampshade is clean and free of dust or grime before you begin.
- Sequin Fabric: The star of our show! Sequin fabric comes in a vast array of colors, sizes, and types of sequins (e.g., iridescent, matte, reversible). Consider the overall aesthetic of your room and your desired level of shimmer. Remember that sequin fabric can be a bit messy due to shedding, so prepare your workspace accordingly. Measure your lampshade carefully to determine how much fabric you’ll need; it’s always better to have a little extra than to run short.
- Tape Measure: Essential for accurate measurements. Precision here will save you headaches later, ensuring your fabric piece is perfectly sized for your lampshade.
- Sharp Scissors: Working with fabric, especially sequin fabric, requires sharp scissors. Dull scissors can fray edges or make uneven cuts, leading to a less professional finish. Dedicated fabric scissors are highly recommended.
- Spray Adhesive: A strong, permanent spray adhesive designed for fabric or multi-purpose use is crucial. Look for one that provides a strong, even bond and dries clear. Always test the adhesive on a scrap piece of fabric first to ensure it doesn’t stain or react negatively. Brands like 3M Super 77 or Gorilla Spray Adhesive are popular choices for their reliability.
- Gloves: Protect your hands from the spray adhesive. Latex, nitrile, or even basic work gloves will prevent sticky residue from getting on your skin, making cleanup much easier.
- Optional: A craft knife or X-Acto knife for precise trimming, a clean cloth for smoothing, and a fabric marker or tailor’s chalk for marking measurements.
Having all these items ready before you start will streamline your crafting process and help you achieve a beautifully finished sequin lampshade.
Step-by-Step Guide to Your Sequin Lampshade Makeover
Now that you have all your materials, let’s dive into the creative process. Each step is designed to be clear and manageable, ensuring you achieve a professional-looking result. Take your time, especially with the measurements and adhesive application, as these are critical for a flawless finish.
Step 1: Precise Measurement of Your Lampshade
Accuracy is paramount in this initial stage. Begin by carefully measuring your lampshade. If you have a drum lampshade (a perfect cylinder), measure the circumference of the top and bottom edges, as well as the height. For tapered or empire lampshades, you’ll need to measure the circumference of the widest part (usually the bottom), the circumference of the narrowest part (the top), and the slant height (the measurement along the slope of the shade). For most cases, especially for a beginner, focusing on the largest part’s circumference and the height will provide a good starting point. Add an extra 1-2 inches to both your circumference and height measurements. This extra allowance is essential for wrapping the fabric neatly around the lampshade, creating clean seams, and turning the edges inwards for a professional finish. It’s always better to have a little too much fabric that you can trim later than not enough.
Step 2: Cutting Your Sequin Fabric to Size
Lay your chosen sequin fabric face down on a clean, flat surface. This helps prevent the sequins from catching and ensures a smoother cutting process. Using your tape measure and sharp scissors, carefully cut the fabric based on the measurements you took in Step 1, remembering to incorporate that extra 1-2 inches for seam allowance on all sides. If your fabric is wide and you’re working with a smaller lampshade, you might find it easier to initially trim the fabric down to a more manageable size before aiming for exact dimensions. This makes handling the fabric less cumbersome. However, ensure that this preliminary trim still leaves you with ample excess for wrapping and finishing. For sequin fabric, be prepared for some sequins to detach during cutting; this is normal. Work slowly and precisely to achieve straight edges, which are crucial for a clean seam line on your lampshade.
Step 3: Applying Adhesive and Attaching the Fabric
With your fabric cut, lay it sequin-side down on your protected flat surface. Put on your gloves to protect your hands from the spray adhesive. Working in a well-ventilated area, spray a generous, even layer of spray adhesive across one end of the fabric, covering the area that will be the starting seam of your lampshade. A common practice is to start attaching the fabric at the existing seam line of the lampshade, making it less conspicuous. Align the bottom edge of your fabric with the bottom edge of the lampshade. Carefully press the fabric onto the lampshade, ensuring it adheres smoothly without any wrinkles or bubbles. Gently roll the lampshade, pressing the fabric firmly as you go, ensuring the bottom edge of the fabric remains perfectly straight and aligned with the lampshade’s bottom rim. Work in small sections, spraying adhesive onto the lampshade itself if needed, and smoothing the fabric as you proceed. The key here is patience and steady hands to prevent any unsightly creases or uneven application.
Step 4: Finishing the Seams and Edges
Once you’ve wrapped the fabric around the entire lampshade, you’ll have an overlapping seam. Carefully trim off any excess fabric from this seam, aiming for a clean, straight edge that aligns perfectly with the starting edge. Apply a light spray of adhesive to the exposed lampshade surface near the seam and firmly press the overlapping fabric down to create a seamless finish. Try to match the edges as precisely as possible to make the seam virtually invisible. Next, focus on the top and bottom edges of your lampshade. Using sharp scissors or a craft knife, carefully trim the excess fabric on the top and bottom as close to the lampshade frame as you can, leaving about ½ to 1 inch of fabric to wrap around the rim. This is where the extra fabric allowance truly pays off. Spray a thin line of adhesive along the very edge of the lampshade’s internal frame and carefully pull the remaining fabric taut, wrapping it around the inside edge of the lampshade frame. Press it firmly into place. Repeat this process for the bottom edge, ensuring all raw edges are neatly tucked away and secured. This creates a clean, professional finish, preventing fraying and giving your lampshade a high-quality appearance.
Finally, and perhaps most importantly, allow the adhesive to dry completely for at least 24 hours (or as recommended by the adhesive manufacturer) before using the lamp. This extended drying time is crucial for several reasons: it ensures a strong, permanent bond, allows any residual fumes from the adhesive to dissipate, and reduces any potential flammability risks associated with wet adhesive. Your patience here guarantees both the longevity and safety of your beautiful new sequin lampshade.
Why Choose a Sequin Lampshade for Your Home?
The allure of a sequin lampshade goes beyond mere aesthetics; it’s a statement piece that brings unique advantages to any interior design scheme. Firstly, it offers an instant infusion of glamour and sophistication. The reflective quality of sequins creates a dazzling play of light, adding depth and visual interest that a plain lampshade simply cannot achieve. This makes it an ideal choice for rooms that need a focal point or a touch of luxury.
Secondly, it’s an incredibly versatile decorative element. Depending on the color and size of the sequins, you can achieve various styles – from bold, party-ready shimmer to subtle, elegant sparkle. A gold or silver sequin lampshade can evoke old Hollywood glamour, while iridescent sequins might lean towards a whimsical, modern fairy-tale vibe. Darker sequins can add a dramatic flair, and lighter tones can brighten a space.
Moreover, choosing a DIY sequin lampshade is a fantastic way to practice sustainable decorating. Instead of discarding an old, functional lampshade, you’re upcycling it, reducing waste, and giving it a new lease on life. This budget-friendly approach allows you to achieve a high-end look without the designer price tag, making stylish home decor accessible to everyone.
Finally, the personalization aspect is immense. This project allows you to select a fabric that perfectly matches your existing decor, or even to inspire a new color palette for your room. The satisfaction of creating something beautiful and unique with your own hands is a reward in itself, making your sequin lampshade not just a decor item, but a testament to your creativity.
Expert Tips for a Flawless Finish
- Work in a Well-Ventilated Area: Spray adhesives release fumes. Ensure good airflow to protect your respiratory health.
- Protect Your Workspace: Lay down old newspapers, cardboard, or a tarp to protect your table and floor from adhesive overspray and sequin fallout.
- Test the Adhesive: Always test your spray adhesive on a small, inconspicuous scrap of your fabric before applying it to the main piece. This checks for any discoloration or adverse reactions.
- Apply Adhesive Evenly: Hold the spray can about 6-8 inches away from the fabric and move it in a sweeping motion to achieve an even coat. Avoid concentrating the spray in one area, which can lead to saturation and bubbling.
- Work in Sections: Instead of spraying the entire fabric at once, work in smaller sections (e.g., a quarter of the lampshade’s circumference at a time). This gives you more control and prevents the adhesive from drying before you can smooth the fabric.
- Smooth Out Bubbles Immediately: Use your gloved hand, a clean cloth, or a soft craft roller to smooth out any air bubbles or wrinkles as you go. Work from the center outwards to push air out.
- Dealing with Sequin Shedding: Sequin fabric can be prone to shedding. Have a lint roller or vacuum cleaner handy for cleanup. Don’t worry too much about a few missing sequins; the overall effect will still be stunning.
- Consider the Sequin Direction: If your sequin fabric has a distinct “grain” or direction where the sequins lay, try to keep it consistent around the lampshade for a uniform look.
- Patience is Key: Don’t rush any step. Especially during adhesive application and fabric smoothing, patience will yield a much cleaner and more professional result.
Frequently Asked Questions About DIY Sequin Lampshades
- Can I use other types of fabric besides sequins?
- Absolutely! The technique described here is highly adaptable. You can use virtually any fabric – cotton, linen, silk, velvet, or fabrics with floral, geometric, or abstract patterns. Just ensure the fabric isn’t too thick or stiff, which could make it difficult to wrap smoothly.
- What if my lampshade has pleats or unusual shapes?
- While drum shades are easiest, more complex shapes are possible. For pleated shades, you might need to remove the existing fabric first. For conical or bell-shaped shades, you might need to cut your fabric into a specific arc pattern rather than a rectangle. There are many online templates for cutting fabric for tapered lampshades that can guide you.
- How do I clean a sequin lampshade?
- A sequin lampshade should generally be dry-cleaned. Use a soft, dry cloth or a lint roller to gently remove dust. Avoid water or harsh cleaning solutions, as they can damage the sequins or the adhesive.
- Will the spray adhesive hold up over time?
- When applied correctly and allowed to cure fully, a good quality spray adhesive designed for fabric should provide a long-lasting bond. Factors like extreme humidity or direct, prolonged sunlight might affect its longevity over many years, but for typical indoor use, it should hold well.
- Is it safe to use a lamp with a fabric-covered shade?
- Yes, it is generally safe, provided you follow the drying instructions for the adhesive and use an appropriate wattage bulb that doesn’t generate excessive heat. LED bulbs are an excellent choice as they run much cooler than traditional incandescent bulbs, reducing any potential heat-related risks. The 24-hour drying period is also critical for dissipating any flammable solvents in the adhesive.