
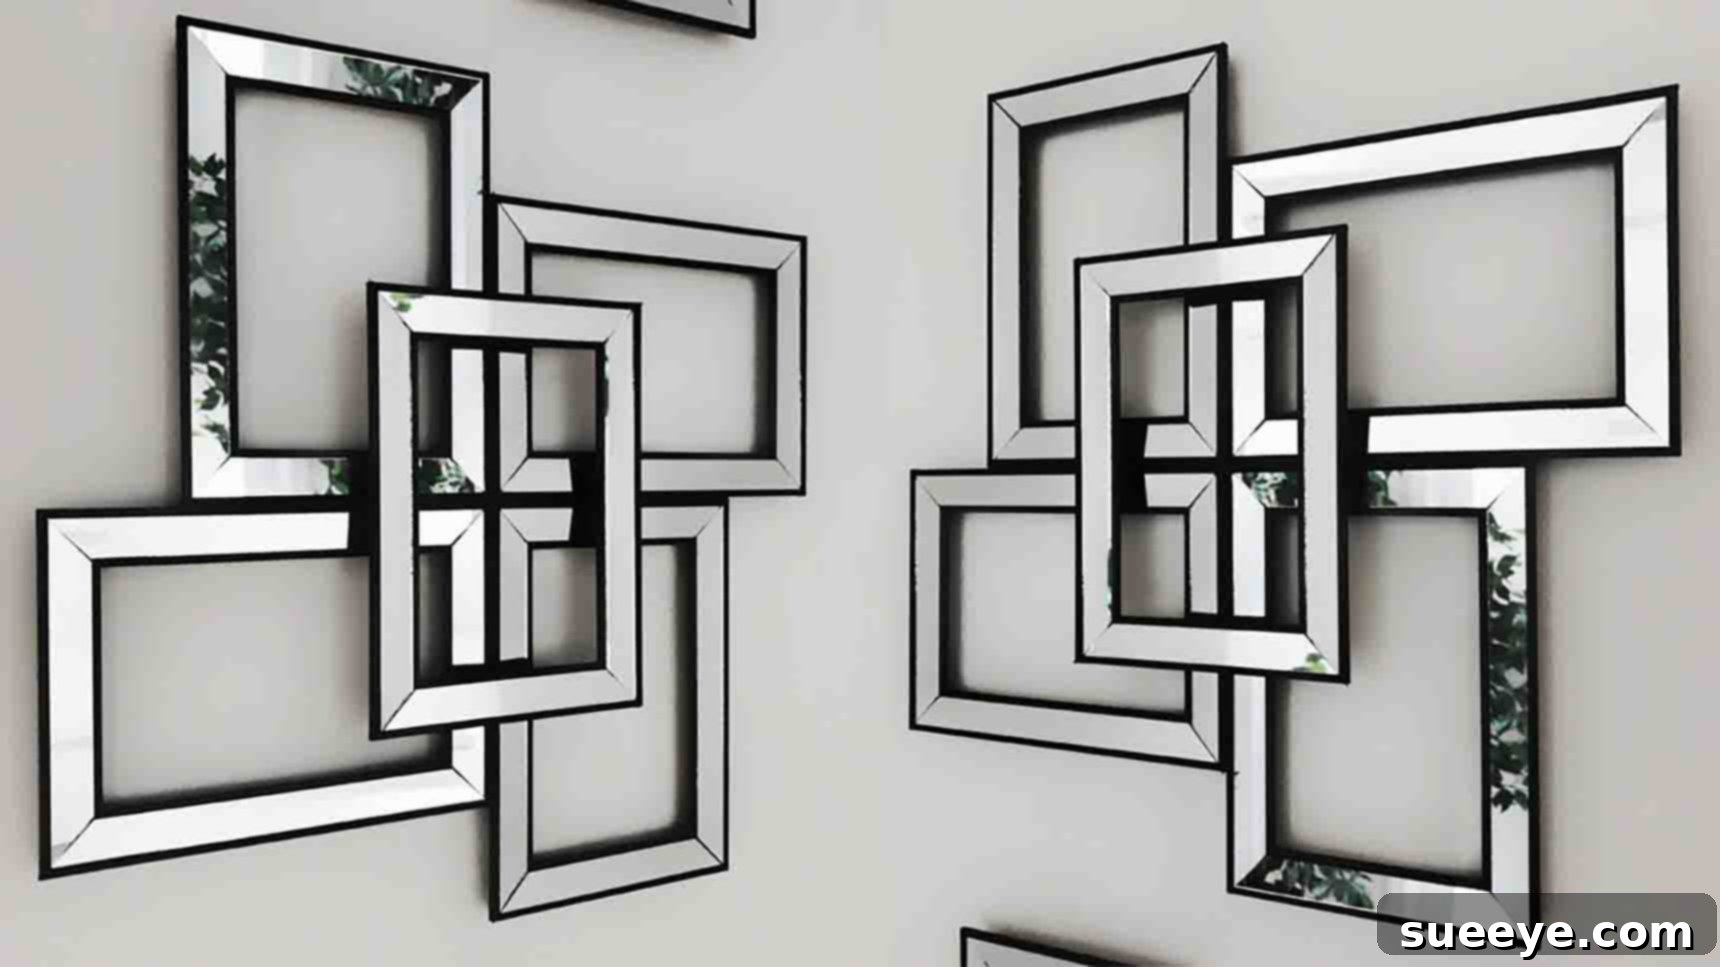
Ready to dramatically enhance your home’s aesthetic without breaking the bank? This DIY mirror wall decor project, inspired by the creative brilliance of treshaja on YouTube, offers an incredibly chic and sophisticated solution. What might appear as a complex, high-end design is, in reality, one of the simplest and most rewarding do-it-yourself crafts you’ll ever undertake. This eye-catching piece isn’t just a functional mirror; it’s a statement art installation that will instantly elevate any room, adding light, depth, and a touch of modern elegance.
Mirrors are renowned for their ability to transform spaces, making them feel larger, brighter, and more inviting. When arranged creatively, they become powerful decorative elements that reflect your style and personality. This particular project capitalizes on the affordability of mirrored frames, often found at dollar stores or discount retailers, turning them into a cohesive, designer-inspired display. Whether you’re aiming for a minimalist, contemporary, or glamorous look, this DIY mirror wall decor provides the perfect canvas for your interior design aspirations. Dive into our detailed guide below to discover how to craft this stunning and surprisingly inexpensive piece for your home.
Why DIY Mirror Wall Decor is a Must-Try Project
The appeal of a well-placed mirror wall extends far beyond simple reflection. It’s a strategic design element that can profoundly influence the ambiance and perceived size of a room. Opting for a DIY approach to this decor trend brings a multitude of benefits, making it an incredibly popular choice for savvy homeowners and renters alike.
- Budget-Friendly Elegance: One of the most compelling reasons to undertake this project is the cost savings. High-end decorative mirrors can be prohibitively expensive. By sourcing individual mirrored frames from discount stores like Dollar Tree, you can achieve a luxurious look for a fraction of the price. This project proves that stunning home decor doesn’t require a hefty investment.
- Customizable and Unique: Unlike mass-produced decor, a DIY mirror wall allows for complete personalization. You’re not just assembling frames; you’re crafting a piece of art tailored to your specific taste and space. While this tutorial provides a specific pattern, you can adapt the design, experiment with frame finishes, or even incorporate different mirror shapes to create something truly one-of-a-kind.
- Amplifies Light and Space: Mirrors are masters of illusion. Strategically placed, they can bounce natural and artificial light around a room, instantly making it feel brighter and more open. For smaller rooms or those lacking abundant natural light, a mirror wall is a game-changer, creating an illusion of expanded space and greater depth.
- Adds Texture and Interest: The reflective surface of mirrors, combined with the frames, introduces a dynamic element to your wall. It breaks up monotonous wall spaces, adding visual interest and a sophisticated focal point. The specific arrangement of frames in this DIY project creates a geometric pattern that serves as both art and functional decor.
- A Sense of Accomplishment: There’s immense satisfaction in creating something beautiful for your home with your own hands. This project is accessible enough for beginners but yields professional-looking results, giving you a wonderful sense of pride in your decor.
Whether you’re looking to refresh a living room, add a touch of glamour to a bedroom, brighten a hallway, or create a welcoming entryway, this DIY mirror wall decor is a versatile and impactful choice. It’s an opportunity to infuse your personality into your home while enjoying all the practical and aesthetic benefits mirrors offer.
Materials for Your Mirror Wall Masterpiece
Gathering your materials is the first exciting step towards your new wall decor. The beauty of this project lies in its simplicity and the affordability of the items required. For this specific elegant design, you will need:
- 5 Mirrored Frames: These are the stars of your project. Look for simple, identical frames, typically 8×10 or 10×12 inches, often found at dollar stores, discount retailers, or craft supply stores. While this tutorial uses five, you can scale up or down depending on your desired wall coverage and the specific pattern you wish to create. Ensure they are clean and free of cracks or damage.
- Gorilla Glue Sticks (or equivalent strong hot glue): Essential for the initial tack. Hot glue provides an instant bond, allowing you to hold the frames in place while a more permanent adhesive cures. Use high-quality glue sticks for a reliable temporary hold.
- Glue Gun: A standard hot glue gun will be needed to apply the hot glue sticks. Ensure it’s in good working order and heats up efficiently.
- E6000 Glue (or similar industrial-strength adhesive): This is your permanent bonding agent. E6000 is renowned for its industrial strength, flexibility, and strong adhesion to various surfaces, including glass and plastic. It creates a durable, long-lasting bond that will keep your frames securely together for years. Make sure to work in a well-ventilated area when using E6000.
- Command Strips (optional) or Drywall Nails/Screws with Anchors: Your choice for hanging depends on your preference for permanence and wall integrity.
- Command Strips: Ideal for renters or those who prefer a damage-free hanging solution. Choose heavy-duty strips appropriate for the weight of your assembled mirror piece.
- Drywall Nails/Screws with Anchors: For a more permanent and robust installation, especially if your mirror piece is heavier or you want absolute stability. You’ll need to locate studs or use appropriate drywall anchors for secure mounting.
Optional but Recommended Tools:
- Microfiber Cloth and Glass Cleaner: For preparing and cleaning the mirrors before and after assembly.
- Measuring Tape and Pencil: For planning your layout and marking hanging points on the wall.
- Level: Crucial for ensuring your mirror decor hangs perfectly straight.
- Painter’s Tape: Can be useful for temporarily holding frames during the dry-fitting stage.
Directions: Crafting Your Elegant Mirror Wall Decor
Follow these steps carefully to transform your simple mirrored frames into a striking piece of wall art. Precision and patience are key to achieving a flawless finish.
Step 1: Prepare and Assemble the Frames
Before you begin gluing, it’s crucial to prepare your frames and finalize your layout. This meticulous preparation ensures a smooth assembly process and a stunning final result.
- Unpack and Inspect: Carefully remove all frames from their packaging. Check each mirror for any cracks, chips, or imperfections. Clean the mirror surfaces thoroughly with glass cleaner and a microfiber cloth to remove dust, smudges, and fingerprints. This step is vital for a pristine finish.
- Remove Contents and Tabs: For each frame, gently remove the backing, any paper inserts, and the metal tabs or clips that hold the backing in place. You’ll only be working with the mirrored frame itself.
- Dry-Fit Your Design: This is arguably the most important preparatory step. On a clean, flat surface (like your floor or a large table), arrange your five frames in the desired pattern. The pattern described in the original tutorial, and which creates a visually intriguing geometric design, is as follows:
- Place one frame vertically in the center. This will serve as your base.
- Take a second frame and place it horizontally directly above the top edge of the vertical frame, ensuring it is perfectly centered and aligned.
- Now, take a third frame and place it horizontally below the bottom edge of the central vertical frame, again ensuring it’s centered and aligned.
- Next, place a fourth frame vertically on the right side of the central vertical frame, aligning its top and bottom edges with the horizontal frames.
- Finally, place the fifth frame vertically on the left side of the central vertical frame, mirroring the placement of the fourth frame.
Take your time to adjust the frames until they are perfectly lined up, with minimal gaps between them. This dry-fit stage allows you to visualize the finished piece and make any necessary adjustments before applying adhesive.
- Apply Dual Adhesives: Once you are completely satisfied with the layout, you’ll begin gluing them together. Work methodically, one connection at a time.
- Initial Hot Glue Bond: Apply a small amount of hot glue along the edges where two frames meet. Hot glue sets quickly, providing an instant tack that holds the frames in position. This is particularly helpful for maintaining alignment while the E6000 cures.
- Permanent E6000 Bond: Immediately after applying the hot glue, apply a continuous bead of E6000 glue along the same joining seams. E6000 is a powerful, flexible adhesive that will create a strong, permanent bond. Apply it generously but neatly, ensuring good contact between the frames.
Work carefully around the entire design, gluing each frame connection until your entire five-piece mirror unit is assembled. Press the frames together firmly for a few moments after applying the glue to ensure good adhesion. Remember to work in a well-ventilated area when using E6000.
Step 2: Allow to Dry and Mount Your Creation
Patience is a virtue, especially when working with adhesives that require adequate curing time to reach their maximum strength.
- Complete Drying Time: Once all frames are glued together, it is absolutely crucial to let the entire assembly dry completely. While hot glue sets quickly, E6000 typically requires 24 to 72 hours to fully cure and achieve its strongest bond. Leave your mirror decor undisturbed on a flat surface during this period. Attempting to move or hang it prematurely could compromise the integrity of the glue joints.
- Prepare for Mounting: After the glue has fully cured, carefully lift your assembled mirror piece. Decide on your preferred hanging method:
- Using Command Strips: If opting for Command strips, turn the mirror decor face down. Apply the appropriate number of heavy-duty Command strips to the back of the frame, distributing them evenly for balanced support. Generally, you’ll want at least one strip near each corner and possibly more in the center, depending on the overall weight. Ensure the adhesive strips are properly pressed onto the frame for secure attachment.
- Using Drywall Nails/Screws: For a more permanent fixture, you will need to identify the best hanging points on the back of your joined frames. If your frames have built-in hangers, use those. Otherwise, you might need to attach D-rings or picture wire securely to the back of the frames. Before drilling into the wall, use a level and measuring tape to precisely mark where your nails or screws will go. If you’re not hitting a stud, use appropriate drywall anchors to ensure a secure hold for the weight of your mirrors.
- Mount to the Wall:
- With Command Strips: Once the strips are on the mirror, carefully position the mirror decor on your wall. Press firmly along each Command strip for at least 30 seconds to ensure a strong bond with the wall.
- With Drywall Nails/Screws: Carefully hang your mirror decor onto the pre-installed nails or screws. Use a level one last time to make sure your stunning new wall art is perfectly straight.
- Final Cleaning: Give the mirror surfaces a final polish with your glass cleaner and a microfiber cloth to remove any dust or fingerprints accumulated during the hanging process.
Tips for Success and Creative Customization
While this project is straightforward, a few expert tips can ensure your DIY mirror wall decor turns out perfectly. Plus, consider these ideas to truly make it your own!
Ensuring a Flawless Finish:
- Measure Your Space: Before you even buy frames, measure the wall area where you plan to hang your decor. This helps you determine the ideal size and number of frames needed.
- Consistent Frames: For the specific geometric look demonstrated, using identical frames is key. Slight variations in size or style can disrupt the visual flow.
- Ventilation is Crucial: When working with E6000 glue, ensure you’re in a well-ventilated area. The fumes can be strong, so open windows or work outdoors if possible.
- Clean as You Go: Have some rubbing alcohol or a mild adhesive remover handy for any accidental glue smudges on the mirror surface. It’s easier to clean fresh glue than dried glue.
- Double-Check Leveling: A crooked mirror wall can detract from its elegance. Use a good quality level during the dry-fit stage and again when mounting to the wall.
Personalizing Your Mirror Wall Decor:
- Paint the Frames: Don’t limit yourself to the original frame color. Spray paint the frames in a metallic gold, silver, matte black, or a bold color that matches your room’s palette before assembling. This can instantly elevate the perceived value and customize the look.
- Vary the Pattern: While this tutorial provides a specific pattern for five frames, you can experiment with different arrangements. Create a symmetrical grid, an abstract cluster, or a larger installation by using more frames. Sketch out ideas on paper first!
- Mix Frame Styles (Carefully): If you want a more eclectic look, you could incorporate frames with different textures or subtle patterns, as long as they are the same size. However, for a cohesive, elegant look, sticking to simple, identical frames is usually best for this particular project.
- Add Embellishments: Once the mirror is hung, consider adding small, tasteful embellishments to the frames. Self-adhesive rhinestones, decorative mouldings, or even small painted stencils can add a touch of glamour or personality.
- Consider Different Mirror Types: While standard mirrors are used here, you could explore tinted mirrors (bronze, grey) or even antique-effect mirrors for a different aesthetic.
DIY Dollar Tree Mirror Wall Decor: Your Affordable Style Statement
The journey from a few inexpensive mirrored frames to a breathtaking piece of wall art is incredibly satisfying. This DIY mirror wall decor project, often achievable with items sourced from places like Dollar Tree, proves that high style doesn’t have to come with a high price tag. With a bit of creativity, some strong adhesive, and an afternoon of crafting, you can create a striking focal point that reflects your personal taste and transforms your living space.
This project is more than just a craft; it’s an investment in your home’s ambiance, promising to make rooms feel grander, brighter, and more curated. By following these detailed steps, you’ve not only added a beautiful decor item to your home but also gained the satisfaction of creating something truly unique. So, go ahead, level up your space, and enjoy the radiant beauty of your new, custom-made mirror wall decor!