
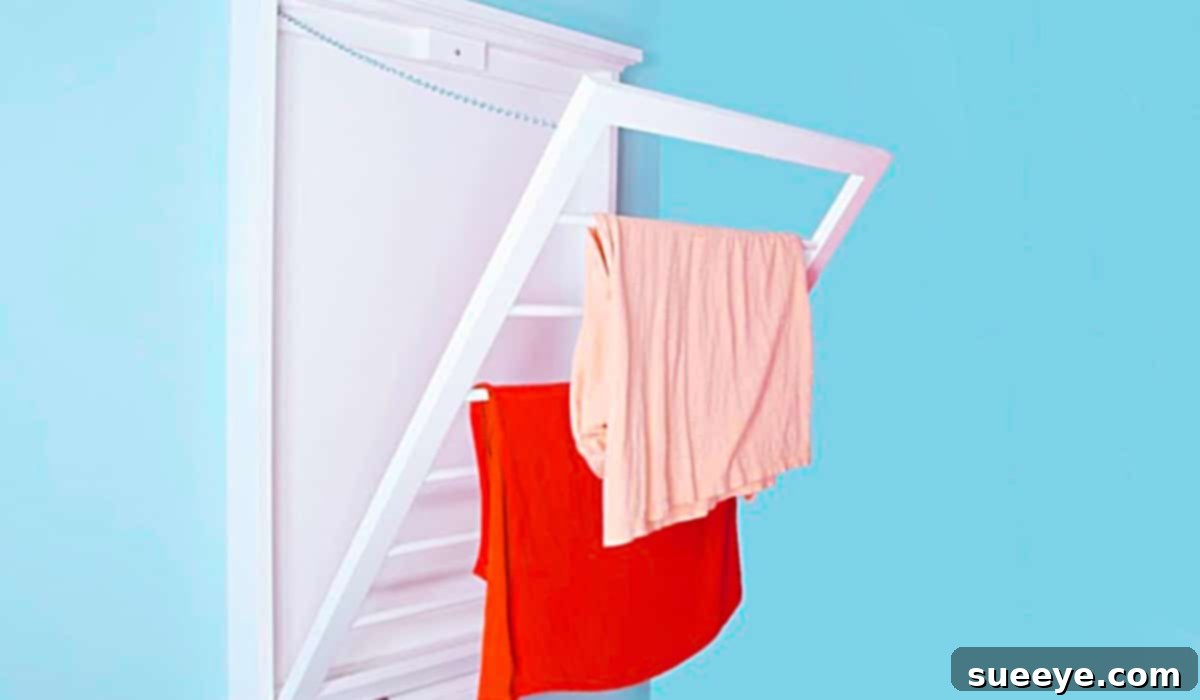
DIY Wall-Mounted Drying Room Rack: Optimize Your Laundry Space
For many households, the laundry room often presents a challenge: how to efficiently dry clothes without sacrificing valuable floor space. Traditional freestanding drying racks, while undeniably useful, can be cumbersome, prone to collapsing, and certainly not the most aesthetically pleasing addition to your home. They tend to get in the way, making the laundry area feel cluttered and unorganized. But what if there was a solution that was both highly functional, space-saving, and even a stylish enhancement to your home decor?
That’s precisely where the brilliance of a DIY wall-mounted drying rack comes into play. Inspired by the ingenious design shared by Fix This Build That on YouTube, this project transforms a common household problem into an elegant, custom-built solution. This isn’t just another drying rack; it’s a professional-looking, robust fixture that promises to revolutionize your laundry routine. With its sleek design and the ability to be customized to your personal style, this wall-mounted rack is an essential upgrade for any modern home seeking to maximize efficiency and minimize clutter.
The beauty of this particular DIY drying rack lies in its simplicity and adaptability. Whether you envision a crisp, painted finish that seamlessly blends with your existing decor or prefer the rustic charm of raw, natural wood to complement a farmhouse aesthetic, the choice is entirely yours. For those who are just beginning their woodworking journey, like myself, don’t be intimidated! Many hardware stores, such as Lowe’s, offer convenient wood-cutting services, allowing you to bypass the initial sawing step and jump straight into assembly. This significantly shortens the build time and makes the project accessible to crafters of all skill levels, ensuring you can enjoy your new, organized laundry space sooner rather than later.
Why Choose a Wall-Mounted Drying Rack? Unlocking the Benefits
The shift from a traditional floor-standing drying rack to a wall-mounted alternative offers a plethora of advantages that extend far beyond mere space-saving. This smart home improvement project can dramatically enhance the functionality and aesthetics of your laundry area.
- Unrivaled Space Optimization: This is arguably the primary benefit. By utilizing vertical wall space, you completely free up precious floor area. This is a game-changer for small laundry rooms, apartments, or multi-purpose utility areas where every square inch counts. No more tripping over collapsible racks or struggling to navigate around bulky drying clothes.
- Improved Airflow and Faster Drying: Lifting clothes off the floor and hanging them on a wall-mounted rack often allows for better air circulation around each garment. This enhanced airflow can significantly reduce drying times, especially for delicate items that cannot go into a tumble dryer.
- Enhanced Organization and Aesthetics: Unlike temporary solutions, a custom-built wall-mounted rack becomes an integrated part of your laundry room design. It provides a dedicated, neat spot for drying, contributing to a more organized and visually appealing space. When not in use, many designs can even fold away or blend discreetly into the background.
- Durability and Stability: Crafted from wood and securely mounted to wall studs, a DIY rack offers far greater stability and load-bearing capacity than most flimsy portable racks. This means you can confidently dry heavier items like sweaters, towels, or even small rugs without worry.
- Customization to Match Your Style: This DIY approach allows for complete personalization. You can choose the wood type, dimensions, finish (paint, stain, varnish), and even the hardware to perfectly complement your home’s decor, whether it’s modern, rustic farmhouse, minimalist, or eclectic.
- Cost-Effective Home Improvement: Building your own drying rack is often significantly more affordable than purchasing pre-made, high-quality wall-mounted options from specialty stores. You get a custom solution tailored to your needs without breaking the bank.
- Reduced Energy Consumption: By air-drying more clothes, you naturally reduce your reliance on electric tumble dryers, leading to lower energy bills and a smaller carbon footprint.
Embracing a DIY wall-mounted drying rack is more than just a practical decision; it’s an investment in a more efficient, organized, and aesthetically pleasing home environment.
Essential Materials for Your DIY Wall-Mounted Drying Room Rack
Gathering the right materials is the first crucial step in any woodworking project. The beauty of this DIY drying rack is its reliance on readily available and affordable supplies. For precise measurements and cutting instructions, it is highly recommended to refer to the detailed video tutorial by Fix This Build That on YouTube. However, here’s a general list of what you’ll need to get started:
- Wood for the Frame: This will form the main structure of your drying rack. Common choices include pine, poplar, or even plywood for the back panel. The dimensions will depend on the desired size of your rack, but typically you’ll need boards for the outer frame and possibly additional pieces for internal support. Look for straight, knot-free pieces for the best results.
- Dowel Rods: These will serve as the actual drying rods. Opt for sturdy hardwood dowels (e.g., oak or maple) that are approximately 3/4 inch to 1 inch in diameter to prevent sagging under the weight of wet clothes. The total length needed will depend on the number and spacing of your drying rods.
- Paint or Stain (Optional): To customize the look of your rack. Choose a durable, moisture-resistant paint or wood stain that complements your laundry room decor. Don’t forget primer if you’re painting raw wood.
- Protective Finish (Optional but Recommended): A clear sealant, varnish, or polyurethane can protect the wood from moisture and wear, especially if you opt for a natural wood finish.
- Chains (2 pieces): These provide the mechanism for the rack to swing down and prop open. Heavy-duty zinc-plated or galvanized steel chains are ideal for durability and resistance to rust. The length will depend on how far you want the rack to extend from the wall. You can find these at hardware stores like Lowe’s.
- Mounting Hardware:
- Wood Screws: Various lengths for assembling the frame and attaching hardware. Choose screws appropriate for wood, ensuring they are long enough to provide a secure hold without penetrating through the other side.
- Wall Anchors (if not mounting into studs): If you cannot mount directly into wall studs, heavy-duty toggle bolts or expanding anchors will be necessary to ensure the rack can support the weight of wet laundry.
- Eye Hooks or Screw Eyes: To attach the chains to the frame and the wall.
- Wood Glue: A strong woodworking glue will add significant strength and stability to all your frame joints, making the rack more robust and durable.
Tools You’ll Need for a Smooth Building Experience
Having the right tools on hand will make this project much smoother and more enjoyable. Even if you’re a beginner, most of these are standard household tools or easy to rent/borrow:
- Drill/Driver: Essential for drilling pilot holes and driving screws quickly and efficiently. Cordless models offer excellent maneuverability.
- Drill Bits: Various sizes, including wood bits for pilot holes and a spade bit or Forstner bit for drilling the dowel holes.
- Measuring Tape: For accurate measurements of all wood pieces.
- Pencil: For marking cuts and drill points.
- Speed Square or Combination Square: To ensure all your cuts and angles are perfectly square.
- Level: Crucial for mounting the rack perfectly straight on the wall.
- Small Saw: A hand saw, miter saw, or circular saw will be needed for cutting wood pieces if you’re not getting them pre-cut. A miter saw offers the most precision for square cuts.
- Clamps: Essential for holding wood pieces together securely while glue dries or while drilling and screwing.
- Sandpaper or Electric Sander: For smoothing rough edges and preparing the wood for finishing.
- Stud Finder: Absolutely vital for locating wall studs, ensuring your rack is securely mounted and can handle the weight of wet clothes.
- Safety Glasses and Hearing Protection: Always wear appropriate personal protective equipment when working with power tools.
Step-by-Step Directions to Build Your Space-Saving Drying Rack
This comprehensive guide will walk you through the process of constructing your wall-mounted drying rack, transforming your laundry routine with a functional and aesthetically pleasing solution. Remember to consult the inspiring video from Fix This Build That for visual guidance and specific measurements.
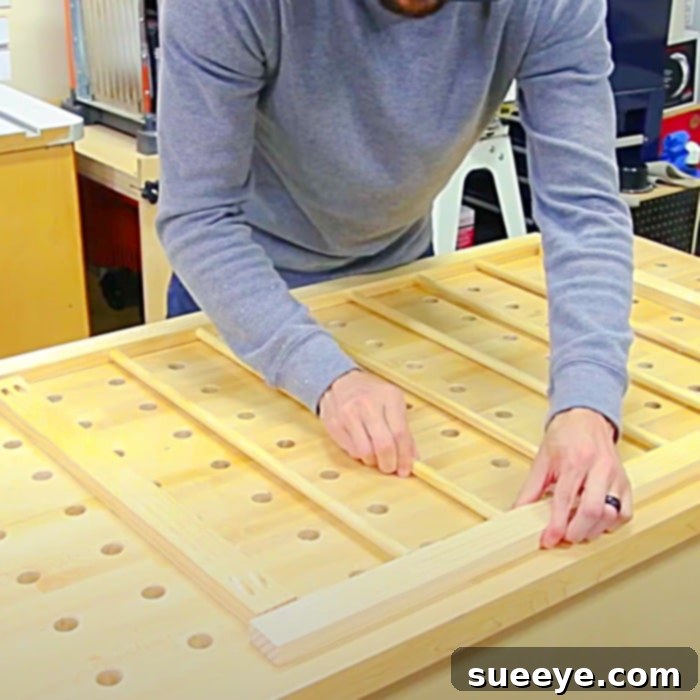
1. Prepare Your Wood Pieces
Begin by cutting all your wood pieces according to the dimensions provided in the video tutorial, or your own customized plans. This typically includes:
- A back panel (the piece that mounts directly to the wall).
- Side pieces for the main frame.
- Front and back cross members for the frame where the dowels will sit.
- The dowel rods themselves.
If you had your wood pre-cut at a hardware store, carefully inspect each piece for accuracy. Once all pieces are cut, use sandpaper or an electric sander to smooth all edges and surfaces. This not only makes the rack look more professional but also prevents splinters and snagged clothing.
2. Assemble the Basic Frame
The core of your drying rack is its frame. This typically involves constructing a rectangular box-like structure. Apply wood glue to the joints before securing them with screws. Use clamps to hold the pieces tightly together while you drill pilot holes and drive screws. Pilot holes are crucial to prevent the wood from splitting, especially near the ends of boards. Ensure all corners are square using your speed square for a clean, professional finish.
3. Integrate the Dowel Rods
With the frame assembled, it’s time to add the drying rods.
- Mark Dowel Locations: On the inside faces of the frame’s side pieces (or specific cross members if your design uses them), precisely mark where each dowel will be inserted. Ensure even spacing for optimal drying and aesthetic appeal.
- Drill Dowel Holes: Using a drill bit that matches the diameter of your dowels, carefully drill holes at each marked location. For a strong hold, drill these holes about half to two-thirds of the way through the wood. If your design allows for removable dowels, drill through one side and create a shallower “pocket” on the opposite side.
- Insert and Secure Dowels: Apply a small amount of wood glue inside each hole before inserting the dowel rods. Tap them gently with a mallet if necessary for a snug fit. Wipe away any excess glue immediately. Allow the glue to dry completely according to the manufacturer’s instructions.
4. Sand and Finish Your Drying Rack
Once the glue has dried and the structure is solid, it’s time for the finishing touches.
- Final Sanding: Give the entire rack a final sanding with finer grit sandpaper to ensure all surfaces are smooth and ready for paint or stain.
- Clean: Wipe down the wood thoroughly with a damp cloth to remove any sawdust.
- Apply Finish: If desired, apply primer first, then paint or stain your drying rack in the color or finish of your choice. Remember, a rustic farmhouse look can be achieved by simply applying a clear protective sealant over natural wood. For painted racks, two thin coats are usually better than one thick coat. Allow ample drying time between coats and before proceeding to the next step.
- Seal: A clear protective finish like polyurethane or lacquer is highly recommended to protect the wood from moisture, especially in a laundry environment.
5. Mount the Rack to the Wall
This is a critical step to ensure the stability and safety of your drying rack.
- Locate Studs: Use a stud finder to locate at least two wall studs in your desired mounting location. Mounting directly into studs provides the strongest and most secure attachment. Mark the center of these studs with a pencil.
- Position and Level: Hold the back panel of your drying rack against the wall at the marked stud locations. Use a level to ensure it is perfectly horizontal. Mark the drill points for your mounting screws.
- Drill Pilot Holes: Drill pilot holes into the wall studs through your marked points on the rack.
- Secure the Rack: Attach the rack to the wall using long, sturdy wood screws that will penetrate deep into the studs. Ensure the screws are countersunk for a flush finish if desired.
6. Attach the Chains
The chains provide the necessary support for the rack when it’s extended.
- Install Eye Hooks: Screw eye hooks into the underside of the drying rack’s outer frame, typically near the front corners. Also, screw corresponding eye hooks into the wall directly below where the rack is mounted, ensuring they are aligned. The length of the chain will determine how far the rack extends.
- Connect Chains: Attach one end of each chain to the eye hooks on the drying rack and the other end to the eye hooks on the wall. Adjust the chain length as needed to achieve your desired open angle. You want the rack to be mostly horizontal when extended.
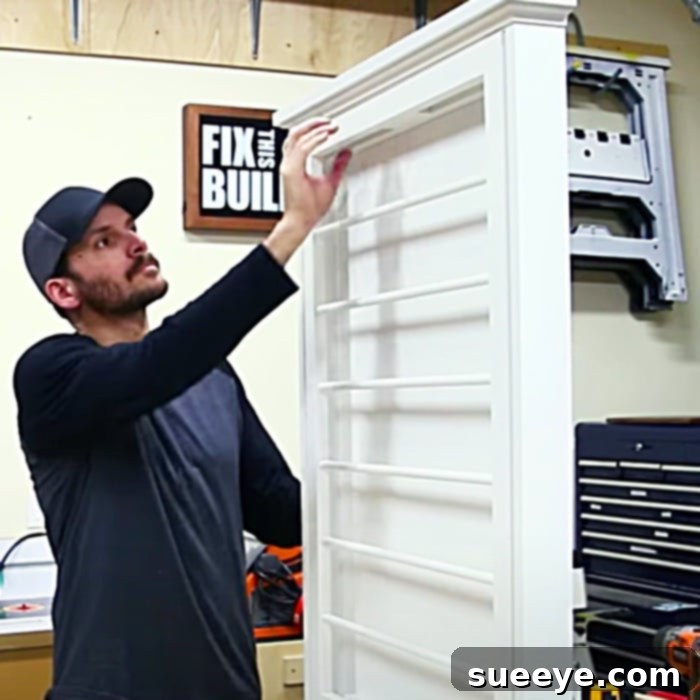
Customization and Personalization: Make It Truly Yours
One of the most rewarding aspects of a DIY project is the freedom to customize it to your heart’s content. Your wall-mounted drying rack can be more than just a functional item; it can be a statement piece in your laundry room. Consider these ideas for personalization:
- Color and Finish Palette:
- Bold & Modern: Paint it a vibrant color to add a pop to a neutral laundry room, or choose a sleek black or white for a contemporary minimalist look.
- Farmhouse Chic: Stain the wood a rich, warm tone like dark walnut or a light, distressed grey. Pair with matte black hardware for an authentic farmhouse feel.
- Coastal Vibe: Use light blues, greens, or sandy tones, perhaps with a distressed finish, to evoke a breezy beach house feel.
- Adding Extra Features:
- Top Shelf: Integrate a small shelf above the drying rods for storing detergent, fabric softener, or decorative items.
- Utility Hooks: Add small hooks along the bottom edge or sides of the frame for hanging smaller items, delicate lingerie, or even laundry bags.
- Magnetic Strip: Install a magnetic strip on one of the frame pieces to hold small metal items like safety pins or clothespins.
- Hardware Choices:
- Chains: Explore different chain styles – industrial-chic metal, or even decorative chains if the aesthetic calls for it.
- Hinges: If your design incorporates hinges for a fold-flat option, choose ones that match your overall style.
- Pull Knobs/Handles: For easier deployment if your design has a front panel.
- Decorative Elements: Stencil a cute laundry-themed phrase on the top panel or add decorative trim to the frame edges for a more ornate look.
Maintenance and Longevity of Your DIY Drying Rack
To ensure your custom-built wall-mounted drying rack remains a functional and beautiful asset for years to come, a little routine maintenance goes a long way:
- Regular Cleaning: Wipe down the wood surfaces periodically with a damp cloth to remove dust, lint, and any residue from laundry products. For deeper cleaning, use a mild soap solution, but avoid harsh chemicals that could damage the wood finish.
- Inspect for Wear: Every few months, check all screws and joints to ensure they remain tight. Wood can sometimes expand and contract with temperature and humidity changes, potentially loosening fasteners over time. Tighten any loose screws promptly.
- Check Chains and Hardware: Inspect the chains, eye hooks, and any other metal hardware for signs of rust or wear. If you notice significant rust, consider replacing the affected components to maintain safety and function.
- Reapply Finish (if needed): If your rack sees heavy use or is in a particularly humid environment, the protective finish (paint, stain, or sealant) might wear down over time. Reapplying a fresh coat every few years can significantly extend its lifespan and maintain its aesthetic appeal.
- Respect Weight Limits: While a DIY wooden rack is sturdy, it’s not indestructible. Avoid overloading it with excessively heavy or dripping wet items, which could put undue stress on the frame, dowels, or wall mounts. Wring out clothes thoroughly before hanging.
By following these simple maintenance tips, your DIY wall-mounted drying rack will continue to serve as an indispensable and attractive feature of your laundry room.
Conclusion: Transform Your Laundry Space with a DIY Solution
The journey from conceptualizing to completing your own DIY wall-mounted drying room rack is incredibly rewarding. What starts as a simple idea for better organization evolves into a sturdy, stylish, and highly practical addition to your home. This project effectively tackles the age-old problem of bulky, inconvenient drying solutions, replacing them with a custom-built fixture that not only saves significant space but also elevates the entire aesthetic of your laundry area.
No longer will you have to wrestle with an unstable drying rack cluttering your floor. This elegant, wall-mounted alternative brings a sense of order and calm to what can often be a chaotic part of the house. The satisfaction of building something with your own hands, tailoring it perfectly to your space and style, is immense. I personally feel so much more organized and content with this awesome wall-mounted drying rack proudly displayed in my new laundry room. It’s a testament to how thoughtful design and a little bit of DIY effort can truly transform a functional space into something both beautiful and efficient.
So, take the leap! Gather your materials, watch the excellent tutorial by Fix This Build That on YouTube, and embark on this rewarding home improvement journey. You’ll be amazed at the difference a well-designed, custom drying rack can make in your daily routine and the overall ambiance of your home. It’s more than just a place to hang clothes; it’s a smart, sustainable, and stylish solution that you’ll appreciate for years to come.