
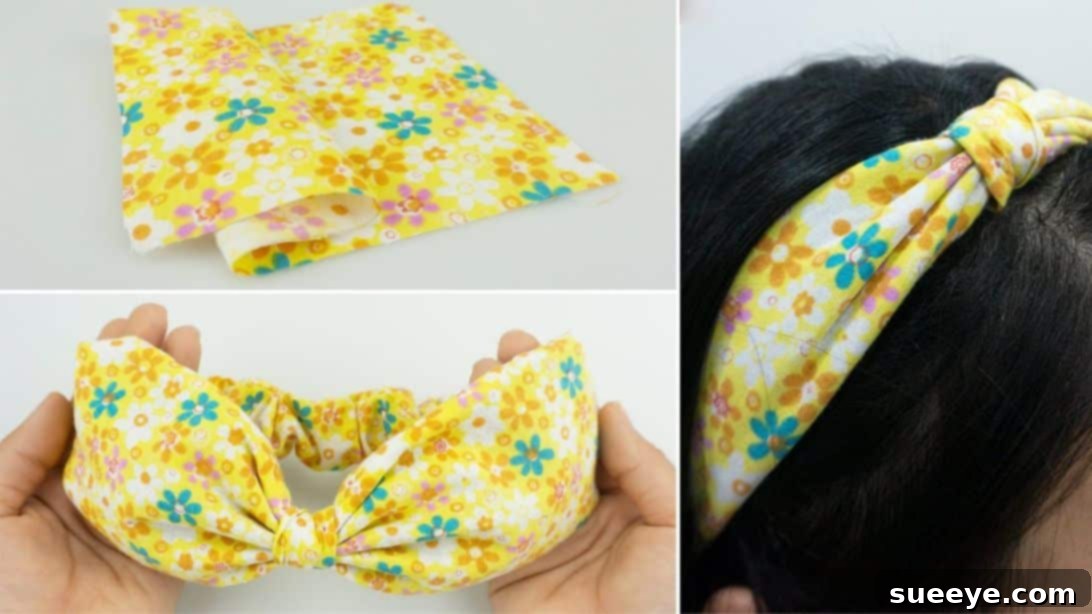
Effortless DIY Cotton Bow Headbands: Transform Fabric Scraps into Chic Accessories
Are you looking for a delightful and rewarding craft project that breathes new life into your leftover fabric scraps? Look no further! This comprehensive guide will show you how to create adorable cotton bow headbands, perfect for adding a touch of charm to any outfit. Not only are these headbands incredibly cute, but they also offer a fantastic opportunity to practice your sewing skills, reduce fabric waste, and craft thoughtful, personalized gifts for friends and family. Imagine gifting a set of these handmade treasures, customized in their favorite colors and patterns – a truly unique and heartfelt present.
Whether you’re a seasoned sewing enthusiast or a beginner eager to dive into the world of fabric crafts, this tutorial is designed to be easy-to-follow and enjoyable. We’ll walk you through each step, from selecting your materials to the final stitch, ensuring you achieve professional-looking results. Get ready to transform those forgotten fabric remnants into stylish accessories that are both practical and wonderfully whimsical. You can learn alongside the helpful visuals provided by Art and Crafts Ideas on Youtube, or simply follow our detailed written instructions below. Let’s gather our supplies and begin this exciting sewing journey!
Essential Materials for Your Cotton Bow Headbands
Before embarking on any creative project, having all your materials organized and ready is key to a smooth and enjoyable crafting experience. For these charming cotton bow headbands, you’ll need a few basic sewing supplies, many of which you might already have on hand. Choosing the right fabrics and tools will not only make the process easier but also ensure the durability and aesthetic appeal of your finished headbands.
- Patterned Cotton Fabric: This will form the main bow and the headband’s outer layer. Opt for cotton fabrics due to their ease of sewing, breathability, and comfort against the skin. Scraps from previous projects are ideal! Consider various patterns – florals, geometrics, stripes, or even whimsical prints – to create a diverse collection of headbands.
- Plain Cotton Fabric (3.9″ x 7.9″): This piece will serve as a subtle accent or liner for a part of the bow, adding a touch of contrast or stability. While the specific size is provided, having a small coordinating plain fabric scrap is generally useful.
- Matching Thread and Sewing Needle: A good quality polyester thread that matches or complements your fabric colors is crucial. If sewing by hand, choose a sharp, appropriately sized needle for cotton fabric. If using a machine, ensure your bobbin is wound and tension is set correctly.
- Elastic (approximately 6-8 inches, 1/4″ to 1/2″ wide): This is vital for the headband’s stretch and comfortable fit. The length can be adjusted based on desired tension and head circumference. A standard 1/2-inch wide elastic works well, but thinner elastic (1/4 inch) can also be used for a more delicate feel.
- Safety Pin: An indispensable tool for threading elastic through fabric casings quickly and easily, preventing it from twisting or disappearing inside.
- Sharp Fabric Scissors: Precision cutting is paramount for clean edges and accurate pattern pieces. Invest in a good pair of fabric-only scissors to ensure they remain sharp.
- Measuring Tape or Ruler: Essential for accurate fabric measurements, which are critical for the bow and headband components to fit together perfectly.
- Fabric Marker or Chalk (Optional but Recommended): For marking cutting lines or sewing guides on your fabric.
- Iron and Ironing Board (Highly Recommended): Pressing seams and fabric folds as you go will result in a much neater and more professional-looking finished product.
Preparing Your Workspace and Fabrics
Before cutting into your beautiful fabrics, take a moment to prepare your workspace and your materials. A clean, well-lit area will make the process much more enjoyable and efficient. Lay out all your tools so they are easily accessible. If you’re using new fabric, it’s always a good idea to pre-wash and iron it. This helps to pre-shrink the fabric and remove any manufacturing chemicals, ensuring your headbands maintain their shape and size after washing. For fabric scraps, a quick iron will smooth out any wrinkles, making cutting and sewing much easier.
Accuracy in cutting is foundational to a successful sewing project. Take your time with measurements and ensure your fabric is laid flat and smooth before cutting. Remember the old adage: “Measure twice, cut once.” This will prevent frustration and wasted material down the line. Keep your cutting lines clean and straight for the best results.
Step-by-Step Instructions: Crafting Your Cotton Bow Headbands
Step 1: Precise Fabric Cutting
The foundation of a beautifully structured headband lies in accurate fabric pieces. Using your sharp fabric scissors and a ruler or measuring tape, carefully cut your chosen patterned fabric into three distinct rectangular pieces. These dimensions are critical for the proportional design of your bow and headband band:
- Piece A (Main Bow Body): Cut one rectangle measuring 14.6 inches by 7.8 inches. This larger piece will form the main, prominent part of your bow, creating its elegant loops.
- Piece B (Bow Tie/Center Wrap): Cut one rectangle measuring 9.8 inches by 3.15 inches. This narrower piece will be used to gather and secure the center of your bow, giving it that classic cinched look.
- Piece C (Headband Band/Elastic Casing): Cut one rectangle measuring 7.8 inches by 3.15 inches. This piece will house the elastic, forming the stretchy back portion of your headband.
In addition to these three patterned pieces, retrieve your pre-cut plain fabric measuring 3.9 inches by 7.9 inches. This will be used in the next step to add a subtle detail to the main bow piece.
Step 2: Preparing the Fabric Pieces for Sewing
Now that your fabric pieces are perfectly cut, it’s time to prepare them for stitching. This step involves folding and positioning, which is crucial for creating clean seams and the correct shape once flipped right-side out. Take each of your patterned rectangles (A, B, and C) and fold them in half lengthwise. Ensure the “right sides” of the fabric (the side with the print or pattern you want to be visible) are facing each other, and the “wrong sides” are facing outwards. This technique, known as “sewing right sides together,” ensures that when you turn the fabric, all the raw edges are neatly hidden inside.
Once folded, carefully place the 3.9″ x 7.9″ plain fabric piece on top of the folded Fabric A, positioning it precisely in the middle. This plain fabric will add a lovely accent to the center of your main bow, creating a nice contrast or design element.
Step 3: Stitching the Fabric Tubes
With your fabrics folded and positioned, it’s time to sew! Using your sewing machine or needle and thread, sew along the long raw edges of each folded fabric piece. You should sew Fabric C’s long sides together first, creating a tube. Repeat this process for Fabric A and Fabric B, stitching their respective long sides together. Aim for a consistent seam allowance, typically around 1/4 to 1/2 inch, for a neat finish. Remember to backstitch at the beginning and end of each seam to secure the stitches and prevent them from unraveling.
Once all three pieces have been sewn into tubes, it’s time to reveal their true form. Carefully flip each fabric tube right side out. This can be done by pushing one end of the fabric inward until it emerges from the other end. A safety pin or a turning tool can be incredibly helpful here. Take your time to gently poke out the corners and edges to achieve crisp, defined shapes. Once turned, give them a good press with an iron to flatten the seams and make them look professional and ready for the next steps.
Step 4: Sculpting the Main Bow (Fabric A)
Now let’s transform Fabric A, your largest piece, into the beautiful loops of your bow. Lay the pressed fabric tube flat. First, fold it in half crosswise, aligning the short ends. Then, working from the top folded edge, begin creating small, accordion-like pleats or folds. Gently gather the fabric into tiny, even folds, pushing them towards the center of the piece. Do the same for the bottom half of the fabric, folding it towards the center as well. The goal is to create a gathered, cinched effect in the middle of the fabric, forming the classic bow shape. Hold these folds firmly in place in the middle with your fingers.
To secure these delicate folds, take your needle and thread. Pass the thread through the gathered center several times, looping it tightly around the compressed fabric. This hand-stitching will hold the pleats firmly in position, preventing them from unraveling. Make sure your stitches are secure but not overly visible, as this section will eventually be covered. This meticulous step is crucial for defining the elegant structure of your bow.
Step 5: Attaching the Bow Tie (Fabric B)
With the main bow piece (Fabric A) beautifully gathered and secured, it’s time to add the finishing touch that defines its shape: the center wrap using Fabric B. Take your Fabric B tube, which you previously turned right side out and pressed. Position one end of this piece over the gathered middle section of Fabric A. Carefully wrap Fabric B snugly around the center of Fabric A, pulling it taut to further cinch the bow and create a clean, tailored look.
Once you’re satisfied with its position and tightness, secure Fabric B in place by sewing its raw edges together at the back of the bow. You can do this with either a hand stitch or a machine stitch, ensuring the seam is neat and hidden on the underside. Trim off any excess fabric from Fabric B, making sure the raw edges are well contained within the seam. This step not only holds the bow together but also provides a polished, professional finish to your cotton bow headband.
Step 6: Assembling the Headband with Elastic (Fabric C)
The final step brings all the components together, creating the functional and comfortable headband. Take your Fabric C tube (the smallest one, intended for the elastic casing). Attach a safety pin to one end of your chosen elastic piece. Carefully insert the safety pin, with the elastic trailing behind it, into one end of Fabric C. Gently guide the safety pin through the fabric tube, inching it along until it emerges from the other end. As you do this, make sure to hold onto the other end of the elastic, preventing it from disappearing completely inside the casing. This technique ensures the elastic remains flat and untwisted.
Once both ends of the elastic are visible, carefully remove the safety pin. Overlap the ends of the elastic by about half an inch and securely sew them together, either by machine or hand, creating a strong loop. A zigzag stitch is excellent for elastic as it allows for stretch. Now, position this elasticized loop at the middle end of your main bow assembly. Fold the raw edges of Fabric C inwards, neatly enclosing the elastic connection and raw edges of the bow, and then sew them together. Repeat this process for the other side of the bow, ensuring a clean and durable connection between the bow and the elastic headband. After these final stitches, carefully flip the entire headband right side out where needed, smooth out any wrinkles, and admire your beautifully handmade cotton bow headband! You’ve successfully transformed simple fabric pieces into a charming accessory.
Tips for Personalization and Styling Your Bow Headbands
One of the greatest joys of DIY projects is the ability to infuse them with your personal style. These cotton bow headbands offer endless possibilities for customization, making each one truly unique. Here are some ideas to help you personalize and style your creations:
- Fabric Choices: Experiment with a variety of cotton prints! Think seasonal themes (florals for spring, plaids for fall), holiday patterns, or even solid colors for a more classic look. Mix and match patterns between the main bow and the center wrap for a striking contrast.
- Embellishments: Elevate your headbands with small additions. Consider sewing on a few beads or sequins to the bow center, or adding a delicate lace trim along the edges of the bow. Small embroidered details can also add a unique, handmade touch.
- Sizing for Different Ages: While the given measurements create a standard adult headband, you can easily adjust the length of Fabric A and Fabric C, as well as the elastic, to fit children. For a younger child, you might reduce the elastic length and the overall circumference of the headband band.
- Gift Giving: Package a few headbands together with coordinating outfits or accessories for a thoughtful gift. They make wonderful presents for birthdays, baby showers, or as stocking stuffers. Personalize them with the recipient’s favorite colors or interests.
- Matching Outfits: Create headbands that perfectly match your favorite dresses, blouses, or skirts. This is a fantastic way to use up leftover fabric from garment sewing projects and create a cohesive look.
- Hair Accessories: Beyond just wearing them, you can also attach smaller versions of these bows to hair clips or elastic hair ties for a versatile set of hair accessories.
Care Instructions for Your Handmade Headbands
To ensure your beautiful cotton bow headbands last for a long time and retain their vibrant look, proper care is essential. Cotton is generally easy to care for, but a little attention goes a long way:
- Washing: Most cotton headbands can be machine washed on a gentle cycle with cold water. For best results, place them in a mesh laundry bag to protect them from tangling or stretching during the wash.
- Drying: Air dry your headbands by laying them flat or hanging them. This helps maintain the elastic’s integrity and prevents shrinking or distortion of the fabric. If using a dryer, tumble dry on low heat.
- Ironing: If your headbands become wrinkled, you can gently iron them on a cotton setting. Be careful to avoid direct heat on the elastic, as it can melt or lose its stretch.
- Storage: Store your headbands neatly to prevent them from getting crushed or losing their shape. Hanging them on a hook or storing them in a dedicated drawer will keep them looking their best.
Troubleshooting Common Sewing Challenges
Even experienced sewers encounter little snags now and then. Here are some common issues you might face when making your bow headbands and how to resolve them:
- Uneven Seams: If your seams are wobbly, practice sewing straight lines on scrap fabric. Using a guiding foot on your machine or drawing a straight line with fabric chalk can also help.
- Twisted Elastic: This often happens when threading the elastic through the casing. A safety pin helps, but always double-check that the elastic is flat before sewing its ends together. If it twists, simply unpick the seam, untwist, and re-sew.
- Bow Not Holding Shape: Ensure you’ve gathered Fabric A tightly enough in Step 4 and secured it with multiple passes of thread. The center wrap (Fabric B) also plays a crucial role in cinching the bow, so make sure it’s snug.
- Headband Too Tight or Loose: The fit depends on the elastic length. If it’s too tight, try a slightly longer piece of elastic for your next headband. If too loose, a shorter piece might be better. Don’t be afraid to adjust based on comfort.
- Fabric Fraying: If your fabric frays excessively, you might need to finish the raw edges with a serger or a zigzag stitch before sewing seams, especially if the fabric is loosely woven.
Conclusion: Embrace the Joy of Handmade Accessories
Congratulations! You’ve successfully crafted your very own collection of charming cotton bow headbands. This project is a testament to the fact that even small fabric scraps can be transformed into beautiful and functional accessories, all while honing your creative skills. The process is not just about making a headband; it’s about the joy of creation, the satisfaction of a handmade item, and the sustainable practice of upcycling materials.
These adorable headbands are more than just fashion statements; they are expressions of creativity and care. Whether you wear them yourself to brighten your day, gift them to loved ones for a truly personal touch, or even turn this into a fun side hustle, you’ve unlocked a world of possibilities. We encourage you to experiment with different fabrics, colors, and embellishments to truly make these designs your own. Don’t forget to share your creations with the crafting community – your unique designs can inspire others!
So, gather your fabric scraps, unleash your inner designer, and continue to explore the wonderful world of DIY accessories. Happy sewing!