
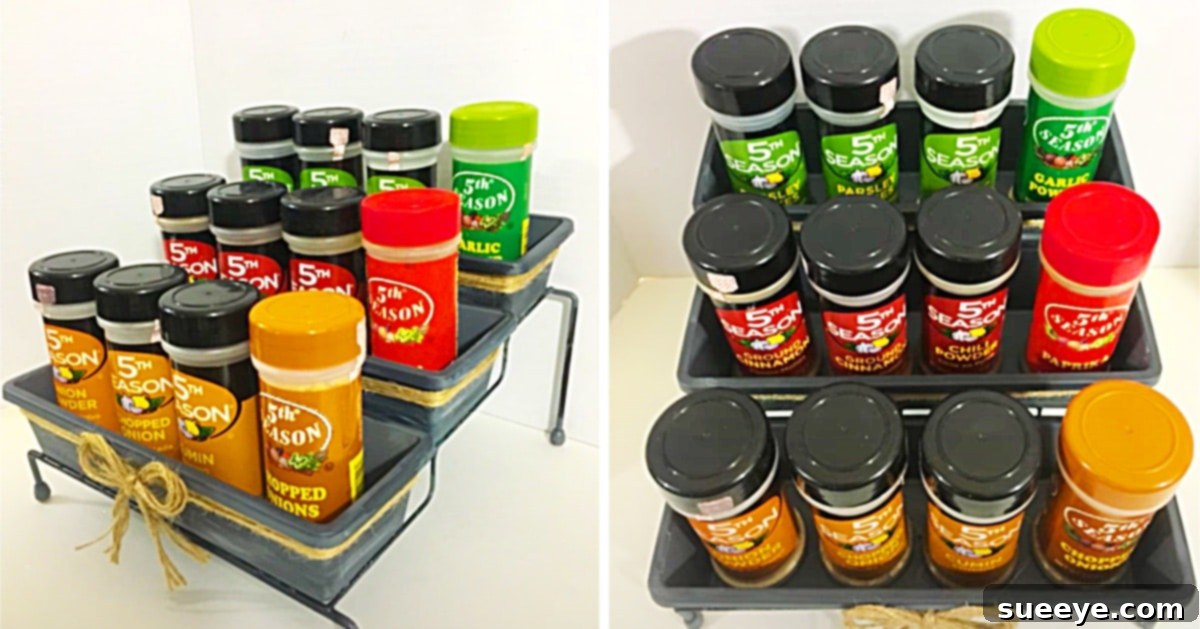
DIY Dollar Tree 3-Tiered Spice Rack: Elevate Your Kitchen Organization on a Budget
Every home cook understands the joy and necessity of having a well-stocked collection of herbs and spices. These aromatic treasures are essential for transforming ordinary ingredients into extraordinary meals. However, beyond their culinary value, spices also offer a charming aesthetic appeal, making them perfect candidates for attractive home decor when displayed thoughtfully. Unfortunately, simply lining up jars on a countertop can quickly lead to a cluttered, unorganized look, undermining both their beauty and accessibility.
This is where a dedicated spice rack becomes an invaluable asset. It’s not merely a storage solution; it’s a statement of organization and style in your kitchen. Recently, while exploring creative DIY projects online, I stumbled upon an absolute gem: a DIY 3-tiered spice rack by Kelly Barlow Creations on YouTube. What truly captivated me was the ingenious simplicity and undeniable charm of this project, proving that practical elegance doesn’t have to come with a hefty price tag. The best part? This entire free-standing spice organizer is crafted almost exclusively from incredibly budget-friendly items sourced from Dollar Tree, making it accessible to virtually anyone.
For years, I’ve been a loyal enthusiast of craft stores like Michael’s, admiring their vast array of supplies. Yet, Dollar Tree has truly stepped up its game in the DIY arena, offering an astonishing range of items perfect for creative projects, all at an unbeatable price point. This project is a testament to the fact that you can achieve stunning, custom home decor and functional organization without breaking the bank. Let’s dive into creating your very own charming and efficient 3-tiered spice rack that will not only declutter your kitchen but also add a rustic, personalized touch to your culinary space.
Why a 3-Tiered Spice Rack is a Kitchen Essential
Before we gather our materials, let’s explore why a tiered spice rack, especially one you craft yourself, is a game-changer for any kitchen. A well-organized spice collection offers numerous benefits that extend beyond mere aesthetics. Firstly, it dramatically improves cooking efficiency. Imagine no longer rummaging through a messy cupboard or drawer, trying to find that elusive cumin or cinnamon. With a tiered rack, every spice is visible and within easy reach, saving you precious time and frustration during meal preparation.
Secondly, proper storage helps preserve the potency and flavor of your spices. Keeping them in an organized manner, away from direct sunlight and heat, can extend their shelf life. A tiered display also helps you keep track of what you have, preventing duplicate purchases and ensuring you use your spices before they lose their vibrancy. Beyond functionality, a beautiful spice rack serves as a delightful decorative element. Whether you prefer a rustic farmhouse look, a modern minimalist vibe, or something in between, a DIY spice rack offers endless possibilities for customization, allowing it to seamlessly integrate with your existing kitchen decor. It transforms what could be a chaotic corner into an eye-catching and functional display.
Materials Needed for Your Budget-Friendly 3-Tiered Spice Rack
One of the most appealing aspects of this project is its reliance on readily available and inexpensive materials. You’ll be amazed at what treasures you can find at your local Dollar Tree that are perfect for crafting. Here’s a detailed list of what you’ll need:
- Three-tiered step shelf (from Dollar Tree): This forms the foundational structure of your spice rack. Its tiered design is naturally perfect for displaying spice jars at different heights, maximizing visibility and access.
- Plastic Drawer Organizers (from Dollar Tree): These versatile organizers will be placed on each tier to hold your spice jars securely. Their plastic construction makes them lightweight and easy to work with.
- Jute Twine (from Dollar Tree): Essential for adding that charming, rustic, farmhouse-inspired decorative touch. Jute twine is easy to work with and provides wonderful texture.
- Grey Primer Spray Paint (specifically designed to bond to plastic): This is a crucial step for ensuring your paint adheres properly to the plastic shelf and organizers, preventing chipping and providing a smooth base for your topcoat.
- Waverly Chalk Paint (in Black and White): Chalk paint is fantastic for achieving a distressed, vintage look without extensive prep work. Having both black and white allows for excellent contrast when distressing.
- Rust-Oleum Clear Spray Enamel (or similar clear sealant): A protective topcoat is vital for sealing your paintwork, making the rack durable, easy to clean, and resistant to moisture and everyday kitchen wear and tear.
- A Hot Glue Gun: Your go-to tool for securely attaching the jute twine and any other embellishments.
- Glue Sticks: Plenty for your hot glue gun.
- A Pair of Scissors: For cutting the jute twine and any other necessary materials.
Step-by-Step Directions: Crafting Your Personalized Spice Organizer
This DIY 3-tiered spice rack by Kelly Barlow Creations is incredibly straightforward, even for beginner crafters. Follow these detailed steps to transform simple Dollar Tree items into a stunning kitchen accessory.
Step 1: Prepare and Prime Your Dollar Tree Components
Begin by ensuring your 3-tiered step shelf and plastic drawer organizers are clean and dry. Any dust, dirt, or grease could prevent the paint from adhering properly. Once clean, take your items to a well-ventilated area, preferably outdoors or in a garage with open doors. Lay down a drop cloth or newspaper to protect your work surface. Apply an even coat of grey primer spray paint to all surfaces of the tiered shelf and the plastic organizers. This specific primer is formulated to bond effectively with plastic, creating a durable base for your subsequent paint layers. Apply thin, even coats, allowing each coat to dry according to the manufacturer’s instructions before applying the next. This prevents drips and ensures full coverage.
Step 2: Paint and Master the Art of Distressing
Once your primer is completely dry, it’s time to add color and character. Apply a base coat of your chosen Waverly chalk paint (e.g., black) to both the tiered shelf and the organizers. Allow it to dry fully. For a distressed look, apply a second contrasting color (e.g., white) over the first coat in certain areas, focusing on edges and raised sections where natural wear would occur. Once the topcoat is slightly dry but not fully cured, use a fine-grit sandpaper or a damp cloth to gently rub away some of the top layer, revealing the base color underneath. This technique creates an aged, vintage, and rustic aesthetic. Experiment with the amount of distressing to achieve your desired effect – a little goes a long way to add charm without looking overly worn.
Step 3: Embellish with Jute Twine for Rustic Charm
Now comes the fun part of adding decorative details that truly elevate your spice rack. Using your trusty hot glue gun, carefully attach jute twine to various parts of your rack. You can wrap the twine around the vertical supports of the tiered shelf, create decorative bands along the front edges of the tiers, or even add small bows or accents. Start by securing one end of the twine with a small dab of hot glue, then tightly wrap it around the desired section, applying small dots of glue intermittently to keep it in place. Finish by trimming the twine and securing the end with another dab of glue. The natural texture and color of the jute twine will instantly infuse a warm, rustic, and inviting feel into your spice rack.
Step 4: Seal for Protection and Longevity
Once all your paint and decorative elements are dry and securely in place, it’s crucial to protect your work with a clear sealant. Take your completed rack back to your well-ventilated area and apply a few light, even coats of Rust-Oleum Clear Spray Enamel. This clear coat will protect the paint from chips, scratches, and moisture, which is especially important in a kitchen environment where spills and splashes are common. The sealant will also make your spice rack easier to wipe clean, ensuring its beauty lasts for years to come. Allow the enamel to cure completely according to the product instructions, which might take up to 24-48 hours, before moving or filling your rack.
Step 5: Assemble and Fill Your New Spice Rack
With the sealant cured, your magnificent 3-tiered spice rack is ready for action! Place the plastic drawer organizers onto each tier. These will help keep your spice jars neatly aligned and prevent them from toppling over. Now, gather your favorite herbs and spices and arrange them attractively in their new home. You might consider adding labels to the tops of your spice jars for quick identification, further enhancing the organization. Place your finished rack on your countertop, inside a pantry, or on a shelf where it’s easily accessible and can be admired.
Customization Ideas to Make It Truly Yours
While Kelly Barlow Creations’ design offers a wonderful starting point, the beauty of DIY lies in personalization. Don’t hesitate to adapt this project to your unique style and kitchen aesthetic:
- Color Palette: Instead of black and white, consider soft pastels for a shabby chic look, bold primary colors for a modern vibe, or natural wood stains if you opt for a wooden base.
- Different Embellishments: Replace jute twine with colorful ribbons, fabric strips, or even small decorative beads or buttons. You could also stencil patterns or text onto the painted surfaces.
- Labels: Create custom labels for your spice jars using a label maker, chalkboard paint and a chalk pen, or even printable designs. This adds to both functionality and visual appeal.
- Magnetic Strips: For a twist, consider attaching magnetic strips to the back of the rack and using magnetic spice tins for a sleek, space-saving solution.
This charming spice rack is more than just a place to store your spices; it’s a reflection of your creativity and a testament to clever, budget-conscious decorating. I truly adore how functional, attractive, and simple this project is to create!
Conclusion: The Power of Dollar Tree DIY
In conclusion, this Dollar Tree 3-tiered spice rack project is a shining example of how inexpensive materials, a little creativity, and some elbow grease can lead to truly remarkable results. It solves the common problem of kitchen clutter, adds a delightful touch of rustic decor, and provides immense satisfaction from having created something beautiful and functional with your own hands. The inspiration from Kelly Barlow Creations reminds us that sophisticated home solutions don’t require expensive purchases; sometimes, the best finds are at our local dollar store.
So, gather your supplies, set aside an afternoon, and embark on this rewarding DIY journey. Not only will you end up with a beautifully organized spice collection, but you’ll also gain a fantastic new piece of kitchen decor that you can proudly say you made yourself. Happy crafting, and may your kitchen be forever organized and inspiring!