
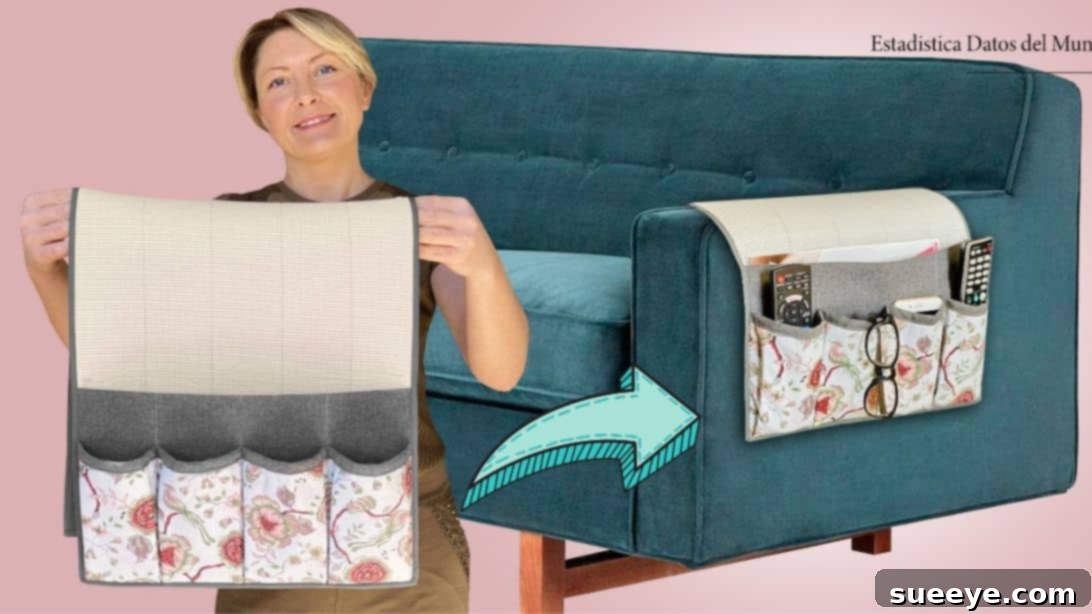
DIY Sofa Armrest Organizer: Your Ultimate Guide to a Tidy Living Room
Tired of endlessly searching for remote controls, misplaced magazines, or your favorite book beneath sofa cushions? Imagine a world where all your living room essentials are neatly organized, always within arm’s reach. This dream can become a reality with a simple, yet incredibly functional, DIY sofa armrest organizer. Whether you’re looking for a practical addition to your own home, a thoughtful handmade gift, or even a unique item to sell online, this project offers both versatility and immense satisfaction.
Inspired by a fantastic tutorial from Estadistica Datos del Mundo on YouTube, this guide will walk you through creating an armrest organizer that not only provides ample storage for books, magazines, tablets, and remote controls, but also serves as a protective cover for your sofa’s armrest. Say goodbye to clutter and hello to a more organized, serene living space!
Why a DIY Sofa Armrest Organizer is a Must-Have for Every Home
In today’s fast-paced world, maintaining an organized home environment can significantly reduce stress and enhance comfort. A custom-made armrest organizer offers a multitude of benefits that extend beyond simple storage:
- Ultimate Convenience: Keep all your frequently used items—remote controls for your TV, sound system, and smart home devices, your phone, reading glasses, a notepad, or even snacks—right where you need them. No more jumping up during your favorite show!
- Clutter Reduction: Transform your living room from a chaotic jumble into a haven of order. By providing designated spots for small items, you eliminate the visual clutter that can accumulate on coffee tables and side tables.
- Sofa Arm Protection: Your sofa’s armrests are often high-traffic areas, prone to spills, scuffs, and general wear and tear. This organizer acts as a stylish protective layer, extending the life and maintaining the pristine look of your furniture.
- Personalized Style: Unlike generic store-bought organizers, a DIY version allows you to choose fabrics, colors, and patterns that perfectly match your existing home decor, adding a unique touch of personality to your space.
- Budget-Friendly Solution: Crafting your own organizer is often more cost-effective than purchasing a similar quality item. Plus, it’s a rewarding project that uses relatively simple materials.
- Perfect Gift Idea: A handmade armrest organizer makes a thoughtful and practical gift for housewarmings, birthdays, or holidays. It shows care and creativity, and recipients will appreciate its everyday utility.
- Beginner-Friendly Project: This tutorial is designed to be accessible for sewers of all skill levels, including those new to sewing. With clear instructions and a step-by-step approach, you’ll be amazed at what you can create.
Materials You’ll Need for Your DIY Sofa Armrest Organizer
Before diving into the sewing process, gather all your materials. High-quality materials will ensure your organizer is durable and looks fantastic. Here’s a comprehensive list, including essential tools:
Fabric and Interfacing:
- Main Body Fabric: Two pieces of 33.5″ by 14.6″ cotton fabric. This will form the main strip that drapes over the armrest. Choose a durable, attractive cotton fabric that complements your sofa.
- Thin Thermo-Adhesive Wadding (for Main Body): Two pieces of 33.5″ by 14.6″. This wadding (or batting) adds structure, padding, and a soft feel to the main body, helping it lie smoothly and protect your armrest.
- Front Pocket Panel Fabric (A): One piece of 14.6″ by 17.7″ cotton fabric. This will be the exterior of your primary storage pockets.
- Thermo-Adhesive Interlining (B – for Front Pocket Panel): One piece of 13.8″ by 16.9″. Interlining provides stability and stiffness to the pocket panel, helping it hold its shape even when filled.
- Side Pocket Fabric (C): Two pieces of 20.5″ by 6.3″ cotton fabric. These pieces will form the smaller, additional pockets.
- Thin Thermo-Adhesive Wadding (D – for Side Pockets): One piece of 20.5″ by 7.5″. Similar to the main body wadding, this adds structure and a padded feel to the side pockets.
- Bias Tape: Approximately 90.6″ (or 2.5 yards) of pre-made bias tape. This is crucial for neatly finishing all the raw edges of your organizer, giving it a professional and polished look. Choose a color that matches or contrasts nicely with your main fabric.
Essential Tools:
- Sewing Machine: A standard sewing machine will make this project much quicker and easier.
- Fabric Scissors: Sharp scissors are essential for clean, precise cuts.
- Measuring Tape or Ruler: For accurate measurements of your fabric and sofa.
- Fabric Marking Pen/Chalk: To draw lines on your fabric for sewing and cutting.
- Straight Pins or Fabric Clips: To hold fabric layers together before sewing.
- Iron and Ironing Board: Crucial for pressing seams, adhering wadding/interlining, and achieving crisp folds.
- Matching Thread: High-quality polyester thread that matches your fabric color.
Step-by-Step Guide: Crafting Your Sofa Armrest Organizer
Now that you have all your materials ready, let’s begin crafting your custom sofa armrest organizer. Follow these detailed steps carefully for the best results.
Step 1: Taking Accurate Measurements for the Main Panel
Begin by measuring your sofa’s armrest to ensure your organizer fits perfectly. Using a flexible measuring tape, start from the end of the armrest on the sitting area side of your sofa. Measure 5.9 inches (approximately 15 cm) and gently insert the tape inside the cushion or between the armrest and seat back to account for the part that tucks in. Continue measuring across the top of the armrest and down the outer side. The total length of the main panel should be 33.5 inches (about 85 cm), with a width of 14.6 inches (about 37 cm). This initial measurement is critical for the drape and stability of your organizer.
Step 2: Preparing the Main Panel with Wadding
Take one of your main body cotton fabric pieces (33.5″ x 14.6″) and one piece of the thin thermo-adhesive wadding of the same size. Lay the cotton fabric right side down. Carefully place the thermo-adhesive wadding on top of the fabric, ensuring the adhesive side is facing down onto the fabric. Use an iron to press and adhere the wadding to the fabric, following the manufacturer’s instructions for the wadding. This fuses the two layers, giving the main panel structure. Once adhered, on the shorter 14.6-inch side, make small marks every 2.9 inches (about 7.5 cm). Then, draw straight lines across the fabric using a fabric marker or tailor’s chalk, parallel to the longer sides. These lines will guide your quilting stitches.
Step 3: Quilting the Main Panel for Added Structure
Now that your wadding is fused and lines are marked, place the second main body cotton fabric piece on top of the wadding-backed fabric, right sides together. Secure all layers with plenty of pins or fabric clips to prevent shifting. Carefully sew along the lines you drew in the previous step. These stitches will create a quilted effect, adding stability, durability, and a professional finish to your main panel. After sewing, gently press the entire piece with an iron to flatten the seams and ensure a smooth, crisp appearance. This quilting not only looks good but also helps the organizer maintain its shape.
Step 4: Crafting the Central Pocket Panel
Take your cotton fabric (A) measuring 14.6″ by 17.7″ and the thermo-adhesive interlining (B) measuring 13.8″ by 16.9″. Place the interlining on the wrong side of fabric (A) and iron to fuse them together, following the interlining’s instructions. This creates a stiff, structured panel for your pockets. Once fused, fold the entire piece in half lengthwise and mark the center with a crease or fabric marker. Draw a clear line down this center. From this center line, measure and mark 3.5 inches (approximately 9 cm) to each side, drawing two more parallel lines. These lines define the individual compartments of your central pocket panel. Pass a backstitch along these marked lines to create strong, secure pocket divisions. Press with an iron for neatness.
Step 5: Constructing the Side Pockets
For the side pockets, take one of your cotton fabric pieces (C) measuring 20.5″ by 6.3″ and the thin thermo-adhesive wadding (D) measuring 20.5″ by 7.5″. Place fabric (C) right side up. Lay the wadding (D) on top, aligning one long edge, ensuring the wadding slightly overhangs on one side. Sew along the aligned long edge, securing the wadding to the fabric. Flip the cotton fabric over so the right side is now facing up and the wadding is on the back. Press the seam flat. Now, on the right side of the fabric, mark the center along the 20.5-inch length. From this center mark, measure and mark 4.72 inches (approximately 12 cm) to each side, drawing parallel lines. Pass a backstitch and sew along these lines to create distinct compartments within your side pocket. Repeat this process for the second side pocket fabric piece (C) if you want two identical side pockets.
Step 6: Assembling the Front and Back Sections of the Pockets
Now it’s time to join the separate pocket elements. Take your central pocket panel (from Step 4) and the two side pocket panels (from Step 5). Align the front section of the side pockets to the corresponding positions on the central pocket panel. Ensure all raw edges are aligned. Sew along the seams to securely join these pieces together. For the bottom edge of the pocket assembly, you may want to create small pleats or gathers. This adds a little extra volume and flexibility to the pockets, allowing them to hold bulkier items without straining the fabric. Pin the pleats in place and stitch them down to secure the bottom edge of your pocket structure.
Step 7: Attaching Pockets to the Main Body
With your pocket assembly complete, it’s time to attach it to the main quilted fabric panel (from Step 3). Lay your long, quilted cotton fabric flat with the right side facing up. Carefully position your assembled pocket unit onto the main fabric. The pockets should be centered on one end of the main panel, leaving enough length on the other end to drape over the armrest and tuck into the sofa. Pin the pocket unit securely in place around all its edges that meet the main panel. Now, sew the pocket unit onto the main fabric. For added durability and a neat finish, perform zigzag stitching all around the perimeter where the pockets meet the main fabric. This secures the pockets firmly and encases the raw edges, preventing fraying.
Step 8: Finishing with Bias Binding
The final step is to give your armrest organizer a clean, professional finish using bias tape. Take your 90.6 inches of bias tape. Fold the bias tape in half lengthwise and press it with an iron to create a sharp crease. This makes it easier to attach. Starting at an inconspicuous spot, align the raw edge of the folded bias tape with the raw edge of your entire organizer (where the main fabric and pockets are joined). Pin it all around the perimeter. Carefully sew the bias tape to the organizer. As you reach the corners, gently fold the bias tape to create neat, mitered corners. Continue sewing until you’ve completely enclosed all raw edges. Overlap the beginning and end of the bias tape by about 1 inch and sew them together neatly. This finishing touch not only makes your organizer durable but also elevates its overall appearance, making it look store-bought.
Tips for Customizing Your Armrest Organizer
The beauty of DIY lies in customization! Don’t hesitate to personalize your armrest organizer to perfectly fit your style and needs:
- Fabric Choices: Experiment with different fabric types. Opt for heavy-duty upholstery fabric for extra durability, or choose a vibrant print to add a pop of color. Velvet or faux leather can add a touch of luxury.
- Pocket Variations: Adjust pocket sizes and configurations. Add a deeper pocket for a tablet, a small zippered pocket for valuables, or a pen holder. Consider adding flaps with magnetic snaps or Velcro for extra security.
- Embellishments: Enhance your organizer with decorative elements. Embroider initials, sew on appliques, or add decorative stitching. Fringe or tassels can also add a unique flair.
- Padding: For extra protection or a softer feel, you can add an additional layer of thin foam or denser wadding to the main panel.
Care and Maintenance for Your Handmade Organizer
To ensure your sofa armrest organizer lasts for years, proper care is essential. The cleaning method will largely depend on the fabric you chose:
- General Cleaning: For most cotton fabrics, a gentle machine wash in cold water with a mild detergent is usually safe. Tumble dry on low or air dry to prevent shrinking and maintain shape.
- Spot Cleaning: For small spills or marks, use a damp cloth with a mild soap to spot clean. Blot the area gently; avoid harsh scrubbing.
- Delicate Fabrics: If you’ve used delicate fabrics like silk or certain blends, hand washing or dry cleaning might be necessary. Always check fabric care labels if you’re unsure.
- Ironing: If your organizer becomes wrinkled, iron it on a medium setting, using a pressing cloth if your fabric is delicate or has embellishments.
Embrace Organization with Your New Sofa Armrest Organizer
You’ve successfully created a functional, stylish, and completely customized sofa armrest organizer! This project is a testament to the power of DIY – transforming simple materials into a practical item that enhances your daily life. No more scrambling for remotes or losing your page in a book; everything you need for a cozy evening will now be neatly tucked away, right by your side.
Enjoy the newfound order and elegance your handmade organizer brings to your living room. It’s a small change that makes a big difference, proving that a little creativity and effort can lead to significant improvements in home comfort and efficiency. Share your creation with friends and family, and perhaps inspire them to embark on their own DIY journey!