
Master Strip Piecing in Quilting: 3 Easy Methods for Beginners
Are you new to the captivating world of quilting and eager to tackle intricate patterns without feeling overwhelmed? Or perhaps you’re an experienced quilter looking for ways to streamline your process? You’ve come to the right place! One of the most beloved and efficient techniques in quilting, especially for creating complex-looking designs with ease, is strip piecing. This method allows you to sew long strips of fabric together before cutting them into smaller units, dramatically speeding up the piecing process and enhancing accuracy.
For those just starting their quilting journey, understanding how to effectively use strip piecing can be a game-changer. It unlocks a world of design possibilities, from classic block patterns to modern, geometric quilts, all while minimizing the repetitive individual cutting and sewing of small fabric pieces. We’ll explore three fantastic, beginner-friendly methods demonstrated by the experts at Art Gallery Fabrics on their popular YouTube channel. These techniques will equip you with the skills to confidently approach your next quilting project, transforming stacks of fabric into stunning textile art.
Why Strip Piecing is a Quilter’s Best Friend
Strip piecing offers a multitude of benefits that make it an indispensable technique for quilters of all skill levels. Its primary advantage lies in its efficiency. Instead of meticulously cutting and sewing dozens, or even hundreds, of small squares or rectangles individually, strip piecing allows you to assemble longer segments of fabric. This significantly reduces the time spent at your sewing machine and rotary cutting mat, letting you see your project come together much faster.
Beyond speed, strip piecing also enhances accuracy. By sewing longer seams, you naturally create more stable units, reducing the chance of distortion that can occur when handling many tiny pieces. This consistency is crucial for ensuring your quilt blocks lie flat and fit together perfectly, leading to a professional-looking finish. Furthermore, it opens up a vast array of design possibilities, from simple striped blocks to intricate chevrons, log cabins, and even complex medallion patterns. It’s an empowering technique that simplifies complexity, making ambitious projects feel achievable.
Essential Tools and Preparation for Strip Piecing
Before diving into the methods, ensure you have the right tools and your workspace is prepared for optimal results. Accuracy is paramount in quilting, and strip piecing is no exception. Here’s what you’ll need:
- Rotary Cutter: A sharp blade is essential for clean, precise cuts.
- Self-Healing Cutting Mat: Protects your work surface and your blade.
- Quilting Rulers: A long ruler (e.g., 6″ x 24″) is ideal for cutting long strips, and a square ruler (e.g., 6.5″ or 12.5″) will be handy for sub-cutting.
- Sewing Machine: Equipped with a 1/4-inch seam allowance foot if possible, or precise seam guides.
- Iron and Ironing Board: Crucial for pressing seams accurately, which impacts the final lay of your quilt.
- Fabric: High-quality quilt cotton is recommended for its stability and ease of use. Pre-wash and press your fabrics if you typically do so, to prevent shrinkage and color bleeding later.
- Thread: A good quality, all-purpose polyester or cotton thread that matches your fabric or is a neutral color.
Always take your time to cut accurately. Even a slight wobble can throw off your entire block. Measure twice, cut once! And remember, pressing is not ironing; gently lift and press your iron down to set seams, avoiding stretching the fabric.
Method #1: Efficient Two-Strip Piecing for Uniform Blocks
The first method is a fundamental yet incredibly powerful technique for creating multiple identical units quickly. It’s perfect for generating a stack of two-patch blocks or setting the foundation for more complex designs like half-square triangles or simple checkerboard patterns. This approach minimizes cutting and maximizes your sewing time, making it highly efficient.
Step-by-Step Guide for Method #1:
- Prepare Your Fabric Strips: Begin by selecting two different fabrics that you wish to pair together. Cut two long strips, each measuring 3 & 1/2 inches wide. The length of your strips will depend on how many units you want to create; typically, using the full width of fabric (WOF), around 42-44 inches, is a great starting point for maximizing yield.
- Sew the Strips Together: Place the two fabric strips right sides together, ensuring their raw edges are aligned perfectly. Using a 1/4-inch seam allowance – a standard in quilting – sew along the length of the strips. The key here is to maintain a very straight seam. A consistent 1/4-inch seam allowance is critical for your blocks to come out the correct size and fit together seamlessly.
- Press the Seam: Once sewn, carefully take your strip set to the ironing board. Press the seam open or to one side, depending on your preference and the needs of your project. Pressing open creates a flatter seam, while pressing to one side often adds a bit more stability and can help with nesting seams later. The goal is a crisp, straight seam line that will ensure your subsequent cuts are accurate.
- Sub-Cut Your Units: With your pressed strip set, return to your cutting mat. Using your rotary cutter and a square ruler, sub-cut 3 & 1/2-inch wide segments from the strip set. You will continue to cut as many of these units as possible along the entire length of your sewn strips. Each sub-cut piece will now be a 3 & 1/2-inch square made up of your two original fabrics.
This method brilliantly illustrates the efficiency of strip piecing. Instead of cutting multiple 3 & 1/2-inch squares from two different fabrics and then sewing them individually, you’ve achieved the same result with just two initial strip cuts, one long seam, and a series of quick sub-cuts. This technique is perfect for quickly building blocks for projects like rail fence quilts, checkerboard quilts, or as components for larger, more intricate patterns. The precision gained from cutting after sewing long strips makes this method incredibly rewarding for beginners.
Method #2: Creative On-Point Cutting for Unique Designs
The second method introduces a fantastic way to add visual interest and a dynamic feel to your quilts by playing with varied strip widths and “on-point” cutting. This technique allows for a more improvisational approach while still benefiting from the efficiency of strip piecing. It’s ideal for creating unique focal points, medallion quilts, or adding unexpected elements to a more traditional design.
Step-by-Step Guide for Method #2:
- Construct a Varied Strip Set: Unlike the uniform strips in Method #1, here you’ll sew together several fabric strips of varying widths. You might use strips of 2 inches, 3 inches, 4 inches, or any combination that appeals to your design aesthetic. Sew these strips together along their long edges, again using a consistent 1/4-inch seam allowance. You can make this strip set as wide and long as you desire, depending on the size of the final shapes you want to cut. Press all seams carefully, either open or to one side.
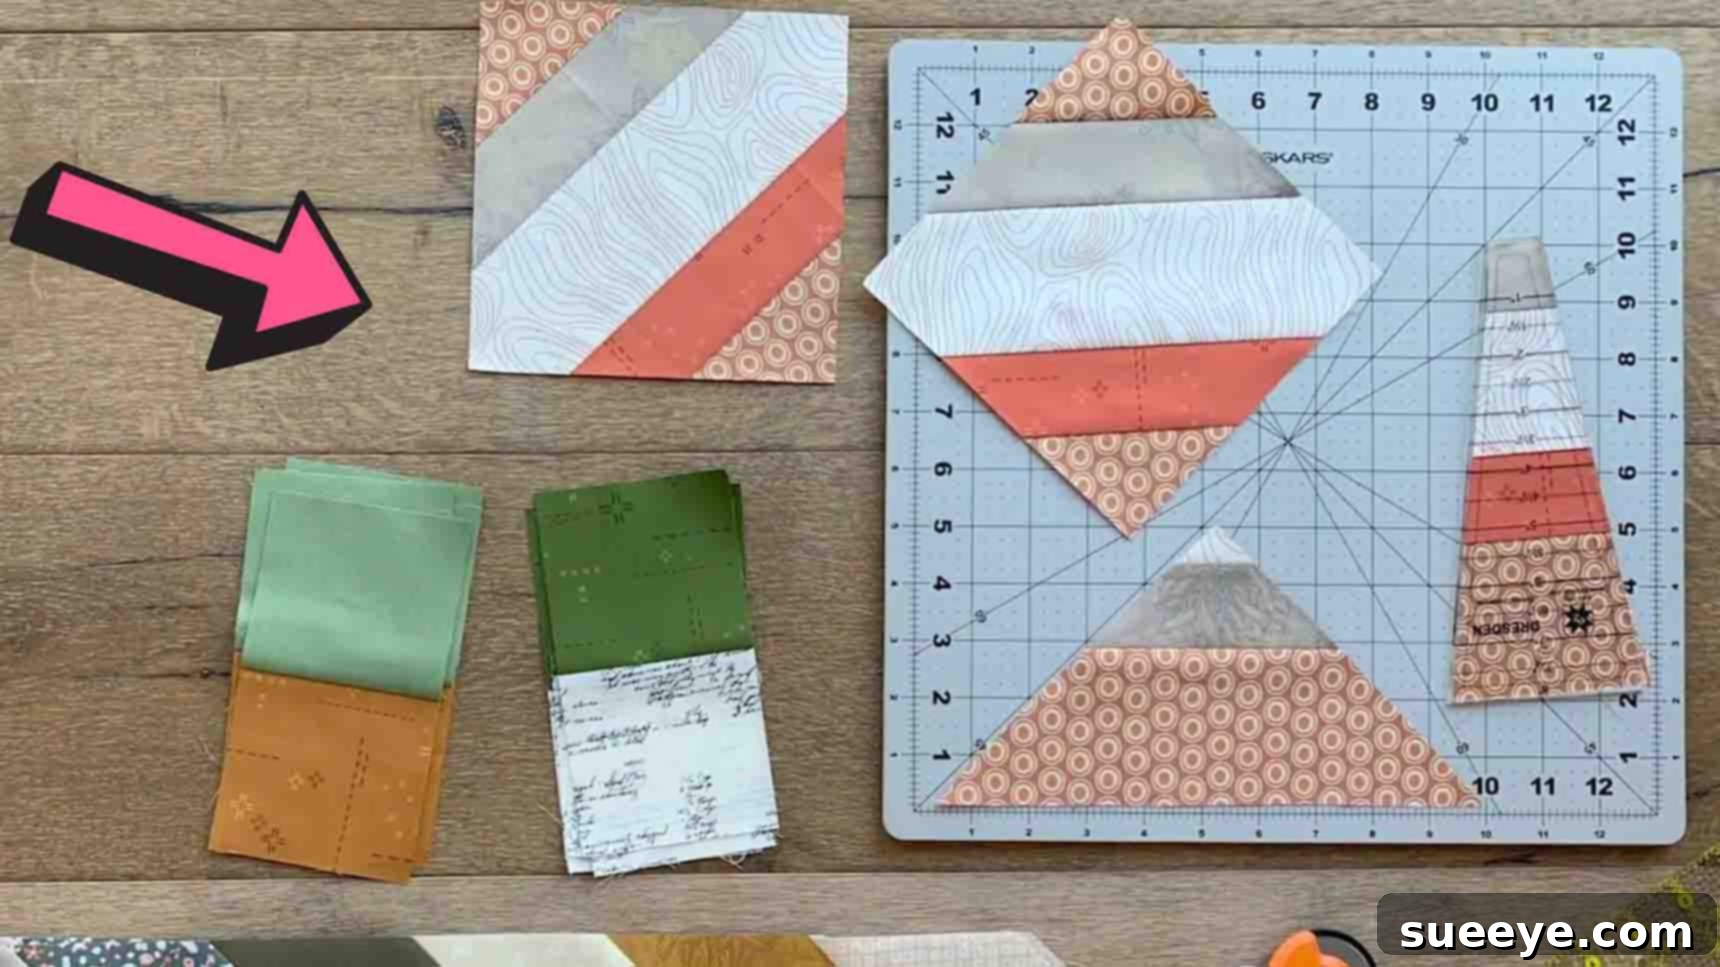
- Prepare for On-Point Cutting: Once your varied strip set is complete and pressed flat, lay it on your cutting mat. Grab a square ruler, for example, a 6 & 1/2-inch square ruler. The magic of this method comes from placing the ruler “on point.” This means you orient the ruler so that one of its corners points directly up or down, and its diagonal line runs horizontally across your strip set.
- Center and Cut: Carefully center your square ruler on point, aligning its vertical and horizontal center lines with a central point or seam within your strip set. This centering ensures a balanced design within your cut piece. Once aligned, use your rotary cutter to trim around all four sides of the ruler. This will yield a perfect square, but because it was cut from a strip set placed on point, the fabric strips inside the square will appear on a diagonal, creating a striking visual effect.
- Experiment with Shapes and Templates: While a square ruler is demonstrated, don’t limit yourself! This method can be applied with various rulers or templates. Consider using diamond rulers, hexagon templates, or even custom paper templates to cut out unique shapes from your strip sets. The beauty is in the unexpected angles and combinations that emerge when you cut across multiple fabric strips simultaneously.
This technique is particularly exciting for quilters who enjoy modern and abstract designs. The varied strip widths combined with the on-point cutting create a sense of movement and depth that is difficult to achieve with traditional block piecing. It’s a fantastic way to use up smaller fabric scraps and turn them into something cohesive and beautiful.
Method #3: Dynamic Staggered Strips for Angled Patterns
Our third method takes strip piecing to another level by introducing staggered seams and angled cuts, resulting in highly dynamic and modern quilt patterns like chevrons, zigzags, or bold diagonal lines. This technique requires a bit more attention to initial placement but rewards you with visually captivating results that look much more complex than they actually are.
Step-by-Step Guide for Method #3:
- Stagger Your Strips: Start by cutting several fabric strips of uniform width (e.g., 2.5 inches or 3 inches). Instead of aligning them perfectly side-by-side, you will stagger them. Lay your first strip horizontally on your workspace. Then, place your second strip parallel to the first, but shift it to the right by a consistent amount, such as 2 inches. Mark this 2-inch interval on each strip as you go, ensuring even staggering. Continue this process with all your strips, creating a stepped or zigzag arrangement.
- Sew in Order: Carefully sew these staggered strips together, maintaining your precise 1/4-inch seam allowance. It’s often easiest to sew them one by one, attaching the second strip to the first, then the third to the second, and so on. Pay close attention to your 2-inch markings to keep the stagger consistent. Press your seams as you go, or once the entire strip set is assembled.
- Clean Up the Edges: Once all your staggered strips are sewn, you’ll notice uneven edges on the left and right sides of your strip set due to the staggering. Lay your strip set on the cutting mat and use a long quilting ruler to trim a straight, clean edge on the left side. This provides a perfect reference point for your subsequent angled cuts.
- Introduce Angled Cuts with a 45-Degree Line: Now for the exciting part! Grab your long quilting ruler and locate its 45-degree line. This line is crucial for creating the dynamic angles. Place the 45-degree line of your ruler along the bottom edge of your strip set, aligning it precisely with the clean edge you just created.
- Trim the First Angled Piece: With the ruler positioned, use your rotary cutter to trim away the left side of the strip set. This first cut establishes your desired angle. Before making the cut, *always* double-check your ruler placement and ensure your fingers are clear of the rotary cutter’s path. If you are left-handed, you might need to flip your strip set or adjust the ruler orientation to cut safely.
- Continue Cutting Angled Units: To cut subsequent pieces, you’ll slide your ruler along the strip set. Instead of using the 45-degree line again, you will align a specific measurement mark (e.g., the 3-inch mark or 4-inch mark, depending on your desired block size) on your ruler with the freshly cut straight edge of your strip set. Continue cutting as many angled units as possible from your fabric. Each piece will reveal the beautiful staggered pattern, cut at a perfect 45-degree angle.
This method generates eye-catching results, perfect for modern quilt designs, striking borders, or even unique bag patterns. The staggered seams combined with the precise 45-degree cuts create an illusion of complex piecing that is surprisingly simple to achieve once you master the technique. It’s a wonderful way to add a contemporary flair to your quilting projects and play with linear movement.
Beyond the Basics: Tips for Strip Piecing Success
While these three methods provide an excellent foundation, here are some general tips to ensure your strip piecing journey is smooth and successful:
- Always Use a Consistent 1/4-inch Seam Allowance: This is arguably the most crucial aspect of accurate quilting. Practice sewing a perfect 1/4-inch seam until it becomes second nature.
- Press, Don’t Iron: As mentioned, pressing means lifting and placing the iron, not sliding it back and forth. This prevents distorting your fabric strips, which can ruin accuracy.
- Use Starch or Best Press: A light spray of fabric starch or Best Press can add crispness to your fabric, making it easier to cut and sew accurately, especially with longer strips.
- Chain Piecing: For methods involving multiple short seams (like sub-cutting from strip sets), use chain piecing. Sew one unit after another without lifting the presser foot or cutting threads in between. This saves time and thread.
- Stay Organized: Label your strip sets or cut units if you’re working on a complex project with many different fabric combinations.
- Watch the Tutorial: For a visual demonstration of these techniques, make sure to check out the Art Gallery Fabrics tutorial on YouTube. Seeing the steps in action can clarify any uncertainties.
Conclusion: Embrace the Efficiency of Strip Piecing
Strip piecing is a fundamental yet incredibly versatile technique that every quilter, especially beginners, should add to their skillset. It transforms the often-laborious process of cutting and piecing small units into an efficient, enjoyable experience, allowing you to create stunning and intricate quilt patterns with remarkable ease. By mastering these three methods – uniform two-strip piecing, creative on-point cutting, and dynamic staggered strip angles – you’ll unlock a new level of creativity and productivity in your quilting.
Remember that practice makes perfect. Don’t be afraid to experiment with different fabric combinations, strip widths, and cutting angles. Each project is an opportunity to learn and refine your skills. So gather your fabrics, sharpen your rotary cutter, and embark on your next quilting adventure with the confidence that strip piecing provides. Happy quilting!