
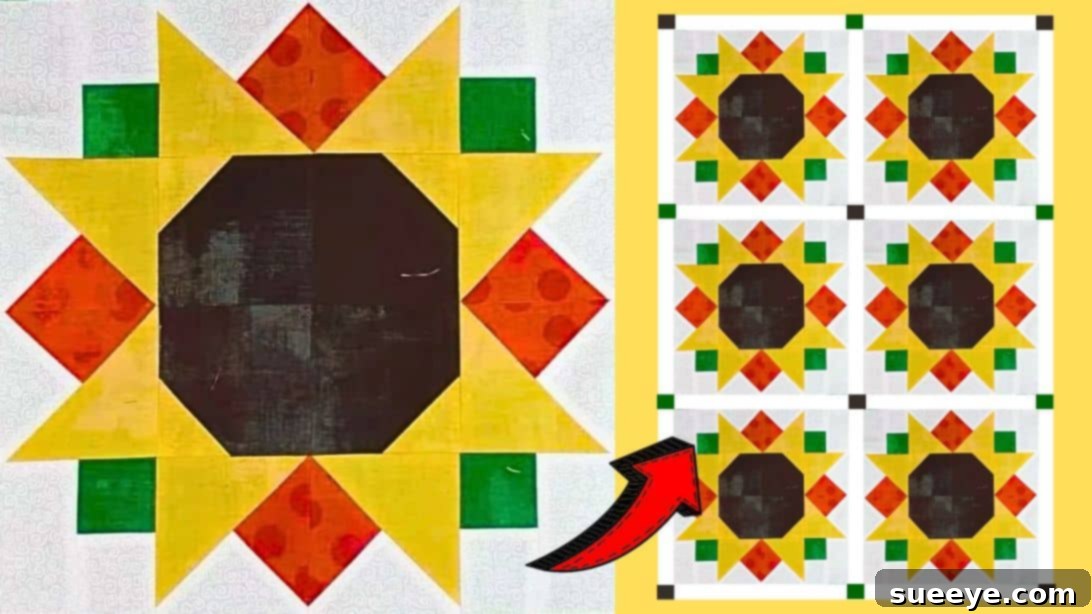
Craft Your Own Stunning Sunflower Quilt Block: An Easy DIY Tutorial for Beginners
Sunflowers stand as a vibrant symbol of summer, warmth, and pure joy. Their bright, cheerful faces have an undeniable charm that captivates anyone who gazes upon them. It’s no wonder that these magnificent blooms are a favorite subject for artists, decorators, and crafters alike. For those who love the art of quilting, incorporating the radiant beauty of a sunflower into your projects can transform a simple piece of fabric into a stunning work of art.
If you’ve ever dreamt of creating a quilt block that radiates sunshine and happiness, then you’re in the perfect place. We’re excited to guide you through crafting a beautiful sunflower quilt block, inspired by the fantastic tutorial from Carol Thelen on YouTube. Carol’s method is incredibly approachable, making it an ideal project for quilting novices and experienced stitchers seeking a quick and satisfying make. This comprehensive step-by-step guide will help you piece together your very own sunflower quilt block with ease, ensuring a perfect finish right from your first attempt.
Imagine the possibilities: a radiant sunflower quilt adorning your bed, a charming throw pillow brightening your living room, or a unique wall hanging that brings the spirit of summer indoors. This tutorial not only simplifies the process but also empowers you to create something truly special and personal. Let’s gather our materials, set up our sewing space, and embark on this delightful quilting adventure!
Why Choose a Sunflower Quilt Block for Your Next Project?
Sunflowers are more than just pretty flowers; they carry a rich symbolism of adoration, longevity, and happiness. Bringing this symbolism into your quilting projects can infuse your home with positive energy and a sense of natural beauty. A sunflower quilt block offers numerous advantages:
- Vibrant Aesthetics: The iconic yellow petals and deep brown center create a striking visual contrast that instantly brightens any space.
- Creative Expression: This block provides a wonderful canvas for experimenting with different fabric prints, textures, and color combinations.
- Versatility: Once mastered, this versatile block can be replicated to create full-sized quilts, charming table runners, practical pot holders, stylish tote bags, or even incorporated into garment designs.
- Beginner-Friendly: With clear instructions, detailed visuals, and a free downloadable pattern, even those completely new to quilting can achieve professional-looking results with confidence.
- Personal Touch: Selecting your own fabrics allows for endless customization, making each sunflower block uniquely yours and reflecting your personal style.
- Skill Building: This project introduces fundamental quilting techniques like accurate cutting, piecing, and pressing, building a strong foundation for future projects.
Materials You’ll Need for Your Sunflower Quilt Block
Before diving into the fun of cutting and sewing, let’s ensure you have all the necessary supplies. High-quality 100% cotton fabrics are generally recommended for quilting projects as they are easy to work with, durable, and hold their shape well after washing. Remember to pre-wash and iron your fabrics to prevent any future shrinkage or color bleeding and to ensure accurate, crisp cuts.
- Yellow Fabric: For the main, vibrant petals of your sunflower. Choose a bright, cheerful shade that truly pops.
- Orange Fabric: To add depth and a secondary layer to your petals, giving a beautiful gradient effect and visual interest.
- Brown Fabric: Essential for the distinct, textured center of the sunflower. A rich, dark brown or even a patterned brown works wonderfully.
- Green Fabric: For the charming leaves that peek out from behind your sunflower. A medium to dark green will provide nice contrast and a natural touch.
- Background Fabric: This fabric will surround your sunflower, making it stand out prominently. A light, neutral color like white, cream, or a soft blue often works best.
- Marking Pen, Pencil, or Chalk: For drawing precise lines on the wrong side of your fabric for stitching.
- Quilting Ruler: A clear acrylic ruler with visible grid lines (e.g., 6.5″ x 24″ or a square ruler) is invaluable for accurate cutting and measuring.
- Rotary Cutter and Self-Healing Mat: (Optional but Highly Recommended) For faster, safer, and more precise fabric cutting than traditional scissors. Ensure your blade is sharp.
- Fabric Scissors: For any smaller, intricate cuts or trimming threads.
- Good Quality Needle and Thread: High-quality 50wt polyester or cotton thread is durable and strong. Match thread color to your fabrics, or use a neutral like white, light grey, or beige.
- Iron and Ironing Board: Crucial for pressing seams open or to one side, which is vital for achieving flat, square, and accurate quilt blocks.
- Sewing Machine: A standard sewing machine capable of a consistent straight stitch is all you need. Consider a 1/4-inch presser foot for perfect seam allowances.
- Free Pattern Download: Click here to download the pattern for free to get all the specific cutting dimensions and detailed assembly diagrams. This is essential for accurate execution.
Step-by-Step Directions: Crafting Your Easy Sunflower Quilt Block
This tutorial breaks down the process into manageable, bite-sized steps, making it simple for anyone to follow along. Precision in cutting and consistent pressing are paramount to achieving a beautiful, professional-looking final block, so take your time with each stage. Always use a 1/4-inch seam allowance unless otherwise specified in the pattern.
1. Prepare Your Fabrics and Download the Pattern
- Pre-wash and Iron Fabrics: Begin by washing all your chosen fabrics as you normally would for a finished quilt project. This is a critical step to prevent any future shrinkage or color bleeding once your quilt is completed. After washing, iron them thoroughly until they are crisp, smooth, and completely wrinkle-free. This preparation is crucial for achieving accurate cuts.
- Download the Free Pattern: Access and print the free pattern provided by Carol Thelen. This pattern will provide you with all the precise measurements for cutting your fabric pieces, along with diagrams for assembly.
- Refer to the Video Tutorial: While these written instructions are comprehensive, watching Carol’s video tutorial alongside will offer invaluable visual clarity, especially for understanding cutting layouts, fabric orientation, and specific assembly techniques.
2. Accurately Cut All Your Fabric Pieces
Using your rotary cutter, self-healing mat, and clear quilting ruler, meticulously cut all your fabric pieces according to the specific dimensions outlined in Carol’s downloadable pattern. Precision at this stage is paramount and will directly impact the neatness and accuracy of your finished quilt block. Take your time, measure twice, and cut once!
- Cut the required number of squares for your yellow petals, orange petals, the central brown core, green leaves, and all necessary background pieces as precisely instructed in the pattern.
- Double-check all measurements against your pattern before making any cuts to prevent errors.
3. Assemble the Petal Units (Likely Half-Square Triangles)
The beautiful petals of your sunflower are typically created using a fundamental quilting technique, often Half-Square Triangles (HSTs), or by joining smaller squares with background triangles. Carol’s video tutorial clearly demonstrates the exact construction method for these units.
- Pair Fabric Squares: Take one yellow fabric square and one background fabric square (or as per the pattern, perhaps an orange square and a background square). Place them together with their right sides facing.
- Mark the Diagonal: On the back (wrong side) of the lighter fabric square, use your marking tool to draw a clear diagonal line from one corner to the opposite corner.
- Stitch the Seams: Stitch a seam precisely 1/4 inch away from *both* sides of this drawn diagonal line. Do not stitch directly on the line yet.
- Cut Along the Line: Carefully cut along the drawn diagonal line between your two stitched seams. You will now have two separate units.
- Press and Trim: Open these units and press the seams open or towards the darker fabric, as preferred, to ensure a flat finish. Trim these units to the exact square size indicated in your pattern, squaring them up if necessary.
- Repeat for All Petals: Continue this process to create all the necessary yellow and orange petal units, ensuring all pieces are uniform in size and pressed perfectly flat. Set these completed units aside.
4. Construct the Sunflower Center Block
The distinct center of your sunflower block often involves adding small yellow squares to the corners of the main brown center fabric, creating a “snowball” effect or pointed corners that mimic the texture of a sunflower’s core. This technique is also known as “stitch and flip.”
- Select Center Square: Take your main brown fabric square that will form the central core of the sunflower.
- Add Corner Square: Place a small yellow fabric square onto one corner of the brown square, aligning the edges perfectly, with right sides facing together.
- Draw and Stitch: Draw a diagonal line on the back (wrong side) of the yellow square, running from the outer corner (of the brown square) to the inner corner (where the yellow square meets the brown). Stitch directly on this drawn line.
- Trim and Press: Carefully trim off the excess fabric, leaving a 1/4-inch seam allowance from your stitched line. Press the yellow fabric triangle open, revealing a perfectly formed yellow corner on your brown square.
- Repeat for All Corners: Repeat this exact process for the remaining three corners of the brown square, adding yellow fabric to each. This technique creates the textured, dimensional center of the sunflower, bringing your block to life.
5. Assemble the Remaining Units and Layout Your Block
Now that you have meticulously crafted your petal units and the distinct sunflower center, it’s time for the exciting stage of arranging all the pieces. This crucial stage allows you to visualize your finished block and ensure everything fits together perfectly before you commit to stitching.
- Create Corner Units (Leaves): Assemble the green fabric pieces (intended for the leaves) with background triangles as shown in the pattern. This often utilizes the same HST method as the petals or a simple stitch-and-flip. Once assembled, press these units flat.
- Layout Your Entire Block: Following the pattern and Carol’s video tutorial closely, carefully lay out all your assembled petal units, the central sunflower block, the green leaf corner units, and any remaining background pieces on a clean, flat surface (such as a design wall or a large table). This arrangement typically forms a 9-patch grid (three rows of three units each). Take a moment to step back, admire your work, and ensure the design is correct and symmetrical.
6. Stitching Rows and Final Assembly of the Block
With all your individual units beautifully laid out and confirmed, it’s time to bring your sunflower to life by stitching the rows together and then joining those rows to form the complete block. Maintain that consistent 1/4-inch seam allowance.
- Sew Units within Each Row: Starting with the top row of your layout, stitch the individual units within that row together using a 1/4-inch seam allowance. For example, if your top row consists of three units, sew unit 1 to unit 2, then sew unit 3 to the combined unit 1-2.
- Press Each Row: After each row is completely stitched, press the seams. You can press them open or to one side, but ensure you alternate the pressing direction for adjacent rows. This technique, called “nesting seams,” helps reduce bulk and makes it easier to align your rows perfectly later.
- Repeat for All Rows: Continue sewing the units for the middle and bottom rows in the same careful manner, pressing after each row is complete.
- Join the Rows: Now you have three fully completed rows. Carefully align the first (top) row with the second (middle) row, making sure that all vertical seams match up perfectly. Using pins generously at these intersections will greatly help in achieving precise alignment. Stitch the two rows together.
- Attach the Third Row: Repeat the process to carefully attach the third (bottom) row to the combined first two rows. Again, pin at seam intersections for accuracy.
- Final Pressing and Squaring Up: Once all rows are joined and your block is complete, give your entire sunflower quilt block a final, thorough press. Press from both the front and back to ensure it lays perfectly flat and square. Finally, use your quilting ruler and rotary cutter to “square up” your block to the exact final dimensions specified in the pattern. This ensures all your sunflower blocks will fit together seamlessly if you plan to create a larger project.
Expert Tips for a Perfectly Pieced Sunflower Quilt Block
Achieving a beautiful, precise quilt block is incredibly satisfying and elevates your finished project. Here are some extra tips from experienced quilters to help you along the way:
- Accurate Cutting is Paramount: This cannot be stressed enough. Invest in a good quality rotary cutter with a sharp blade and a self-healing mat. Always use a clear quilting ruler and take your time. Even a tiny deviation in cutting can throw off your entire block.
- Consistent 1/4-inch Seam Allowance: A perfect and consistent 1/4-inch seam allowance is the fundamental building block of successful quilting. Practice on scraps if necessary. Many sewing machines offer a dedicated 1/4-inch presser foot, which can be an invaluable tool.
- Pressing, Not Ironing: When quilting, we “press” seams, which means gently lifting and placing the iron down, rather than sliding it back and forth. This crucial technique prevents distorting your fabric pieces, which can lead to wavy seams or skewed blocks. Press after every single seam to keep your work flat and accurate.
- Nesting Seams: When joining two units or rows, try to press the seams of adjacent units in opposite directions. This clever trick allows the seams to “nest” together snugly, significantly reducing bulk and helping your points and corners align perfectly.
- Use Good Quality Thread: A strong, low-lint polyester or 100% cotton thread (like 50wt) will ensure your seams are durable and won’t break during future use or washing.
- Pinning is Your Friend: Don’t be shy about using pins! Use pins generously, especially when joining rows or pieces where precise alignment is vital. Pin at every seam intersection and every few inches along the seam.
- Squaring Up Your Block: After completing your entire block, use your quilting ruler and rotary cutter to “square up” the block to the exact final dimensions specified in the pattern. This ensures all your blocks will be uniformly sized and fit together perfectly when assembling a larger quilt top.
- Stay Hydrated and Take Breaks: Quilting can be intense! Remember to take short breaks to stretch and rest your eyes. This helps maintain focus and prevents fatigue-related mistakes.
Unleash Your Creativity: Variations and Project Ideas
Once you’ve mastered this easy and charming sunflower quilt block, the possibilities for customization and incorporating it into larger, stunning projects are truly endless. Let your imagination guide you!
- Color Variations: Experiment with different shades of yellow and orange, from pale pastels to deep golds and fiery oranges. You could even create unique, artistic sunflowers in unexpected colors like purples, blues, or reds for a modern twist.
- Fabric Textures and Prints: Introduce subtle patterns, tone-on-tone prints, or even small floral prints in your fabrics for added visual interest and depth to your sunflower petals and center.
- Seasonal Themes: Combine your cheerful sunflower blocks with other themed blocks to create delightful seasonal quilts. Imagine sunflowers alongside pumpkins for an autumnal theme, or with bright florals for a spring garden quilt.
- Beyond the Quilt: Creative Home Decor Ideas:
- Throw Pillows: One or two beautifully pieced sunflower blocks can be transformed into a stunning decorative pillow cover, instantly brightening a sofa or bed.
- Tote Bags: Incorporate a single, eye-catching sunflower block into the front panel of a handmade tote bag for a personalized and stylish accessory.
- Table Runners/Placemats: A series of sunflower blocks can be joined to form a charming table runner, or individual blocks can become unique, cheerful placemats for your dining table.
- Wall Hangings: Frame a single, perfectly executed block, or combine several for a striking piece of fabric art that brings the warmth of summer indoors.
- Appliqué Accents: Use the block as an appliqué element on larger projects like denim jackets, plain curtains, or even kitchen towels.
- Full Quilts and Beyond: Repeat the block multiple times, joining them with sashing and borders to create a full-sized quilt. The cumulative impact of many sunflowers together is truly breathtaking and makes for a magnificent heirloom piece.
Troubleshooting Common Quilting Challenges
Even the most experienced quilters occasionally encounter snags or frustrations. Don’t be discouraged if things don’t look perfect on your first try. Here are solutions to a few common issues you might face:
- Points Not Matching Up: This is a very common frustration, especially when joining blocks or piecing intricate units. The culprits are usually inconsistent seam allowances, pressing seams in conflicting directions, or not pinning precisely at intersections. Ensure you’re pressing seams carefully (nesting helps immensely), and use plenty of pins to hold fabric in place. Sometimes, slightly over-pressing seams can distort the fabric.
- Block is Not Square or Distorted: An inaccurate finished block can stem from inaccurate cutting, inconsistent seam allowances, or improper pressing techniques. Always square up your block to the pattern’s exact dimensions after completion. If it’s significantly off, it might be worth carefully unpicking and re-sewing problematic seams for a better result.
- Fabric Stretching or Waving: Handle fabric gently, especially bias edges, which are prone to stretching. Remember to press, not iron. If fabric seems to be stretching or shifting excessively under the needle, consider using a walking foot on your sewing machine, which helps feed multiple layers of fabric evenly.
- Thread Breaking or Skipping Stitches: Check your sewing machine needle; it might be dull, bent, or the wrong type for your fabric. Always use a fresh, sharp needle. Re-thread your machine completely (top and bobbin), clean out any lint from the bobbin area, and adjust your tension settings if necessary.
- Bulky Seams: This can occur when too many seams converge in one spot. Pressing seams open (instead of to one side) can help distribute bulk. Trimming bulk from seam allowances in inconspicuous areas can also help, but be careful not to cut too close to your stitches.
Creating your very own sunflower quilt block is an incredibly rewarding experience. Not only do you get to hone your quilting skills and explore your creativity, but you also create a beautiful, lasting piece of fabric art that radiates joy and warmth. We extend our sincere gratitude to Carol Thelen via YouTube for graciously sharing such an accessible, inspiring, and delightful tutorial. Her clear instructions make it possible for anyone, regardless of skill level, to embrace the timeless charm of sunflower quilting.
We highly encourage you to visit Carol’s YouTube channel for more fantastic quilting ideas, detailed tutorials, and a wealth of inspiration. If you enjoyed crafting this sunflower block and found her guidance helpful, you’re sure to discover many more inspiring projects and techniques there. Happy quilting, and may your creations always be filled with sunshine!