
Easy & Quick Summer Fireworks Quilt Pattern: Your Perfect Patriotic Project
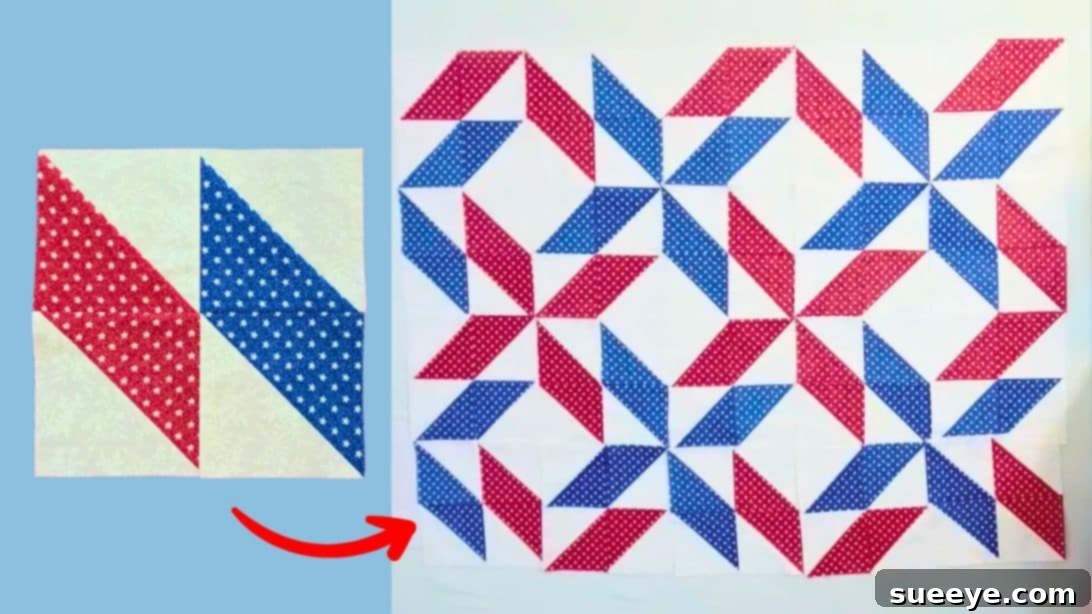
As the vibrant colors of summer fill the air, the anticipation for Independence Day celebrations grows! What better way to honor the spirit of the 4th of July than with a dazzling, handmade quilt? This Summer Fireworks Quilt Pattern is an absolute gem – a super easy and incredibly quick project that will add a burst of patriotic charm to your home. Designed by the talented Brita Nelson, The Questioning Quilter, this design is perfect for quilters of all skill levels, especially beginners. You’ll fall in love with the dynamic red and blue pinwheel stars that seem to dance across the fabric, reminiscent of a festive fireworks display. Best of all, this delightful quilt can often be completed in just an hour or two of focused sewing, making it ideal for a last-minute project or a relaxing weekend craft. Dive into this tutorial and get ready to create a stunning piece that will be cherished for years to come!
Why This Fireworks Quilt is a Must-Make
Beyond its patriotic allure, this particular fireworks quilt pattern offers numerous advantages that make it a favorite among quilters:
- Beginner-Friendly: If you’re new to quilting, this pattern is an excellent starting point. It relies on fundamental techniques, primarily Half-Square Triangles (HSTs), which are easy to learn and master.
- Speedy Construction: Unlike complex projects that can take weeks or months, this quilt can be pieced together rapidly, perfect for instant gratification or a quick gift.
- Stunning Visual Impact: The clever arrangement of HSTs creates a captivating pinwheel design that truly evokes the energy and beauty of fireworks bursting in the night sky.
- Versatile Design: While presented in classic red, white, and blue for patriotic holidays, the core block design is adaptable to any color scheme or occasion.
- Skill Builder: Even experienced quilters will appreciate this pattern for honing precision in HST construction and block assembly.
Materials and Essential Tools for Your Patriotic Quilt
Before you embark on creating your beautiful fireworks quilt, it’s crucial to gather all your materials and tools. Having everything at hand will ensure a smooth and enjoyable quilting process. For the original design featuring 20 finished 9″ x 9″ blocks, resulting in a quilt approximately 36″ x 45″ (a lovely lap or throw size), here’s what you’ll need:
Fabric Requirements:
For the patriotic theme, we’ll focus on vibrant red, blue, and crisp white.
- 1/2 yard of Red Fabric: Choose a clear, bright red. This will form a significant part of your pinwheel stars.
- 1/2 yard of Blue Fabric: A rich, deep blue or a vibrant royal blue works wonderfully as a contrasting color.
- 1 yard of White Fabric: A pure, crisp white is essential. It provides the necessary contrast to make your red and blue elements pop and gives the quilt its light, airy feel, much like smoke from fireworks.
- Fabric Quality Tip: Always opt for high-quality 100% cotton quilting fabric. It’s easier to work with, less prone to fraying, and will stand the test of time, ensuring your quilt lasts for generations.
- Pre-Washing Note: It’s highly recommended to pre-wash all your fabrics. This helps prevent future shrinkage, removes excess dyes that could bleed onto lighter fabrics, and ensures a more consistent final product.
Essential Quilting Tools:
These tools are standard for most quilting projects and will make your work significantly easier and more accurate:
- Rotary Cutter: A sharp 45mm or 60mm rotary cutter is indispensable for precise, straight cuts.
- Self-Healing Cutting Mat: Protect your work surface and your rotary blade with a good quality mat.
- Quilting Rulers: A large rectangular ruler (e.g., 6.5″ x 24″) for cutting strips and a smaller square-up ruler (e.g., 6.5″ x 6.5″) for trimming HSTs are highly recommended.
- Sewing Machine: Any sewing machine capable of a consistent straight stitch will work. Ensure it’s well-maintained and threaded correctly.
- Thread: A high-quality cotton or polyester thread in a neutral color (like white, light gray, or ecru) is suitable for piecing.
- Iron and Ironing Board: Proper pressing is as important as accurate sewing in quilting. A good steam iron is a must.
- Fabric Scissors: Keep a sharp pair dedicated solely to fabric.
- Pins or Fabric Clips: To secure fabric pieces before sewing, ensuring they don’t shift.
- Seam Ripper: An essential tool for every quilter – we all make mistakes, and a good seam ripper makes corrections less painful!
Step-by-Step Fireworks Quilt Assembly Guide
Now that you have all your materials ready, let’s begin the exciting process of bringing your fireworks quilt to life. Precision at each step will result in a beautifully aligned and impressive finished quilt.
Step 1: Cutting Fabrics and Crafting Perfect Half-Square Triangles (HSTs)
Half-Square Triangles are the building blocks of this dynamic design. Taking your time here will ensure your final blocks are square and perfectly matched.
- Prepare Your Squares: For Brita’s specific design, aiming for 5″ x 5″ unfinished HSTs (which will finish at 4.5″ x 4.5″ once sewn), a common and accurate method is to cut your starting squares at 5 7/8″ x 5 7/8″.
- From Red Fabric: Cut twenty (20) 5 7/8″ x 5 7/8″ squares.
- From Blue Fabric: Cut twenty (20) 5 7/8″ x 5 7/8″ squares.
- From White Fabric: Cut forty (40) 5 7/8″ x 5 7/8″ squares. (You need twice as many white squares because each red or blue square will be paired with a white square).
- Constructing Red and White HSTs:
- Take one red 5 7/8″ square and one white 5 7/8″ square. Place them right sides together, ensuring all edges are aligned perfectly.
- On the back of the lighter fabric (the white square), draw a diagonal line from one corner to the opposite corner. This line will serve as your cutting guide later.
- Using your sewing machine, stitch a scant 1/4″ seam allowance on both sides of the drawn diagonal line. A “scant” 1/4″ means just a thread’s width less than a true 1/4″, which accounts for the fabric taken up by the thread and helps your blocks measure accurately once pressed.
- Cutting and Pressing Red and White HSTs:
- Carefully cut along the drawn diagonal line. This action will yield two individual HST units from each pair of squares.
- Open each unit and press the seam. You can either press the seam open (which reduces bulk) or press it towards the darker fabric (the red, in this case). Choose a consistent pressing direction for all your HSTs.
- Trimming Red and White HSTs:
- This is a critical step for accuracy! Using your square-up ruler, carefully trim each red and white HST unit to precisely 5″ x 5″. Position the 45-degree line of your ruler along the diagonal seam of the HST to ensure it’s square. Trim one side, rotate, and trim the other. This ensures your HSTs are perfectly square and will fit together seamlessly.
- Constructing and Trimming Blue and White HSTs:
- Repeat the entire process (steps 2-4) using your twenty blue 5 7/8″ squares and twenty white 5 7/8″ squares. This will produce forty (40) blue and white HST units, each trimmed to a perfect 5″ x 5″ unfinished square.
- You should now have forty (40) red and white 5″ x 5″ HSTs and forty (40) blue and white 5″ x 5″ HSTs.
Step 2: Assembling the Harlequin Block – The Core of the Fireworks Design
This unique “harlequin block” is where the magic truly begins, combining your HSTs to form a distinct motif. Pay close attention to the orientation of your triangles!
- Arrange for the First Diamond:
- Take one red-white HST. Orient it so the red triangle is positioned in the bottom-left corner (its point should be facing diagonally down-left).
- Place one blue-white HST directly to the right of the red-white HST. Ensure the blue triangle is also positioned in its bottom-left corner. When placed side-by-side, the straight seams of both HSTs should align vertically, and the red and blue points should both be pointing downwards and inwards if viewed as a larger rectangle.
- Arrange for the Second Diamond:
- Below the first red-white HST, place another red-white HST. This time, rotate it so the red triangle connects with the red triangle of the HST above it, forming a symmetrical diamond shape.
- Similarly, place the remaining blue-white HST below the first blue-white HST. Rotate it so its blue triangle connects with the blue triangle above, forming a second, parallel diamond shape.
When all four HSTs are correctly arranged, you will see a red diamond tilting to the left, and a blue diamond also tilting to the left, positioned side-by-side. This forms the basis of one “harlequin block.”
- Sewing the Diamonds:
- First, sew the two red-white HSTs together to form the red diamond unit. Use a scant 1/4″ seam allowance. Press the seam open or to one side.
- Next, sew the two blue-white HSTs together to form the blue diamond unit. Press this seam as you did the first.
You now have two rectangular units, each measuring approximately 5″ x 9″ (unfinished).
- Forming the Harlequin Block:
- Carefully align the red diamond unit with the blue diamond unit, right sides together. Your goal is to sew them along the vertical seam to create a single, larger square block.
- Pay extra attention to aligning the horizontal seam lines where the HSTs meet. Pin generously at these intersections to ensure your points match up perfectly.
- Sew these two diamond units together with a scant 1/4″ seam allowance.
- Final Pressing: Press the final seam open or to one side to reduce bulk and create a flat, crisp “harlequin block.” This block should now measure approximately 9″ x 9″ (unfinished). Repeat this process until you have twenty (20) identical harlequin blocks.
Step 3: Crafting Pinwheel Stars and Assembling Your Quilt Top
This is where your individual harlequin blocks come together to form the spectacular pinwheel stars and eventually, your complete quilt top.
- Arranging for the Pinwheel Star Motif:
- Take four of your finished 9″ x 9″ harlequin blocks.
- Arrange them on a flat surface or design wall so that the blue corners (the points where the two blue HSTs within each harlequin block meet) all converge towards the very center of the four-block arrangement. This specific orientation is crucial for forming the mesmerizing pinwheel star.
- Sewing the Pinwheel Star Motif:
- First, sew the top-left harlequin block to the top-right harlequin block, forming a horizontal pair. Press the seam.
- Next, sew the bottom-left harlequin block to the bottom-right harlequin block, forming another horizontal pair. Press this seam.
- Finally, sew these two horizontal pairs together, aligning the central seams with care to ensure a perfect center point for your pinwheel. Pin well at the center intersection to match the seams accurately. Sew with a scant 1/4″ seam allowance.
- Press this final seam. You have now created one magnificent Pinwheel Star Motif, which will measure approximately 18″ x 18″ finished.
- The Emergence of Secondary Red Pinwheels:
- As you create and arrange multiple pinwheel star motifs and begin to sew them together, you will notice a delightful secondary design appearing: vibrant red pinwheels! This happens automatically where the red diamond sections of adjacent blocks meet, adding another layer of visual interest to your “fireworks” display.
- Planning Your Quilt Top Layout:
- Brita Nelson’s specific quilt uses a total of 20 individual 9″ x 9″ harlequin blocks. These are arranged into a layout of 4 blocks down by 5 blocks across. This means you will have 4 rows, each containing 5 harlequin blocks.
- If you prefer to think in terms of the larger Pinwheel Star Motifs, you will create five (5) such motifs (20 blocks / 4 blocks per motif = 5 motifs). You would then arrange these motifs into a grid, for example, 2 motifs by 2 motifs, with an extra motif or partial arrangement. However, following the original instruction of 20 individual blocks in a 4×5 grid is simpler for assembly.
- Lay out all your completed harlequin blocks on a design wall or a clean floor. This allows you to visualize the entire quilt top, ensure all blocks are correctly oriented, and make any adjustments before sewing.
- Assembling Rows:
- Sew your harlequin blocks together into horizontal rows. For the 4×5 layout, you will have 4 rows, each with 5 blocks.
- Use a consistent scant 1/4″ seam allowance.
- Press the seams of alternating rows in opposite directions. For example, press seams to the right for Row 1, to the left for Row 2, to the right for Row 3, and to the left for Row 4. This technique helps the seams “nest” when you join the rows, reducing bulk and leading to flatter, more accurate intersections.
- Joining Rows to Complete the Quilt Top:
- Once all your rows are sewn, carefully join them together vertically. Align the seams between rows, pinning generously, especially at the intersections where your pinwheel points meet.
- Sew the rows together with a scant 1/4″ seam allowance.
- Press the final seams thoroughly, ensuring your quilt top lies flat and smooth. Your quilt top is now complete!
Finishing Your Fireworks Quilt: The Final Touches
With your quilt top proudly pieced together, the final steps transform it into a durable, cozy, and display-ready piece.
- Layering (Basting): Create a “quilt sandwich.” Lay your backing fabric right side down on a clean, flat surface, smoothing out any wrinkles. Place your batting centered on top of the backing. Finally, place your completed quilt top right side up on top of the batting. Secure these three layers together by basting – either with safety pins, basting spray adhesive, or long hand stitches.
- Quilting: This is where you stitch through all three layers (quilt top, batting, backing) to hold them together and add texture. You can choose a simple straight-line quilting pattern (often called “stitch-in-the-ditch” where you stitch along existing seams), a free-motion meandering pattern, or any design you desire. Keep it simple for a quick finish or get creative!
- Binding: Once quilted, trim the edges of your quilt square. Prepare binding strips (usually cut at 2.5 inches wide from your chosen fabric). Attach the binding around the perimeter of the quilt, first machine-sewing to the front and then hand-stitching or machine-stitching to the back for a clean, professional finish.
Expert Tips for Quilting Success (Especially for Newbies)
Quilting is a rewarding craft, and a few simple tips can elevate your experience and the quality of your finished project:
- Measure Twice, Cut Once: This old adage holds true in quilting. Precision in cutting is paramount. Even a slight inaccuracy can compound over many blocks.
- The Power of Pressing: Always press your seams after each sewing step. Pressing isn’t ironing; it’s lifting and placing the iron to set stitches and flatten fabric without distorting it.
- Consistent Seam Allowance: Strive for a consistent 1/4″ seam allowance. Many sewing machines come with a 1/4″ quilting foot, which is a fantastic investment for accuracy.
- Chain Piecing: When making multiple identical units like HSTs, use chain piecing. Sew one unit, and without lifting your presser foot or cutting the thread, feed the next unit directly under the needle. This saves time and thread!
- Don’t Fear the Seam Ripper: Every quilter, no matter how experienced, uses a seam ripper. It’s a tool for improvement, not a sign of failure. Embrace it!
- Watch the Video Tutorial: Visual learners will greatly benefit from Brita Nelson’s original video tutorial (find it here). She offers excellent visual demonstrations for layout options and techniques.
Design Variations and Personalizing Your Fireworks Quilt
While the red, white, and blue motif is perfect for the 4th of July, the beauty of this fireworks quilt pattern lies in its adaptability. Don’t hesitate to personalize it!
- Alternative Color Palettes:
- Seasonal: Use oranges, browns, and golds for an autumn-themed quilt; greens, reds, and creams for Christmas; or pastels for a charming baby quilt.
- Modern Look: Experiment with contrasting brights and grays, or a monochromatic scheme using various shades of a single color for a sophisticated touch.
- Size Adjustments:
- Table Runner: Make fewer harlequin blocks (e.g., 3×1 or 4×1 arrangement) for a festive table runner.
- Wall Hanging: A 2×2 or 3×3 arrangement of pinwheel star motifs makes for a lovely decorative wall hanging.
- Larger Quilt: To make a larger throw, twin, or even queen-sized quilt, simply make more harlequin blocks and adjust your grid layout accordingly. Calculate your desired finished quilt dimensions, divide by the finished block size (9″), and that will give you your block count.
- Experiment with Quilting Designs: The open spaces within the pinwheels provide a fantastic canvas for various quilting patterns, from simple straight lines that define the shapes to intricate free-motion designs that add texture and depth.
Conclusion: Celebrate with Your Handmade Fireworks Quilt!
Congratulations! You’ve successfully navigated the steps to create a stunning Summer Fireworks Quilt, a truly memorable and patriotic project. This pattern, championed by Brita Nelson, The Questioning Quilter, is a testament to how simple techniques can yield spectacularly beautiful results. Whether you’ve crafted it for a 4th of July celebration, a cherished gift, or simply to add a burst of joy to your home, your handmade quilt is a unique work of art.
We hope this detailed guide has empowered you to confidently tackle this project and perhaps sparked a deeper love for quilting. The satisfaction of seeing your fabric pieces transform into a cohesive and beautiful quilt is truly unmatched. Don’t forget to share your creations and continue exploring the wonderful world of quilting. Brita Nelson’s YouTube channel is a treasure trove of unique and inspiring patterns, so be sure to check out her other video tutorials for your next quilting adventure!
Happy quilting, and may your summers be filled with joy, creativity, and beautiful handmade fireworks!