
Unwrap Joy This Christmas: A Quick & Easy Holiday Quilt Project for All Skill Levels
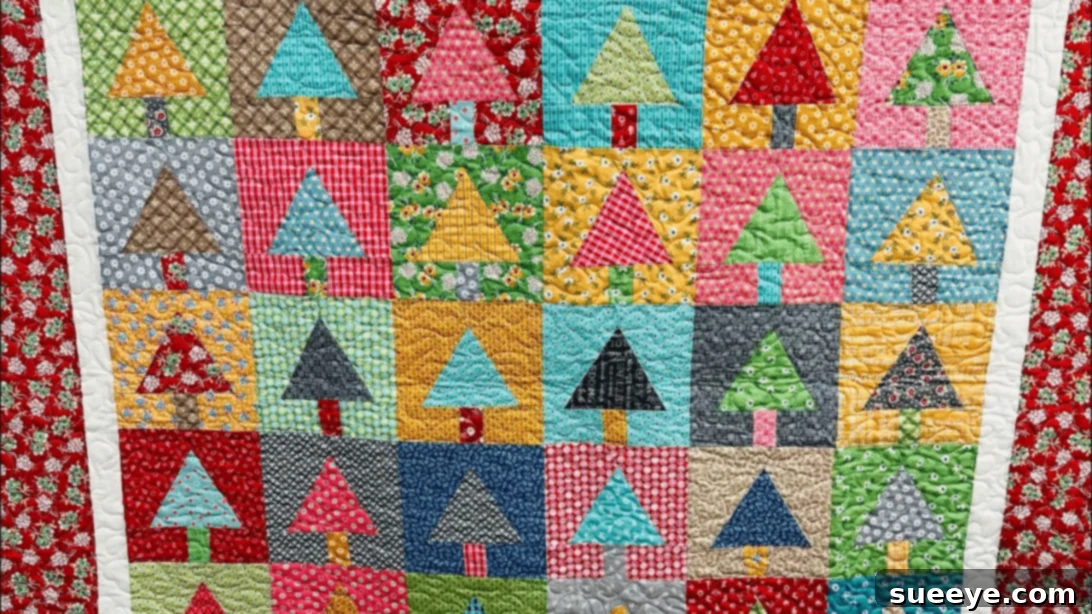
Embrace the festive spirit and add a touch of handmade warmth to your home this holiday season with a delightful Christmas quilt. This beginner-friendly project, thoughtfully demonstrated by Sew Charming Quilt Shop on YouTube, is designed to bring joy and beauty without overwhelming complexity. Whether you’re seeking the perfect heartfelt gift for a loved one, a charming wall hanging to showcase your creative skills, or even versatile decor for your holiday table, this quilt pattern is wonderfully adaptable.
Imagine transforming pre-cut fabric squares into a stunning Christmas tree design, perfect for a cozy throw or a decorative accent. The beauty of this pattern also lies in its scalability: craft it into an elegant table runner, a festive table topper, or even scale it down to create adorable coasters or practical pot holders. This guide will walk you through every step, ensuring a successful and enjoyable quilting experience, even if it’s your very first attempt.
RELATED: Explore another festive project with our Easy Reindeer Quilt Tutorial
Why Embrace Christmas Quilting This Season?
Quilting is more than just sewing fabric; it’s an art form that creates lasting memories and tangible comfort. A Christmas quilt holds special significance, infusing your home with warmth and holiday cheer. Here’s why diving into this project is a fantastic idea:
- Personalized Gifts: A handmade quilt speaks volumes. It’s a unique, thoughtful present that shows immense care and effort, far surpassing any store-bought item.
- Festive Home Decor: Elevate your holiday decorations with a custom quilt. It can be draped over a sofa, hung on a wall, or used as a festive throw to complete your seasonal ambiance.
- Creative Expression: Quilting offers a wonderful outlet for creativity. Choose fabrics that reflect your personal style or match your existing decor, making each quilt truly one-of-a-kind.
- Skill Development: This project is an excellent starting point for beginners. It introduces fundamental quilting techniques like cutting, piecing, and pressing, building a solid foundation for more complex projects in the future.
- Sustainable Crafting: Utilize fabric scraps from previous projects to create a beautiful, “scrappier” quilt that tells a story and minimizes waste. The more diverse your fabric choices, often the more charming the result!
This particular Christmas quilt is celebrated for its ease and speed, making it accessible to even absolute beginners. Don’t be intimidated; with clear instructions and a supportive video tutorial, you’ll be amazed at what you can create. Let’s gather our supplies and start crafting!
Essential Materials for Your Festive Christmas Quilt
To embark on this delightful quilting journey, you’ll need a few essential tools and materials. Quality supplies ensure a smoother process and a more professional-looking finish. Here’s what you’ll need to get started:
- Layer Cakes: These are pre-cut fabric bundles, typically 10-inch squares, that save you significant cutting time. They often come in coordinated collections, making fabric selection a breeze. For this project, they are ideal for creating a cohesive and beautiful design.
- Marking Pen, Pencil, or Chalk: Essential for transferring template lines or marking stitching guides onto your fabric accurately. Choose a tool that is easily removable or disappears over time.
- Ruler: A clear acrylic quilting ruler (preferably with a non-slip grip) is indispensable for precise measurements and straight cuts.
- Scissors or Rotary Cutter and a Cutting Mat: While sharp fabric scissors work, a rotary cutter combined with a self-healing cutting mat will make cutting multiple layers of fabric quickly and accurately, which is crucial for successful quilt piecing.
- Fabric Pins or Clips: Use these to hold fabric pieces together securely before sewing, preventing shifting and ensuring accurate seams.
- Needle and Thread: High-quality cotton thread (e.g., 50wt) is generally recommended for quilting, matching the dominant color of your fabrics or a neutral shade like white or light gray.
- Iron, for Pressing: A good steam iron is non-negotiable in quilting. Pressing seams properly is vital for flat blocks and a smooth quilt top.
- Sewing Machine: A reliable sewing machine with a quarter-inch foot (if available) will make stitching accurate seams much easier.
- Template (Click here to download the template): This specific paper template is key to achieving the iconic Christmas tree design for your quilt blocks. Make sure to download and print it accurately according to the instructions provided.
Crafting Your Christmas Quilt: A Step-by-Step Guide
Now that you have all your materials ready, let’s dive into the exciting process of making your beautiful Christmas quilt. Follow these steps carefully, and remember that precision in cutting and pressing will lead to the best results.
Step 1: Preparing and Cutting Your Layer Cakes
Begin by carefully cutting your layer cake squares using the downloadable paper template. The video tutorial from Sew Charming Quilt Shop provides excellent visual guidance on how to position the template for optimal use of your fabric. This specific template design allows you to create distinct sections for your Christmas tree blocks. As you cut, think about your design. Once the pieces are cut, you’ll start playing with the arrangement. This is where the magic begins: swap the corner fabrics of your initial squares. This simple technique creates contrast and allows the Christmas tree shape to emerge. Consider which fabric you’d like to use for the main background of your blocks – perhaps a snowy white, a deep green, or a festive red. Also, select a contrasting fabric for the tree trunk, ensuring it stands out beautifully against the tree and background.
Step 2: Piecing Your Quilt Blocks
With your fabric pieces neatly cut and arranged for your first block, it’s time to start sewing. Always use a scant quarter-inch seam allowance for quilting, which means stitching just a hair less than a quarter-inch from the edge to account for the thickness of the thread and fabric when pressed. Begin by stitching the pieces that form the bottom row of your first block. Sew them together right sides facing, creating a strip. Once stitched, take your strip to the ironing board and press the seams nicely. For quilting, you generally press seams either to one side (usually the darker fabric to minimize shadow) or open (which reduces bulk). For this project, pressing seams open can help the block lie flatter. After completing the bottom row, proceed to stitch the pieces for the upper row, pressing those seams as well. Repeat this process for all the individual blocks you intend to create for your quilt top.
Step 3: Assembling Your Quilt Top
Once you have all your individual rows and blocks stitched and pressed, it’s time to piece them together to form the full quilt top. Lay out all your finished rows on a flat surface (your design wall, floor, or large table) to ensure they are in the correct order and orientation. This step allows you to double-check your design before making permanent stitches. Pin the rows together, aligning seams carefully to ensure your points match up precisely. Stitch these rows together, again using your scant quarter-inch seam allowance. As you finish sewing each new seam, take it to your iron and press thoroughly. Continuous pressing as you go will result in a much flatter and more professional-looking quilt top. Once all your rows are joined, give the entire quilt top a final, thorough press.
Step 4: Adding Batting, Backing, and Quilting
With your beautiful quilt top complete, the next steps involve turning it into a functional quilt. You’ll need a layer of batting (the fluffy interior layer that provides warmth and texture) and a backing fabric. Cut both your batting and backing fabric a few inches larger on all sides than your quilt top. Create a “quilt sandwich” by laying the backing fabric right side down, then the batting on top, and finally your quilt top right side up. Smooth out any wrinkles and secure the layers together using safety pins, basting spray, or basting stitches. Now, it’s time for the actual quilting! You can choose simple straight-line quilting using your walking foot, outline the Christmas tree shapes, or try a free-motion design if you feel adventurous. The quilting stitches hold the three layers together and add texture.
Step 5: Finishing with Binding
The final step to complete your Christmas quilt is adding the binding. This fabric strip finishes and protects the raw edges of your quilt. Cut binding strips (typically 2.5 inches wide) from a coordinating fabric, join them to create one long strip, and press it in half lengthwise. Attach the binding to the front of your quilt, aligning the raw edges and stitching with a quarter-inch seam. Miter the corners for a neat finish. Then, flip the binding to the back of the quilt, fold it over, and hand-stitch or machine-stitch it in place to secure. Trim any excess batting or backing before you start binding. Once the binding is complete, your quick and easy Christmas quilt is ready to be enjoyed!
Tips for Quilting Success, Especially for Beginners
Quilting can be a deeply rewarding hobby, and with a few key tips, your projects will come out beautifully every time. Here’s some advice to help you succeed with your Christmas quilt and future projects:
- Master the Scant Quarter-Inch Seam: This is arguably the most important skill in quilting. Practice sewing a perfect scant quarter-inch (just slightly less than 1/4 inch) seam. Consistency here ensures your blocks will be the correct size when sewn together.
- Pressing, Not Ironing: When quilting, you “press” seams, you don’t “iron” them. Ironing involves moving the iron back and forth, which can stretch and distort your fabric. Pressing means lifting the iron and placing it down, holding it, then lifting it again. This keeps your fabric stable.
- Use Good Quality Fabric: Investing in good quality 100% cotton fabric is worthwhile. It cuts, sews, and drapes better, and is more durable.
- Sharp Tools are Your Friends: Always use a sharp rotary cutter blade and good quality needles in your sewing machine. Dull tools can fray fabric or cause uneven cuts and stitches.
- Read and Watch: Before you begin, thoroughly read through all instructions and watch the tutorial video from Sew Charming Quilt Shop. Understanding the entire process beforehand minimizes errors.
- Take Your Time: Quilting is not a race. Enjoy the process, pay attention to detail, and don’t be afraid to unpick (or “frog,” as quilters say) stitches if something isn’t quite right.
- Pre-Wash Fabrics (Optional but Recommended): Some quilters pre-wash their fabrics to check for shrinkage and colorfastness. If you choose not to, be aware that your quilt might crinkle more after its first wash.
Creative Variations for Your Christmas Quilt Design
While the classic Christmas tree quilt is beautiful on its own, this pattern is incredibly versatile and can be adapted to various sizes and purposes. Let your creativity flow and consider these exciting variations:
- Table Runners: Instead of a full-sized quilt, arrange a few of the tree blocks in a linear fashion to create a stunning Christmas table runner. Add a simple border to complete the look.
- Placemats or Table Toppers: Make individual tree blocks or combine two to create festive placemats for your holiday dinner. A single block can also serve as a charming table topper for a small accent table.
- Coasters or Pot Holders: Scale the pattern down significantly to craft adorable mini-tree coasters. For pot holders, ensure you use heat-resistant batting.
- Wall Hangings: Frame a single large tree block or a small grouping of blocks with a border to create a festive wall hanging for your entryway or living room.
- Adding Borders: Experiment with different border styles. A simple solid border can frame your design beautifully, while a pieced border with smaller squares or strips can add another layer of complexity and visual interest.
- Embellishments: Once your quilt top is complete, consider adding small embellishments. Tiny buttons can act as ornaments on your trees, or you could add some subtle embroidery for extra detail.
- Scrappy vs. Coordinated: While this pattern is great for using fabric scraps, you can also create a highly coordinated look by sticking to a strict color palette or a specific fabric line for a more sophisticated finish.
Caring for Your Handmade Christmas Quilt
After all your hard work, you’ll want to ensure your beautiful Christmas quilt lasts for many holiday seasons to come. Proper care will help preserve its colors, stitching, and overall quality:
- First Wash: For the first wash, especially if you didn’t pre-wash fabrics, use a color catcher to absorb any bleeding dyes. Wash in cold water on a gentle cycle.
- Subsequent Washes: Machine wash cold on a gentle cycle with a mild, pH-neutral detergent. Avoid harsh chemicals or bleach, as these can damage fabric fibers and colors.
- Drying: Tumble dry on low heat or, ideally, lay flat to air dry. Air drying helps prevent shrinkage and maintains the quilt’s shape. If machine drying, remove promptly to minimize wrinkles.
- Storage: When not in use, store your quilt in a cool, dry place away from direct sunlight to prevent fading. Avoid storing in plastic bags for extended periods, as this can trap moisture; breathable cotton bags or pillowcases are better options. Fold it periodically in different ways to prevent permanent creases.
- Spot Cleaning: For small spills, blot immediately with a clean cloth and a little water. Avoid rubbing, which can push the stain deeper into the fabric.
*All these amazing images are thanks to Sew Charming Quilt Shop via YouTube. Do visit her channel to see more videos like this!
A Quick & Easy Christmas Quilt: Your Festive Project Awaits!
There you have it – a comprehensive guide to creating a quick, easy, and utterly charming Christmas quilt! This project from Sew Charming Quilt Shop is a fantastic way to infuse your home with holiday cheer, create cherished handmade gifts, and discover the satisfying craft of quilting. The simplicity of using layer cakes combined with the clear instructions makes this an ideal endeavor for both seasoned quilters looking for a swift project and absolute beginners eager to make their first stitches.
Imagine the delight on a loved one’s face as they unwrap a beautiful, handmade quilt, or the festive atmosphere it will bring to your own home. Don’t let the idea of quilting intimidate you. With the right materials, a little patience, and this detailed tutorial, you’re well on your way to creating a treasured holiday heirloom. So, gather your fabrics, fire up your sewing machine, and let the holiday crafting begin! We encourage you to visit Sew Charming Quilt Shop’s YouTube channel for more inspiring projects and visual guidance. Happy quilting!