
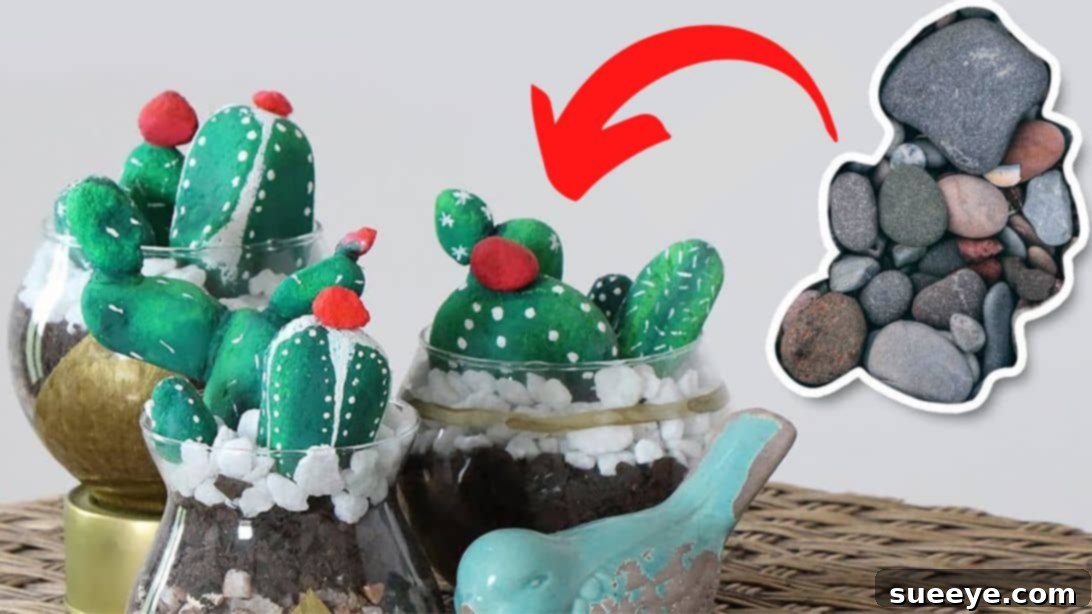
Craft Your Own Everlasting Oasis: An Easy DIY Pebble Cactus Tutorial for Stunning Home Decor
Are you looking to infuse a touch of desert charm into your home without the fuss of watering or sunlight? This delightful DIY pebble cactus project, inspired by the creative genius of Kary DIY on YouTube, offers the perfect solution! Transform ordinary pebbles and rocks into vibrant, maintenance-free faux cactus plants that will brighten any space. Ideal as a unique decorative accent or a heartfelt handmade gift, this craft is surprisingly simple to execute and yields truly amazing results. Dive into the world of pebble art and create your own miniature desert landscape today!
Why Choose a DIY Pebble Cactus for Your Home?
In a world where natural plants require constant attention, a DIY pebble cactus offers a refreshing alternative. This project provides numerous benefits, making it a favorite among crafters and home decorators alike. Firstly, these charming creations require absolutely no care—no watering, no specific light conditions, and no worries about pests. They are forever green, vibrant, and perfectly still, making them ideal for busy individuals, those without a green thumb, or spaces where real plants might struggle. Secondly, crafting your own pebble cacti is an incredibly rewarding and relaxing activity, allowing you to unleash your creativity while producing a beautiful, personalized item. Lastly, they serve as fantastic, eco-friendly gifts that showcase your thoughtfulness and artistic flair. Imagine gifting a friend a handmade desert scene that will last indefinitely, a constant reminder of your bond.
Gather Your Creative Arsenal: Essential Materials for Your Pebble Cactus Project
Before embarking on this artistic journey, ensure you have all your materials organized. A well-prepared workspace enhances the crafting experience and ensures a smooth process from start to finish. Here’s a detailed list of what you’ll need:
- Small Pebbles, Gravel, or Aquarium Rocks: These will form the base layer in your vase or glass bowl, simulating soil or decorative ground cover. Choose a variety of colors and textures for visual interest.
- Potting Soil (Decorative, Not Real): While real potting soil isn’t necessary for these fake plants, a small amount of dark-colored gravel or fine pebbles can visually mimic soil, enhancing the realism of your arrangement.
- Different-Sized Pebbles for the Cactus Bodies: This is where your cacti truly come to life! Select larger, smooth, rounded pebbles for the main bodies and smaller, irregularly shaped pebbles for arms, offshoots, and flower buds. Look for shapes that naturally resemble cactus segments.
- Acrylic Paint:
- Dark Green & Light Green: Essential for painting the cactus bodies, allowing you to create depth and realistic shading.
- Red or Pink: For adding delicate “flowers” or fruit to your cacti, providing a pop of vibrant color.
- White: Perfect for adding intricate details like spines, dots, or highlights, bringing your cacti to life.
- Glass Paint (Gold): This is optional but highly recommended for adding elegant decorative touches to your glass bowl, transforming it from a simple container into a personalized artistic planter.
- Paintbrush Set: You’ll need a range of sizes—a wider brush for base coats on larger pebbles and fine-tipped brushes for intricate details like spines and flowers.
- Foam Brush: Excellent for applying smooth, even coats of paint to the inside of your glass bowl, especially when working with stencils or tape designs.
- Painter’s Tape or Masking Tape: Crucial for creating clean lines and geometric patterns on your glass bowl, ensuring professional-looking results.
- Scissors: For cutting tape and opening paint tubes or other packaging.
- Hot Glue Gun and Glue Sticks: Your primary tool for securely assembling the pebble cactus segments. Ensure you have plenty of glue sticks on hand.
- Newspaper or Protective Covering: To shield your work surface from paint splatters and glue drips, making cleanup a breeze.
- Vase or Glass Bowl: The container for your finished pebble cactus display. Clear glass bowls or vases work best as they allow the decorative base layers to be seen.
Step-by-Step Guide: Bringing Your Pebble Cacti to Life
Phase 1: Sculpting and Adorning Your Pebble Cacti
The first phase focuses on transforming your raw pebbles into vibrant cactus components through careful painting and assembly. Patience and attention to detail here will result in stunning, lifelike creations.
- Prepare Your Workspace: Begin by laying down a generous spread of newspaper or a protective sheet on your work surface. This will catch any stray paint drops or glue, simplifying the cleanup process considerably. Ensure you have good ventilation, especially when working with paints.
- Envision Your Cactus Shapes: Before painting, arrange your dry pebbles to conceptualize the shapes and forms of your cacti. Think about varying heights and configurations. Typically, a larger, rounded pebble forms the main body, while smaller, elongated pebbles can serve as arms, offshoots, or crown elements. Don’t be afraid to experiment with whimsical or traditional cactus designs. The beauty of this project lies in its flexibility—let your imagination guide you!
- Paint the Cactus Bodies: Using your acrylic paints, begin painting your chosen pebbles. Start with a base coat of dark green, ensuring full coverage. Once dry, apply a second coat or add accents with light green paint. This layering of two shades creates depth and a more realistic appearance, mimicking the natural variations in cactus foliage. Don’t worry about perfection at this stage; slight imperfections add character. Allow each layer of paint to dry thoroughly before proceeding to the next.
- Add Intricate Details: Once the green base is completely dry, it’s time for the fun details. Use a fine-tipped paintbrush and white acrylic paint to create tiny dots, dashes, or short lines that resemble cactus spines. These small touches make a significant difference in bringing your pebbles to life. For a vibrant touch, use red or pink paint to create small “flowers” or “fruits” at the top or along the arms of your cacti. A tiny dab of paint or a few delicate strokes can transform a simple pebble into a blooming cactus.
- Cure and Assemble: Allow all painted pebbles to dry completely. This is crucial to prevent smudging and ensure a strong bond. Once dry, carefully assemble your cactus pieces using a hot glue gun. Apply small dots of hot glue to the surfaces where pebbles will join, then press them together firmly. Hold each piece in place for a few seconds until the glue sets. Work methodically, adding arms and crown elements to the main body. Once assembled, let the entire cactus sculpture dry and cure for an extended period to ensure maximum sturdiness and durability.
Phase 2: Creating the Perfect Desert Habitat and Final Assembly
With your individual pebble cacti painted and assembled, the second phase focuses on preparing your glass bowl and arranging your desert scene for a captivating display.
- Decorate Your Glass Bowl (Optional): While your painted pebbles are drying, turn your attention to the glass bowl or vase. This step allows for further personalization. Clean the bowl thoroughly to remove any dust or fingerprints. Apply painter’s tape to the bowl in any pattern you desire—think geometric lines, stripes, or even abstract designs. Ensure the tape adheres firmly to prevent paint bleeding.
- Paint the Bowl: Using your foam brush and gold glass paint (or any color of your choice), carefully paint the areas within the tape borders. Apply thin, even coats for the best finish. Alternatively, you could paint a solid band around the bowl, or even use stencils for more intricate designs. Allow the paint to dry completely according to the manufacturer’s instructions. Once dry, gently and slowly peel off the tape to reveal crisp, clean lines. Patience here is key to avoiding paint lift or smudging.
- Create the Desert Base: Once your bowl decoration is complete and fully dry, begin filling it. Pour a layer of small pebbles, gravel, or aquarium rocks into the bottom of the bowl. This layer serves both a decorative purpose and provides a stable base for your cacti. You can mix different colors or layer them for visual interest, mimicking natural desert terrain. Aim for a depth that supports your largest cactus.
- Position Your Pebble Cactus: Carefully place your assembled pebble cactus onto the layer of rocks. Experiment with different positions until you find a visually pleasing arrangement. If you have multiple cacti, arrange them to create a varied landscape, considering height, size, and shape.
- Secure and Finalize: Once your cactus is positioned, add more small pebbles or gravel around its base. Gently press these rocks around the cactus to provide additional support, ensuring it stands upright and remains stable. Continue adding rocks until the base of the cactus is firmly “planted” and the overall aesthetic is balanced. You can use different colored rocks here to add more texture and realism. Step back and admire your miniature desert oasis!
Elevate Your Craft: Pro Tips for Stunning Results
To ensure your pebble cacti are not just good, but truly exceptional, consider these additional tips:
- Pebble Selection is Key: Spend time collecting or selecting pebbles. Look for naturally smooth, varied shapes that lend themselves well to cactus forms. Oddly shaped pebbles can become unique cactus types.
- Layer Your Paints: For richer colors and better coverage, apply multiple thin coats of acrylic paint rather than one thick coat. Allow each layer to dry fully to avoid a tacky finish.
- Embrace Imperfection: Real cacti aren’t perfect! A slightly uneven paint job or a unique pebble shape can add character and realism to your finished piece.
- Hot Glue Safety: Always use your hot glue gun with caution. Ensure proper ventilation and be mindful of the hot nozzle and glue. For intricate assemblies, consider using tweezers to hold smaller pebbles.
- Experiment with “Soil”: Instead of just plain gravel, try layering fine sand, crushed shells, or even colored glass beads at the bottom of your vase for a varied aesthetic.
Personalize Your Desert Landscape: Ideas for Customization
The beauty of DIY projects lies in their endless possibilities for personalization. Don’t limit yourself to traditional green cacti! Experiment with different shades of green, or even bold blues and purples for whimsical, fantasy-inspired cacti. Add glitter to the “flowers” for extra sparkle, or tiny googly eyes for a humorous touch. You can also incorporate small figurines, miniature fences, or tiny signs into your pebble garden to create a complete miniature desert scene. Consider using different types of glass containers too – from shallow dishes to tall cylindrical vases – to create diverse displays.
Beyond the Craft: Displaying Your Unique Pebble Creations
Once your pebble cactus masterpiece is complete, it’s time to find its perfect home. These charming decorations are incredibly versatile and can enhance almost any room. Place them on a sunny windowsill where they’ll catch the light, brightening your kitchen or living room. They make excellent desk companions in a home office, adding a touch of nature without the distraction of maintenance. For a minimalist aesthetic, group several pebble cacti of varying sizes on a bookshelf or side table. They’re also perfect for bathrooms, guest rooms, or as a centerpiece for your dining table, bringing a unique, artistic flair to your interior decor. The possibilities are truly endless!
Final Thoughts: Embrace the Art of Pebble Crafting
This easy DIY pebble cactus tutorial offers a wonderful opportunity to create something beautiful, lasting, and completely unique. Whether you’re a seasoned crafter or just starting your DIY journey, the satisfaction of transforming simple pebbles into a charming desert oasis is immense. So gather your materials, let your creativity flow, and enjoy the process of crafting these adorable, no-maintenance “plants.” You’ll be amazed at how a few rocks and a splash of paint can bring such delightful character to your home or create the perfect thoughtful gift.
Inspired by Kary DIY on YouTube for this brilliant project idea and the inspiring images used throughout this guide. Be sure to visit her channel for more creative DIY projects!