
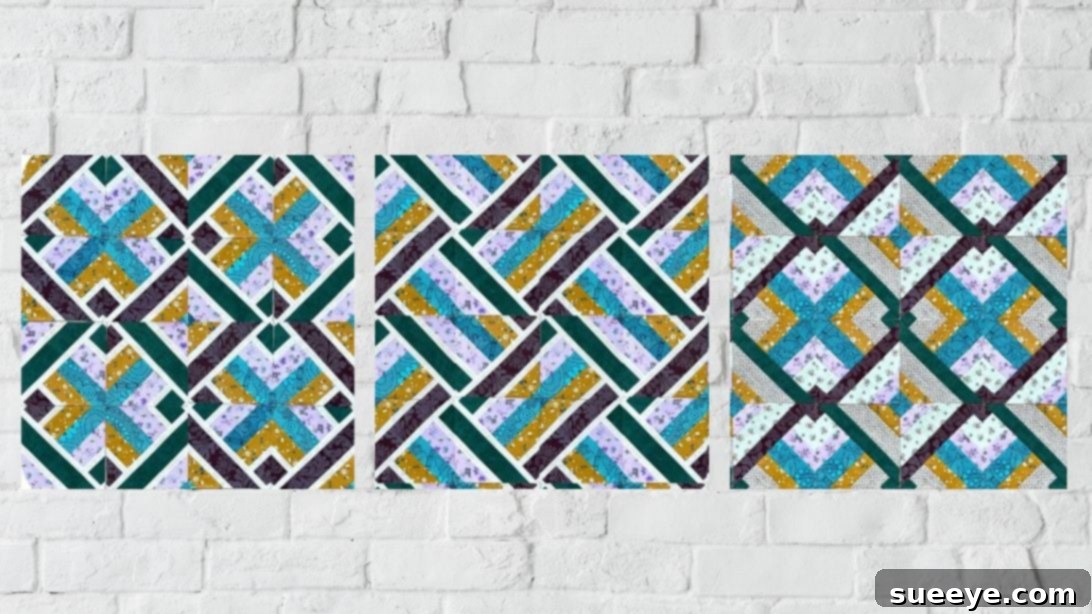
Master Easy Patchwork Blocks: A Beginner’s Guide to Stunning Quilt Patterns
Embarking on your quilting journey can be incredibly rewarding, especially when you discover projects that are both beginner-friendly and yield impressive results. If you’re searching for an accessible way to create beautiful, eye-catching quilts, you’ve landed in the perfect spot. This comprehensive guide introduces you to a revolutionary method for crafting stunning patchwork blocks, all originating from a single, versatile unit. Yes, you read that correctly – with just one fundamental block, you can unlock a multitude of exquisite patterns, transforming simple fabric strips into intricate designs that will captivate and delight.
The secret to this incredible versatility and ease comes courtesy of The Melody of Sewing, whose innovative approach simplifies complex-looking quilt designs. The moment we encountered this brilliant video tutorial, we knew we had to share its magic with our community. It demystifies the art of patchwork, proving that even a novice can produce professional-looking quilts.
Don’t let the sophisticated appearance of these finished designs intimidate you. The foundational block is far from complicated; in fact, it’s remarkably straightforward to construct. Many aspiring quilters are pleasantly surprised to learn that these elaborate patterns are primarily built upon the humble Half-Square Triangle (HST). If you’ve ever had the pleasure of creating HSTs before, you’ll find yourself gliding through this quilt project with confidence and speed. Even if you haven’t, this guide breaks down every step, making it easy to master. Prepare to add this elegant and surprisingly simple pattern to your must-make list, as it promises both a rewarding creative process and a beautiful finished product.
RELATED: If you’re eager to expand your quilting repertoire, explore other foundational techniques like the Beginner-Friendly Half-Rectangle Triangles Tutorial. Mastering these basic shapes will open up a world of design possibilities.
For those looking to diversify their collection of beginner-friendly blocks, we highly recommend checking out these fantastic resources:
- Easy Crumb Quilt Tutorial: A fun way to use up fabric scraps.
- Easy Large Tulip Quilt Tutorial: Add a floral touch to your projects.
- Four Seasons Quilt: A versatile pattern perfect for any time of year.
Essential Materials for Your Beginner-Friendly Patchwork Block
Gathering your materials is the first exciting step in any quilting project. For this particular block, simplicity is key, requiring only a few strips of fabric. The beauty of this design lies in how these basic components transform into something spectacular. Here’s what you’ll need to get started:
- 3 pieces of 2-inch wide fabric strips
- 4 pieces of 1 1/2-inch wide fabric strips
While the tutorial suggests specific widths, feel free to experiment with different dimensions once you’ve mastered the basic technique. The choice of fabric colors and patterns will dramatically influence the final look of your quilt, so select fabrics that inspire you!
How to Construct Your Versatile Patchwork Block
Creating this beginner-friendly patchwork block is a delightful process that focuses on precision and simple steps. Follow these instructions carefully, and you’ll soon have a collection of blocks ready to assemble into a magnificent quilt.
Step 1: Assembling the Fabric Strip Unit
Begin by laying out your fabric strips. Arrange them in an alternating pattern: start with a 2-inch strip, followed by a 1 1/2-inch strip, then a 2-inch strip, and so on, until all strips are used. You should have a sequence like this: 2-inch, 1 1/2-inch, 2-inch, 1 1/2-inch, 2-inch, 1 1/2-inch, 1 1/2-inch. This alternating arrangement is crucial for creating the visual effect of the final block. With right sides together, carefully sew these strips along their long edges, using a consistent 1/4-inch seam allowance. This precise seam allowance is standard in quilting and ensures that your blocks will fit together accurately later on. Once all strips are sewn into a single unit, it’s time to press. Lay the unit flat and gently press the seams. You can press them open to reduce bulk or press them to one side (typically towards the darker fabric) – consistency is more important than the direction at this stage, but pressing open often yields a flatter block which is beneficial for subsequent cuts.
Step 2: Preparing for Half-Square Triangles (HSTs)
Once your strip unit is pressed flat, it’s time to cut it into squares. Carefully measure and cut your strip unit into 9 1/2-inch squares. The tutorial demonstrates this with precision, and using a rotary cutter and mat with a quilting ruler will make this step much easier and more accurate. You’ll need at least two of these squares to create one set of HSTs. Take two of your precisely cut 9 1/2-inch squares. Rotate one square 90 degrees if you want to achieve a specific directional pattern with your strips. Place the two squares right sides together, ensuring all edges align perfectly. Pin them in place liberally around all four edges. This pinning is crucial to prevent shifting while sewing. Now, sew a seam all the way around the perimeter of the pinned squares, maintaining that consistent 1/4-inch seam allowance. This creates a fabric ‘sandwich’ with stitching on all sides.
Step 3: Creating and Finishing Your Half-Square Triangles
With your two squares sewn together along their outer edges, the magic truly begins. Take your stitched square and, using a ruler and rotary cutter, cut it diagonally in both directions. Imagine drawing an “X” across the square from corner to corner – you will cut along these two lines. This process will yield four smaller triangular units. These are the foundations of your Half-Square Triangles. Once cut, carefully open up each triangular unit. You’ll see that each now forms a perfect square composed of two triangles. Gently press these open. Pressing your seams either open or to one side (again, consistency is key) will ensure your HSTs lay flat and square up beautifully. After pressing, your HSTs might have tiny “dog ears” – small bits of fabric extending beyond the square edges. Trim these off, and if necessary, square up your HSTs to a consistent size using a quilting ruler. This trimming step is vital for ensuring all your blocks are uniform, which is essential for a perfectly assembled quilt.
Step 4: Arranging Your Patchwork Blocks and Exploring Designs
Now that you have your individual HST blocks, the real fun begins: arranging them! Take your newly created HSTs and experiment with different layouts. The beauty of this single block type is its incredible versatility. By simply rotating the blocks, you can create a myriad of stunning patterns. Arrange the blocks on a design wall or even on your floor, moving them around until a pattern emerges that you love. The photo below provides an excellent starting point for one beautiful arrangement. However, don’t stop there! Watch the full video tutorial from The Melody of Sewing for a captivating demonstration of just how many design options are possible from these seemingly simple units. You’ll be amazed at how a minor rotation or repositioning can completely transform the overall look of your quilt top.
Easy Patchwork Blocks for Beginners: Your Gateway to Quilting Success
This method of creating patchwork blocks is an absolute game-changer for beginners and experienced quilters alike. It simplifies the process without compromising on the visual impact. The ability to generate numerous intricate designs from one basic Half-Square Triangle unit not only makes quilting less daunting but also incredibly exciting. You’re not just making a quilt; you’re building foundational skills that will serve you in countless future projects.
Why This Is the Perfect Beginner Quilt Project
Many novice quilters feel overwhelmed by complex patterns and precise cutting. This project addresses those concerns directly. By focusing on simple strip piecing and the versatile HST, it minimizes potential pitfalls and maximizes success. The repetitive nature of creating HSTs allows you to hone your seam allowance accuracy, pressing techniques, and squaring-up skills – all crucial for beautiful quilting. Plus, seeing how easily you can rotate and combine these blocks to create varied patterns is incredibly motivating, proving that quilting doesn’t have to be hard to be stunning.
Tips for Achieving Perfect Patchwork
- Accurate Cutting: Invest in a good quality rotary cutter, self-healing mat, and an acrylic ruler. Precision in cutting is paramount for blocks that fit together perfectly.
- Consistent Seam Allowance: The 1/4-inch seam allowance is standard. Practice to make sure yours is consistent, as even a slight deviation can cause blocks to misalign. A quarter-inch foot for your sewing machine can be a great help.
- Pressing Matters: Don’t skip pressing! It flattens seams, reduces bulk, and ensures your blocks lay flat and square. Decide whether to press seams open or to one side and stick with it for consistency.
- Chain Piecing: To save time, especially when making multiple HSTs, try chain piecing. Sew units one after another without cutting the thread in between.
- Squaring Up: After creating your HSTs, use a square-up ruler to trim them to their exact finished size. This step is critical for ensuring all your blocks are uniform.
By following this beginner-friendly guide and utilizing the ingenious single-block technique demonstrated by The Melody of Sewing, you’re well on your way to crafting a patchwork quilt that is both easy to make and visually spectacular. Embrace the joy of creation, experiment with fabric combinations, and delight in the process of bringing your unique quilt vision to life. Happy quilting!